Advertisement
INSTALLATION INSTRUCTIONS FOR ICE MAKER PART NO. W10190965
To avoid risk of electrical shock, personal injury or death; disconnect electrical power before servicing.
1. Unplug refrigerator or disconnect power.
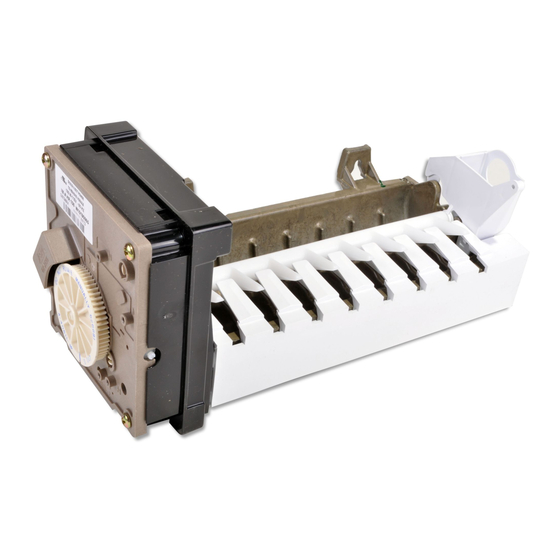
2. Remove defective ice maker from freezer. The ice
maker may be held in place by three screws (Figure 1)
or by two clips and one screw (Figure 2).
FIG. 1
3. When replacing certain ice makers there will be a
mounting plate as an intregal part of the defective unit.
This must be removed and attached to the W10190965
(Figure 3).
4. Install lower bracket using the one on the defective unit
with a self tapping screw (Figure 4).
WARNING! Electrical Shock Hazard
FIG. 2
FIG. 3
FIG. 4
5. If the harness from the defective unit has a thermal
fuse, as shown in Figure 5A, reuse the harness. If the
harness does not have a thermal fuse or the thermal
fuse is blown, as shown in Figure 5B, you must
purchase a new wiring harness.
FIG. 5A
FIG. 5B
6. Remove knock-out from end as indicated in Figure 6.
7. Mount with screws removed from the defective unit.
Plug harness into the receptacle in freezer and mount
unit.
8. Check position of the inlet tube and position properly.
Make sure the shut off is in the down position.
9. Plug in refrigerator or reconnect power. It may take up
to 24 hours for your ice maker to begin producing ice.
Thermal fuses
FIG. 6
IS025 (2/18)
Advertisement
Table of Contents

Related Manuals for Whirlpool W10190965


Summary of Contents for Whirlpool W10190965
- Page 1 3. When replacing certain ice makers there will be a FIG. 5B mounting plate as an intregal part of the defective unit. This must be removed and attached to the W10190965 (Figure 3). 6. Remove knock-out from end as indicated in Figure 6.
- Page 2 SERVICE SHEET FOR MODULAR ICE MAKER WARNING! Electrical Shock Hazard To avoid risk of electrical shock, personal injury or death; disconnect electrical power before servicing. MODULE TEST POINTS Ejector blades or stripper: Remove module, motor, and assembly. When reinstalling ejector blades, realign “D” coupling with module cam.
Need help?
Do you have a question about the W10190965 and is the answer not in the manual?
Questions and answers