Table of Contents
Advertisement
Quick Links
RT3422
OPERATOR'S
MANUAL
WARNING!
Read this Operator's Manual
carefully before using this tool.
Failure to understand and fol-
low the contents of this manual
may result in extensive prop-
erty damage and/or serious
personal injury.
Tapping Tool
99 Washington Street
Melrose, MA 02176
Phone 781-665-1400
Toll Free 1-800-517-8431
Visit us at www.TestEquipmentDepot.com
Advertisement
Table of Contents

Related Manuals for RIDGID RT3422


Summary of Contents for RIDGID RT3422
- Page 1 RT3422 Tapping Tool OPERATOR’S MANUAL WARNING! Read this Operator’s Manual carefully before using this tool. Failure to understand and fol- low the contents of this manual 99 Washington Street may result in extensive prop- Melrose, MA 02176 erty damage and/or serious Phone 781-665-1400 personal injury.
-
Page 2: General Safety Information
RT3422 Tapping Tool General Safety Information • Use only accessories that are recommended by the manufacturer for your model. Accessories that WARNING! Read and understand all instructions. Failure may be suitable for one tool may become hazardous to follow all instructions listed below may re- when used on another tool. -
Page 3: Description, Specifications, And Equipment
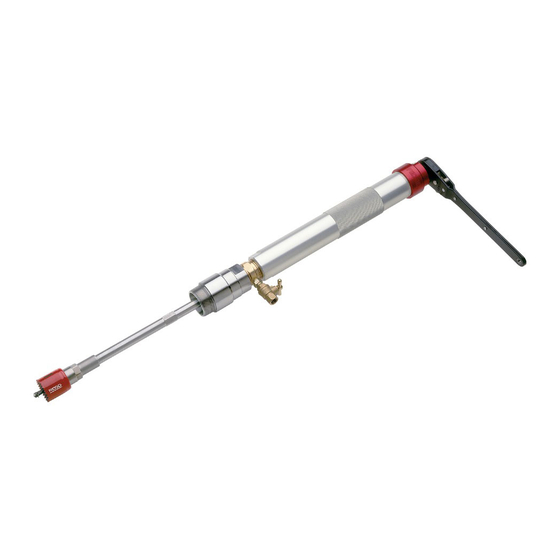
150 psi. Weighing only 18 lbs, the Model into a properly grounded outlet. If tool should RT3422 can produce 3/4″ – 2″ taps fast and easy. The electrically malfunction or breakdown, grounding cutter is rotated by an 11/16″ hand ratchet or can be op- provides a low resistance path to send electricity erated by an air ratchet or right angle drill if desired. - Page 4 Service saddles have a known pressure rating, how- ever if for some reason the integrity of the strap RT3422 3/4″ – 1″ Set ...Tool body with bleed valve hardware should fail this type of joint can fail as well. Tool box Ratchet wrench 4.
- Page 5 RT3422 Tapping Tool Valve Adapter Selection Valve Bore BSPT BSPT Pilot Remarks Size Size Adapter Female Male Female Male Size Extension Adapter Adapter Adapter Adapter Adapter Preferred Configuration 3/4″ 0.625 76057 76087 76132 76177 76222 0.250 76047 76037 0.688 1″...
- Page 6 RT3422 Tapping Tool Figure 3 – Installation of small hole saw adapter Figure 1 – Installation of extension Figure 3a – Installation of large hole saw adapter d) Inspect the selected cutter to be used for this partic- ular operation to ensure that it is in good working order and screw it into the hole saw arbor if present or Figure 2 –...
- Page 7 RT3422 Tapping Tool RIDGID Tapping Tool Cutter Selection Chart Bore Fractional Ridgid RIDGID RIDGID RIDGID Size Size Bi-Metal Steel CI/DI Cutters PVC Cutters (Power (Manual (Power or Man- (Manual Operation Operation Operation Operation Only) Only) Only) Only) 0.625 76267 76292 76317 0.688...
- Page 8 RT3422 Tapping Tool g) Unscrew the sleeve back up the bronze feed screw. before breaking through the far side of the pipe to be ″.) (i.e. Looking along the length of the tool from cap end drilled into. (In the illustrated example this is 10 towards the drill end, the sleeve turns counter-clock- Record this dimension in the worksheet provided.
- Page 9 RT3422 Tapping Tool connection of the valve adapter to the valve when l) Calculate the ideal distance to penetrate in order to using CTS (Copper Tube Size – flared or compres- stop at the centerline of the pipe. Add the valve...
-
Page 10: Maintenance
After that, all that is required is to open the valve to activate the newly installed system. Cleaning and Maintaining the RT3422 9. To remove the coupon from the cutter, turn the This procedure should only be conducted by a qualified sleeve clock-wise until the cutter is exposed. - Page 11 RT3422 Tapping Tool 3. Locate and remove the retaining ring and washer 2. Inspect the spindle for any damage and replace if re- from the end of the red cap. quired. Insert the spindle into the adapter end of the bronze feed screw hex end first.
-
Page 12: Service And Repair
RIDGID service technician. If any maintenance is required other than that outlined, the tool should be sent to a RIDGID Independent Authorized Center or returned to the factory. All repairs made by Ridge service facilities are warranted against defects in material and workmanship. - Page 13 RT3422 Tapping Tool Worksheet Pipe Identification Code Marking Media Pressure Actual Pipe Type and Size Identified By Saddle or Thread-O-Let™ Manufacturer Part Number Designed Saddle Pipe Type & Size (Must match pipe data above) Designed Saddle or Threadolet Pressure Rating...
- Page 14 No other express warranty applies This FULL LIFETIME WARRANTY is the sole and exclusive warranty for RIDGID ® products. No employee, agent, dealer, or other person is authorized to alter this warranty or make any other warranty on behalf of the RIDGE TOOL COMPANY.
Need help?
Do you have a question about the RT3422 and is the answer not in the manual?
Questions and answers