Table of Contents
Advertisement
Advertisement
Table of Contents

Related Manuals for Kewtech KT77


Summary of Contents for Kewtech KT77
- Page 1 Kewtech KT77 Portable Appliance Tester Instruction Manual www.kewtechcorp.com...
-
Page 2: Table Of Contents
All rights reserved. Nothing from this edition may be multiplied, or made public in Default Sequence ................ 26 any form or manner, either electronically, mechanically, by photocopying, recording, or in any manner, without prior written consent from Kewtech Corporation Limited. Use Testcodes ................28 This also applies to accompanying drawings and diagrams. - Page 3 How to use the Meter Display ..............35 How to print Barcode Labels and Testcodes ........57 How to view Test Results ................. 38 To Print Barcode Pass/Fail Labels ........57 Appliance Number ................38 To Print Barcode Testcodes ..........57 How to use Setup ...............
- Page 4 Temperature monitoring ................79 Earth Screen Test ..................89 Multiple Earth connections: ..............79 Insulation Test ..................89 Barcodes ....................79 Substitute Leakage Test ................90 Interfacing ....................80 IEC Lead Test ..................90 Downloading to Computer Software ............80 Powered Tests ..................
-
Page 5: Disposal Of Old Product
Conformity For the Kewtech KT77 Portable Appliance Tester statement of Conformity Based on test results using appropriate standards, the product is in This product has been designed and manufactured with high quality conformity with Electromagnetic Compatibility Directive 89/336/EEC and materials and components that can be recycled and reused. -
Page 6: Before Starting
Read the operating instructions fully before conducting any tests. a caution will identify the conditions and actions that may damage the Contact Kewtech if you need information on training for Portable Tester. Appliance Testing. Symbols used within this manual and on the Tester are shown below: Data may be lost or altered in virtually any electronic memory under certain circumstances. -
Page 7: Chapter 1 Introducing The Tester
The user should ensure that all reasonable Introduction safety precautions are followed and if any doubt exists The Kewtech KT77 Portable Appliance Tester is a powerful tool to should seek advice before proceeding. assist in the analysis of the safety of portable electrical and electronic equipment. -
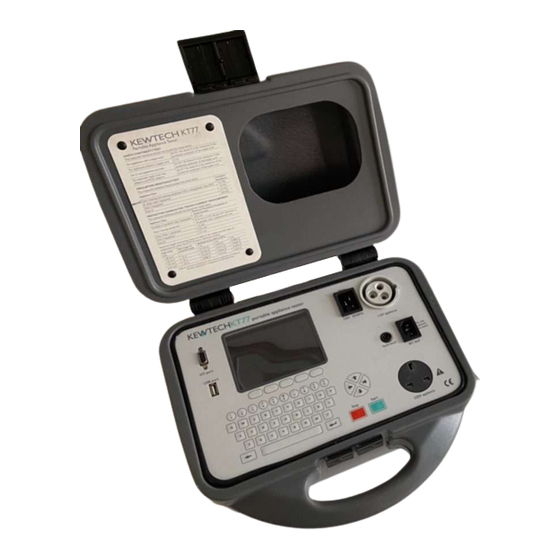
Page 8: Your Portable Appliance Tester
Item number part Mains socket for appliance to be tested 110V Socket Included in the box: IEC Lead Connector Kewtech KT77 RS232 for Scanners and Download Lead Earth Bond Lead Connector Mains Cord Mains Supply Lead earth bond lead USB Port www.kewtechcorp.com... -
Page 9: Definitions
Start and Stop. used to select menu options displayed on the screen. The Kewtech KT77 also has the ability to use non-standard characters which can be displayed by pressing the ‘Symbols’ key during text entry. Simply Tester -... -
Page 10: Quick Reference
To store the System Data return to the MAIN MENU from the SETUP MENU. On delivery of Kewtech KT77 it is necessary to ensure that a user name(s) is The unit will then display the message STORING SYSTEM DATA. This will stored. -
Page 11: Chapter 2 Connecting The Tester
USER : John Thursday 4 March 2011 09:03 Navigation through the menus is by dedicated keys: - function Cursor Left HARDWARE VERSION: 7.25 SOFTWARE VERSION: KEWTECH 28t . BETA2 Cursor Up Cursor Right Cursor Down Red Button Stop Green Button Start note Current revision numbers are shown at the bottom of the screen. -
Page 12: Fast Key Menus
FAST KEY MENUS HOW TO PERFORM AUTOMATIC TESTS fasT KeY Menus hoW To perforM auToMaTIC TesTs To facilitate a fast access to commonly used options on the menus, use the To perform automatic tests, use the cursor keys to highlight the New Test ‘fast’... -
Page 13: Re -Test Period
LOCATION and press Enter to change the Location Name across the PAT system. For Pat Manager Users re-test periods are downloaded and appear in the ---LOCATION LIST-- test sheet reports as entered in the KT77 WORKSHOP LOCATION 2 LOCATION 3... -
Page 14: Default Sequence
HOW TO PERFORM AUTOMATIC TESTS default sequence Use the cursor left and right keys to highlight the description, then use the cursor up and down keys to highlight the required setting. Use the cursor When you first enter this menu all of the previous values are displayed and one of the field descriptions is highlighted. -
Page 15: Use Testcodes
HOW TO PERFORM AUTOMATIC TESTS HOW TO PERFORM AUTOMATIC TESTS use Testcodes Visual Test This option bypasses the need to edit a specific test sequence, allowing direct entry If a visual test is included as part of the test sequence, the following screen of a Testcode through the keyboard or a barcode scanner. -
Page 16: Add Comments
HOW TO PERFORM AUTOMATIC TESTS HOW TO PERFORM AUTOMATIC TESTS add Comments If an external connection e.g. a probe is required, the display will flash the connection icon. The user needs to connect the probe. The test can then proceed when the Green or Enter button is pressed. -
Page 17: Options After Test
HOW TO PERFORM AUTOMATIC TESTS HOW TO PERFORM AUTOMATIC TESTS review Test results The inverse video descriptions are Comments Designators. These are Display the results from the test in tabular form: used to remind the user what to enter into each comment line. The Asset Description should be entered into Comment Line 1. -
Page 18: Abort Actions
HOW TO PERFORM AUTOMATIC TESTS HOW TO USE THE METER DISPLAY Main Menu hoW To use The MeTer dIsplaY Return to the Main Menu. The following screen is displayed prior to tests commencing in both Manual Mode and Automatic Mode:- abort actions During an Automatic test, pressing the Red Button immediately stops the test in progress and displays the following menu:-... - Page 19 HOW TO USE THE METER DISPLAY Test Icon Test in progress Icon Indicates the test selected. Indicates test in progress with voltage warning. Earth Bond Visual Low Voltage Substitute Leakage Insulation High Voltage Applying Power Leakage & Load Flash Test duration Counter Touch Polarity Indicates duration of test.
-
Page 20: How To View Test Results
HOW TO VIEW TEST RESULTS hoW To VIeW TesT resulTs Use the cursor keys to highlight a Site name and press Enter to select the desired option. To view test results stored in memory, use the cursor keys to highlight the ∗... -
Page 21: Test Status
HOW TO VIEW TEST RESULTS HOW TO VIEW TEST RESULTS Test status This option allows the user to search for test results before the selected When Test Status is highlighted use the Enter button to select the option date. Use the cursor keys to highlight the digit to be changed. Use the required, every time you press the Enter button a different option will be cursor keys to change the value or enter the digits directly using the keypad. -
Page 22: Appliance Test Results
HOW TO VIEW TEST RESULTS HOW TO VIEW TEST RESULTS HOW TO PERFORM MANUAL TESTS appliance Test results hoW To perforM Manual TesTs Manual mode provides the user with direct access to the tests. In this It is possible to view the results obtained for a certain appliance by mode individual tests can be selected and performed. - Page 23 HOW TO PERFORM MANUAL TESTS HOW TO PERFORM MANUAL TESTS Create appliance number If you need to change the current Site use the cursor keys to highlight SITE and press Enter to select another Site name. This allows all manual tests performed to be stored against the appliance number until the appliance number is changed.
-
Page 24: Re -Test Period
Manager users re-test periods are downloaded and appear The Touch Leakage Test can be performed without powering down the EUT in the test sheet reports as entered in the KT77 and plugging it into the tester power socket. The only connection the User is required to make is to connect the Earth Bond Test lead to the exposed metal work of the EUT and then perform the test. - Page 25 HOW TO PERFORM MANUAL TESTS enter Comments/save results note When you have completed testing the EUT, you can enter When the connection icon is flashing you cannot change any settings. comments. The settings cannot be changed for a test if you have performed that test from within an appliance sequence.
-
Page 26: How To Download Data
HOW TO DOWNLOAD DATA HOW TO PERFORM MANUAL TESTS how to download data review results Display the results from the test in tabular form: - To download results stored in memory, use the cursor keys to highlight the Download Results option from the Main Menu and press Enter to display the following menu:- -------------------DOWNLOAD OPTIONS--------------------- DESTINATION... -
Page 27: Output Connection
For downloading to a PC the user has the option of sending data in a START SEARCH SIMPLY PATS format, compatible with Kewtech PAT Manager software, SSS format - Seaward Super String, compatible with Seaward PAT software and Robin / Fluke’s Power Pat Plus, Certificate - downloads... -
Page 28: Location Name
HOW TO DOWNLOAD DATA HOW TO DOWNLOAD DATA HOW TO DOWNLOAD DATA site name note Use the cursor keys to highlight a Site name and press Enter to select the desired If the list contains more locations than the unit can display then use the cursor keys ∗... -
Page 29: Date From
This option allows the user to search for test results after the selected The Kewtech KT77 is capable of printing barcode labels in conjunction with date. Use the cursor keys to highlight the digit to be changed. Use the (up a compatible thermal printer (see chapter 6). -
Page 30: How To Use Setup
HOW TO PRINT BARCODE LABELS AND TESTCODES HOW TO PRINT BARCODE LABELS AND TESTCODES how to use setup Test settings editor The TEST SETTINGS EDITOR allows the test sequence for the selected test To set up the Tester, use the cursor keys to highlight the Setup option on to be examined and changed if required. -
Page 31: Test Parameter Fields
HOW TO PRINT BARCODE LABELS AND TESTCODES HOW TO PRINT BARCODE LABELS AND TESTCODES Test parameter fields store settings Use the cursor keys to highlight the OK and press Enter or select the OK By selecting one of the test parameter fields from the TEST SETTINGS Fast key to save the settings and return to the previous menu. -
Page 32: Edit User List / Options
HOW TO PRINT BARCODE LABELS AND TESTCODES edit user list / options advanced user Selects the user level as an ADVANCED user. No Help will be displayed before each test automatically. Help is still available from the Help fast key startup Mode Use the cursor keys to highlight a test mode on startup and press Enter to select the desired option. -
Page 33: Edit Site List
HOW TO PRINT BARCODE LABELS AND TESTCODES beep on Warning edit location list Use the cursor keys to highlight the option and press Enter to select the desired option. This option will cause a beep whenever a warning message is displayed or a test fails. -
Page 34: Change Date / Time
HOW TO PRINT BARCODE LABELS AND TESTCODES Change date / Time system Configuration -SET TIME AND DATE- 01/08/2002 15.30 This option allows the user to change the Date and Time. Use the left and right cursor keys to highlight the digit to be changed. Use the up and down cursor keys to change the value or enter the digits directly using the keypad. - Page 35 HOW TO PRINT BARCODE LABELS AND TESTCODES AFTER TEST COMMENTS The options set here determine the next action all the test results are saved This option allows the User to determine if the Comments field will be to memory. Options are: OPTIONS – Displays the OPTIONS menu giving the available at the end of a test.
-
Page 36: Change Password
AVAILABLE MEMORY It is possible to reset the Kewtech KT77 to the settings which were configured from new. This option will first ask you if you are sure, select Yes to reset or No to abort. MEMORY CAPACITY REMAINING... -
Page 37: Delete Single Appliance
HOW TO PRINT BARCODE LABELS AND TESTCODES Clear results Memory Once the PERFORM MEMORY TEST option is highlighted press the enter button. The memory test checks all of the appliance results against their checksums. If This option will delete all of the appliances currently stored in memory and should be used carefully! the test passes then no action is taken. - Page 38 HOW TO CHANGE THE USER HOW TO CHANGE THE USER how to change the user A description of how to connect the test leads and perform the test is provided in a step-by-step format. To change the User, use the cursor keys to highlight the CHANGE USER option on the Main Menu and press Enter to display the following menu:- note: ------SELECT USER-------...
-
Page 39: Chapter 4 Tips & Troubleshooting
Tester connection is secure. power-on self tests: If all the above is checked OK then the Kewtech KT77 may be faulty. When the tester is powered on, a number of messages can possibly Contact your Kewtech Agent for repair. -
Page 40: Safety Tests During Operation
The TesT has been aborTed beCause The applIanCe TesTer beCaMe Too hoT. alloW The unIT To Cool before sTarTIng If this message appears, the Kewtech KT77 is faulty and requires repair. press enTer buTTon To ConTInue Contact your Kewtech Agent for repair. -
Page 41: Interfacing
To avoid any problems during download, ensure that leads are undamaged and correct for the application. downloading to Computer software The Kewtech KT77 can be setup to be compatible with various software N.C. packages. The APLNCE & CNMTS option can be found in SYSTEM CONFIGURATION in the SETUP menu this may need to be set for 10 DIGIT RESTRICTION for non Seaward software. -
Page 42: Chapter 5 Maintaining The Tester
There are no user replaceable parts in the Tester. • The unit should be regularly calibrated (at least annually). • For repair or calibration return the instrument to Kewtech at:- The Service Department Kewtech Corporation Ltd Unit 2, Shaw Wood Business Park... -
Page 43: Chapter 6 Accessories
STANDARD ACCESSORIES Chapter 6 accessories Chapter 7 specifications A series of standard and optional accessories are available for the Kewtech earth bond Test KT77 Tester. The standard accessories are supplied with the Tester. Test Voltage *............. 6V nominal (no load) Test Current *.........10A, 25A selectable (into s/c load) -
Page 44: Insulation Test
INSULATION TEST TOUCH LEAKAGE Insulation Test Touch leakage range ................0.1mA - 2.0mA Test Voltage * ....500V d.c. or 250V d.c. nominal (0.5MΩ load) short Circuit Current ..........2mA d.c. maximum resolution ................0.01mA range ..............0.10MΩ - 19.99 MΩ accuracy .......... -
Page 45: Environmental
EARTH BOND TEST ENVIRONMENTAL enVIronMenTal appendix a purpose of Tests Operating ..........0ºC to 40ºC (non condensing) earth bond Test Storage ..........-10ºC to 50ºC (non condensing) This test is to ensure that the connection between the earth pin in the mains Maximum R.H .................. -
Page 46: Substitute Leakage Test
POWERED TESTS POWERED TESTS SUBSTITUTE LEAKAGE TEST SUBSTITUTE LEAKAGE TEST powered Tests For Class 2 appliances, the Earth Bond Test clip can be used for an earth return lead. For appliances which incorporate over-voltage protection, a 250V DC test voltage is provided to allow a reading to be taken without the protection Warning devices generating a false failure. -
Page 47: Leakage Test
LOAD TESTS LEAKAGE TEST leakage Test load Test Warning Warning Mains voltage applied to appliance Mains voltage applied to appliance The Leakage Test shows the current being lost through Leakage as the The Tester measures the power used by the appliance and displays difference in the currents flowing in the Live and the Neutral conductors. -
Page 48: Appendix B Reference Information
TESTCODE TABLES TESTCODE TABLES FACTORY-SET TEST SEQUENCES FACTORY-SET TEST SEQUENCES Testcode Tables appendix b reference Information The test sequence code is split into two 10-digit testcodes, this Appendix factory-set Test sequences describes how the two testcodes are broken down. earth Touch name Insulation leakage... - Page 49 TESTCODE TABLES earth bond digit 4 Insulation Voltage digit 3 Current Multiplier Skip 0.5MΩ 250V d.c. 1.0MΩ 250V d.c. x100 2.0MΩ 250V d.c. x1000 4.0MΩ 250V d.c. 7.0MΩ 250V d.c. 0.5MΩ 500V d.c. x100 1.0MΩ 500V d.c. x1000 2.0MΩ 500V d.c. 4.0MΩ...
- Page 50 TESTCODE TABLES digit 6 not used (set to 0) digit 9 earth bond Test duration Reserved 2s : add 0.0 to the earth bond limit Reserved 5s : add 0.0 to the earth bond limit 10s : add 0.0 to the earth bond limit Reserved 30s : add 0.0 to the earth bond limit Reserved...
- Page 51 TESTCODE TABLES digit 1 sub-leakage Test duration digit 4 Touch leakage Test duration 120s digit 2 not used (set to 0) 180s Reserved Unlimited Reserved Reserved Reserved digit 5 number of earth bond Tests digit 3 leakage/load Test duration 120s 180s Unlimited Unlimited...
- Page 52 TESTCODE TABLES digit 6 number of Insulation Tests digit 8 not used (set to 0) Reserved Reserved Reserved Reserved Reserved Reserved Reserved Reserved Reserved Reserved Reserved Unlimited Reserved number of substitute leakage digit 9 number of load/leakage Tests digit 7 Tests Unlimited www.kewtechcorp.com...
- Page 53 TESTCODE TABLES digit 10 number of Touch leakage Tests www.kewtechcorp.com www.kewtechcorp.com www.kewtechcorp.com...
Need help?
Do you have a question about the KT77 and is the answer not in the manual?
Questions and answers