Advertisement
SWEMA AB
Pepparv. 27
123 56 FARSTA, SWEDEN
Tel: +46 8 94 00 90
Fax: +46 8 93 44 93
E-mail: swema@swema.com
Web site: www.swema.com
Operating instructions
Contents:
1. Introduction........................ 1
2. Technical data...................... 1
3. Function............................. 2
4. Charging............................. 7
5. Driver Installation................ 7
6. SwemaTerminal 3................ 8
with firmware update........ 10
7. Instrument PC menu............. 10
vers 1.23 CW20160601
Advertisement

Related Manuals for Swema SwemaFlow 125


Summary of Contents for Swema SwemaFlow 125
-
Page 1: Table Of Contents
Pepparv. 27 5. Driver Installation....7 123 56 FARSTA, SWEDEN 6. SwemaTerminal 3....8 Tel: +46 8 94 00 90 with firmware update..10 Fax: +46 8 93 44 93 7. Instrument PC menu..... 10 E-mail: swema@swema.com Web site: www.swema.com... -
Page 2: Introduction
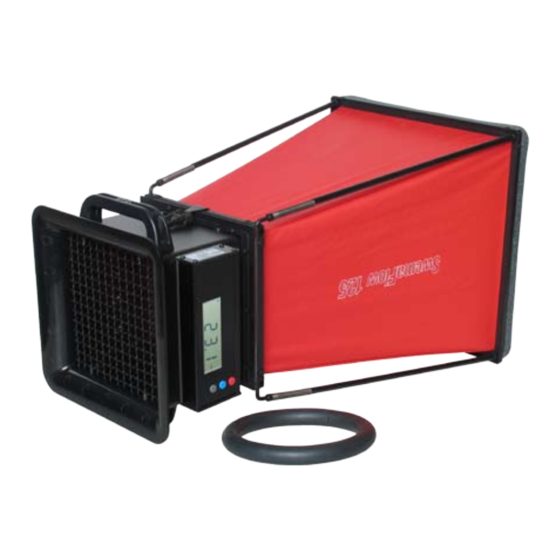
1. Introduction Thank you for choosing a quality instrument from Swema. SwemaFlow 125D measures air flow directly in l/s, m3/h or cfm (when set to US units). The instrument is turned on and off with the red button next to the display. When the instrument is turned on the display shows first the firmware version then the voltage of the bat- tery. -
Page 3: Function
3. Function The current flow is presented on the display two times seconds. SwemaFlow 125D compensates automatically for the air density by measuring air temperature and barometric pressure. On/Off (RED button) Turn on the instrument by pressing the RED button. When turning on the display will go through a sequence showing firmware version, battery voltage, ”Stnd”... - Page 4 Flow hood selection For exhaust flow any hood size can be selected. For supply flow, use a longer hood (650x650 or 250x650mm) to stabilize the flow. The included 300x300 hood can be used for supply if it gives the same result on the valve type as one of the longer hoods. BP Mode (Back Pressure) When measuring with any Flow capture the flow may be influenced by the Flow capture itself.
- Page 5 BP Measurement (BLACK button) Place the hood with the sealing list making a proper seal around the valve. Start with or without the throttle ring and press the BLACK button (button on the side). SwemaFlow 125D will wait 2 seconds to let the flow stabalize in the flow capture, the display will show ”P1”...
- Page 6 Flow Factor Measurement (F-mode) In Flow Factor mode the flow is multiplied with a flow factor (flow factor 1.00 will not alter the flow). A flow factor can be used to com- pensate for example a leakage. Warning: Changing to anything else than 1.00 will alter the reading from calibration certificate.
- Page 7 Note book (notE) If GREY button is pressed two times when in BP Mode notE will be displayed. To enter the note book press the BLACK button. ”Note” and the number of the last saved note will be shown on the display. With GREY and BLUE button it’s possible to scroll through the saved notes.
-
Page 8: Charging
5. Driver installation To use SwemaFlow 125D with a Windows 10 PC, just connect the USB cable and wait for the driver installation to complete. To use Swema- Flow 125D with an earlier OS driver matching .inf-files must be used by the OS. -
Page 9: Swematerminal 3
6. SwemaTerminal 3 With SwemaTerminal 3 it’s possible change settings, print stored measurements, update firmware, print calibration protocol, do on- line logging and store the logged data on your PC. Information of what kind of instrument and at which COM-port it’s connected can be found on the top left side. - Page 10 ”Actual” or ”Standard flow”: If set to ”Real” the flow shows as it is at present temperature and barometric pressure. Standard air flow is used to present the air flow at standard condition of 1013 hPa (29,9 inHg) and 20 °C (68 °F). ”Point”...
-
Page 11: With Firmware Update
7. Instrument PC menu After ”Terminal Window” is clicked a new window is opened. Press ”Enter” on the keyboard and the main terminal menu for Swema- Flow 125D will be opened. To change a setting use the PC keyboard and press on the corresponding letter. - Page 12 SWEMA AB Pepparv. 27 SE-123 56 FARSTA Tel: +46 8 94 00 90 Fax: +46 8 93 44 93 swema@swema.com www.swema.com...
Need help?
Do you have a question about the SwemaFlow 125 and is the answer not in the manual?
Questions and answers