Table of Contents
Advertisement
Available languages
Available languages
Advertisement
Chapters
Table of Contents

Related Manuals for Kwikset 907 15 SMT


Summary of Contents for Kwikset 907 15 SMT
- Page 1 Touchpad Electronic Deadbolt Installation & Learning Instructions Owner’s Manual 19701 DaVinci A Black & Decker Company Lake Forest, CA 92610 Printed in the USA 1-800-327-5625 Copyright © 2010 Kwikset Corporation www.kwikset.com Part No: 40486 / 02...
-
Page 2: Table Of Contents
Table of Contents Page 1 Enclosed Pieces 1 Door Preparation Page 2 2 Deadbolt Latch Installation Page 2 3 Strike Installation Page 3 4 Touchpad Electronic Deadbolt Installation Page 4 5 Programming Instructions Page 6 6 Proper Operation of Touchpad Electronic Deadbolt Page 7 Notes and Warranty Page 8... -
Page 3: Enclosed Pieces
Enclosed Pieces Pieces Important Notes: Touchpad Use the components from this Latch package, make no substitutions. Strike Consult local building codes for Keys requirements in your area. Deadbolt Read all instructions and lay out Mounting Plate parts as shown. Power Strip Under normal use it is recom- Power Board mended to replace the batteries in... -
Page 4: Door Preparation
1. Door Preparation 2. Deadbolt Latch Installation (Piece B) Replacement Installation To Adjust Backset: Preparation for latch with Face Plate Install Latch Remove all old lock For latch with face plate: Keeping edges parallel to the face of the door, components. -
Page 5: Strike Installation
3. Strike Installation (Piece C) Install strike First-time Installation For Drive-In latch: Install 3” (76mm) screws in large strike holes Draw a horizontal centerline across the door Center strike over hole and trace around and install remaining 5/8” wood screws in jamb, the same distance from floor as is the strike. -
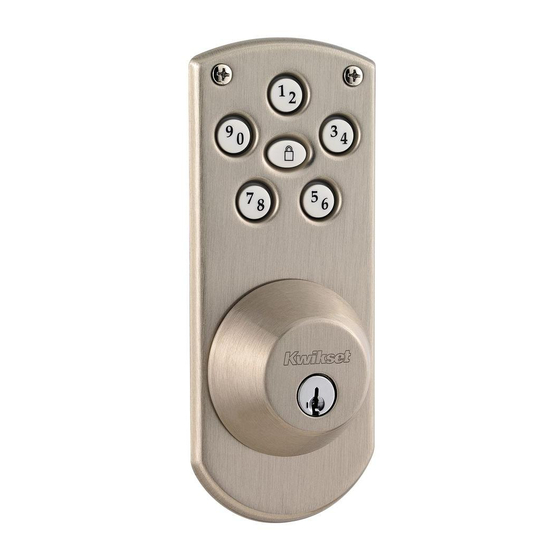
Page 6: Touchpad Electronic Deadbolt Installation
4. Touchpad Electronic Deadbolt Installation With bolt of latch in the extended position, With key removed, place deadbolt E against Attach deadbolt with 2 large black bolts Line Touchpad A up with small holes from place Touchpad A on outside of door and Touchpad A with round of torque blade at top through mounting plate F as shown. - Page 7 Remove access cover I from Power Board H. Feed power strip G through large square hole Line Power Board H up to the 3 small holes Install 4 new AA Alkaline batteries (not Hold as shown in photo and twist or pull up of Power Board H and plug into the 6 prongs.
-
Page 8: Programming Instructions
4. Touchpad Electronic Deadbolt Installation 5. Programming Instructions Retract deadbolt latch B with T-turn. Press the lock button on Touchpad A. If motor runs but Push program button on Power Board H once. Enter desired 4 to 8 digit code by pressing latch does not extend: Door handing needs to be changed. -
Page 9: Proper Operation Of Touchpad Electronic Deadbolt
This Touchpad Electronic Deadbolt should be your own. Since anyone with access to the accompanied by a Kwikset Knobset, Leverset, power board can change these codes, you or Handleset. must restrict access to the power board... - Page 10 Manufacture's note. Under normal use it is recommended to • Full Lifetime Finish Warranty California 92610. Kwikset will repair or replace WARNING: This Manufacturer the lock or refund the purchase price (if it is replace the batteries once a year. When •...
-
Page 11: Troubleshooting Tips
This lock will maintain two different codes. sound for 15 seconds if an incorrect security Two random codes are preset by the factory or visit www.kwikset.com code is entered three times consecutively. The for testing. It is recommended that you enter... - Page 13 Cerrojo electrónico con teclado de contacto Instalación e instrucciones de uso Manual del propietario 19701 DaVinci Una compañía de Black & Decker Impreso en E.U.A. Lake Forest, CA 92610 1-800-327-5625 Copyright © 2010 Kwikset Corporation www.kwikset.com Parte No: 40486 / 02...
- Page 14 Table of Contents Página 1 Piezas incluidas 1 Preparación de la puerta Página 2 2 Instalación del pestillo Página 2 3 Instalación del recibidor Página 3 4 Instalación del cerrojo electrónico con teclado de contacto Página 4 5 Instrucciones de programación Página 6 6 Operación correcta del cerrojo electrónico con teclado de contacto Página 7...
-
Page 15: Piezas Incluidas
Piezas incluidas Pieces Notas importantes: Teclado de contacto Use los componentes de este Pestillo paquete; no haga sustituciones. Recibidor Consulte los códigos de con- strucción locales para los Llaves requerimientos específicos en su Cerrojo electrónico zona. Placa de montaje Lea todas las instrucciones y Cordel de energía despliegue las partes como se muestra aquí. -
Page 16: Preparación De La Puerta
1. Preparación de la puerta 2. Instalación del pestillo (Pieze B) Para reemplazar una vieja cerradura: Para ajustar la distancia del frente a la Preparación para un pestillo con una Instale el pestillo placa de cara. bocallave: Remueva todos los Para un pestillo con una placa de cara: componentes de la vieja cerradura. -
Page 17: Instalación Del Recibidor
3. Instalación del recibidor (Piece C) Instalación nueva Instale el recibidor Marque una línea central horizontal a través Para un pestillo con una cara redonda. Coloque los tornillos de 3" (76 mm) en los 3 Centre el recibidor sobre el agujero y de la jamba de puerta, la misma distancia del agujeros grandes del recibidor y los tornillos marque una línea a su alrededor. -
Page 18: Instalación Del Cerrojo Electrónico Con Teclado De Contacto
4. Instalación del cerrojo electrónico con teclado de contacto Amplíe el perno del pestillo. Coloque el Sacándole la llave, ensamble el cerrojo Asegure el cerrojo con los dos tornillos negros Centre el teclado de contacto A sobre los teclado de contacto A por fuera de la puerta electrónico E en el teclado de contacto A. - Page 19 Retire la cubierta I del panel de energía H. Pase el cordel de energía G por el agujero Centre el panel de energía H sobre los tres Instale 4 baterías alcalinas AA nuevas Sosténgalos de la manera que aparece en la cuadrado grande del panel de energía H y pequeños agujeros que hizo con la plantilla.
-
Page 20: Instrucciones De Programación
4. Instalación del cerrojo electrónico con teclado de contacto (continuado) 5. Instrucciones de programación Retraiga el pestillo B utilizando la manija. Oprima la tecla Cerrar [lock] en el teclado de contacto Oprima una vez la tecla “Program” del panel Ingrese su código personal (4 a 8 dígitos) A. -
Page 21: Operación Correcta Del Cerrojo Electrónico Con Teclado De Contacto
Kwikset de tipo perilla, manija o manilla. el acceso al tablero de distribución y veri- ficar los dos códigos con regularidad para asegurarse de que no se han alterado sin que usted lo sepa. - Page 22 Esta garantía establece que todos los componentes Kwikset reparará o reemplazará la cerradura o puede evadirse entrando por otra parte de mecánicos estarán libres de defectos de materiales y reembolsará el precio del producto (si no es práctico El pestillo inferior debe asentarse firmemente para...
-
Page 23: Tips Para Solucionar Problemas
(ver el paso 4.9). 1-800-327-5625 USA la llave o la manija en T, el deslizamiento del pestillo será o visite www.kwikset.com Alarma de código no registrado: Códigos fijados de fábrica firme. Cierta resistencia es nor- Importador: Para su seguridad adicional, sonará...
Need help?
Do you have a question about the 907 15 SMT and is the answer not in the manual?
Questions and answers