Table of Contents
Advertisement
Advertisement
Table of Contents

Related Manuals for Void Venu 210i


Summary of Contents for Void Venu 210i
- Page 1 Venu 210i User Guide V1.0...
- Page 2 This user guide is subject to change without notice. For the latest online version, visit: www.voidacoustics.com Void Acoustics and the Void logo are registered trademarks of Void Acoustics Research Ltd. in the United Kingdom, USA and other countries; all other Void trademarks are the property of Void Acoustics...
-
Page 3: Table Of Contents
LED chart Software Processing architecture Internal signal path polarity System design System design principles High frequency loudspeaker placement and positioning Bass alignment - delay times Service Return authorisation Shipping and packing considerations Appendix Venu 210i User Guide V1.0 Page 3... -
Page 4: Safety And Regulations
Void Acoustics Research Ltd for reprocessing. For more information about where you can send While every care has been taken in creating this guide, safety is... -
Page 5: Limited Warranty
Void free and clear of all liens or other specifications for each respective model. Void agrees restrictions. -
Page 6: Unpacking And Checking
When you are removing your Venu 210i loudspeaker from its original packaging: • Venu 210i loudspeakers come double boxed and each box is stapled shut; take care when unboxing and removing the staples to avoid injury or damage to the loudspeaker •... -
Page 7: About
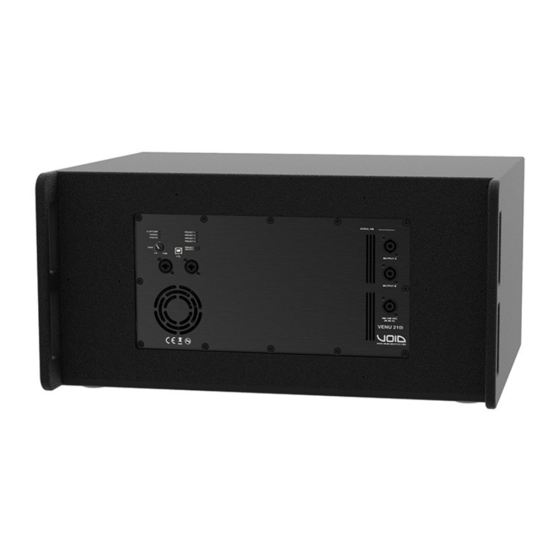
4.2 Venu 210i overview The Venu 210i is a 2,400 W (1,200 W + 2 x 600 W), self-powered double 10” reflex-loaded low frequency enclosure, capable of powering up to four loudspeaker enclosures from its built-in, dual-channel 600 Watt power module. speakON™ sockets are provided for ultra-quick and reliable connections and a protected rear connector panel allows the enclosure to be placed against a rear wall without damaging the audio or power connections. -
Page 8: Venu 210I Specifications
Output equalizer Parametric IIR filters: peaking, hi/lo-shelving, all-pass, band-pass, band-stop, hi/lo-pass Crossover Butterworth, Linkwitz-Riley, Bessel: 6 dB/oct to 48 dB/oct (IIR) Limiters Peak limiter, RMS limiter, frequency dependent RMS limiter, Clip limiter, Temperature limiter Venu 210i User Guide V1.0 Page 8... -
Page 9: Dimensions
4 About 4.5 Dimensions 684 (26.9”) 530 (20.9”) 530 (20.9”) 684 (26.9”) Figure 4.1: Dimensions Venu 210i User Guide V1.0 Page 9... -
Page 10: Cabling And Wiring
IEC 60332.1 Fire retardancy of a single cable • IEC 60332.3C Fire retardancy of bunched cables • IEC 60754.1 Amount of Halogen Gas Emissions • IEC 60754.2 Degree of acidity of released gases • IEC 61034.2 Measurement of smoke density. Venu 210i User Guide V1.0 Page 10... -
Page 11: Venu 210I Wiring
5.3 Venu 210i wiring Input A 10” LF DSP and amplifier Input B 10” LF Out/Link A Out/Link B Figure 5.1: Venu 210i wiring diagram Input XLR pins +/- Input A 2 x 10” LF Input B 2 x 10” LF Output... -
Page 12: Input Connectors
5.5 Output connectors Analogue line output Neutrik speakON™ CH1+ CH1+ Output B Output A speakON™ speakON™ connector connector CH1- CH1- Figure 5.4:Channel 1 and 2 speakON™ connector diagram. Note: pins 2+/2- are not connected. Venu 210i User Guide V1.0 Page 12... -
Page 13: Venu 210I Dsp
11. Neutrik speakON™ output A 5. Preset LEDs 12. Neutrik speakON™ output B 13. PowerCon™ power input 6. Preset select 14. Exhaust vents 7. USB-B programming connector 8. Combi Jack - XLR input signal connector input A Venu 210i User Guide V1.0 Page 13... -
Page 14: Factory Presets
6 Venu 210i DSP 6.2 Factory presets Factory presets for the Venu 210i are as follows: Preset 1 Air 8 Preset 2 Cyclone 55 Preset 3 Indigo 6S Preset 4 Venu 6 6.3 Selecting your preset To change your Venu 210i preset: 1. -
Page 15: Software
6 Venu 210i DSP 6.5 Software Starting from version 2.11.1, Armonía Pro Audio Suite supports the Venu 210i processing board which is available from: http://www.voidacoustics.com/void_uploads/Armonia.zip In order to access the DSP via the USB port of your computer, the CP210x USB to UART Bridge Virtual COM Port (VCP) drivers are required. -
Page 16: Processing Architecture
LIMITER Processing Processing 170ms POTENTIOMETER Output 3 MONO CLIP Output LIMITER Processing Output 4 clipping Temperature GAIN (5 bands) Input processing OUTPUT EQ/OVER PEAK GAIN DELAY (8-11 bands) LIMITER LIMITER 10ms Output processing Venu 210i User Guide V1.0 Page 16... -
Page 17: Internal Signal Path Polarity
Please pay special attention in using balanced inputs on all measurement equipment (such as oscilloscope probes) when you are bench testing. Figure 6.5: Internal signal path polarity with example input signal. Both channels 1 and 2 are fed with the sma sine signal. Venu 210i User Guide V1.0 Page 17... -
Page 18: System Design
For permanent installation, it is recommended to fly high frequency loudspeakers for more even coverage. This also allows co-located low frequency enclosures in a single block, increasing sensitivity and providing more consistent bass coverage. Figure 7.3: Venu ceiling mounting Venu 210i User Guide V1.0 Page 18... -
Page 19: High Frequency Loudspeaker Placement And Positioning
7.5. The applied aiming reduces unwanted reflections from the ceiling and directs the highest energy concentration to the audience area requiring it most. This is the most desirable position for the loudspeakers in this example. Figure 7.5: Correct loudspeaker placement Venu 210i User Guide V1.0 Page 19... - Page 20 This will help provide a wider coverage and result in more of the power being used usefully. Audience Stage Figure 7.7: Correct horizontal dispersion Venu 210i User Guide V1.0 Page 20...
- Page 21 The shallow angle of attack will also induce refraction issues on a hot dance floor, leading to reduced HF penetration at mid and far distances, again reducing intelligibility and coherence. Figure 7.10: Incorrect loudspeaker placement Venu 210i User Guide V1.0 Page 21...
-
Page 22: Bass Alignment - Delay Times
E to the north edge of the circle, and multiply by the delay time per metre. Or: (A - D) x 2.9 ms/m = delay time. Figure 7.13: Bass alignment example 2 Venu 210i User Guide V1.0 Page 22... -
Page 23: Service
8.2 Shipping and packing considerations • When sending a Void Venu 210i loudspeaker to an authorised service centre, please write a detailed description of the fault and list any other equipment used in conjunction with the faulty product. -
Page 24: Appendix
(H) 334 mm x (W) 684 mm x (D) 530 mm (13.2” x 26.9” x 20.9”). Weight shall be 32 kg (70.5 lbs). The loudspeaker system shall be a Void Acoustics Venu 210i. Venu 210i User Guide V1.0... - Page 26 North America Void Acoustics North America 503-854-7134 sales.usa@voidacoustics.com Head Office Void Acoustics Research Ltd Unit 15 Dawkins Road Industrial Estate Poole Dorset BH15 4JY England +44 (0) 1202 666 006 info@voidacoustics.com Registered in England & Wales No. 07533536 www.voidacoustics.com...
Need help?
Do you have a question about the Venu 210i and is the answer not in the manual?
Questions and answers