Gold Note GIGLIO Owner's Manual
The italian turntable
Hide thumbs
Also See for GIGLIO:
- Owner's manual (20 pages) ,
- Owner's manual (21 pages) ,
- User manual (72 pages)
Table of Contents
Advertisement
Quick Links
Advertisement
Table of Contents

Related Manuals for Gold Note GIGLIO


Summary of Contents for Gold Note GIGLIO
- Page 1 Italian Music Experience GIGLIO THE ITALIAN TURNTABLE OWNER’S MANUAL...
-
Page 2: Important Safety Information
Protect the product from rain and humidity and keep away from heat sources, electric and electronic motors etc. The power Chord supplied must be used only on this unit. Gold Note does not have responsibility for any improper use of this unit. This appliance has a serial number located on the rear panel. - Page 3 IMPORTANT SAFETY INFORMATION 1. Read these instructions and store them. 11. Use only with the cart, stand, tripod, bracket, or table specified by the manufacturer, or sold with the apparatus. 2. Heed all warnings. When a cart is used, use caution when moving the 3.
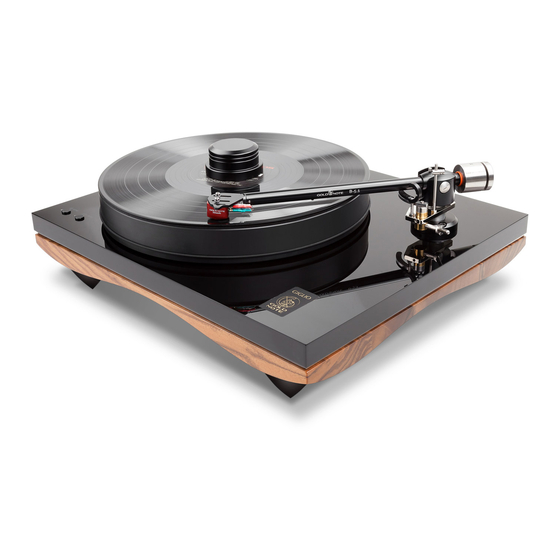
- Page 4 Thanks to our proprietary power control generator based on a Quadral-Core micro-controller, Giglio can effectively control vibrations and deliver high torque for the greatest dynamic and resolution. Every Gold Note products is 100% proudly designed, manufactured and assembled in Italy...
- Page 5 33/45rpm adjustable set up and fine pitch control. • The Giglio is a rigid turntable that uses a 50mm thick plinth made of Hardwood or MDF interfaced with a 3mm stainless steel and a 20mm acrylic plinth.
- Page 6 CONTENT AND KEY FEATURES MAIN FEATURES FINISHES • WOW & FLUTTER 0,1% • LOWER PLINTH • RUMBLE -78dB Walnut Hardwood or Black or White lacquered MDF 50mm thick • SPEED 33⅓ and 45 ±0,1% • UPPER PLINTH Black Polished Acrylic with S/Steel •...
-
Page 7: Set-Up Instruction
Once the 33⅓ is playing its red LED light turns on. 2. Place the Giglio deck on a levelled surface, such as a wall • Outer button starts and stops the 45 speed. shelf immune to footfall, then level the turntable. -
Page 8: Installing The Platter
INSTALLING THE PLATTER To assemble the platter you are going to need 33mm platter supplied Platter Spindle Tip STEP 1 position the platter on the turntable as shown in the picture: the platter should fit perfectly on the spindle flat surface. STEP 2 thread the spindle tip as show in the picture to secure the platter to the turntable. - Page 9 INSTALLING THE BELT AND THE TONEARM CABLE Wrap the belt around the pulley and the platter as shown in the picture: The tonearm cable should be always connected before the tone arm is installed on the turntable. Always pay attention to the cable and make sure it is connected before placing the tonearm in position. REAR SIDE The Male DIN plug and the female DIN plug must be connected as...
- Page 10 ANTI-SKATING, AZIMUTH, COUNTERWEIGHT ADJUSTMENTS ANTI-SKATING nylon wire with bullet counterweight 2. ANTI-SKATING adjustment bar 3. ANTI-SKATING support hoop 4.TONEARM COUNTERWEIGHT: to set up the correct tracking force depending on the phono cartridge in use 5. SHELL AZIMUTH ADJUSTMENT: to adjust the alignment of the tonearm head-shell (0,9mm Allen Wrench) INSTALLING THE ANTI-SKATING SYSTEM 1.
- Page 11 VTA SETUP VTA SETUP Loose the Hex-bolt indicated by the arrow on the collar using the 1,5mm Allen Wrench supplied to lift up or down the arm correctly adjusting the VTA as necessary. AZIMUTH After the cartridge has been properly installed on the tone arm, adjust the Azimuth of the shell with the supplied 0,9mm Allen Wrench.
-
Page 12: Power Supply
POWER SUPPLY Power Supply Adapter AC Plug it is necessary to use the correct AC plug based on your local area. European plug U.S.A plug U.K. Plug Australian plug PLEASE NOTE WELL: Before plugging the AC adapter plug the round connector indicated here. - Page 13 POWER ADAPTER & SPEED CONTROL CONNECTING THE POWER SUPPLY ADAPTER Use only the original GOLD NOTE AC adapter to power the turntable to ensure the correct functioning. PLEASE NOTE:Before plugging the adapter in to the AC make sure the connector is plugged into the turntable.
- Page 14 CALIBRATION: CARTRIDGE OVERHANG, ALIGNMENT & SPEED Our turntables and tone arms are always supplied with the Gold Note Calibration Tool to calibrate correctly the setup. With this tool you will be able to adjust: A) Phono Cartridge alignment B) Overhang C) 45rpm and 33⅓rpm speed...
-
Page 15: Cartridge Alignment
CARTRIDGE ALIGNMENT PHONO CARTRIDGE ALIGNMENT To correctly align the phono cartridge and achieve the best tracking position, point the tip of the phono cartridge into the white circles as in the picture below. The body of the phono cartridge must be aligned to the vertical stripes in order to achieve the best position for musical reproduction. allignment 66 mm. - Page 16 DETACHABLE DUST COVER PICTURE 1 The new Gold Note dust cover features detachable hinges, a new proprietary design developed to let you enjoy your turntable at the best in any situation. The new dust cover is incredibly versatile and allows the usage of the turntable with or without it.
-
Page 17: Warranty And Service
WARRANTY & SERVICE WARRANTY To validate the warranty is necessary to register the unit on the Gold Note internet web site within 15 days from the purchase on the appropriate area of the web site: www.goldnote.it/warranty If the unit is not registered correctly or has been purchased from a different country of the purchaser home address the unit will not be covered by any warranty and the registration will be refused. -
Page 18: Troubleshooting
TROUBLESHOOTING TROUBLESHOOTING PROBLEM CAUSE SOLUTION Levelling the turntable. The turntable is not levelled. With a spirit level, only level the Turntable Platter through its shelf layer eventually screwing its feet just for very fine adjustment, take care of levelling the platter on its vertical and horizontal lines Be sure that the turntable layer is enough solid and rigid to support the weight of the turntable easily... - Page 19 NOTE...
- Page 20 Italian Music Experience www.goldnote.it...
Need help?
Do you have a question about the GIGLIO and is the answer not in the manual?
Questions and answers