Gold Note GIGLIO Owner's Manual
Hide thumbs
Also See for GIGLIO:
- Owner's manual (21 pages) ,
- Owner's manual (21 pages) ,
- User manual (72 pages)
Table of Contents
Advertisement
Quick Links
Advertisement
Table of Contents

Related Manuals for Gold Note GIGLIO


Summary of Contents for Gold Note GIGLIO
- Page 1 GIGLIO Italian Prestige Turntable OWNER’S MANUAL...
-
Page 2: Important Safety Information
The power Chord supplied must be used only on this unit. Gold Note does not have responsibility for any improper use of this unit This appliance has a serial number located on the rear panel. Please record the model and serial numbee and retain them for your records. - Page 3 IMPORTANT SAFETY INFORMATION 1 Read these instructions. normally, or has been dropped. 2 Keep these instructions. • Do not expose this apparatus to drips or splashes. • Do not place any objects filled with liquids, such as vases, on 3 Heed all warnings. the apparatus.
- Page 4 The Power Supply of the motor electronically control the 33⅓ and 45rpm and the fine speed adjust keeping the selection permanently in the turntable All Gold Note products are proudly designed, manufactured and assembled in Italy 100% page 3 OWNER’S MANUAL...
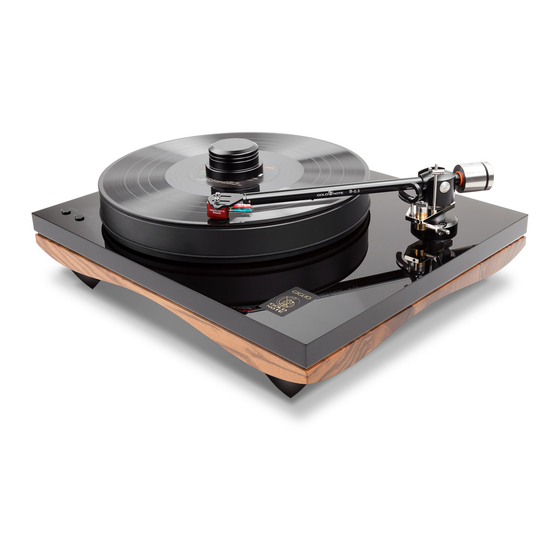
- Page 5 • The Giglio is rigid turntable that uses a plinth made of The Giglio motor features the Gold Note PWM design high damped MDF with 3mm stainless steel and allows a 12V very low voltage power optimized power- 20mm acrylic plinth.
- Page 6 SPECIFICATION & TECHNICAL FEATURES FINISHES MAIN FEATURES • LOWER PLINTH Curved solid olive or walnut wood • WOW & FLUTTER 0,02% 60mm thick • RUMBLE -80dB • UPPER PLINTH Black Polished Acrylic and S/Steel • SPEED 33⅓ and 45rpm ±0,1% 23mm thick •...
-
Page 7: Set-Up Instruction
• PITCH + pressing in sequence the 45rpm button its POSITIONING THE MEDITERRANEO LED light flashes fine speed increase. Your GIGLIO turntable has been designed for home To get out the PITCH CONTROL MODE press and Hi-Fi systems. It must be protected from direct hold for 3/4 seconds both 33⅓and 45 buttons togeth-... - Page 8 Installing the platter For the assembling the Mediterraneo Platter you need these parts: 45mm thick Platter made of Sustarin Acetamide supplied Platter Spindle Tip that clamps the platter (1x) STEP 1 Lay down the Platter of the turntable as shown in the picture taking care it perfectly fits the spindle flat surface.
- Page 9 Installing the belt and the Tone Arm cable For installing the belt you need these parts: - Belt supplied Wrap the belt around the puelly and the Platter as shown in the picture. For installing the Tone Arm Cable you need these parts: - Tone Arm Cable supplied To insert the Tone Arm cable, lift up the turntable plinth bottom side here below the pictures show the Male DIN connector and the...
- Page 10 ANTI-SKATE, AZIMUTH & COUNTERWEIGHT ADJUSTMENT - Anti-Skate Nylon Wire with lead stopping spot supplied in the tone arm accessories. - Anti-Skate Nylon Nire arm Cylinder Eye - Anti-Skate Bullet Counterweight - Anti-Skate Bar - Adjusting Lift Bent Bar Hex-Bolt. The Lift Bent Bar can be adjusted loosing the hex-bolt with the 1,5mm Allen wrench supplied in the tone arm accessories.
- Page 11 VTA SETUP VTA SETUP CYLNDER EYE Insert the supplied anti-skate weight Loose the indicated Hex-bolt of the arm (3)[see previous page] into the collar with the 1,5mm Allen Wrench sup- anti-skate Nylon then pass the Nylon plied in the tone-arm accessories, to lift Wire through the micro hole of the and down the arm correctly adjusting the...
-
Page 12: Power Supply
POWER SUPPLY - Power Supply Adapter AC Plug It is necessary to select the correct AC plug of the local working area to insert into the adapter. U.S.A plug European plug U.K. Plug Australian plug PLEASE NOTE WELL: Before plugging the AC adapter plug the round connector indicated here. - Page 13 POWER ADAPTER & SPEED CONTROL - Connecting the Power Supply Adapter Use exclsuively the original GOLD NOTE AC adapter to power the turntable to ensure the correct performance. PLEASE NOTE WELL: Before plugging the AC adapter plug the round connector indicated here.
- Page 14 The Inner line is for checking the 45rpm OVERHANG: To get the right Overhang it is necessary to insert the Gold Note Calibration Tool into the turntable record Pin and position the cartridge Tip on the indicated overhang of the phono cartridge manufacturer as well indicated in the picture below.
-
Page 15: Cartridge Alignment
CARTRIDGE ALIGNMENT PHONO CARTRIDGE ALIGNMENT: To correctly align the phono cartridge having the best tracking position, point the tip of the phono cartridge into the red circle both of the Green and the Blue ones indicated in the picture below. The phono cartridge body must be aligned on the stripes around to have a correct working geometry. - Page 16 WARRANTIES WARRANTIES REGISTRATION To validate the warranty is necessary to register the unit on the Gold Note internet web site within 15 days from the purchase on the appropriate area of the web site: http://www.goldnote.it/ If the unit is not registered correctly or is been purchased from a different coun- try of the purchaser origin/home the unit will not be covered by any warranty and the eventual registration refused.
-
Page 17: Troubleshoting
For spare parts visit the official Gold Note store at: http://www.akamaiaudio.it/ OWNER’S MANUAL page 16... - Page 18 Do not use any alcohol to clean the turntable anodised label, pulley and motor spindle. Only dry cloth is allowed For spare parts visit the official Gold Note store at: http://www.akamaiaudio.it/ OWNER’S MANUAL page 17...
- Page 19 USER NOTE OWNER’S MANUAL page 18...
- Page 20 Via della Gora, 6 Montespertoli (Florence) Italy 50025 Tel. + 39 0571 675005 Fax. + 39 0571 675013 www.goldnote.it...
Need help?
Do you have a question about the GIGLIO and is the answer not in the manual?
Questions and answers