Table of Contents
Advertisement
Quick Links
Advertisement
Table of Contents

Subscribe to Our Youtube Channel
Related Manuals for Olympia SECURE AS 302


Summary of Contents for Olympia SECURE AS 302
- Page 1 Alarm System SECURE AS 302 Operating Manual SECURE Light app now available!
-
Page 2: Table Of Contents
Door/Window Contact .......13 Preparing the Secure AS 302 ..... . 16 Installing the App . - Page 3 Function: Settings ........27 Setting the Arm Delay .......28 Setting the Ringing Volume .
-
Page 4: Before You Start
Before You Start Read the operating manual thoroughly and observe all the information contained when using the alarm system. Keep the operating manual in a safe place for future reference. Pay attention to this symbol. Texts which are highlighted by this symbol provide helpful infor- mation on handling the alarm system. - Page 5 ence and knowledge as long as they are supervised or have been instructed with regard to safe use of the device and are aware of the potential risks involved with its use. Children must never play with the device. Cleaning and user maintenance may not be completed by children without any supervision.
- Page 6 Caution! Hearing damage through loud alarm signal! Due to legal requirements, the alarm signal continues for a maxi- mum of 120 seconds. The alarm signal switches off automatically after about 120 seconds if the user does not inter- rupt it. Use ear protectors when testing the device.
-
Page 7: Intended Use
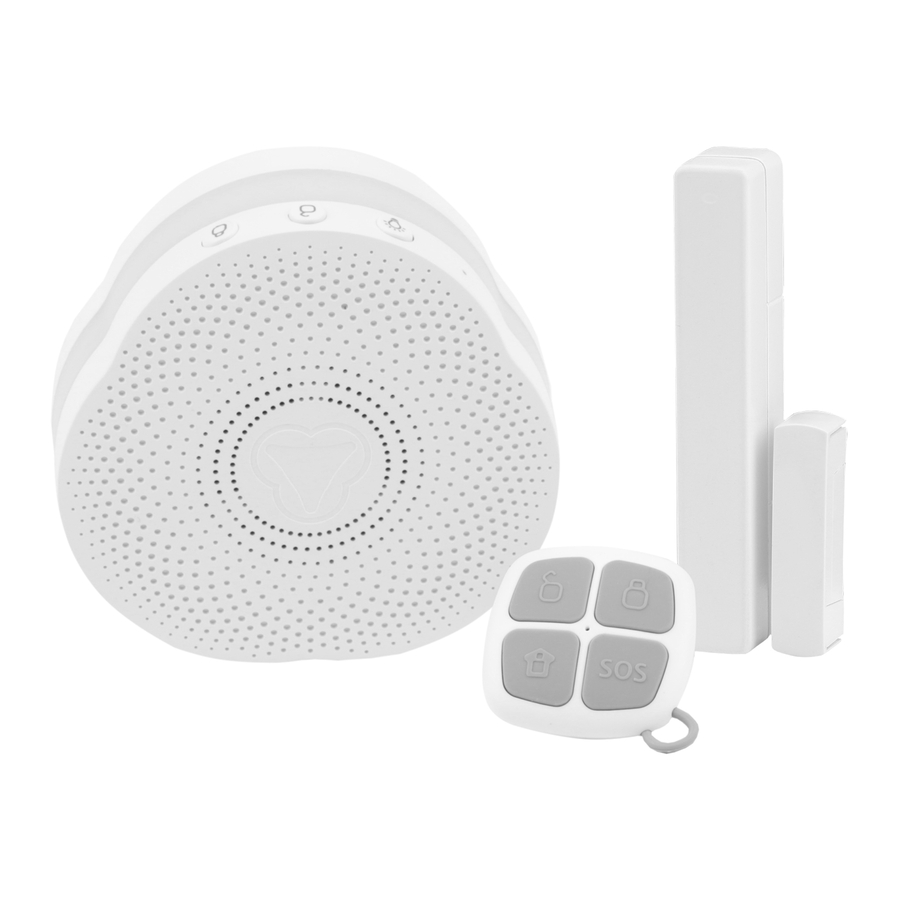
Intended Use The Secure AS 302 alarm system, consisting of a base unit, remote control and door/window contact, is intended for use monitoring rooms and buildings and can be controlled via the Secure Light app. -
Page 8: Package Contents
Package Contents Please check the contents of the package carefully. If anything is missing or has been damaged during trans- port, DO NOT put the alarm system into operation! Please note that the water detector and motion detec- tor are not necessarily component parts of the package contents and must be obtained separately. -
Page 9: Base Unit In Detail
Base Unit in Detail Loudspeaker Power plug Reset function key Lamp indicator LED on/off function key Arm function key Disarm function key Metal pin BASE UNIT IN DETAIL... -
Page 10: Positioning The Base Unit And Putting It Into Operation
Positioning the Base Unit and Putting it into Operation Only connect the base unit to an individual power socket. Do not connect the base unit to a connector strip or multi- ple socket. Locate the base unit as centrally as possible so that there is an optimum connection to all the sensors registered. -
Page 11: Sensors In Detail
Other sensors, such as motion detectors, water detectors and glass breakage detectors are available on option. Visit us at www.olympia-vertrieb.de Remote control 1 Notch (battery compartment) 4 Home Arm function key... - Page 12 Registering the Remote Control on the Base Unit Register the remote control on the base unit. Press and hold the LED on/off function key on the alarm system base unit. You will hear the voice message For connection, trigger the sensor. Press any button on the remote control.
-
Page 13: Door/Window Contact
Door/Window Contact 1 Magnetic contact 4 Battery compartment 2 Door/Window contact 5 Positioning aids with transmitter 3 LED Positioning the Door/Window Contact The door/window contact serves to monitor the position of doors and windows. Important! Before starting to position the sensors, take into account that walls, ceilings and sources of electrical disturbance can impair wireless communication. - Page 14 The door/window contact only functions in conjunction with the base unit from the SECURE AS 302 alarm system. Press and hold the LED on/off function key on the alarm system base unit.
- Page 15 Changing the Battery of the Door/Window Contact When the door/window contact batteries are discharged, you receive the corresponding message via the app. Change the batteries immediately in this case. Attention! Risk of property damage through the use of inappropriate batteries! The use of inappropriate batteries can cause a loss of function of the device.
-
Page 16: Preparing The Secure As 302
Preparing the Secure AS 302 This section explains the initial steps to take to connect the Secure Light app with the base unit. Installing the App Download the current version of the Secure Light app from the App Store or Google Play Store onto your smart- phone. - Page 17 Please note that only one smartphone at a time may be linked to the base unit via the app. When the app and base unit have been connected successfully and you have defined your personal settings, you can close the app. PREPARING THE SECURE AS 302...
-
Page 18: Secure Light App
Secure Light App Start Screen The start screen displays an overview of the alarm modes available, namely Away arm, Disarm and Home arm. Tap on the respective button on the right-hand side of the screen to activate the required mode. The way in which the sen- sors connected respond is explained in the following... -
Page 19: Function: Home Page
Function: home page The SECURE AS 302 alarm system provides three diff erent alarm modes (Away arm, Home arm and Disarm). The alarm modes are assigned to the defense lines. You can assign all the sensors connected to a defense line. The de-... -
Page 20: Using Away Arm Mode
Using Away Arm Mode When you activate Away arm mode, the circumferential control lamp is red. All the sensors are armed, ready to issue an alarm. If a sensor connected is triggered, a loud alarm signal is issued. You should activate Away arm mode when you leave your apartment or house. -
Page 21: Using Home Arm Mode
Using Home Arm Mode When Home arm mode is used, an acoustic alarm is issued when one of the sensors which is assigned to the 24 hour defense line and/or Away + Home defense lines is triggered. It is recommended to activate Home arm mode during the night. -
Page 22: Using Disarm Mode
Using Disarm Mode When Disarm mode is used, you can move freely around the house/apartment without an alarm being triggered. Only the sensors which are assigned to the 24 hour defense line can alert the base unit or remote control. You can switch Disarm mode on and off directly on the base unit, via the remote control or by using the app. -
Page 23: Function: My Device
Function: my device The my device function can be used to see which sensors are connected to the base unit of the alarm system. You can also adapt the settings of the sensors registered according to your own personal needs or local condi- tions. -
Page 24: Defense Lines
Defense Lines Away Arm Devices and sensors set to this de- fense line only trigger the base unit when the base unit is in Away arm mode. Tap on the defense line option. Select the Away arm entry from the list. Tap on OK. -
Page 25: Away + Home
Away + Home Devices and sensors set to this defense line only trigger the base unit when the base unit is in Away arm or Home arm mode. Tap on the defense line option. Select the Away + Home entry from the list. -
Page 26: Always Active
Always Active Devices and sensors set to this defense line always trigger an alarm on the base unit. Tap on the defense line option. Select the Always Active entry from the list. Tap on OK. The sensor selected is assigned to the Always Active defense line. -
Page 27: Function: Settings
Function: Settings The Settings function can be used to defi ne settings for the base unit in order to adapt the response of the alarm system, the brightness of the control lamp and the volume of the base unit alert. Tap on the Settings option. -
Page 28: Setting The Arm Delay
Setting the Arm Delay You can set the alarm system to be armed following a defi ned delay. This provides you with suffi cient time to leave the area being monitored after arming the alarm system without actually triggering the alarm signal. You can set an arm delay of between 0 and 90 seconds. -
Page 29: Setting The Ringing Volume
Setting the Ringing Volume The base unit is equipped with a loudspeaker. Voice messages and acoustic warning signals are issued via the loudspeaker. You can adjust the volume of the base unit. Caution! Risk of hearing damage through loud alarm signal! Due to legal require- ments, the alarm signal continues for a maximum of 120 seconds. -
Page 30: Setting The Brightness Of The Lamps
Setting the Brightness of the Lamps The base unit is equipped with a large, circumferential control lamp which also serves as a status indicator for the alarm system. Tap on the lamp brightness setting option. Set the required brightness using the slider control. -
Page 31: Setting The Language
Setting the Language You can select the language of the voice messages from the base unit to be in English or German. Press and hold the Disarm function key to switch the lan- guage of the voice output on the base unit. You will hear a short confirmation signal. -
Page 32: Appendix
Appendix If Something Does Not Work You have discovered that something is not working. First of all, try and identify the problem and attempt to solve the problem using the solutions suggested. The base unit is not opened when I try to access it via the app. - Page 33 The app breaks down. Download the latest version of the app from the App Store / Google Play Store. Observe the minimum system requirements of the app (see Section Technical Data on Page 36). The control lamp is too bright. The brightness of the control lamp can be adjusted. The adjustment affects each defense line.
-
Page 34: Restoring The Default Factory Settings
Restoring the Default Factory Settings You have encountered a problem that cannot be solved using the help provided in Section If Something Does Nor Work on Page 32. Try and reset the default factory settings. Restoring the factory settings automatically deletes all the personal user settings. -
Page 35: Guarantee
Guarantee Dear Customer, we are pleased that you have chosen this equipment. In the case of a defect, please return the device together with the receipt and original packing material to the point- of-sale. APPENDIX... -
Page 36: Technical Data
Technical Data Base unit Wireless communication 868 MHz, max. range 100 m Bluetooth 2.4 GHz, max. range 50 m Max. transmission power Radio: 18,3 mW Bluetooth: 0,47 mW Power supply 110 - 240 V, 50/60 Hz Power consumption Approx. 9 W (standby, without LED) Approx. - Page 37 Remote control Weight Approx. 13 g Batteries 1 x round cell battery (CR2032) Dimensions 40 x 40 x 6 [mm] (W x H x D) Wireless communication 868 MHz Max. transmission power 0.05 W Permissible ambient 5°C to 50°C at conditions 5% to 80% rel. humidity Door/Window contact Weight Approx.
-
Page 38: Information On Disposal
Information on Disposal In order to dispose of your device, take it to a collection point provided by your local public waste authorities (e.g. recycling centre). According to laws on the disposal of electronic and electrical devices, owners are obliged to dispose of old electronic and electrical devices in a separate waste container. -
Page 39: Declaration Of Conformity
Declaration of Conformity Olympia Business Systems Vertriebs GmbH, Zum Kraftwerk 1, 45527 Hattingen hereby declares that this device fulfils the basic require- ments and other relevant provisions stipulated in the Directive 2014/53/EC. The CE mark on the device confirms its conformity. - Page 40 12/2017 Article Numbers Base unit 5990 Door/Window contact 5991 Remote control 5992 Subject to change without prior notice.
Need help?
Do you have a question about the SECURE AS 302 and is the answer not in the manual?
Questions and answers