Table of Contents
Advertisement
Quick Links
- 1 Ports and Buttons
- 2 Connecting Your Xplornet Hub
- 3 Record Your Xplornet Hub 2.0 Gui Password
- 4 What Are the Xplornet Hub 2.0 Gui Password and Default Xplornet Ssid Names Used for
- 5 To Your Personal Wireless Router
- 6 Set Your Own Ssid Home Network Name and Passphrase
- 7 Router Features
- Download this manual
Advertisement
Table of Contents
Troubleshooting

Related Manuals for Xplornet Hub 2.0

Summary of Contents for Xplornet Hub 2.0
- Page 1 Xplornet Hub 2.0 User Guide Version 4.0 Xplornet Hub Manual UPDATE DEC 2017...
-
Page 3: Table Of Contents
Record Your Xplornet Hub 2.0 GUI Password ......What are the Xplornet Hub 2.0 GUI Password and Default Xplornet SSID names used for? ......... 7 Connect the Xplornet Hub 2.0 to a Computer ....... Activate your Home Phone Service ..........9 Connect the Xplornet Hub 2.0 to your Personal Wireless Router ......... -
Page 5: Getting Started
Getting Started Thank you for signing up with Xplornet. Your Xplornet Hub provides Home Phone and Wi-Fi Router service. This guide will help you set up your device. Just follow the easy step-by-step instructions and start connecting to what matters to you. -
Page 6: Safety Precautions
Should anything fall into the Xplornet Hub through the air vent, it could result in fire or damage to the device. • To avoid injury, do not open the Xplornet Hub. Tampering with the device could void your warranty. -
Page 7: In The Box
AC Power Adapter RJ-45 LAN Network Cable RJ-45 WAN Network Cable RJ-11 Telephone Cable If any parts are missing, please contact Xplornet Support: By Email: support@xplornet.com By Phone: 1-866-841-6001 X P L O R N E T H U B... -
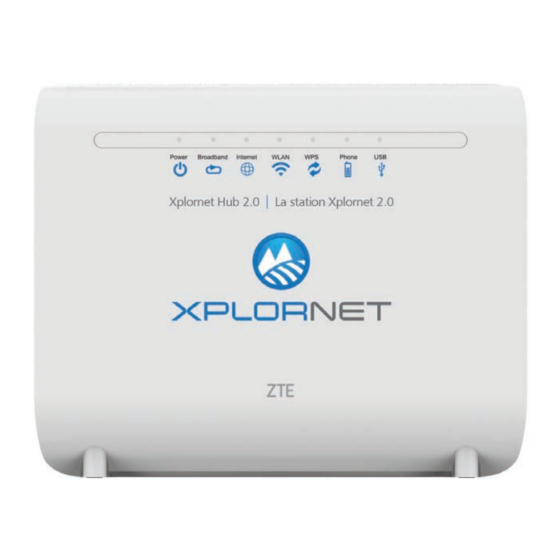
Page 8: Indicators
Indicators The following indicators are arranged across the top of the Xplornet Hub. LED Indicator Status Description Solid Green Hub is powered on Power Solid Red Hub is not working Hub is powered off Solid Green The link is activated... -
Page 9: Ports And Buttons
RJ-45 port is used to connect to your Xplornet modem WLAN Protected Setup Reset button should not be used unless advised by an Xplornet Reset representative. This button is used to restore the factory default settings when pressed for more than 5 seconds. -
Page 10: Connecting Your Xplornet Hub
Connecting Your Xplornet Hub The Xplornet Hub is your main connection point for your Xplornet Internet service. These steps will guide you in the setup of the Xplornet Hub. The Xplornet Hub should be the only device directly attached to the Xplornet service modem. -
Page 11: Record Your Xplornet Hub 2.0 Gui Password
Xplornet Hub 2.0 D-SN serial number with admin, for example: admin0340, to login to your Xplornet Hub 2.0 GUI Your Xplornet Hub 2.0 GUI is where you can reset your Xplornet Hub 2.0 GUI Password Home Network name (SSID) and Wi-Fi Protected Access (WPA) passphrase which are used to connect wireless devices to the Internet. -
Page 12: Connect The Xplornet Hub 2.0 To A Computer
Connect the small black power adaptor cord into the Power port on the Xplornet Hub 2.0 and then plug the other end of the cord into a 120 volt household outlet. Power on your Xplornet Hub 2.0 by pressing the On/Off button on the side of the unit. -
Page 13: Activate Your Home Phone Service
Password to login. Existing Xplornet Home Phone Customers Upgrading to Xplornet Hub 2.0 Wi-Fi: If you are upgrading to Xplornet Hub 2.0 Wi-Fi from an Xplornet Hub (Home Phone) device, please call 1-866-841-6001 to ensure that your Home Phone service is transferred to your new Xplornet Hub 2.0. -
Page 14: Connect The Xplornet Hub 2.0
Connect the small black power adaptor cord into the Power port on the Xplornet Hub 2.0 and then plug the other end of the cord into a 120 volt household outlet. Power on your Xplornet Hub 2.0 by pressing the On/Off button on the side of the unit. -
Page 15: Activate Your Home Phone Service
Password to login. Existing Xplornet Home Phone Customers Upgrading to Xplornet Hub 2.0 Wi-Fi: If you are upgrading to Xplornet Hub 2.0 Wi-Fi from an Xplornet Hub (Home Phone) device, please call 1-866-841-6001 to ensure that your Home Phone service is transferred to your new Xplornet Hub 2.0. -
Page 16: Set Your Own Ssid Home Network Name And Passphrase
Set Your Own SSID Home Network Name and Passphrase Before you connect a wireless device to your Xplornet Hub 2.0, we recommend that you first change the default Xplornet SSID Name and WPA Passphrase (listed as WLAN Security on the sticker) (See Record Your Xplornet Hub 2 GUI Password, Page 7) to your own Name and Passphrase. - Page 17 WLAN SSID Configuration section. In the SSID1 (2.4GHz) section, change the default Xplornet SSID Name (your Xplornet Hub 2.0 name) and the WPA Passphrase to your own SSID name and password, then press the Apply button to complete the changes.
-
Page 18: Connect A Wireless Device To The Internet
You can connect to either SSID *. The 2.4 GHz is best suited for wireless devices that are more than 1.5 Meters (5 FT) from the Xplornet Hub 2.0. The 5 GHz is best suited for wireless devices that are 1.5 Meters (5 FT) or less from the Xplornet Hub 2.0. -
Page 19: Connection Troubleshooting
Connection Troubleshooting To maximize your Wi-Fi connection: • Reduce the number of walls and ceilings between your Hub and other network devices • Place Hub upright with lights facing towards the centre of the home • Keep at least 6 feet away from electrical devices or components that generate interference like a microwave oven, home security system or blue tooth devices •... -
Page 20: Xplornet Hub Wi-Fi Faq's
Hub is turned to “ON”. To troubleshoot a specific device, please ensure that the device is connected to the correct SSID. If it is not, please disconnect and connect to the SSID of the Xplornet Hub 2.0. -
Page 21: Router Features
Router Features • Dual Band Wi-Fi – Provides both 2.4 and 5 GHz • GB Ethernet Port – 1GB LAN Ethernet port for home networking • WLAN On or Off (2.4 and 5 GHz) – Wireless “on” or “off” for 2.4 or 5 GHz channels •... -
Page 22: Xplornet Home Phone
511 – Road Conditions / Traffic Advisory Information on transportation and infrastructure to guide your travel plans 611 – Xplornet Direct Support Helps you contact Xplornet directly and (like 911) will work even if Xplornet Home Phone is suspended 711 – TDD / TTY Services... -
Page 23: Troubleshooting For Home Phone
Xplornet Voice Over IP (VOIP) phone • Ensure that you have plugged the correct cables into the ports of the • The Xplornet Hub should be the only device directly connected to your modem • Be sure to go through the Xplornet Activation Portal to activate your Home Phone service •... - Page 24 Local Number Portability form which is included in your welcome email. Once complete, sign the completed Letter of Authorization and then fax to 1-866-485-4156 or email a picture or scanned copy to csg@corp.xplornet.com and we will complete the port in 15 business days or under.
-
Page 25: Important 9-1-1 Emergency Services
9-1-1 emergency calls. Limitations of liability Please carefully read Xplornet’s terms of service related to 9-1-1 service detailed http://www.xplornet.com/legal/xplornet-e911-terms/ X P L O R N E T H U B... -
Page 26: About Xplornet
Our customers live in the farthest reaches of the country and just outside of major urban centres, and through our coast-to-coast network of local dealers, we connect them to all that the Internet offers. Xplornet is high- speed Internet – for all of Canada. - Page 27 Canada Statement This device complies with Industry Canada’s licence-exempt RSSs. Operation is subject to the following two conditions: 1. This device may not cause interference. 2. This device must accept any interference, including interference that may cause undesired operation of the device. The device meets the exemption from the routine evaluation limits in section 2.5 of RSS 102 and compliance with RSS-102 RF exposure, users can obtain Canadian information on RF exposure and compliance.
- Page 28 WPA2™, Wi-Fi CERTIFIED Passpoint™, Passpoint™, Wi-Fi CERTIFIED Miracast™, Wi-Fi ZONE™, WiGig CERTIFIED™, Wi-Fi Aware™, the Wi-Fi Alliance logo, and the WiGig CERTIFIED logo are trademarks of Wi-Fi Alliance. Xplornet® is a trademark of Xplornet Communications Inc. © 2017 Xplornet Communications Inc.
Need help?
Do you have a question about the Hub 2.0 and is the answer not in the manual?
Questions and answers