Advertisement
Available languages
Available languages
Quick Links
If you have any questions regarding assembly or if parts are missing, DO NOT return this item to the
store where it was purchased. Please call our customer service number and have your instructions
and parts list ready to provide the model name, part name or factory number:
Pacific Standard Time: 8:30 a.m. - 4:30 p.m., Monday - Friday
Or visit our web site 24 hours a day, 7 days a week for product assistance at
THIS INSTRUCTION BOOKLET CONTAINS IMPORTANT SAFETY INFORMATION.
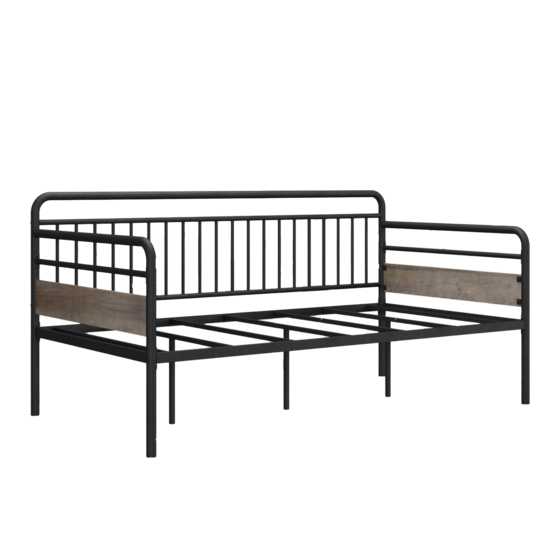
New Industrial Daybed
Stock # BH18-084-097-29
ADULT ASSEMBLY REQUIRED
www.whalenstyle.com
Or e-mail your request to parts@whalenfurniture.com
PLEASE READ AND KEEP FOR FUTURE REFERENCE.
Date 2018-03-08 Rev. 0001-A Factory: CHEGRE
866-942-5362
LOT NUMBER:
DATE OF PURCHASE: / /
Advertisement

Related Manuals for Better Homes and Gardens New Industrial Daybed


Summary of Contents for Better Homes and Gardens New Industrial Daybed
- Page 1 LOT NUMBER: DATE OF PURCHASE: / / New Industrial Daybed Stock # BH18-084-097-29 ADULT ASSEMBLY REQUIRED If you have any questions regarding assembly or if parts are missing, DO NOT return this item to the store where it was purchased. Please call our customer service number and have your instructions...
- Page 2 Parts and Hardware List Please read completely through the instructions and verify that all listed parts and hardware are present before beginning assembly. A- Left Front Leg (Qty. 1) B- Right Front Leg (Qty. 1) C- Left Back Leg (Qty. 1) D- Right Back Leg (Qty.
- Page 3 Assembly Instructions 1/4" x 5/8” Bolt (2 used in this step) ① NOTE: Please follow the instructions carefully to ensure a safe and sturdy bed. Do not fully tighten the bolts until all rails and guardrails are attached. 1. Unpack the units and confirm that you have all hardware and required parts. Assemble the unit on a carpeted floor or the empty carton to avoid any scratch.
- Page 4 Assembly Instructions 1/4" x 5/8” Bolt (4 used in this step) ① Plastic Washer 1/4" x 2-1/2” Bolt (4 used in this step) (4 used in this step) ③ ⑤ 3. Align and attach the Back Cross Assembly (J) between the Back Stretcher (K) and the Back Legs (C and D) with four 2-1/2”...
- Page 5 Assembly Instructions 1/4" x 5/8” Bolt (2 used in this step) ① 5. Fit one Side Arm (H) into the Left Front Leg (A) properly and fasten in place with one 5/8” Bolt (1). 6. Repeat the same procedure to combine the other Side Arm (H) and Right Front Leg (B).
- Page 6 Assembly Instructions 1/4" x 5/8” Bolt (8 used in this step) ① 7. Fasten the Side Stretchers (E and F) to the previous assembly with two 5/8” Bolts (1) in each.
- Page 7 Assembly Instructions 1/4" x 5/8” Bolt 1/4" x 2-1/2” Bolt (8 used in this step) (2 used in this step) ③ ① 8. Attach the assembled Side Arms (H) to the Back Stretcher (K) with two 2-1/2” Bolts (3). 9. Fasten the Side Stretchers (E and F) to the Back Legs (C and D) with the 5/8” Bolts (1). DO NOT fully tighten the bolts.
- Page 8 Assembly Instructions 1/4" x 5/8” Bolt (4 used in this step) ① 10. Attach the other Mattress Side Rail (I) between the Front Legs (A and B) with four 5/8” Bolts (1).
- Page 9 Assembly Instructions 1/4" x 1/2” Bolt (8 used in this step) ④ 11. Align and attach the Side Panels (G) to the metal tabs on Legs (A, B, C and D) with the 1/2” Bolts (1).
- Page 10 Assembly Instructions 1/4" x 5/8” Bolt 1/4" x 1-1/4” Bolt (14 used in this step) (3 used in this step) ② ① 12. Attach Support Leg (N) to the middle of Mattress Support Slat (M) with one 1-1/4” Bolt (2). 13.
-
Page 11: Care And Maintenance
Care and Maintenance For everyday cleaning, chrome, brass, aluminum, and painted metal surfaces can be kept looking their best by wiping with a slightly damp, soft cotton cloth or vacuum cleaner brush. If soiled, wipe with clean sponge or cloth wrung out of water. Wipe dry with cloth or paper towel to avoid water spots. - Page 13 NÚMERO de LOTE: FECHA de COMPRA: / / Cama New Industrial Serie # BH18-084-097-29 ENSAMBLE REQUERIDO POR ADULTO Si tienen alguna pregunta acerca del ensamble o si alguna parte está faltante, no retorne esté producto a la tienda donde lo compró. Por favor llame a nuestro departamento de ayuda al cliente teniendo su instructivo y lista de partes para proveer el modelo, nombre de parte o el número de fábrica: 866-942-5362 Hora estándar del Pacífico: 8:30 a.m.
- Page 14 Lista de partes y material de ferretería Por favor lea completamente las instrucciones y verifique que estén todas las partes antes de iniciar el ensamblado. A- Pata izquierda frontal (Cant. 1) B- Pata derecha frontal (Cant. 1) C- Pata izquierda posterior (Cant. 1) D- Pata derecha posterior (Cant.
- Page 15 Instructivo de ensamble Perno de 1/4" x 5/8” usados en este paso ① NOTA: Por favor siga las instrucciones para asegurar de que la cama sea segura y robusta. No apretar completamente los pernos hasta que todos los rieles estén adjuntados 1.
- Page 16 Instructivo de ensamble Perno de 1/4" x 5/8” usados en este paso ① Arandela de plástico Perno de 1/4" x 2-1/2” usados en este paso usados en este paso ③ ⑤ 3. Alinear y adjuntar el ensamble del respaldo soporte (J) entre el soporte posterior (K) y las patas posteriores (C y D) con 4 pernos de 2-1/2”...
- Page 17 Instructivo de ensamble Perno de 1/4" x 5/8” usados en este paso ① 5. Encajar un brazo lateral (H) en la pata izquierda frontal (A) y sujetar en su lugar con un perno de 5/8” (1). 6. Repetir el mismo procedimiento para combinar el otro brazo lateral (H) y la pata derecha frontal (B).
- Page 18 Instructivo de ensamble Perno de 1/4" x 5/8” usados en este paso ① 7. Sujetar los soportes laterales (E y F) al ensamble previo con 2 pernos de 5/8” (1) en cada uno.
- Page 19 Instructivo de ensamble Perno de 1/4" x 5/8” Perno de 1/4" x 2-1/2” usados en este paso usados en este paso ③ ① 8. Adjuntar los brazos laterales ensamblados (H) al soporte posterior (K) con 2 pernos de 2-1/2” (3). 9.
- Page 20 Instructivo de ensamble Perno de 1/4" x 5/8” usados en este paso ① 10. Adjuntar el otro riel lateral del colchón (I) entre las patas frontales (A y B) con 4 pernos de 5/8” (1).
- Page 21 Instructivo de ensamble Perno de 1/4" x 1/2” usados en este paso ④ 11. Alinear y adjuntar los paneles laterales (G) a los resguardos de metal en las patas (A, B, C y D) con los pernos de 1/2” (1).
- Page 22 Instructivo de ensamble Perno de 1/4" x 5/8” Perno de 1/4" x 1-1/4” usados en este paso usados en este paso ② ① 12. Adjuntar la pata soporte (N) a la parte media de la tablilla de soporte del colchón (M) con un perno de 1-1/4”...
- Page 23 Mantenimiento y Cuidados Para limpieza diaria, superficies de cromo, de cobre, de aluminio, y de metal pintados se pueden mantener viéndose bien limpiando con un patio de algodón suave y húmedo o con un cepillo de aspiradora. Si mojado, limpiar con una esponja limpia o con un paño sacada del agua. Secar con un paño o un papel de cocina para evitar puntos causados por agua.
Need help?
Do you have a question about the New Industrial Daybed and is the answer not in the manual?
Questions and answers