Table of Contents
Advertisement
Quick Links
Advertisement
Table of Contents

Related Manuals for Aim GPS05


Summary of Contents for Aim GPS05
- Page 1 GPS05 Module USER MANUAL...
- Page 2 We suggest to periodically check on www.aim-sportline.com new releases of software and/or firmware for GPS05 Module or for the loggers it can be connected to. Before connecting GPS05 Module to any AIM logger please make sure the firmware has been updated.
-
Page 3: Table Of Contents
4.1.1 – Connection with internal power ..................11 4.1.2 – Connection with external power (recommended) ............. 12 4.1.3 – Connection on MyChron4 eBox with AIM Data Hub and external power ......13 4.2 – Installation on the vehicle ..................... 14 ... -
Page 4: Gps05 Module
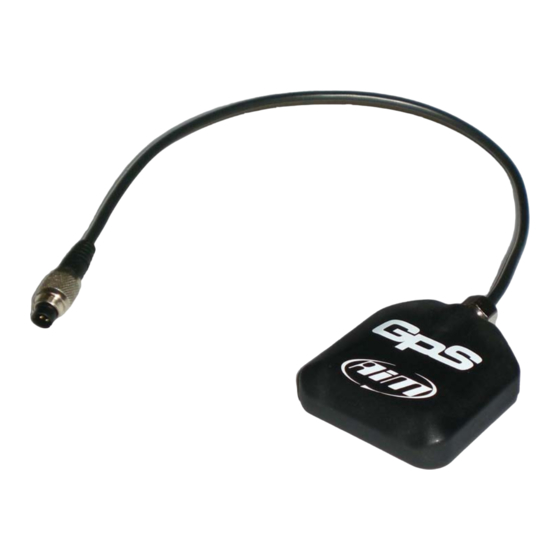
User manual Release 1.01 1 – GPS05 Module The newest GPS05 Module is faster in satellite signal acquisition and more reliable in adverse situations: it includes in a single unit both receiver and antenna, making installation even easier. Lightweight and waterproof, GPS05 Module is connectable to AIM loggers via CAN cable. -
Page 5: Gps05 Module And Mxl
2.1 – Connection and Power The figure above shows a CAN network made of MXL Pista and GPS05 Module. To connect MXL Pista to GPS05 Module use the 5 pins connector mounted on the logger back side as shown below. -
Page 6: Connection With Additional Peripherals
Peripherals can be connected to Data Hub using one of the 4 CAN inputs. The CAN network can be further increased using the same logic. To connect MXL Pista to GPS05 Module use the 5 pins connector mounted on the logger back side as shown below. -
Page 7: Installation On The Vehicle
For a proper working of GPS05 Module, please pay attention while installing it on the vehicle. Install GPS05 Module far from heat sources and let the antenna cable pass as far as possible from electromagnetic sources like coil or alternator. -
Page 8: Configuration Wizard
It is suggested to switch on the system a few minutes before entering the track. 2.5 – GPS Laptimer GPS05 Module is now available with a new and very useful feature: lap timing. It allows to show and record lap/split times without installing any beacon receiver nor transmitters. -
Page 9: How To Set Gps Beacons
User manual Release 1.01 2.5.2 – How to set GPS beacons Here follow the steps to set start/finish line and splits position of GPS05 Module: • ensure GPS05 Module is correctly connected to MXL • press “MENU” button on MXL keyboard. -
Page 10: Additional Functions
Release 1.01 2.5.3 – Additional functions GPS05 Module can record up to 50 track configurations with up to 5 splits for each track. Once the number of 50 tracks reached it is necessary to download data on a PC to manage more tracks. Once saved, the circuit is automatically recognised when entering that track with that GPS05 Module connected to MXL. -
Page 11: Gps05 Module And Evo3
3.2 – Installation on the vehicle GPS05 Module installation on the vehicle with EVO3 is the same as MXL one. For a proper working of GPS05 Module, pay attention while installing it on the vehicle. -
Page 12: Gps05 Module And Mychron4
The figure above shows a CAN network powered by MyChron4 internal batteries: this powering reduces network autonomy, valuable in around two hours recording time. To connect GPS05 Module to MyChron4 use the 5 pins back connector labelled as EXP shown here below. www.aim-sportline.com... -
Page 13: Connection With External Power (Recommended)
The figure below shows a CAN network where GPS05 Module and MyChron4 are externally powered (assuming a 12 volts battery is available on TAG kart). To connect GPS05 Module to MyChron4 use the 5 pins back connector labelled as EXP shown here below. -
Page 14: Connection On Mychron4 Ebox With Aim Data Hub And External Power
GPS05 Module. The all network is externally powered. It is recommended to leave MyChron4 and eBox internal batteries at their place. To connect GPS05 Module to MyChron4 use the 5 pins back connector labelled as EXP shown here below. www.aim-sportline.com... -
Page 15: Installation On The Vehicle
Release 1.01 4.2 – Installation on the vehicle For GPS05 Module to work properly, pay attention while installing it on the vehicle. The GPS antenna has to be parallel to the ground to have a wider angle of view to the sky and to receive the maximum number of satellites correctly connected to the system: we would suggest to install it on the front number plate (see the photo below). -
Page 16: The Gps Lap Timer
Selecting “GPS Laptimer” it is possible to leave the optical/magnetic receiver connected and the system will automatically disable it when GPS05 Module with lap timer function is connected. If – for any reason – GPS05 Module is disconnected from the logger, the system will automatically switch to “Type: magnetic/Optical”. www.aim-sportline.com... -
Page 17: Setting Gps Laptimer
4.4.2 – Setting GPS Laptimer Once MyChron4 is correctly configured it is necessary to go on the track to set lap and split positions giving correct instructions to the GPS05 Module. This allows it to get beacons. Warning: this operation is required the first time entering the track and only once for each track. -
Page 18: Additional Features And Equivalent Circuits Management
4.4.3 – Additional features and equivalent circuits management GPS05 Module can record up to 50 track configurations with up to 5 splits for each track. Once the number of 50 tracks reached it is necessary to download data on a PC to manage more tracks. - Page 19 GPS05 Module User manual Release 1.01 Pressing “>>/OFF” button this window appears: Use MENU/>> and “<</OFF” buttons to scroll the list and “MEM/OK” button to select a track. The system informs that the track has been selected with the symbol “►►”...
-
Page 20: Troubleshooting
GPS05 Module User manual Release 1.01 4.4.4 – Troubleshooting If the screen shows: "Bad Setting, please Restart": the beacon setting procedure did not end correctly and needs to be restarted. Press “ON/VIEW” button and restart the procedure. If the screen shows: "GPS LapTimer Initializing": simply wait a few seconds. -
Page 21: Mychron4: Data Visualisation
GPS05 Module User manual Release 1.01 4.5 – MyChron4: Data visualisation When GPS05 Module is connected to MyChron4, switching the logger on GPS05 Module recognition window appears. • MyChron4, eBox Gold and GPS Firmware versions • EU = European version; USA = American Version 4.5.1 –... -
Page 22: Gps Manager Software
5.1 – Typical use of GPS Manager Typical use of GPS Manager software implies going on the track with GPS05 Module connected to AIM logger and setting lap and splits (if configured). Afterwards GPS05 Module can record lap and split times of the track forever. -
Page 23: Gps05 Module Data Analysis
GPS05 Module User manual Release 1.01 6 – GPS05 Module data analysis Opening a test containing GPS data with Race Studio Analysis software some additional channels are shown: • GPS Speed; • GPS Nsat; • GPS LatAcc; • GPS LonAcc;... - Page 24 GPS05 Module User manual Release 1.01 The same function can be activated through the proper icon on the toolbar. To modify graph and shown channels settings it is necessary to activate “Color Channel settings” window. This can be done in three ways: •...
-
Page 25: Settings Gps Channels Graphic View
GPS05 Module User manual Release 1.01 6.1 – Settings GPS channels graphic view The image below shows “Colour Channel Settings” window. This window allows the user to set the visualization of GPS data on the graph. It is made up of various parts, explained here below. - Page 26 GPS05 Module User manual Release 1.01 Selecting Bands visualisation it is necessary to set some parameters that will make the software show GPS data using bands and with no colour gradients. The first operation to perform is choosing number of Bands (1) – accepted values from 3 to 10 –...
- Page 27 GPS05 Module User manual Release 1.01 The images below show a situation where only values lower than the min one are shown. Max values band (first row in the right box) shows only the range of values between the penultimate band value and max value and values higher than the max one are hidden in the map (parts yellow circled in the figure below);...
-
Page 28: Race Studio Analysis Software - Other Functions
GPS05 Module User manual Release 1.01 “Decimal figures” panel, shown below, allows to set the number of decimal figures to show for the selected channel. 6.2 – Race Studio Analysis software – Other functions Positioning the mouse on the trajectory, the punctual value of the measure in that point is shown. - Page 29 GPS05 Module User manual Release 1.01 To better compare more laps it is suggested to enable “Per Lap” colour checkbox shown below in software Measures bar. It gives a colour to each lap. Like in measures graphs, in GPS data analysis too, it is possible to zoom in and out the graph to better analyze a point of the track;...
- Page 30 GPS05 Module User manual Release 1.01 It is also possible to rotate the map along the three axes keeping mouse right button pressed and mouse pointer on the track view. The map is created in three dimensions and it is thereby possible to show it laterally to detect altimetric variations.
- Page 31 GPS05 Module User manual Release 1.01 To better analyse the track it is possible to show a grid using the related icon placed on the toolbar. Grid settings can be modified following this path GPS ► Grid Settings. Another usefull function is the possibility of creating an export file for Google Earth®...
-
Page 32: Appendix - Pinout
GPS05 Module User manual Release 1.01 Appendix – Pinout N. rev. / Rev. N. Descrizione / Description Data / Date Firma / Signature Contr. da / Ckd. by GPS05 Module pinout CAN BUS CAN BUS CAN BUS CAN+ CAN- n.c. Q.tà/Q.ty Rif.
Need help?
Do you have a question about the GPS05 and is the answer not in the manual?
Questions and answers