EVBox Elvi Installation Manual
Hide thumbs
Also See for Elvi:
- User manual (150 pages) ,
- Installation and user manual (38 pages) ,
- Installation manual (30 pages)
Table of Contents
Advertisement
Quick Links
Advertisement
Table of Contents

Related Manuals for EVBox Elvi


Summary of Contents for EVBox Elvi
- Page 1 Elvi installation manual...
- Page 2 I’m home! Let’s get started.
- Page 3 Elvi installation manual...
-
Page 4: Table Of Contents
1. unpack Elvi 2. install wall dock 3. install charging cable 4. install station 5. activate Elvi 6. install cable dock (optional) 7. switch charging cable (optional) 8. charge with Elvi 9. troubleshooting 10. warranty 11. declaration of conformity... -
Page 5: Safety Precautions 1
Amperage rating of the applied protective device (MCB), the installer / user should change the station settings in the Hey EVBox app or via hey.evbox.com. This will be signaled by a warning in the app. Installation or modification of the service panel should always be performed by a qualified electrician. -
Page 6: Components And Features
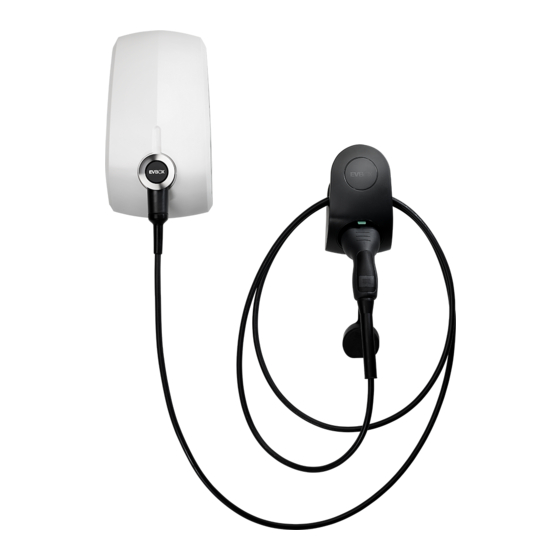
3.7kW up to 22kW. The cable dock (sold separately, part. No.290135) secures the cable in its position when Elvi is not in use. Note: Make sure to select a charging cable/plug that is compatible with your car. - Page 7 Cable dock D 161 m W 186 (sold separately) D94mm W122mm Dimensions Components Wall dock Station Cable dock (sold separately) Cable dock Wall base Charging plug (type 2 in Charging example) cable Cable dock Front cover Cable dock Cable dock Keys Plug holder Plug holder...
-
Page 8: Unpack Elvi
1. unpack Elvi Place Elvi’s package on a flat & stable surface. Remove sleeve. Set the boxes aside. Box 1 contains the charging station Box 2 contains the charging cable Open the charging station box. Put the instructions folder aside. - Page 9 1. unpack Elvi Wall dock already installed? Go to next page Go to page 11...
-
Page 10: Install Wall Dock
Make sure the power line you’re using is switched off on your service panel. Make sure that the power line to Elvi is installed on a dedicated circuit breaker on your service panel, which is protected by an adequate RCD. MCB must be in line with the capacity of the charging cable (3.7, 7.4, 11, 22 kW). - Page 11 2. install wall dock Select a solid and flat vertical surface to install the wall dock. The surface must be able to carry a vertical load of 20 kg. At the bottom of the box’s sleeve, you’ll find a drilling template. Cut the drilling template from the sleeve.
- Page 12 2. install wall dock Cut off the right diameter of the rubber seal to allow the power cable and optional data cables to come in. Note: Strain release and rubber seal are supplied in a separate bag in the box. x mm Feed the power line and optional data wiring through the seal.
- Page 13 Tighten the bolts with T20 bit. Do not over-tighten the bolts. Special bolt on the bottom right corner. To seal the installation with a temper evident seal, use a regular flat head screw driver. Note: Installation example of a 1-phase connection of Elvi.
-
Page 14: Install Charging Cable
Take the cable out of the box and plug it in to the station. When plugging in the charging cable, properly support Elvi and the four snap fits on the back of Elvi. Check if the seal on the plug is present before inserting the plug. -
Page 15: Install Station
CLICK Switch on the power to the station on the service panel. Elvi will switch on automatically. This is indicated by a blinking red LED ring. -
Page 16: Activate Elvi
Start and stop every charging session by holding your charge card / key fob in front of Elvi. Your charge card / key fob tracks and registers all your charging sessions in your Hey EVBox account. Alternatively, you can simply unplug your car from the charging station to stop your charging session. -
Page 17: Install Cable Dock (Optional)
6x70mm Bit T30 plug 8x65mm pencil 8mm drill The Elvi Cable Dock is sold separately, part. No.290135. Unpack your Elvi cable dock. De-assemble the cable management system by loosening the Torx bolt with the T30 bit. Place the cable dock’s wall base on a solid and flat surface. - Page 18 Place the cable dock’s wall baseon the wall and fasten the screws. Do not overtighten. The Elvi cable dock (290135) is supplied with a plug holder for Type 1 and Type 2 charging plugs. Insert the right charge plug holder for your situation into your cable dock (Type 1 or Type 2).
-
Page 19: Switch Charging Cable (Optional)
7. switch charging cable Tools you need to switch the cable Bit T30 Make sure your Elvi is powered off on the service panel, the LED ring in the charging plug should be off. Remove the keys from the folder in the box. - Page 20 Elvi can release (3.7, 7.4, 11 or 22 kW). Switch on the power to Elvi. Check with your installer if the selected output power from your Elvi can be supported by your local electrical installation.
-
Page 21: Charge With Elvi
1. Hold your charge card (RFID Card) in front of the reader, marked with icon. 2. Elvi reacts with a beep. This means that your charge card / keyfob is being authorized. Elvi’s LED ring turns green when it stops charging. -
Page 22: Troubleshooting
The LED ring should be on. • Turn the charging station off. Turn it on again after 20 seconds, by flipping the circuit breaker or main switch to Elvi. Residual current • Grounding error in the Contact your service device prevents... - Page 23 Elvi. Reconnect again. (check by user) • If your Elvi is equipped with the optional UMTS module, check if Elvi is in contact with the local cellular network and if it has prop- er reception. (check by charging point operator)
-
Page 24: Warranty
If Customer detects any damage / defect / shortcoming to the Product he must notify, within a reasonable time and in any event within ten (10) days, EVBox under statement of all possible details of the defect, the defect or malfunction via info@EVBox.com and / or +31 88 77 55 444. -
Page 25: Declaration Of Conformity
NL registration KvK 32165082_000018683428 Pedro de Medinalaan 31, 1086XP Amsterdam, The Netherlands declares under its’ sole responsibility that the following products: • Article series E1160-XX50XX: EVBox Charging station, 1-phase 16A with charge cable • Article series E1320-XX50XX: EVBox Charging station, 1-phase 32A with charge cable •... - Page 26 The present document is drawn up by way of information only and does not constitute an offer binding upon EVBox. EVBox has compiled the contents of this document to the best of its knowledge. No express or implied warranty is given for the completeness, accuracy, reliability or fitness for particular purpose of its content and the products and services presented therein.
- Page 27 I’m all set! Let’s charge.
- Page 28 Article number: 999481 EVBIM_082017 © EVBox B.V.
Need help?
Do you have a question about the Elvi and is the answer not in the manual?
Questions and answers