Table of Contents
Advertisement
Quick Links
Advertisement
Table of Contents

Subscribe to Our Youtube Channel
Related Manuals for Leviton NorthStar Site Controller


Summary of Contents for Leviton NorthStar Site Controller
- Page 1 NorthStar Site Controller Cat. No OC00G User Guide PK-A3253-10-00-5A...
-
Page 3: Table Of Contents
2.3.3 Create and Import a .CSV file ..........2.3.4 Enter Everything Manually ..........2.4 The NorthStar Site Controller ............. 2.4.1 Buttons on the NorthStar Site Controller ......2.4.2 Setting Up the NorthStar Site Controller ......2.5 Establishing a Connection to the Site Controller ...... - Page 4 TABLE OF CONTENTS 4.6.4 Adding Wireless Switches ..........4.6.5 Discovering Unconfigured Devices ........4.7 Controlling Colored Lights ............4.8 Configuring a Five Button Switch ..........4.9 HTTPS and Installing a Signed Security Certificate ....5 Operations .................... 5.1 Activating, Deactivating, and Dimming Lights ......5.2 Invoking a Scene on a Preconfigured Set of Zones ....
- Page 5 7.3.6 Editing a Scene ..............7.3.7 Deleting a Scene ..............7.4 Configuring Ethernet Settings ............. 7.5 Updating the NorthStar Site Controller ........7.6 Rebooting the Site Controller ............7.7 Backing Up and Restoring a System Configuration ....7.8 Factory Resetting a Stie Controller ..........
- Page 6 WARNING: • TO AVOID FIRE, SHOCK, OR DEATH: TURN OFF POWER at the circuit breaker or fuse and test that power is off before wiring! • RISK OF ELECTRIC SHOCK: more than one disconnect switch may be required to de-energize equipment before servicing. •...
-
Page 7: Introduction
The installation consists of a number of lights that are controlled by Lighting Controllers such as the Leviton OCF01. A Lighting Controller can switch a light off or on, or dim it to a specified level. When sensors are added to the system, lights is triggered by a variety events including motion, a lack of motion, light levels, and user activated switches. -
Page 8: Supported Lighting Controllers
INTRODUCTION Supported Lighting Controllers NorthStar works with the following Leviton outdoor controllers. Lighting Controllers Number Description Features OC00G-00G NorthStar Site Controller Externally mounted 3dBi antennas and external power supply. OC00G-ENC IP67 rated enclosure Externally mounted 3dBi antennas and internal power supply for Northstar Site Controller. -
Page 9: Installation And Initial Setup
• (Optional) sensors and switches Lighting System Configuration Overview A NorthStar lighting solution consists of a NorthStar Site Controller, lights equipped with Leviton light controllers, and potentially sensors and/or switches. The NorthStar Site Controller serves as the communications and control hub for managing the lights that make up the lighting solution. -
Page 10: Methods For New Installations
Controller Type, MAC address, and location of each NorthStar device before it's placed in a permanent home. It's also possible, and easiest, to use the Leviton Lighting Installer app to scan these devices as they're being physically installed. -
Page 11: The Northstar Site Controller
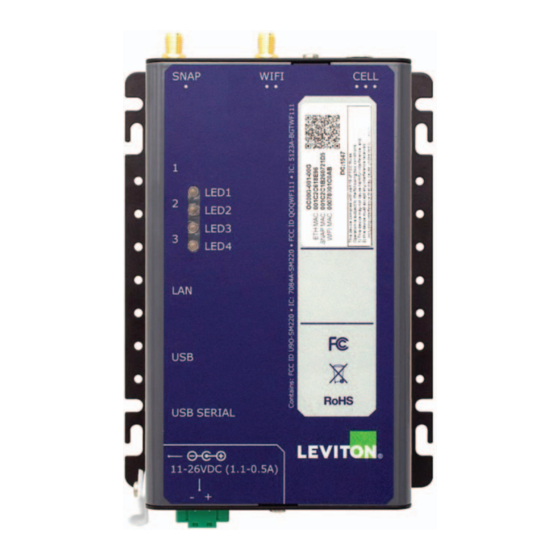
3. Plug the provided power supply into the barrel connector and then into an 110VAC outlet. When the NorthStar Site Controller powers up, orange LEDs will light up for approximately 30 seconds while the site controller software starts up. Once this is complete, the orange LEDs will turn off and the site controller will be ready to use. -
Page 12: Establishing A Connection To The Site Controller
2.5.1 Accessing the Site Controller The NorthStar Site Controller supports connections via LAN (Ethernet) and WI-FI. The NorthStar Site Controller serves as the access point and broadcasts a Wi-Fi SSID over the air. During installation the Wi-Fi connection is used to establish communications between the controller and a browser based device such as a computer or tablet. -
Page 13: Logging In
"Proceed to 192.168.55.1 (unsafe)" link. (This warning is displayed because the site controller is using an unsigned security certificate.) The NorthStar login page should now appear in your browser and present you with the login screen for the NorthStar site controller. Enter the following username: Username: snap For site controllers manufactured prior to NorthStar 4.0, the password will be qwerty. - Page 14 INSTALLATON AND SETUP The NorthStar Site Controller may also be connected to a wired LAN network and accessed via the LAN. The LAN must be configured with a DHCP server to provide an IP address to the site controller when it is connected. To use this method of connection, you must identify the IP address the DHCP server provided to the site controller.
-
Page 15: Navigating The User Interface
NAVIGATING THE USER INTERFACE To access the NorthStar User Interface, enter the IP address for your NorthStar site controller into the address bar of a web browser. You will be prompted to enter a username and password for access. The Dashboard The dashboard provides an overview of the components that make up your NorthStar system. - Page 16 NAVIGATING THE USER INTERFACE Content Area The Content Area contains the active interface screen. The Content area changes depending on what you select in the other control areas. Title Bar The Title Bar is always present at the top of the screen, and displays active alarms and user information in the upper right corner The Alarms Button Clicking the Alarms button will load the Alarms page.
- Page 17 NAVIGATING THE USER INTERFACE Left Menu Bar The Left Menu Bar is the main interaction point within the NorthStar user interface, and it consists of the following menu choices: Dashboard Clicking the Dashboard menu choice displays a brief summary of your lighting system.
-
Page 18: Devices Page
NAVIGATING THE USER INTERFACE Config Clicking the Config menu choice displays general system information and allows configuration of all system settings. Audit Log Clicking the Audit Log menu choice will activate the audit log screen, which provides a listing of all events and errors that have occurred in the NorthStar system. The log is searched and filtered via the Filter Audit Log menu choice at the top of the screen. - Page 19 NAVIGATING THE USER INTERFACE The Zone Panel The expanded zone box provides detailed information about the zone, and the lights and sensors that make up the zone. A number of tasks is accomplished from the zone panel. Controlling all Lights within a Zone Grouping lights into a zone gives you the option of turning the lights on and off, or changing their brightness levels, directly from the zone panel.
-
Page 20: Understanding Zones, Behaviors, And Scenes
NAVIGATING THE USER INTERFACE Searching for a specific light or sensor The zone panel provides a search feature for quickly narrowing the list of devices. Just type in the first few characters of the light or sensor name and names matching the characters will be moved to the top of the list. - Page 21 NAVIGATING THE USER INTERFACE EXAMPLE: You might use a motion sensor to control the lights in a seldom used warehouse. As someone opened the door, the sensor would notify the NorthStar lighting system of movement and the system would respond by invoking a behavior to turn the lights on.
-
Page 22: Configuration
CONFIGURATION Basic Site Configuration After establishing connectivity to the site controller, the following steps should be taken to initially configure the system for lighting control. 4.1.1 Configuring the Site Controller’s Location The location of your NorthStar installation determines the proper sunrise and sunset times for automated systems, determines if and when daylight savings time is applied to the system, and helps provide accurate positioning on map views. -
Page 23: Enabling Or Disabling Offline Maps
CONFIGURATION 4.1.2 Enabling or Disabling Offline Maps If your site controller is connected to the internet via a LAN connection, entering the location will prompt the Map page to display the site controller's location on a map overlay. If the site controller will not have continuous internet access, you should enable the offline map by clicking the Enable toggle under the Offline Map heading, and then clicking the Enable Offline Maps button. -
Page 24: Set And Encrypt The Snap Communications Channel
NorthStar uses a SNAP RF network for lighting control, and proper precautions will help ensure reliable service. For maximum reliability and security, Leviton recommends you change and encrypt the default SNAP channel and network ID. -
Page 25: Changing Wi-Fi Settings
CONFIGURATION Changing Wi-Fi Settings A NorthStar site controller is assigned an SSID at the factory, but this is confusing in installations that have multiple site controllers. For safety and ease of use, Leviton recommends that you change the SSID and Key for your site controller as soon as is reasonable. -
Page 26: Adding Zones
CONFIGURATION 4.5.1 Adding Zones Each zone is defined by its Zone Name. To add a new zone: 1. In the navigation menu, click the Lights and Sensors menu item in the Devices sub-menu, then click the + Add Zone button. 2. -
Page 27: Information Fields For Lights And Sensors
CONFIGURATION 4.6.1 Information Fields for Lights and Sensors Each light and sensor has a number of descriptive fields that define it and make it unique from other lights or sensors. NorthStar Light Fields Name Description Name* The user defined name of the light. SNAP Address* The 6 digit SNAP Address for the light, in hex format. - Page 28 CONFIGURATION Sensor Fields are similar to Lighting fields, with only a few minor exceptions. NorthStar Sensor Fields Name Description Name* The user defined name of the sensor. Sensor Type* The function of the sensor. Acceptable types are Motion, Photocell, Switch (Pushbut- ton), and Switch (Toggle).
-
Page 29: Adding Lights
CONFIGURATION 4.6.2 Adding Lights To manually add a light, click the Lights and Sensors menu item under Devices in the navigation menu. NOTE: If you are using the Lighting Installer app, this information will be provided within the app. NOTE: If you are adding a new light or sensor to an existing NorthStar installation, you'll first need to change the installation's channel, network ID, and encryption settings back to their default values. -
Page 30: Adding Sensors
CONFIGURATION Each light is added individually by invoking this dialog. When all lights are entered, NorthStar will verify your lighting controller(s) software is up-to-date, and update the controller(s) if necessary. NorthStar will then be ready to control your lighting system. After a light is entered it is controlled from the Lights and Zones page. - Page 31 CONFIGURATION At this point you'll need to configure how the sensor will control your lighting. A sensor can control lights at the zone or scene level. To use a sensor for control via zones: 1. Click the Edit Zone button within the zone panel where you placed your sensor. 2.
-
Page 32: Adding Wireless Switches
CONFIGURATION Name Activity Photocell and Lights within the Zone are switched off during the day. At night, the lights will be switched Occupancy on when motion is detected. When motion is no longer detected, the lights will be transi- tioned as described under "Occupancy-only" control. Photocell and This behavior is much like the switch-only behavior, but the lights can only be switched on Switch... -
Page 33: Discovering Unconfigured Devices
CONFIGURATION 4.6.5 Discovering Unconfigured Devices NOTE: Before proceeding, make sure all of your lighting controllers are properly installed and power is applied. To access the Census Page, click the Census menu item under Devices in the navigation menu. From there, you can start a "census" of the unconfigured NorthStar devices with your network settings. -
Page 34: Controlling Colored Lights
CONFIGURATION Controlling Colored Lights NorthStar supports multicolored LEDs as well as standard LED lighting, and color is configured by zone. To define color settings for a zone: 1. From the Devices page, expand the zone that you wish to configured and click the Edit Zone button within the zone panel. -
Page 35: Https And Installing A Signed Security Certificate
If this certificate is not present, the browser will issue a warning that your session with the NorthStar site controller is not private, and attackers might be attempting to steal your information. -
Page 36: Operations
OPERATIONS NorthStar is typically installed in environments where it is programmed once and set to run autonomously with very little interaction. However, it does allow active control of lighting via the user interface. Activating, Deactivating, and Dimming Lights From time to time you may have a need to manually activate or deactivate a light or zone of lights. -
Page 37: Viewing The Status Of A Light Or Site Controller
OPERATIONS Viewing the Status of a Light or Site Controlles You can determine if a given light is on or off using the NorthStar map. To do this, access the Map content area by clicking the Map button in the left menu bar. This will display a map of your NorthStar location along with icons for the configured lights and site controllers. -
Page 38: Viewing Power Consumption Of A Light
OPERATIONS Viewing Power Consumption of a Light Lights equipped with power monitoring enabled controllers maintain an active record of the power consumed by lights attached to the controller. This information is presented in the Light Details page which is accessed by finding the light's corresponding panel and clicking the Details button. -
Page 39: Adding A Custom Floor Plan To The Map
OPERATIONS For installations where an active internet connection won't be available, you can still download a map and store it on the controller and get the same effect. For more information on how to do this, see Enabling or Disabling Offline Maps on page 22. The Map view is locked and unlocked using the Lock/Unlock button at the top of the screen. -
Page 40: Optimizing Control
OPTIMIZING CONTROL The real power of a lighting control system is achieved through events and alarms. Events provide detailed control of your lighting system to ensure that lights are on and properly bright when they're needed, and off when they're not. Alarms give you detailed insight into how your system is running and if anything has gone wrong. -
Page 41: Adding A Scheduled Event
OPTIMIZING CONTROL 6.1.1 Adding a Scheduled Event Events are scheduled times for lights or zones to be switched on, off, or dimmed. Events are entered up to five years in advance, and up to one year of prior events can be viewed. NOTE: Events over five years in the future can be entered, but the functionality has only been tested to the five year mark. -
Page 42: Editing An Event
An alarm is a system generated warning that something unexpected has occurred. The NorthStar site controller initiates a polling cycle of all lighting in the system once every 15 minutes. This polling cycle verifies that all light controllers are responding to wireless communications. - Page 43 OPTIMIZING CONTROL 6.2.1 Possible Warnign Signs When a Warning is generated, it will list a type for the warning type and a description. Possible warnings are divided into two categories: General Alarms Warning Description Triggered by Authentication A server login attempt has failed. A user attempted to login with an invalid Failure password.
-
Page 44: Clearing Alarms
OPTIMIZING CONTROL Warning Description Triggered by Script Failure A light type's script could not be loaded A site controller attempted to read light scripts into the gateway. and found a problem. Time Change Changing the system time was The system time could not be updated. Failure unsuccessful. - Page 45 OPTIMIZING CONTROL Parameter Description MCU Temperature (degrees C) Measures temperature at the microcontroller Peak IC Temperature (degrees C) Records the highest temperature the IC has reached. Peak RMS Current (A) Records the highest RMS current reached Power Factor Measures the power factor RMS Current (A) Measures the root mean square current for the lighting controller...
-
Page 46: Email Alerts
OPTIMIZING CONTROL Email Alerts The NorthStar site controller is configured to send email notifications when alarms are generated within the system. This can help responsible persons know immediately whenever something has occurred that might need their attention. This service must be enabled and a list of persons who will receive the alerts must be configured before Email alerts can be used. -
Page 47: Administration
ADMINISTRATION NorthStar is designed to require very little maintenance, but from time to time you may need to reconfigure the system as your needs evolve. NorthStar User Accounts The NorthStar software supports multiple user accounts to provide you greater security and flexibility within your NorthStar installation. 7.1.1 The Accounts Management Page All user account management is performed from the Accounts Management page. -
Page 48: Changing A User Account Password
ADMINISTRATION 7.1.3 Changing a User Account Password Any user with a user role above Scene Control can change their own password, and users with the Admin user role can change the password for any user account. This is all accomplished via the Accounts Management page which is accessed by clicking the user name in the upper right corner of the Title Bar, and then clicking the Accounts Management drop-down menu selection. -
Page 49: Deleting A User Account
ADMINISTRATION 7.1.5 Deleting a User Account User accounts can only be deleted by a user with the Admin user role, and are deleted from the Accounts Management page. To delete a user account: 1. Click the account user name in the upper right corner of the Title Bar, then click the Accounts Management drop-down menu selection. -
Page 50: Working With Lights, Sensors, Zones, And Scenes
ADMINISTRATION Working with Lights, Sensors, Zones, and Scenes 7.3.1 Editing a Light or Sensor Setting To edit a light or sensor, find it within its corresponding zone panel, and click the Edit button on the right side of the panel. NOTE: Using the search field provides an efficient way of finding the specific light or zone of interest. -
Page 51: Editing Zone Settings
ADMINISTRATION 7.3.3 Editing Zone Settings To edit a Zone's settings, select the zone and click the appropriate option (Manage Lights / Apply Behavior / Edit Zone Name / Delete Zone) from the bottom of the zone window. 7.3.4 Adding Lights to Zones A light can belong to multiple zones and will be affected by each command issued to any zone the light is a member of. -
Page 52: Deleting A Zone
ADMINISTRATION 7.3.5 Deleting a Zone You can delete a zone by clicking the Devices / Lights and Sensors menu choice in the left menu panel, and then selecting the zone you wish to delete. When the Edit Zone window appears, click the Delete Zone button in the upper right of the screen and then click the Delete Zone option at the bottom of the zone window. -
Page 53: Configuring Ethernet Settings
ADMINISTRATION Configuring Ethernet Settings If the NorthStar site controller is using the Ethernet port for connectivity, you can configure it to use a static IP address, or a DHCP-assigned address, test Ethernet connectivity, and view Ethernet network information via the Ethernet Settings tab within the Config menu. -
Page 54: Updating The Northstar Site Controller
Updating the NorthStar Site Controller The NorthStar hardware and application are continually evolving. From time to time Leviton will make new versions available. When this occurs, you'll want to update your site controller to take advantage of the newest functionality. This is accomplished using a NorthStar update drive available from Leviton, or via a downloaded file and the System Upgrade button within the Backup/Restore tab. -
Page 55: Rebooting The Site Controller
ADMINISTRATION To update the NorthStar site controller using the System Upgrade button: 1. Log in to the site controller you wish to update, then click Config - Backup/ Restore to open the Backup/Restore tab. 2. Verify you have a current backup of your system. For more information on backing up the system, see Backing up and restoring a system configuration on... -
Page 56: Backing Up And Restoring A System Configuration
ADMINISTRATION Backing up and restoring a system configuration Once you've configured your NorthStar installation to your liking, Leviton recommends you backup the configuration as soon as possible to allow for later restoration should the need arise. It's also advisable you perform a backup before performing a System Upgrade or Factory Reset, all of which is accomplished from the Backup/Restore tab in the Config screen... -
Page 57: Factory Resetting A Stie Controller
To factory reset a NorthStar site controller using the side buttons: 1. Push and hold button 1 on the side of the NorthStar site controller. 2. The bottom LED (LED 3) will glow amber for 2 seconds, during which the unit will return to factory defaults. -
Page 58: Viewing System Informaiton
ADMINISTRATION Viewing System Information The System Info tab provides the network and version details for your NorthStar installation including connection addresses, device type, and software version. The System Info tab is accessed by clicking the Config menu item in the left menu bar, then clicking the System option from the configuration window. - Page 59 ADMINISTRATION 7.13 Importing and Exporting Light Configurations using a CSV File When you've configured all of your lighting equipment, you should immediately back up the light configurations to a CSV file should you ever need to restore them. The ability to import and export CSV files can also be helpful when you need to make a large number of changes to the lighting configuration.
-
Page 60: Appendix A: Making The Most Of Lighting Controls
APPENDIX A: MAKING THE MOST OF LIGHTING CONTROLS The savings that are realized by a switch from traditional lighting sources to LEDs are so impressive that it's easy to be satisfied with just that. However, the most energy efficient lighting solutions are the ones that are only on when they're needed. NorthStar provides a number of efficiency options that aren't possible with traditional photocell and motion switches that only provide on and off settings. -
Page 61: Appendix B: Using Census For Site Commissioning
APPENDIX B: USING CENSUS FOR SITE COMMISSIONING If you're commissioning a site and you have a number of installed lighting controllers but you're unsure of their addressing, the Census button is a great way to get them added to your NorthStar installation. NOTE: The site controller's network settings must be set to their defaults. -
Page 62: Appendix C: Site Configuration Using A Csv File
APPENDIX C: SITE CONFIGURATION USING A CSV FILE If the Lighting Installer app isn't an option for you, the next most efficient means of site configuration is a comma separated value (CSV) file. NorthStar can export an existing lighting setup to CSV, which you then edit in a spreadsheet or text editor. Once new lights are added in, you can import the CSV file with the new lights added. - Page 63 Leviton warrants to the original consumer purchaser and not for the benefit of anyone else that this product at the time of its sale by Leviton is free of defects in materials and workmanship under normal and proper use for two years from the purchase date. Leviton’s only obligation is to correct such defects by repair or replacement, at its option.
- Page 64 7.9 inches (20 cm) between the radiator and your body. Also, must not be co-located or operated in conjunction with any other antenna or transmitter. Copyright © 2018 by Leviton Leviton and EMH+ are trademarks of Leviton. Other brand and product names are trademarks or registered trademarks of their respective holders. TRADEMARK DISCLAIMER:...
Need help?
Do you have a question about the NorthStar Site Controller and is the answer not in the manual?
Questions and answers