Table of Contents
Advertisement
Quick Links
Advertisement
Table of Contents

Related Manuals for Daymak C5 Blast Go Kart


Summary of Contents for Daymak C5 Blast Go Kart
- Page 1 C5 Blast Go Kart User Manual...
-
Page 2: About Daymak
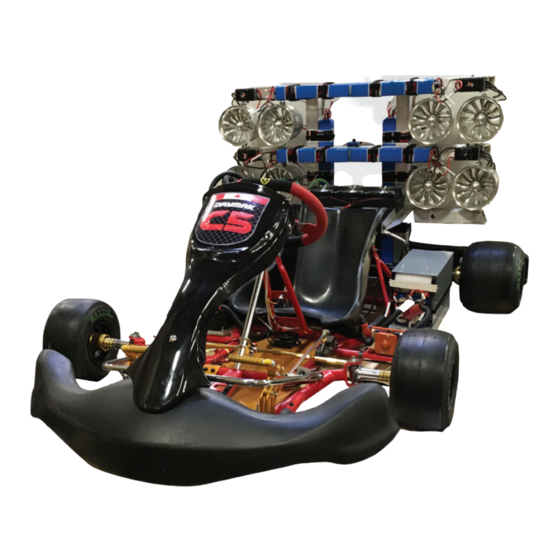
Daymak warranties, services, and stocks parts for everything it sells. We support our products. Please feel free to visit our website. - Page 3 Components 1) Seat 2) Tires ( x 4) 3) Main Battery Pack 4) Throttle 5) Brake 6) Ignition 7) Steering Wheel 8) EDF Motors ( x 8) 9) EDF Battery Packs 10) EDF Motor Control 11) Cooling System...
- Page 4 Safety Congratulations on your purchase of the Daymak C5 Blast Go Kart. You will be experi- ence speed and thrills beyond your imagination with this high powered electric go kart. This is an extremely powerful unit and needs to be treated with utmost care and re- sponsibility.
-
Page 5: Operation
Operation Powering on the unit Once you have went through all the safety mea- sures seen on the previous page you are ready to power on the go kart. To turn on the Go Kart without EDF motors just insert the key below the steering wheel and turn the key clockwise as seen on the right. - Page 6 Powering on the EDF Motors You will fi nd 8 sets of negative and positive cables that you will need to plug together connecting red to red and black to black. If you are powering on ALL the EDF mo- tors ensure you turn on a balanced even set of motors.
- Page 7 Powering on the EDF Motors (cont.d) Turn the EDF motor control so that the arrow is pointing to the lowest setting (counterclockwise). Once the arrow is pointing to the lowest point. Look for the blue button on the steering wheel (see page 8). Press and hold that until the control box lights up blue as see here.
- Page 8 Riding the Unit Your steering wheel will control whether you are turning left or right. You will fi nd two buttons on the steering wheel 1) Reverse button - Press this once to go in reverse. Press it again to go for- ward.
-
Page 9: Charging The Unit
Charging the unit Read this fi rst The below diagrams will show you how to charge the batteries as if the batteries were not situated to the go kart for ease of explanation. Do Not remove the batteries off the go-kart to charge the batteries. Bring the charger to the individu- al batteries and charge them sequentially. - Page 10 Charging the unit (cont'd) 1) Powerbank - This needs to be connected to the main power source 110V/220V Outlet. 2) 110V / 220V Outlet - This is where you get power from your home, offi ce etc. 3) Lithium Charger Set 1 - This is used to charge 6 out of the 12 cells in the pack (see previous page for more info)
- Page 11 Charging the unit (cont'd) Procedure Plug the Powerbank {1} into a 110V / 220V outlet {2} as seen on the previous page. Turn on the switch as seen on the right on the power bank. This will provide power to the Lithium charger {3 + 4} Plug the Positive, Negative and Balance cables on one side of the battery to the lithium charger Set 1 {3}.
- Page 12 Charging the unit (cont'd) Repeat the above process with the cables from the other side of the battery to the lithium charger set 2 {4} Once you have connected all 6 connection points you are ready to charge the battery. Now you must set the Lithium charger sets to the right settings.
- Page 13 Operating the Lithium Charger Step 1 Now that everything is connected. Press {4} and {8} until each display is showing LiPo. Step 2 After press {2} and {6} so both displays read charge. Step 3 Press {1} and {5} once. You will see the number of Amps fl...
-
Page 14: Charging Notes
Operating the Lithium Charger (cont'd) To get more information on the individual cell voltage press the Inc buttons {2 + 4} . To get the total percentage of the charge press it two more times. To get back to the original screen press Enter {1 + 5} To STOP charging. -
Page 15: Parts List
Parts List 1: HPCC72700 72v 700A controller 2: HPM20KL-07D-PZ 20KW liquid cooling BLDC motor 3: Hobbywing 200A ESC 4 :Tppower 560KV EDF 5: 10X4.50-5 tire/wheel 6: 11X7.10-5 tire/wheel 7: 12s 5000mAH Li-po Battery 8: cooling system 9: cable/throttle 10: brake switch 11:reverse switch 12:ESC switch 13:ESC tester( throttle) - Page 16 Thank you for choosing Daymak...
Need help?
Do you have a question about the C5 Blast Go Kart and is the answer not in the manual?
Questions and answers