Table of Contents
Advertisement
Quick Links
Advertisement
Table of Contents

Related Manuals for Bully Dog RAPID FLOW Cold Air Intake


Summary of Contents for Bully Dog RAPID FLOW Cold Air Intake
- Page 1 powered by INSTALLATION MANUAL Applications RFI Part Number Chevrolet Silverado 6.2L ‘14+ GMC Sierra 6.2L ‘14+ GMC Yukon 6.2L ‘15+ 53255 GMC Yukon XL 6.2L ‘15+ Cadillac Escalade ‘15+ Not legal for sale or use in California on pollution-controlled vehicles.
-
Page 2: Table Of Contents
Table of Contents INTRODUCTION This instruction set outlines the installation and maintenance of the Stage 2 Rapid Flow Cold Air Intake for all GM 6.2L gasoline powered pickups. Installation of this intake takes about 20 minutes, requires little mechanical experience and can easily be performed in a driveway even by those who have never installed an intake on a vechicle before. -
Page 3: Parts Included
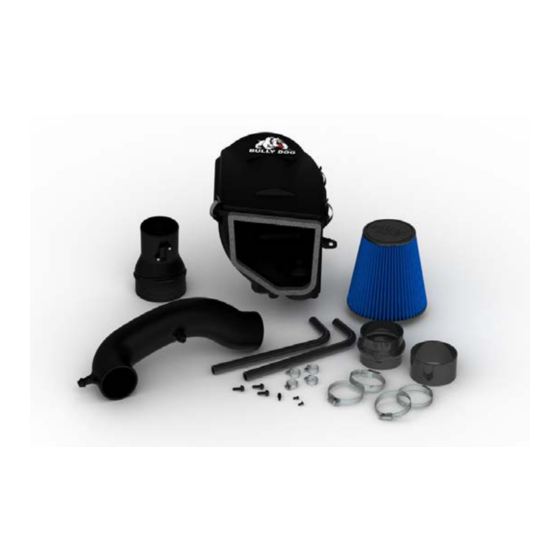
Parts Included Parts Included and Tools Needed: This section displays the parts included in the package and the tools needed to properly install the system. Parts Included TOOLS NEEDED RFI Base (53102-2) Flat head screw driver RFI Lid (53102-1) Phillips screw driver Filter Tube w/MAF sensor mount(53254-3) Bit driver Stage 2 Intake Tube (53255-4) -
Page 4: Parts Description
Parts Description Parts Description: This section describes each part and any special features of each part that need to be noted to assist with installation. All parts will be referred to during installation by the names used in this section. The RFI base: The base of the RFI enclosure that holds the filter has a couple of features to note. -
Page 5: Parts Description
Parts Description Lid Latches: The lid latches come pre-assembled onto the RFI base and are used to secure the lid to the base. This latch system is typical of many OEM style systems and allows for quick and easy access to the air filter for maintenance and to clean out any debris which may have collected inside of the filter housing. - Page 6 Parts Description Stainless black oxide screws: The two Phillips style stainless black oxide screws included with the kit are used to secure the MAF sensor to the air intake tube. Air filter and clamp: The air filter included is an ISO 5011 certified eight layer oil filter. The air filter is secured onto the end of the air intake tube using the filter clamp and a flat head screw driver.
- Page 7 Parts Description Stage 2 Tube: This tube will replace the stock tube. Notice the smooth free flowing design that will enhance air flow. CCV Recirculation Connection Throttle Body Side MAF Sensor Side Silicone couplers and clamp set: Included in the kit, used to connect the stage 2 tube to the other parts are two silicone couplers.
- Page 8 Parts Description Silicone CCV hose and number 8 hose clamps: This hose connects the CCV breather tube to the CCV Recirculation Connection on the Stage 2 tube. There are two CCV recircula- tion connections. The four small #8 clamps are used to secure both ends when installed.
-
Page 9: Installation
Stock Removal Installation Overview: Installation is very simple, it is separated into three parts: Removing the Stock Intake, Preparing the RFI intake for installation, and Installing the RFI intake system. The complete installation of the RFI intake system should total about 20 minutes. Removing the Stock Air Intake: Follow the steps in this section for guidance on how to remove the stock air intake. -
Page 10: Installation
Stock Removal Removing the stock intake continued: . IMPORTANT: Before beginning Installation, disconnect negative battery clamps. Failure to do so could result in injury or damage to your vehicle. 2. Disconnect the Mass Air Flow sensor plug by first unlocking the tab (pull the red plastic away from the plug). - Page 11 Stock Removal 3. There are four points where the stock tube is connected to something else on the vehicle (as seen in the image below). All must be properly disconnected to remove the intake tube. CCV Connection Band Clamp CCV Connection Band Clamp 3A.
- Page 12 Stock Removal 3B. Loosen both band clamps at the throttle body and stock intake enclosure. Once these are loose remove intake tube. Loosen Band Clamp 4. Remove the CCV recirculation tubes that are connected to the engine. Depress the grey tab and pull away from the engine.
- Page 13 Stock Removal 5. The intake enclosure is connected to a plate that sits beneath it by rubber grommets. It can be easily removed by pulling up on the end of the tube. Carefully remove the entire filter housing in one piece. 6.
- Page 14 Take very good care of the MAF sensor while transferring it over to the Bully Dog RFI. 3. Insert the MAF sensor into the MAF sensor mount on the RFI tube. Use the black oxide screws included with the kit to secure the MAF sensor to the RFI tube.
-
Page 15: Preparing To Install The Rfi Intake
RFI Prep 4. Now gather the 4 large band clamps, the 2 silicone couplers, and the stage 2 RFI tube. Preassembling these parts will make installing these parts on the vehicle much easier. When installing the couplers, place the coupler with the hump on the MAF sensor side of the stage 2 tube and the strait coupler on the throttle body side of the stage 2 intake tube. - Page 16 RFI Installation Installing the RFI intake: 1. Place the Bully Dog RFI bottom into the engine bay over the spot where the stock filter housing plate was originally placed, with the RFI MAF tube still installed. *Using three of the 10mm bolts that Bully Dog supplied, secure the RFI bottom to the inside of the engine bay.*...
-
Page 17: Installing The Rfi On The Vehicle
3. Install the Bully Dog CCV tube on the driver side first. Tighten #8 clamps when installed. 4. Install the other Bully Dog CCV tube on the passenger side by first securing it to the engine. Guide the tube to the Stage 2 intake tube and mark where it should be cut. After cutting the tube, install and tighten the tube to the Stage 2 intake tube with the #8 clamp. - Page 18 RFI Installation 5. Reconnect MAF sensor. Plug in and push down on red tab to lock. 6. Install the air filter over the MAF sensor tube on the inside of the RFI intake bottom. Position the air filter onto the end of the tube so that the filter points slightly downward and then tighten the air filter clamp with a flat head screw driver.
- Page 19 RFI Installation 7. Install the RFI Lid onto the RFI bottom and secure the lid using the lid latches. The lid latches work similar to an OEM style system, simply snapping on. 8. The final step of this installation is to replace the engine cover and reconnect the battery terminals.
-
Page 20: Filter Maintenance
To properly clean the filter, a Bully Dog clean- ing kit should be used. Cleaning kits are available at any Bully Dog dealer. -
Page 21: Prefilters
Pre Filter Bully Dog PreFilter (Part # 225201 for your intake) The time between scheduled filter maintenance can be extended. Using a Prefilter will prevent all large debris from getting into the ribs of the filter. When using the prefilter only fine dust particles make it through the prefilter and onto the exterior of the filter. -
Page 22: Replacement Cone Filter
Replacement Filter Bully Dog Replacement Filter In case your filter gets damaged, lost or stolen you can simply purchase a replacement filter from your local Bully Dog Dealer. See the part number information below. Filter Part number: 224800...
Need help?
Do you have a question about the RAPID FLOW Cold Air Intake and is the answer not in the manual?
Questions and answers