Advertisement
Quick Links
Advertisement

Subscribe to Our Youtube Channel
Related Manuals for Omax M8244


Summary of Contents for Omax M8244
- Page 1 User Manual Dual Head Binocular Compound Microscope Model M8244 MicroscopeNet.com ...
-
Page 2: Table Of Contents
Table of Contents i. Caution……..……………………………………………………………1 ii. Care and Maintenance……….………………………………….….…2 1. Component Illustration………………………….…………………..…3 2. Installation ……………………………………………………………...4 3. Operation……………………….………………………….…………..6 4. Specifications…………………….…………………………………..8 5. Troubleshooting Guide…..............9... -
Page 3: Caution
www.microscopenet.com i. Caution 1. Find the “UP” sign and place the Styrofoam container on your table or bench so that the arrow upward. Open the shipping carton carefully to prevent any accessory, i.e. objectives or eyepieces, from dropping and being damaged. 2. -
Page 4: Care And Maintenance
www.microscopenet.com ii. Care and Maintenance 1. Do not attempt to disassemble any component including eyepieces, objectives or focusing assembly. 2. Keep the instrument clean; remove dirt and debris regularly. Accumulated dirt on metal surfaces should be cleaned with a damp cloth. More persistent dirt should be removed using a mild soap solution. -
Page 5: Component Illustration
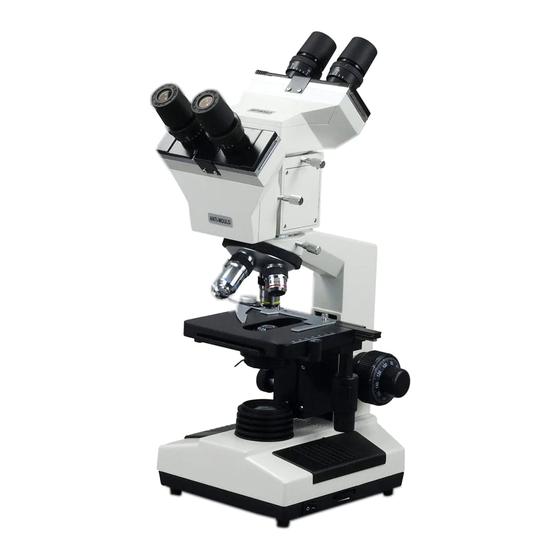
www.microscopenet.com 1 Components Illustration 1. Eyepiece Condenser Thumb Screw 2. Diopter Ring Condenser Focus Knob Body 3. Eyepiece Tube Light Collector Tension Collar 4. Viewing Head H Base Coarse Focus Knob 5. Nosepiece Viewing Head V Fine Focus Knob 6. Objective Thumb Screw V Stage Knobs 7. -
Page 6: Installation
www.microscopenet.com 2 Installation 2.1 Installation of the binocular dual view head 1) Loosen the thumb screw (17) on the top of the body (18) and remove the plastic cover. 2) Remove the cap on the dovetail of the binocular viewing head block (16). 3) Insert the dovetail of binocular viewing head block (16) into the socket of the body (18);... - Page 7 www.microscopenet.com 2.6 Replacing the fuse 1) Turn off the power and disconnect the power cord. 2) Turn over the microscope on its side; find the fuse at the bottom of the base. 3) Turn the fuse holder counter-clockwise to take it off, insert new fuse, and then turn it on clockwise.
-
Page 8: Operation
www.microscopenet.com 3 Operation 3.1 Adjusting illumination 1) Connect the power cord and turn on the power switch (24). 2) Rotate the variable intensity dial (23) to increase or decrease the brightness. 3.2 Placing specimen 1) Place the slide on the mechanical stage (8). 2) Use the slide holder (7) to gently secure the slide. - Page 9 www.microscopenet.com eyepiece and bring it into focus by adjusting the focus knobs (20,21). 2) Then observe the specimen with your left eye only through the left eyepiece. If the specimen is not in focus, rotate the diopter ring (2) until a sharp image is obtained. 3) Since both sides are adjustable, you may also do the above in the opposite way, in other words, left eye first and right eye second.
-
Page 10: Specifications
4 Specifications General Model M8244 Total Magnification 40X, 64X, 100X, 160X, 400X, 640X, 1000X, 1600X Viewing Head Dual viewing head, binocular, inclined 45º, swiveling 360º Interpupillary distance 55-75mm Adjustable diopter on both eyepiece tubes Eyepieces 2 pair of wide field eyepieces WF10X/18... -
Page 11: Troubleshooting Guide
www.microscopenet.com 5 Troubleshooting Guide Optical Problems Problem Cause Solution Revolve the nosepiece to click-stop Revolving nosepiece not in click Darkness at the position by swinging the objective stop position periphery or uneven correctly into the optical path brightness in the The light source of the bulb is not at field of view Adjust the position of the bulb... - Page 12 www.microscopenet.com Image Problems Problem Cause Solution Secure the specimen in the slide Specimen rises from stage surface holder Image moves while focusing Revolving nosepiece is not in the Revolve the nosepiece to the click-stop position click-stop position Blue filter not used Use daylight blue filter Image tinged yellow Adjust the light intensity by rotating...
Need help?
Do you have a question about the M8244 and is the answer not in the manual?
Questions and answers