Humanscale M/Connect 2 User Manual
Usb & monitor docking station
Hide thumbs
Also See for M/Connect 2:
- User manual ,
- Assembly instructions manual (41 pages) ,
- Disassembly instructions (4 pages)
Advertisement
Advertisement

Related Manuals for Humanscale M/Connect 2


Summary of Contents for Humanscale M/Connect 2
- Page 1 USER G UIDE...
-
Page 2: Table Of Contents
Table of Contents PARTS REQUIRED IDENTIFYING COMPONENTS INSTALLING M/CONNECT 2 BASE ATTACHING A MONITOR ARM ELECTRICAL SPECIFICATIONS... -
Page 3: Parts Required
PA RT S R EQUIR ED M/Connect 2 Parts (1) M/Connect 2 Hub and Dock (1) Power Adaptor (1) Power Cable (Localized) (1) USB-C Upstream Cable with USB-A Adapter (1) Upstream Cable Retainer... -
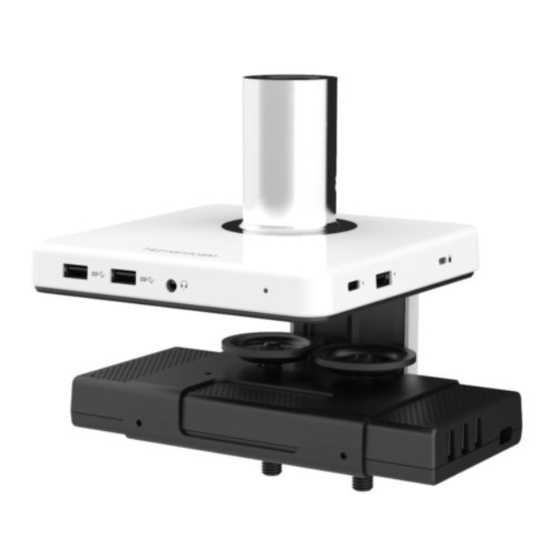
Page 4: Identifying Components
ID ENT IF Y ING COMP ONENT S Front Panel Component Description USB A port Supports USB 3.1 Gen 1 USB A port Supports USB 3.1 Gen 1 To connect combined headphone and microphone headset 3.5 mm TRRS jack... - Page 5 Left Panel Right Panel Component Description DC in 20V, 7 .5A DC to M/Connect 2 Power Button Powers unit on and off USB-C Upstream Port Connects full featured USB-C cable to laptop, Supports PD charging at 60W max. Important: only use USB-C cable provided with unit, other...
-
Page 6: Installing M/Connect 2 Base
INSTALLING M/CONNECT 2 ONTO EDGE OF TABLE Caution: Maximum weightload of M/Connect 2 is as follows: M2: 20 lbs . M8: 40 lbs. M/Flex: 60 lbs. Do NOT exceed maximum weightload limits. OP T ION A L : INSTA LL USB - C C A BL E R E TA INING CLIP Turn M/Connect 2 upside down to access screw hole •... - Page 7 ST EP 2 Place into Grommet Hole or System Furniture Gap • Place the L Bracket of the M/Connect 2 through the grommet hole and to the desired position Note: Minimum hole diameter is 3" (76 mm) ST EP 3 Reattach Clamps •...
- Page 8 ATTACHING AND REMOVING DOCK • To attach dock, slide onto the clamp bracket (fig. F) until it snaps in place • To remove dock, pull away from clamp while applying a downward force near front (Fig. G) • Fully insert USB-C cable head (fig. H) from hub into dock, ensuring complete connection •...
-
Page 9: Attaching A Monitor Arm
ATTACHING A MONITOR ARM TO M/CONNECT 2 M2 / M 8 MONITOR A RM Adjust Base Clamp for Correct Work Surface Depth • Remove set screw (fig. J) from Base using hex key • Insert Monitor Arm into the Base stem (fig. K) with its slot facing the rear •... - Page 10 INSTA LL AT ION GUID ELINES This product is intended to be used with Humanscale’s Monitor Arm product line and the following office desk styles placed on a non-skid surface: Systems Furniture with panel hung surfaces Systems Furniture with a floor mounted panel behind the desk...
- Page 11 CONNECTING CABLES TO M/CONNECT 2 Plug in power cable • Insert power cable (fig. N) into rearward power jack • LED light (fig. O) will illuminate to indicate power Connect upstream cable from source to hub • Remove screw (fig. P) from cable retaining clip •...
- Page 12 MOUNTING THE M/CONNECT 2 DOCK Horizontal Alignment • Screw bracket (fig. R) into desk underside and slide dock in • Attach screw. (fig. S) through bracket into dock to fully secure Vertical Alignment • Screw bracket (fig. T) into desk underside and slide dock in •...
- Page 13 To secure with cable pass through, orient dock bracket to enclose gap (fig. W) • Pass lock cable through gap in dock and loop around table leg or fixed object (fig. X) • Fasten K-Lock to M/Connect 2 hub (fig. Y) so fully secure...
-
Page 14: Electrical Specifications
RECOMMENDED SYSTEM REQUIREMENTS Minimum Requirements for Office, Productivity, Web Processor: Intel Core i3 2+GHz / Intel Cor e M / AMD Trinity or better Memory: 4GB Video Card: Intel HD 4000, ATI Radeon HD7xxx, NVidia GeForce 5xxM or better, with drivers released specifically for the Windows version. - Page 15 —Consult the dealer or an experienced radio/TV technician for help. The FCC requires the user be cautioned that any changes or modifications made to this device that are not expressly approved by Humanscale may void the user's authority to operate the equipment.
- Page 16 Customer Service: N America +1 800 400 0625 / International +353 (0)1 858 0910 humanscale.com...
Need help?
Do you have a question about the M/Connect 2 and is the answer not in the manual?
Questions and answers