
Related Manuals for WIKA CPH7650


Summary of Contents for WIKA CPH7650
- Page 1 Operating instructions Betriebsanleitung Portable pressure calibrator, model CPH7650 Tragbarer Druckkalibrator, Typ CPH7650 Portable pressure calibrator, model CPH7650...
- Page 2 3 - 58 Betriebsanleitung Typ CPH7650 Seite 59 - 113 Further languages can be found at www.wika.com. © 03/2018 WIKA Alexander Wiegand SE & Co. KG All rights reserved. / Alle Rechte vorbehalten. ® WIKA is a registered trademark in various countries.
-
Page 3: Table Of Contents
4.5 User interface ..... . 18 4.5.1 Requirements for test assemblies with the CPH7650 ..19 4.5.2 Important instrument settings for calibration using calibration mode . - Page 4 9.3 Disposal ......56 10. Accessories Declarations of conformity can be found online at www.wika.com. WIKA operating instructions, model CPH7650...
-
Page 5: General Information 5 En
Factory calibrations / DKD/DAkkS calibrations are carried out in accordance with ■ international standards. Further information: ■ - Internet address: www.wika.de / www.wika.com - Relevant data sheet: CT 17.02 - Application consultant: Tel.: +49 9372 132-9986 Fax: +49 9372 132-8767 info@wika.com WIKA operating instructions, model CPH7650... -
Page 6: Safety
Non-observance can result in serious injury and/or damage to the equipment. Further important safety instructions can be found in the individual chapters of these operating instructions. WIKA operating instructions, model CPH7650... -
Page 7: Intended Use
Before switching the instrument on, connect the sensor, otherwise it may not be correctly identified by the instrument. When the CPH7650 is switched on, the CPT6000 reference pressure ■ sensor must not be under pressure, but rather should be at atmospheric pressure. -
Page 8: Personnel Qualification
Do not apply a voltage greater than the specified voltage to the ■ instrument (see chapter 3 „Specifications“). Do not apply any external pressure to the CPH7650. ■ Make sure that the test probes never contact a voltage source while the ■... - Page 9 ■ mains voltage to the output voltage) can result in life-threatening voltages at the instrument! Only use the power supply unit permitted by WIKA for the model ■ CPH7650 portable pressure calibrator. Only use a charger that is fully functional or undamaged.
-
Page 10: Use Of Lithium-Ion Rechargeable Batteries
Never fit the Lithium-Ion batteries into equipment designed to be hermetically sealed. In some cases hydrogen or oxygen may be discharged from the Lithium-Ion batteries, which may result in rupture, fire or explosion. WIKA operating instructions, model CPH7650... - Page 11 Follow the instructions listed below for charging the Lithium-Ion batteries. Failure to do so may cause the Lithium-Ion batteries to become hot, explode or ignite and result in serious injury. To charge the Lithium-Ion batteries, only ever use the specified WIKA ■ battery charger.
-
Page 12: Labelling, Safety Marks
Before mounting and commissioning the instrument, ensure you read the operating instructions! This marking on the instruments indicates that they must not be disposed of in domestic waste. The disposal is carried out by return to the manufacturer or by the corresponding municipal authorities. WIKA operating instructions, model CPH7650... -
Page 13: Specifications
Operating temperature -10 … +50 °C (14 ... 122 °F) Storage temperature -20 … +60 °C (-4 ... +140 °F) Relative humidity 35 ... 85 % r. h. (non-condensing) Communication Interface USB via special interface cable WIKA operating instructions, model CPH7650... - Page 14 O (4 °C) 27.68067 8,304.2 O (20 °C) 27.72977 8,318.9 O (60 °F) 27.70759 8,312.3 mmHg (0 °C) 51.71508 15,515 inHg (0 °C) 2.03602 610.81 3) Electrical pump: -0.85 … +20 bar (-12 … 290 psi) WIKA operating instructions, model CPH7650...
-
Page 15: Design And Function
The pressure calibrator can be used to carry out and document a complete calibration process. In addition to the features of displaying or measuring and calibration, there is also a switch test. The use of the WIKA-Cal software also allows a complete documentation. -
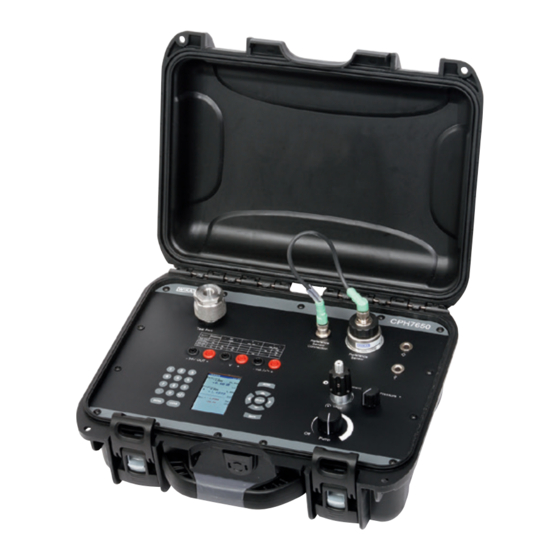
Page 16: Front
Electrical connection to the model CPT6000 reference sensor Reference sensor CPT6000 Connecion of the power supply unit WIKA-Cal connection Fine adjustment / drain valve Switch for pressure / vacuum Pump speed controller Operation Electrical module Display Numeric keypad WIKA operating instructions, model CPH7650... -
Page 17: Scope Of Delivery
If the battery has run down too far, the instrument will switch itself off automatically. Only ever use the power supply unit permitted by WIKA for the model CPH7650 portable pressure calibrator. To avoid measurement uncertainties, only use the CPH7650 without the mains supply connected. -
Page 18: User Interface
4. Design and function 4.5 User interface SETUP menu Selection and entry confirmation Return to previous level Clear entry Input confirmation Numeric keypad Switch on via pressing any button Switch off via menu item in main menu WIKA operating instructions, model CPH7650... -
Page 19: Requirements For Test Assemblies With The Cph7650
■ electrically (see chapter 4.5.4.1 “Connection of the model CPT6000 reference pressure sensor”). Before switching the CPH7650 on, ensure that the test assembly is not pressurised ■ (system is vented to atmosphere) and that the equipment is correctly assembled and in the correct mounting position. -
Page 20: Zero Point Setting And Offset Correction
4.5.3 Zero point setting and offset correction Zero point setting for overpressure sensors If the measured value shown on the CPH7650, with an overpressure sensor connected and the test assembly vented to atmosphere, is not equal to zero, then by pressing the CLEAR button twice (within five seconds), the zero point can be corrected (maximum allowable correction value is twice the magnitude of the class accuracy). - Page 21 To disconnect the sensor, do not pull on the cable, but rather only on the connector sleeve. To connect it to the CPH7650, the other end of the cable must also be plugged in in accordance with the orientation guide.
-
Page 22: Transport, Packaging And Storage
3. If stored for a prolonged period of time (more than 30 days), place a bag containing a desiccant inside the packaging. WARNING! Before storing the instrument (following operation), remove any residual media. This is of particular importance if the medium is hazardous to health, e.g. caustic, toxic, carcinogenic, radioactive, etc. WIKA operating instructions, model CPH7650... -
Page 23: Commissioning, Operation
The difference between these two modes is that the calibration data in CALIBRATION mode are stored internally and can later be transferred onto printable certificates through software (WIKA-Cal). With respect to the transfer of data to a PC, the model CPH7650 pressure calibrator has a USB interface, selectable via menu. SETUP menu... -
Page 24: Menu Structure (Operating Modes)
Functions CPH-Info ReferenceSensor Ref. Sensor-list CPH-Configuration Interface CLEAR CalData CPH switch off SELECT SELECT SELECT SELECT SELECT SELECT optional It is possible to change the test item display (pressure ↔ electrical signal) via WIKA operating instructions, model CPH7650... -
Page 25: Explanation Of The Display
“SETUP/CPH configuration” menu (see chapter 6.4.5 “SETUP additional menu items: CPH configuration”). f) Calibration date for the electrical measuring inputs of the CPH7650 (Year/Month/Day) Following the status messages, the display returns to the screen for the last-selected operating mode (see following chapter 6.2.3 “Display contents of the operating modes”). -
Page 26: Switching The Pressure Calibrator Off
6.2.3 Display contents of the operating modes Operating mode: MEASURING When a CPH7650 with a CPT6000 reference pressure sensor connected to it is first switched on, the instrument (after displaying a brief status message) switches to MEASURING mode (see following figure) - Page 27 % of the measuring span (% FS) or % of reading (% rd) d) Pressure unit (of the test item) e) Original output signal of the test item f) Current value of the output signal of the test item WIKA operating instructions, model CPH7650...
- Page 28 Actual value of the calibration f) P - 01: Test item No. 1 <01>: Test step No. 1 g) IDENT number of the test item h) Current value of the output signal of the test item WIKA operating instructions, model CPH7650...
-
Page 29: Content Of The Setup Menu
Closing switch point e) Hysteresis/separation between opening and closing of the switch f) Pressure unit (adjustable via menu) 6.2.4 Content of the SETUP menu Functions CPH-Info ReferenceSensor Ref. Sensor-list CPH-Configuration Interface CLEAR CalData CPH switch off WIKA operating instructions, model CPH7650... - Page 30 (without PC). In this case the data sets (for up to 16 test items, each with up to 32 test steps including date and time) are recorded within the CPH7650. 1) For mechanical dial instruments, the test item's measured value must be entered via the numeric keypad.
- Page 31 - Ambient temperature during the calibration - Height difference existing between the reference pressure sensor and test item (see chapter 4.5.1 “Requirements for test assemblies with the CPH7650”). → For more information please refer to chapter 6.4.5 “SETUP additional menu items: CPH configuration”...
-
Page 32: Operating Modes
CLEAR CalData CPH switch off Confirmation 2. Preparing for MEASURING SELECT (of the selection) ..Measuring Selection (Menu item); configuration, see next page Confirmation 3. Mode: MEASURING SELECT (of the input) Pressure unit (adjustable via menu) WIKA operating instructions, model CPH7650... - Page 33 If no external supply is required for the test item, “OFF” should be selected to conserve energy. Current cursor position; Alter via ◁▷ ◀▶ Parameter selection from list or menu via 0.00 Parameter input via numeric keypad Input confirmation CLEAR Clear entry ENTER WIKA operating instructions, model CPH7650...
-
Page 34: Measuring Mode (With Test Item)
CPH switch off Confirmation 2. Prepare MEASUREMENT SELECT (of the selection) Selection (Menu item); configuration, see next page Confirmation SELECT (of the input) 3. Mode: MEASURING Deviation switchable Pressure signal (test item) Electrical signal (test item) WIKA operating instructions, model CPH7650... - Page 35 If no external supply is required for the test item, “OFF” should be selected to conserve energy. Current cursor position; Alter via ◁▷ ◀▶ Parameter selection from list or menu via 0.00 Parameter input via numeric keypad Input confirmation CLEAR Clear entry ENTER WIKA operating instructions, model CPH7650...
-
Page 36: Mode Calibration
CPH switch off Confirmation SELECT 2. Preparation for CALIBRATION (of the selection) Selection (Menu item); configuration, see next page Confirmation SELECT (of the input) 3. Mode: Calibration Deviation switchable Pressure signal (test item) Electrical signal (test item) WIKA operating instructions, model CPH7650... - Page 37 Value of the test point x (input via numeric keypad) (Test point x+1 and x-1 accessible via n) True value of the test item (will be recorded during the calibration) WIKA operating instructions, model CPH7650...
-
Page 38: Calibration Mode (Preparing The Test Points Of A Calibration)
1. Test point confirmation with (defined) ← ENTER Test point No. 1 = 0 bar 2. Test point ← 2. Call up test point (define) (with back to previous test point) x. Test point (define) WIKA operating instructions, model CPH7650... - Page 39 As an exact setting of the pressure is not always possible under certain circumstances, the true reference value is also recorded along with the actual value (test item value) and the set point (reference value). With the WIKA-Cal software, this can be listed in the calibration certificate.
- Page 40 This will clear and reset the current and all subsequent test points. (This process can take several seconds.) Should all saved calibration data for all calibrations need to be cleared at a single time, see chapter 6.4.7 “SETUP additional menu items: CLEAR CalProg”. WIKA operating instructions, model CPH7650...
-
Page 41: Calibration Mode (Calibration Of A Pressure Transmitter)
No. of test point pressure generator 2. Test point Deviation Record the measured values of ENTER No. of test item the test point and No. of test point (with back to previous x. Test point test point) WIKA operating instructions, model CPH7650... -
Page 42: Calibration Mode (Calibration Of A Pressure Gauge)
2. Test point Deviation Record the measured values of No. of test item ENTER the test point and No. of test point (with back to previous x. Test point test point) WIKA operating instructions, model CPH7650... -
Page 43: Switch Test Mode
(of the selection) TEST Selection (Menu item); configuration, see next page Confirmation SELECT (of the input) 3. Mode: SWITCH TEST Current switching status Switch points Hysteresis Before the pressure switch test After the pressure switch test WIKA operating instructions, model CPH7650... - Page 44 Customer-specific unit; with respect to bar (input via numeric keypad) Display resolution in operating mode via (back with The calculated measured values of the two switch points and the hysteresis can be reset by pressing the “0” key. WIKA operating instructions, model CPH7650...
-
Page 45: Setup Additional Menu Items
Move the cursor to the field next to the word Alarm that reads <OFF> and via change it to <ON>. Deactivation via: set back to <OFF> e) Filter [1-5]: Damping/smoothing of the reference sensor signal Definition of the numbers: 1 = no additional smoothing ... 5 = strong smoothing WIKA operating instructions, model CPH7650... -
Page 46: Setup Additional Menu Items: Cph Info
Serial No: 6000.001 In this menu item general data are listed, such as: a) Calibration date for the calibration of the electrical measuring inputs of the CPH7650 (Year/Month/Day) b) Firmware version of the CPH7650 c) Serial number of the CPH7650... -
Page 47: Setup Additional Menu Items: Reference Sensor
Current measured value of the connected CPT6000 reference pressure sensor h) This menu option only appears if the CPH7650’s reference pressure sensor is an absolute pressure sensor. Through this menu option the measured value of the reference pressure sensor can be adjusted. -
Page 48: En 6.4.4 Setup Additional Menu Items: Reference Sensor List
Cal-Dat.: 2011/05/10 Class: 0.025 The CPH7650 pressure calibrator supports up to 10 CPT6000 reference pressure sensors. These are listed in this menu. a) Currently connected CPT6000 reference pressure sensor b) Sensor list of the supported CPT6000 reference pressure sensors (calibrated with the... -
Page 49: Setup Additional Menu Items: Cph Configuration
(except ON/OFF) or the instrument is addressed over the interface. h) Current battery capacity At 10 % the low battery charge warning, “low BAT” is shown in the display. WIKA operating instructions, model CPH7650... -
Page 50: Setup Additional Menu Items: Interface
If the SETUP menu item CLEAR CalData is selected with the cursor and then the SELECT button pressed 2 x, then all stored calibration data will be deleted or reset. The status of the deletion process is shown at the left of the lower info screen. WIKA operating instructions, model CPH7650... -
Page 51: Connection Of The Model Cpt6000 Reference Pressure Sensor
6.4.5 “SETUP additional menu items: CPH configuration”. When the mains lead is connected to the CPH7650, the battery will be charged, even if the CPH7650 is switched off WIKA operating instructions, model CPH7650... -
Page 52: Charging/Discharging The Lithium-Ion Rechargeable Batteries
WARNING! In order to charge the Lithium-Ion battery, never use any instrument other than that specified by WIKA. When the Lithium-Ion battery is used in instruments other than the instruments specified by WIKA, the performance and service life of the Lithium-Ion battery may be reduced, and, should the instrument cause an abnormal current to flow, it can cause the Lithium-Ion battery to become hot, explode or ignite and result in serious injury. -
Page 53: Pressure Measurement
To measure current, use the input terminals via the display on the calibrator and select the mA function. Current is measured in mA and percentage of the measuring range. The measuring range of the calibrator is set to 0 % at 4 mA and 100 % at 20 mA. WIKA operating instructions, model CPH7650... -
Page 54: Maintenance, Cleaning And Recalibration
Repairs must only be carried out by the manufacturer. CAUTION! To avoid personal injury or damage to the calibrator, only use accessories supplied by WIKA and ensure that no water finds its way into the case. 7.2 Cleaning CAUTION! Before cleaning, vent and switch off the pressure calibrator. -
Page 55: Faults
In this case, contact the manufacturer. If a return is needed, please follow the instructions given in chapter 9.2 „Return“. WIKA operating instructions, model CPH7650... -
Page 56: Dismounting, Return And Disposal
9.2 Return WARNING! Strictly observe the following when shipping the instrument: All instruments delivered to WIKA must be free from any kind of hazardous substances (acids, bases, solutions etc.). When returning the instrument, use the original packaging or a suitable transport packaging. -
Page 57: Accessories
10. Accessories 10. Accessories Accessories Order number Dirt trap 13477103 USB serial adapter 12981878 1 pair of test cables (red/black) 12981975 For further accessories, see current WIKA price list: Calibration technology. WIKA operating instructions, model CPH7650... - Page 58 WIKA operating instructions, model CPH7650...
- Page 59 4.5 Bedienoberfläche ..... 74 4.5.1 Anforderung an Prüfaufbauten mit dem CPH7650 ... . .75 4.5.2 Wichtige Geräteeinstellungen bzgl.
- Page 60 9.2 Rücksendung ..... 112 9.3 Entsorgung ..... . 112 10. Zubehör Konformitätserklärungen finden Sie online unter www.wika.de. WIKA Betriebsanleitung, Typ CPH7650...
-
Page 61: Allgemeines
Technische Änderungen vorbehalten. ■ Werkskalibrierungen / DKD/DAkkS-Kalibrierungen erfolgen nach internationalen ■ Normen. Weitere Informationen: ■ - Internet-Adresse: www.wika.de / www.wika.com - zugehöriges Datenblatt: CT 17.02 - Anwendungsberater: Tel.: +49 9372 132-9986 Fax: +49 9372 132-8767 info@wika.de WIKA Betriebsanleitung, Typ CPH7650... -
Page 62: Sicherheit
Vor Montage, Inbetriebnahme und Betrieb sicherstellen, dass der richtige Referenz-Drucksensor hinsichtlich Messbereich, Ausführung und spezifi- schen Messbedingungen ausgewählt wurde. Bei Nichtbeachten können schwere Körperverletzungen und/oder Sachschäden auftreten. Weitere wichtige Sicherheitshinweise befinden sich in den einzelnen Kapiteln dieser Betriebsanleitung. WIKA Betriebsanleitung, Typ CPH7650... -
Page 63: Bestimmungsgemäße Verwendung
System belüftet ist. Den Sensor vor dem Einschalten anste- cken, sonst wird er vom Gerät eventuell nicht richtig erkannt. Zum Zeitpunkt des Einschaltens des CPH7650 darf der Referenz- ■ Drucksensor CPT6000 nicht mit Druck beaufschlagt sein, sondern muss an Atmosphärendruck liegen. -
Page 64: Personalqualifikation
WARNUNG! Keine größere Spannung als angegeben an das Gerät anlegen (siehe ■ Kapitel 3 „Technische Daten“). Keinen Druck von außen auf das CPH7650 geben. ■ Darauf achten, dass die Prüfspitzen nie mit einer Spannungsquelle in ■ Kontakt kommen, wenn die Prüfkabel an die Stromklemmen angeschlos- sen sind. - Page 65 Bei Ladevorgang mit einem defekten Netzgerät (z. B. Kurzschluss von ■ Netzspannung zur Ausgangsspannung) können am Gerät lebensgefährli- che Spannungen auftreten! Nur das von WIKA für den tragbaren Druckkalibrator Typ CPH7650 ■ zugelassene Netzgerät verwenden. Nur einwandfrei funktionierendes oder unbeschädigtes Ladegerät ■...
-
Page 66: Verwendung Des Lithium-Ionen-Akkus
Leistung und Lebensdauer des Lithium-Ionen-Akkus sinken. Der Lithium-Ionen-Akku darf nicht in luftdicht abgeschlossene Geräte einge- setzt werden. In einigen Fällen könnte Wasserstoff oder Sauerstoff von der Zelle freigesetzt werden und so zur Beschädigung des Lithium-Ionen-Akkus, zu Feuer oder Explosion führen. WIKA Betriebsanleitung, Typ CPH7650... - Page 67 Verletzungen verursa- chen. Verwenden Sie zum Aufladen des Lithium-Ionen-Akkus ausschließlich ■ das von WIKA festgelegte Ladegerät. Schließen Sie den Lithium-Ionen-Akku weder direkt an eine Steckdose ■ noch an den Zigarettenanzünder eines Autos an. Legen Sie den Lithium-Ionen-Akku weder in die Nähe von Feuer noch in ■...
-
Page 68: Beschilderung, Sicherheitskennzeichnungen
Vor Montage und Inbetriebnahme des Gerätes unbedingt die Betriebsanlei- tung lesen! Bei Geräten mit dieser Kennzeichnung wird darauf hingewiesen, dass diese nicht in den Hausmüll entsorgt werden dürfen. Die Entsorgung erfolgt durch Rücknahme bzw. durch entsprechende kommunale Stellen. WIKA Betriebsanleitung, Typ CPH7650... -
Page 69: Technische Daten
Zulässige Umgebungsbedingungen Betriebstemperatur -10 … +50 °C (14 ... 122 °F) Lagertemperatur -20 … +60 °C (-4 ... +140 °F) Relative Luftfeuchte 35 ... 85 % r. F. (keine Betauung) Kommunikation Schnittstelle USB via speziellem Schnittstellenkabel WIKA Betriebsanleitung, Typ CPH7650... - Page 70 O (4 °C) 27,68067 8.304,2 O (20 °C) 27,72977 8.318,9 O (60 °F) 27,70759 8.312,3 mmHg (0 °C) 51,71508 15.515 inHg (0 °C) 2,03602 610,81 3) Elektrische Pumpe: -0,85 … +20 bar (-12 … 290 psi) WIKA Betriebsanleitung, Typ CPH7650...
-
Page 71: Aufbau Und Funktion
4. Aufbau und Funktion 4.1 Beschreibung Der CPH7650 ist ein kompakter, tragbarer Druckkalibrator, der sowohl für den mobilen Einsatz als auch für stationäre Werkstatt- und Laborprüfungen entwickelt wurde. Durch eine integrierte elektrische Pumpe können Drücke bis zu 20 bar (300 psi) erzeugt werden, ein integriertes elektrisches Modul ermöglicht neben dem klassischen Messen... -
Page 72: Front
4. Aufbau und Funktion 4.2 Front Prüfling Übersicht elektrischer Anschluss Elektrische Verbindung zum Referenzsensor Typ CPT6000 Referenzsensor CPT6000 Anschluss Netzgerät Anschluss WIKA-Cal Feinjustierung / Ablassventil Schalter für Druck / Vakuum Regler Pumpengeschwindigkeit Bedienung Elektrisches Modul Display Nummernblock WIKA Betriebsanleitung, Typ CPH7650... -
Page 73: Lieferumfang
Um falsche Messungen zu vermeiden, den Akku laden, sobald die Batterieanzeige erscheint. Wenn sich der Akku zu sehr entladen hat, schaltet sich das Gerät automatisch aus. Verwenden Sie ausschließlich das von WIKA für den tragbaren Druckkalibrator Typ CPH7650 zugelassene Netzgerät. Um Messunsicherheiten auszuschließen das CPH7650 nur ohne angeschlossenes Netzbetrieb verwenden. -
Page 74: Bedienoberfläche
4. Aufbau und Funktion 4.5 Bedienoberfläche SETUP-Menü Auswahl und Eingabe-Aktivierung 1 Schritt zurück Löschen der Eingabe Eingabe-Quittierung Numerischer Eingabeblock Einschalten durch Betätigen einer beliebigen Taste Ausschalten durch Menüpunkt im Hauptmenü WIKA Betriebsanleitung, Typ CPH7650... -
Page 75: Anforderung An Prüfaufbauten Mit Dem Cph7650
Als Erstes die Prüfaufbauten mechanisch und ggf. elektrisch verbinden/aufbauen ■ (siehe Kapitel 4.5.4.1 „Anschluss des Referenz-Drucksensors Typ CPT6000“). Vor dem Einschalten des CPH7650 sicherstellen, dass sich der Prüfaufbau im druck- ■ losen Zustand (System belüftet zu Atmosphäre) befindet und die Geräte die korrekte Einbaulage/Position aufweisen. -
Page 76: Nullpunkteinstellung Bzw. Offsetkorrektur
1.33322E-03 4.5.3 Nullpunkteinstellung bzw. Offsetkorrektur Nullpunkteinstellung von Überdrucksensoren Ist der Messwert des CPH7650 bei angeschlossenem Überdrucksensor und belüftetem Prüfaufbau ungleich Null, so kann durch ein zweimaliges Drücken der CLEAR-Taste (innerhalb von fünf Sekunden) der Nullpunkt korrigiert werden (maximale zugelassene Korrekturwert ist in Größe der zweifachen Klassengenauigkeit). - Page 77 Drucksensors Typ CPT6000 die entsprechende Steckverbindung des Kabels am Sensor gemäß der Orientierungsführung zusammenstecken. Beim Abstecken des Sensors nicht am Kabel ziehen, sondern nur an der Steckerhülse. Zum Anschluss an den CPH7650 muss das andere Kabelende ebenfalls gemäß der Orientierungsführung zusammengesteckt werden. 4.5.4.3 Mechanischer Anschluss des CPT6000 Referenz-Drucksensors am...
-
Page 78: Transport, Verpackung Und Lagerung
3. Bei längerer Einlagerung (mehr als 30 Tage) einen Beutel mit Trocknungsmittel der Verpackung beilegen. WARNUNG! Vor der Einlagerung des Gerätes (nach Betrieb) alle anhaftenden Messstoff- reste entfernen. Dies ist besonders wichtig, wenn der Messstoff gesund- heitsgefährdend ist, wie z. B. ätzend, giftig, krebserregend, radioaktiv, usw. WIKA Betriebsanleitung, Typ CPH7650... -
Page 79: Inbetriebnahme, Betrieb
Modi ist, dass die Kalibrierdaten im KALIBRIEREN-Modus intern gespei- chert werden und später mittels Software (WIKA-Cal) in ein druckfähiges Zeugnis überführbar sind. Bezüglich des Datentransfer zu einem PC verfügt der Druckkalibrator Typ CPH7650 über eine USB-Schnittstelle, die via Menü auswählbar sind. SETUP-Menü... -
Page 80: Menü-Struktur (Arbeitsmodi)
MB-Ende: 6.000 Klasse: 0.50 Einheit: Klasse: 0.50 Messart: Messart: Medium: Medium: Versorgung: Versorgung: Prüfpunkt: Haltezeit: Soll: 0.00000 Ist: 0.00000 Prüfling 24V/50mA Kalibrierprogramm Prüflingsart SELECT SELECT SELECT optional Wechsel der Prüflingsanzeige möglich (Druck ↔ elektrisches Signal) via WIKA Betriebsanleitung, Typ CPH7650... -
Page 81: Display-Darstellungen
6. Inbetriebnahme, Betrieb 6.2 Display-Darstellungen 6.2.1 Geräte-Statusmeldung kurz nach dem Einschalten des CPH7650 Direkt nach dem Einschalten des Gerätes erscheint für einen kurzen Moment folgende Statusmeldungen: Info CPH7650 CPH6000 Spannung 24V: Akkukapazität: 100% Höhendifferenz: 0 mm Temperatur: 23.0 °C Akt-Dat.: 2011/05/10 Kal-Dat.:... -
Page 82: Druckkalibrator Ausschalten
SELECT-Taste bestätigen. CPH7650 ausschalten. Ausschalten 6.2.3 Displayinhalte der Arbeitsmodi Arbeitsmodus: MESSEN Nach dem erstmaligen Einschalten des CPH7650 mit angeschlossenem CPT6000 Referenz-Drucksensor befindet sich das Gerät (nach einer kurzen Statusmeldung) im Modus: MESSEN (siehe nachfolgendes Bild) Displayanzeige: MESSEN nur mit Referenz-Drucksensor (ohne Prüfling) - Page 83 Abweichung/Differenz zwischen Referenz und Prüfling in der aktuellen Druckeinheit und in % von der Messspanne (% FS) bzw. % vom Messwert (% rd) d) Druckeinheit (des Prüflings) e) Original Ausgangsignal des Prüflings f) Aktueller Wert des Ausgangssignals des Prüflings WIKA Betriebsanleitung, Typ CPH7650...
- Page 84 Abweichung zwischen Prüfling und Referenz d) Sollwert der Kalibrierung e) Istwert der Kalibrierung f) P - 01: Prüfling Nr. 1 < 01 >: Prüfschritt Nr. 1 g) IDENT-Nummer des Prüflings h) Aktueller Wert des Ausgangssignals des Prüflings WIKA Betriebsanleitung, Typ CPH7650...
-
Page 85: Inhalt Des Setup-Menüs
Aktueller Messwert des CPT6000 Referenz-Drucksensors b) Aktueller Schaltzustand/Status des Druckschalters c) Schaltpunkt des Öffnens d) Schaltpunkt des Schließens e) Hysterese/Abstand zwischen Öffnen und Schließen des Schalters f) Druckeinheit (via Menü einstellbar) 6.2.4 Inhalt des SETUP-Menüs WIKA Betriebsanleitung, Typ CPH7650... - Page 86 ■ (ohne PC). Hierbei werden die Datensätze von bis zu 16 Prüflingen mit jeweils bis zu 32 Prüfschritten inkl. Datum und Zeit im CPH7650 gespeichert. 1) Bei mechanischen Zeigerinstrumenten muss der Messwert des Prüflings via numerischem Eingabeblock eingegeben werden. → Weitere Informationen siehe Kapitel 6.3.3 „Modus KALIBRIEREN“...
- Page 87 6.4.5 „SETUP-Zusatzmenüpunkte: CPH-Einstellungen“) Eingabemöglichkeiten: ■ - Umgebungstemperatur während der Kalibrierung - Vorhandene Höhendifferenz zwischen Referenz-Drucksensor und Prüfling (siehe Kapitel 4.5.1 „Anforderung an Prüfaufbauten mit dem CPH7650“). → Weitere Informationen siehe Kapitel 6.4.5 „SETUP-Zusatzmenüpunkte: CPH-Einstel- lungen“ i) Schnittstelle USB-Schnittstelle inkl. Einstellung der Baudrate ■...
-
Page 88: Arbeitsmodi
(der Auswahl) ..MESSEN Prüfling: - - - - MB-Anfang: 0.000 MB-Ende: 0.000 Auswahl Einheit: (Menüpunkt); Klasse: 0.00 Konfiguration, siehe nächste Messart: Seite Medium: Versorgung: Prüflingsart Bestätigung 3. Modus: MESSEN SELECT (der Eingabe) Druckeinheit (via Menü einstellbar) WIKA Betriebsanleitung, Typ CPH7650... - Page 89 Falls keine Fremdversorgung für den Prüfling benötigt wird, sollte „AUS“ gewählt werden, um Energie zu sparen. Aktuelle Cursorposition; Wechsel via ◁▷ ◀▶ Parameter-Auswahl aus Liste bzw. Menü via 0.00 Parameter-Eingabe mittels numerischem Eingabeblock Eingabe-Quittierung CLEAR Löschen der Eingabe ENTER WIKA Betriebsanleitung, Typ CPH7650...
-
Page 90: Modus Messen (Mit Prüfling)
0.50 Konfiguration, siehe nächste Messart: Medium: Seite Versorgung: Prüflingsart Bestätigung SELECT (der Eingabe) 3. Modus: MESSEN MESSEN 13:28 Referenz 0.000 10.000 0.000 Prüfling 4-20 mA 4.0160 Abweichung Abw.: 0.006 umschaltbar 0.10 Drucksignal (Prüfling) Elektrisches Signal (Prüfling) WIKA Betriebsanleitung, Typ CPH7650... - Page 91 Falls keine Fremdversorgung für den Prüfling benötigt wird, sollte „AUS“ gewählt werden, um Energie zu sparen. Aktuelle Cursorposition; Wechsel via ◁▷ ◀▶ Parameter-Auswahl aus Liste bzw. Menü via 0.00 Parameter-Eingabe mittels numerischem Eingabeblock Eingabe-Quittierung CLEAR Löschen der Eingabe ENTER WIKA Betriebsanleitung, Typ CPH7650...
-
Page 92: Modus Kalibrieren
Bestätigung SELECT (der Eingabe) 3. Modus: Kalibrieren KALIBRIEREN 13:41 Referenz 0.000 10.000 0.000 Prüfling 4-20 mA 4.011 Abweichung Abw.: 0.004 umschaltbar 0.07 0.000 Soll: 0.000 Ist : P-01: 123456 ID Nr: Drucksignal (Prüfling) Elektrisches Signal (Prüfling) WIKA Betriebsanleitung, Typ CPH7650... - Page 93 Optionale Wartezeit [sek] (siehe Kapitel 6.3.4 „Modus KALIBRIEREN (die Prüfpunkte einer Kalibrierung vorbereiten)“) m) Wert des Prüfpunktes x (Eingabe via numerischem Eingabeblock) (Prüfpunkt x+1 bzw. x-1 via aufrufbar) n) Wahrer Wert des Prüflings (wird bei der Kalibrierung gespeichert) WIKA Betriebsanleitung, Typ CPH7650...
- Page 94 0 bar) via numerischem Einga- 1. Prüfpunkt beblock und Bestätigung mit (definiert) ← ENTER Prüfpunkt Nr. 1 = 0 bar 2. Prüfpunkt ← 2. Prüfpunkt aufrufen (definieren) (mit zurück zum vorherge- henden Prüfpunkt) x. Prüfpunkt (definieren) WIKA Betriebsanleitung, Typ CPH7650...
- Page 95 Da unter Umständen ein exaktes Einstellen des Druckes nicht immer möglich ist, wird neben dem Istwert (Prüflingswert) und dem Sollwert (Referenzwert) auch der wahre Referenzwert gespeichert. Mittels der Software WIKA-Cal kann dies im Kalibrierzeugnis aufgelistet werden. Wird nach DKD/DAkkS-Richtlinie kalibriert, so dürfen die Messwerte des jeweils nächsten Prüfpunktes erst nach einer bestimmten Zeit (bestehend...
- Page 96 CLEAR-Taste zu drücken. Hierdurch wird der aktuelle und alle nachfolgenden Prüfpunkte gelöscht bzw. zurückgesetzt. (Dieser Vorgang kann einige Sekunden dauern.) Sollen alle gespeicherten Kalibrierdaten sämtlicher Kalibrierungen auf einmal gelöscht werden siehe Kapitel 6.4.7 „SETUP-Zusatzmenüpunkte: CLEAR KalProg“. WIKA Betriebsanleitung, Typ CPH7650...
-
Page 97: Modus Kalibrieren (Die Kalibrierung Eines Druckmessumformers)
Abweichung Vorgegebener Sollwert mittels Druckerzeugung nach Anzeige Nr. Prüfling und der Referenz generieren Nr. Prüfpunkt 2. Prüfpunkt Abweichung Messwerte des Prüfpunktes ENTER speichern Nr. Prüfling und Nr. Prüfpunkt (mit zurück zum vorher- x. Prüfpunkt gehenden Prüfpunkt) WIKA Betriebsanleitung, Typ CPH7650... -
Page 98: Modus Kalibrieren (Die Kalibrierung Eines Manometers)
Abweichung Vorgegebener Sollwert mittels Druckerzeugung nach Anzeige Nr. Prüfling und des Prüflings generieren Nr. Prüfpunkt 2. Prüfpunkt Abweichung Messwerte des Prüfpunktes ENTER speichern Nr. Prüfling und Nr. Prüfpunkt (mit zurück zum vorher- x. Prüfpunkt gehenden Prüfpunkt) WIKA Betriebsanleitung, Typ CPH7650... -
Page 99: Modus Schaltertest
(Menüpunkt) Bestätigung SELECT 2. SCHALTERTEST (der Auswahl) vorbereiten ..SCHALTER-TEST Versorgung: Einheit: Auswahl (Menüpunkt); Konfiguration, siehe nächste Seite Prüfling 24V/50mA Bestätigung SELECT (der Eingabe) 3. Modus: SCHALTERTEST Aktueller Schaltzustand Schaltpunkte Hysterese Vor dem Druckschaltertest Nach dem Druckschaltertest WIKA Betriebsanleitung, Typ CPH7650... - Page 100 Auswahl und Bestätigung (Standard-Einheit) via Kundenspezifische Einheit; bez. auf bar (Eingabe via numerischem Eingabeblock) Auflösung der Anzeige im Arbeitsmodus via (zurück mit Die ermittelten Messewerte der beiden Schaltpunkte und der Hysterese können durch das Drücken der Ziffer: „0“ zurückgesetzt werden. WIKA Betriebsanleitung, Typ CPH7650...
-
Page 101: Setup-Zusatzmenüpunkte
Mit dem Cursor auf das Feld <AUS> neben dem Wort Alarm gehen und via <EIN> umstellen. Deaktivierung via: wieder auf <AUS> zurückstellen e) Filter [1-5]: Beruhigung/Glättung des Referenzsensorsignals Bedeutung der Zahlenwerte: 1 = keine zusätzliche Glättung ... 5 = starke Glättung WIKA Betriebsanleitung, Typ CPH7650... -
Page 102: Setup-Zusatzmenüpunkte: Cph-Info
CPH7650 CPH6000 Kal-Dat.: 2011/05/10 Firmware: 20.05 SerienNr: 6000.001 In diesem Menüpunkt sind allgemeine Daten gelistet, wie: a) Kalibrierdatum der Kalibrierung der elektrischen Messeingänge des CPH7650 (Jahr/Monat/Tag) b) Version der Firmware des CPH7650 c) Seriennummer des CPH7650 WIKA Betriebsanleitung, Typ CPH7650... -
Page 103: Setup-Zusatzmenüpunkte: Referenz-Sensor
Atmosphärendruck für diese Messbereiche eigentlich eine Überlast darstellt) g) Aktueller Messwert des angeschlossenen CPT6000 Referenz-Drucksensors h) Dieser Menüpunkt erscheint nur, wenn der Referenz-Drucksensor des CPH7650 ein Absolutdrucksensor ist. Mittels diesen Menüpunktes kann der Messwert des Referenz-Drucksensors korrigiert werden. Dies sollte jedoch möglichst nur nahe dem absoluten Nullpunkt und mittels einer Referenz, die mindestens viermal genauer ist, geschehen. -
Page 104: Setup-Zusatzmenüpunkte: Referenz-Sensor-Liste
Einheit: Kal-Dat.: 2011/05/10 Klasse: 0.025 Der Druckkalibrator CPH7650 unterstützt bis zu 10 CPT6000 Referenz-Drucksensoren. Diese sind in diesem Menü gelistet. a) Aktuell angeschlossener CPT6000 Referenz-Drucksensor b) Sensor-Liste der unterstützen (mit dem Gerät kalibrierten) CPT6000 Referenz-Druck- sensoren c) Daten des Sensors, der mit dem Cursor angewählt wurde... -
Page 105: Setup-Zusatzmenüpunkte: Cph-Einstellungen
Schnittstellenkommunikation), so werden Hintergrundbeleuchtung und die 24 V Prüflingsversorgung so lange abgeschaltet, bis eine beliebige Taste betätigt bzw. das Gerät über Schnittstelle angesprochen wird. h) Aktuelle Akkukapazität Bei 10 % erscheint im Display die Warnung einer geringen Akkukapazität „low BAT“. WIKA Betriebsanleitung, Typ CPH7650... -
Page 106: De 6.4.6 Setup-Zusatzmenüpunkte: Schnittstelle
6.4.7 SETUP-Zusatzmenüpunkte: CLEAR KalProg Wird der SETUP-Menüpunkt CLEAR KalProg mit dem Cursor angewählt und 2 x die SELECT-Taste betätigt, so werden sämtliche gespeicherten Kalibrierdaten gelöscht bzw. zurückgesetzt. Der Status des Löschvorganges wird links in der unteren Info-Zeile angezeigt. WIKA Betriebsanleitung, Typ CPH7650... -
Page 107: Anschluss Des Referenz-Drucksensors Typ Cpt6000
Der Akkukapazitätsstatus (Ladezustand in %) wird kurz nach dem Einschalten des Gerätes angezeigt bzw. kann im Kapitel 6.4.5 „SETUP-Zusatzmenüpunkte: CPH-Einstel- lungen“ in Erfahrung gebracht werden. Ist das Netzladegerät am CPH7650 angeschlossen, so wird der Akku auch im ausgeschalteten Zustand des CPH7650 geladen WIKA Betriebsanleitung, Typ CPH7650... -
Page 108: Laden/Entladen Des Lithium-Ionen-Akkus
Außerdem kann dabei die Leistung des Lithium-Ionen-Akkus beeinträchtigt werden und die Lebensdauer reduzieren. WARNUNG! Kein anderes Gerät als das von WIKA festgelegte verwenden, um den Lithium-Ionen-Akku zu entladen. Wenn der Lithium-Ionen-Akku in anderen als den von WIKA bestimmten Geräten verwendet wird, kann die Leistung und die Lebensdauer des Lithium-Ionen-Akkus sinken und, falls das Gerät... -
Page 109: Druckmessung
Zur Strommessung die Eingangsklemmen über dem Display des Kalibrators verwenden und die mA-Funktion auswählen. Der Strom wird in mA und in Prozent des Messbereichs gemessen. Der Messbereich des Kalibrators wird bei 4 mA auf 0 % und bei 20 mA auf 100 % gesetzt. WIKA Betriebsanleitung, Typ CPH7650... -
Page 110: Wartung, Reinigung Und Rekalibrierung
Dieser tragbare Druckkalibrator Typ CPH7650 ist wartungsfrei. Reparaturen sind ausschließlich vom Hersteller durchzuführen. VORSICHT! Um Personenschaden oder Schäden am Kalibrator zu vermeiden, nur das von WIKA bereitgestellte Zubehör verwenden und darauf achten, dass kein Wasser in das Gehäuse gelangt. 7.2 Reinigung VORSICHT! Vor der Reinigung den Druckkalibrator entlüften und ausschalten. -
Page 111: Störungen
Hand-Held-Druckkalibrator unverzüglich außer Betrieb zu setzen, sicherzustellen, dass kein Druck bzw. Signal mehr anliegt und gegen versehentliche Inbetriebnahme zu schützen. In diesem Falle Kontakt mit dem Hersteller aufnehmen. Bei notwendiger Rücksendung die Hinweise unter Kapitel 9.2 „Rücksen- dung“ beachten. WIKA Betriebsanleitung, Typ CPH7650... -
Page 112: Demontage, Rücksendung Und Entsorgung
Tragbaren Druckkalibrator nur im drucklosen Zustand demontieren! 9.2 Rücksendung WARNUNG! Beim Versand des Gerätes unbedingt beachten: Alle an WIKA gelieferten Geräte müssen frei von Gefahrstoffen (Säuren, Laugen, Lösungen, etc.) sein. Zur Rücksendung des Gerätes die Originalverpackung oder eine geeignete Transportver- packung verwenden. -
Page 113: Zubehör
10. Zubehör Zubehör Zubehör Bestellnummer Schmutzabscheider 13477103 USB-Serial-Adapter 12981878 1 Paar Prüfkabel (rot/schwarz) 12981975 Weiteres Zubehör, siehe aktuelle WIKA-Preisliste: Kalibriertechnik. WIKA Betriebsanleitung, Typ CPH7650... - Page 114 WIKA Betriebsanleitung, Typ CPH7650...
- Page 115 WIKA Betriebsanleitung, Typ CPH7650...
- Page 116 WIKA subsidiaries worldwide can be found online at www.wika.com. WIKA-Niederlassungen weltweit finden Sie online unter www.wika.de. WIKA Alexander Wiegand SE & Co. KG Alexander-Wiegand-Straße 30 63911 Klingenberg • Germany Tel. +49 9372 132-0 +49 9372 132-406 info@wika.de www.wika.de WIKA operating instructions, model CPH7650...
Need help?
Do you have a question about the CPH7650 and is the answer not in the manual?
Questions and answers