
Related Manuals for Heartland WaveReader Spin


Summary of Contents for Heartland WaveReader Spin
- Page 1 TILT MOUNT FLAT MOUNT INSTALLATION & ORIENTATION GUIDE DOC-WR-SPIN-INST www.heartlandMicroPayments.com 2115 Chapman Road, Suite 159, Chattanooga TN 37421 800.332.4835...
-
Page 2: Required Tools
Required Tools The tools required for the installation process are as follows #T-20 Pin-in-Star Torx Driver (for many machines) Phillips Head Screwdriver (medium) – magnetic tip is helpful 3/16” Drill Bit 7/8” Stepper - Drill Bit ... - Page 3 Installation Kit Contents WaveReader Item Part Number Description WaveReader - SPIN WLAU-READER-SPIN Flat - Mounting Hardware Kit KIT-052-6-_____ Installation hardware for WaveReader-SPIN Item Part Number Description Screw 6-32 Thread x 1/8” Pan-Head, Phillips SRW-632X.125PM PUR-CABLE-TIE CABLE TIE WRAP PANDUIT PLT1.5M-M PUR-CABTIECLAMP CABLE TIE CLAMP PANDUIT# ABM2S-A-D Tilt - Mounting Hardware Kit...
- Page 4 !! WARNING !! MAKE SURE THAT ALL POWER HAS BEEN REMOVED FROM THE MACHINE BEFORE ATTEMPTING TO INSTALL ANY HARDWARE OR CABLING! Preparation Disconnect the laundry machine from all power sources before performing any of the following steps. Remove all screws and fasteners so that you can remove the front panel and access the inside of...
- Page 5 Installation Cut out the mounting template on page 12 (or 13) of this manual, and tape it to the front of the machine panel at the desired location. The large circles on the template indicated the appropriate card-swipe orientation (RIGHT, LEFT, TOP, or BOTTOM).
- Page 6 Installation Pull the wiring harness all the way through the large hole in the Tilt Bracket. Connect J1 of the interface harness to the mating connector of the WaveReader- SPIN. Attach the WaveReader- SPIN to Tilt Bracket using four of the (3/16”) SRW- 632X.1188PM screws that were provided.
- Page 7 Installation Connect J1 of the interface harness to the mating connector of the WaveReader- SPIN. Attach the WaveReader-SPIN to the machine panel using the (4) SRW-632X.125PM screws that were provided. www.heartlandMicroPayments.com DOC-WR-SPIN-INST...
-
Page 8: Finished Assembly
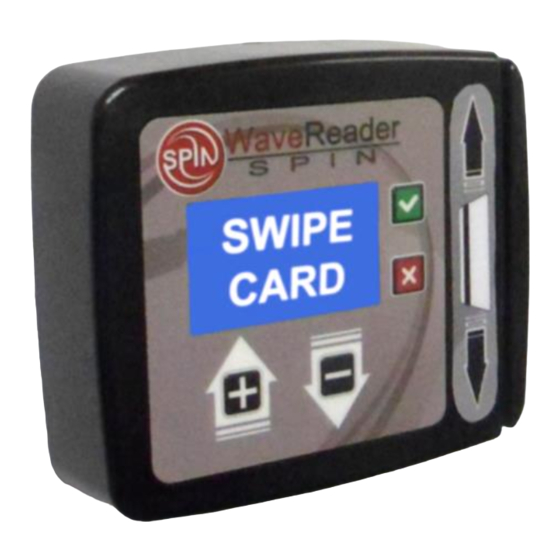
Installation Apply the self-adhesive sticker that displays the accepted card brands (supplied) in a clearly visible location . Reattach all machine panels. Finished assembly. www.heartlandMicroPayments.com DOC-WR-SPIN-INST... - Page 9 Adjusting Card-Swipe Orientation As its’ name implies, the WaveReader-SPIN has the unique ability to be easily adapted to four different card-swipe orientation options. If the RIGHT side will not work for the machine you are installing, just follow this simple steps to find the option that works the right best.
- Page 10 Installation Lift back-plate off of the SPIN reader, and place it with the screws. The center portion of the SPIN reader can be lifted up and rotated to match the desired Card-Swipe orientation, and placed back into the recess. Make sure that the swipe-bar cable is not pinched between the two pieces.
- Page 11 Installation Re-attach the back plate. DO NOT OVER-TIGHTEN THESE SCREWS! Over-tightening the screws will damage the reader casing. The SPIN reader can now be mounted to the machine. www.heartlandMicroPayments.com DOC-WR-SPIN-INST...
- Page 12 Only one of the 7/8” Cable Access holes will need to be drilled-out. Choose the appropriate one for the Card-Swipe position you are using. For instance, if the Card-Swipe is to be on the RIGHT, only drill the location marked ‘RIGHT’. www.heartlandpaymentsystem s.com Wave Reader Spin –...
- Page 13 Only one of the 7/8” Cable Access holes will need to be drilled-out. Choose the appropriate one for the Card-Swipe position you are using. For instance, if the Card-Swipe is to be on the Wave Reader Spin – Tilt Bracket Mount RIGHT, only drill the location marked ‘RIGHT’.
Need help?
Do you have a question about the WaveReader Spin and is the answer not in the manual?
Questions and answers