Advertisement
Quick Links
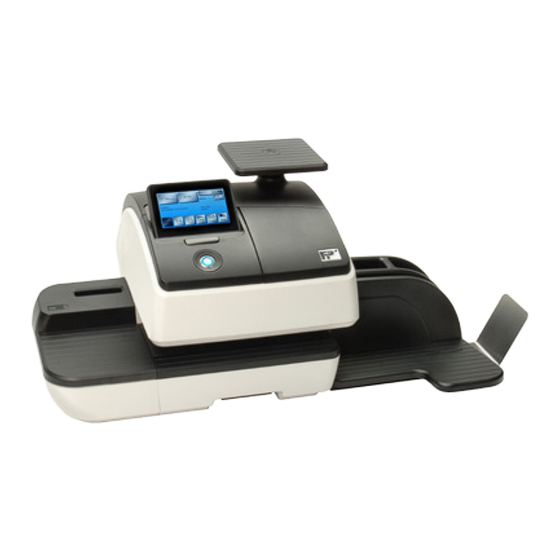
postbase 20
Set-Up and Installation Guide
Checking the Contents of the Package
2
1
3
4
8
7
6
9
Standard Contents*
1
- PostBase Mailing Machine
2
- Scale Platform
3
- Catch Tray with Bracket
4
- Ink Cartridge Set
5
- Power Cable
6
- Ethernet Cable
7
- First Steps Guide
8
- Hand Feed Tray
9
- FP Shipment Packing List
Optional Accessories*
10
- Envelope Moistener
*List applies to new PostBase orders only. Exchange orders will
recieve the PostBase Mailing Machine Base (item #1 above) only.
- Please allow 30 minutes for PostBase Installation
1
Before you Begin,
Activate your PostBase Machine
- Locate the Shipment
Packing List included
with your shipment.
Find your
Customer #
and
Meter Serial #
as
shown to the right.
- Call FP toll-free at
866-750-7570, then
select Option 1 to look
up your PIN.
- Key in your Account #,
Zip Code, and Meter Serial # as
5
directed by the phone prompts.
2
Attach Hand Feed Tray (or Envelope
Moistener) to the PostBase Machine
10
- Gently raise the left hand side of the PostBase as
indicated by the arrow
- Slide the Hand Feed Tray up to the left side of the
PostBase, as shown
- Gently lower the PostBase Machine over Hand Feed
Tray's locking clips, as shown
(Note: Both the Hand Feed Tray and PostBase should be flush)
3
Connect Catch Tray
- Insert Catch Tray Bracket into the Catch Tray as shown
- Gently raise the right hand side of the PostBase as
indicated by the arrow
- Slide the Catch Tray up to the right side of the
PostBase, as shown
- Gently lower the PostBase Machine over the Catch
Tray's locking clips, as shown
(Note: Both the PostBase and Catch Tray should be flush)
4
Fasten Scale Platform
- Lower the Scale Platform onto the metal integrated
scale post on top of the PostBase, as shown
- Make sure one of the long grooves is facing the front
of the machine
5
Connect Power and Ethernet
Ethernet Connection
Power Connection
- Connect one end of the Ethernet Cable to the back
of the PostBase Machine as shown; plug the other
end into an open Ethernet jack
- Attach the female end of the Power Cord to the
back of the PostBase Machine as shown; plug the
male end into a nearby power outlet
6
Power On Your PostBase
- Push the Power Button on the front of the
PostBase Machine, as shown
- The LCD Touch Screen will illuminate and will
begin the installation process; as shown
- System startup takes up to 2 minutes, please
wait until instructions appear on the LCD Touch
Screen to continue with the installation.
Advertisement

Subscribe to Our Youtube Channel
Related Manuals for FP Postbase 20


Summary of Contents for FP Postbase 20
- Page 1 Power Connection Checking the Contents of the Package shown to the right. - Call FP toll-free at 866-750-7570, then - Insert Catch Tray Bracket into the Catch Tray as shown - Connect one end of the Ethernet Cable to the back select Option 1 to look of the PostBase Machine as shown;...
- Page 2 - If no IP address is detected: Is your Ethernet cable is plugged in? if not, plug in and restart your If you have questions or problems, FP’s U.S. Customer machine by holding down the power button. Then - Postage will begin downloading immediately; this...
Need help?
Do you have a question about the Postbase 20 and is the answer not in the manual?
Questions and answers