Table of Contents
Advertisement
Quick Links
Advertisement
Table of Contents

Related Manuals for TSI Quest EG5


Summary of Contents for TSI Quest EG5
- Page 1 THE EDGE INTRINSICALLY SAFE PERSONAL NOISE DOSIMETER MODEL EG5 USER MANUAL...
-
Page 3: Warnings, Safety Markings, & Standard Information
Warnings, Safety Markings, & Standard Information The Edge Intrinsically Safe Personal Noise Dosimeter Model eg5 Warnings, Safety Markings, & Standard Information Warnings concerning safe operation WARNING : To prevent ignition of flammable or combustible atmospheres, no user serviceable parts inside. Repair and battery replacement must be done by authorized service personnel only. -
Page 4: International Customers
Incorporated by using the e-mail or telephone information listed above. SIRA Certification: EC Type-Examination Certificate Equipment intended for use in Potentially Explosive Atmospheres Directive 94/9/EC Safety Markings Manufacturer TSI Incorporated Equipment/model eg5 Dosimeter Certificate number Sira 09ATEX2269 Compliance with safety EN 60079 – 0:2013; EN 60079-11:2012; EN60079-26:2014 markings Markings I/II M1/1G Ex ia I/IIC 143ºC Ma/Ga (-10ºC<T... - Page 5 Warnings, Safety Markings, & Standard Information Edge Dosimeter battery care best practices. The Edge dosimeter incorporates a Lithium Polymer battery as a power source that with proper care should give years of operational service (three years is typical). Proper care includes these best practices: ...
- Page 6 Warnings, Safety Markings, & Standard Information (This page intentionally left blank)
-
Page 7: Table Of Contents
Range of Sound ..............................3 What do the Standards Say? ..........................3 Applications of the Edge ............................. 4 Noise Assessment Steps ............................ 5 eg5 Overview ..............................5 Virtual Dosimeters ............................6 2: Getting Started ..............................7 Checking the Equipment ........................... 7 Turning on ................................ - Page 8 viii Table of Contents Logging ................................19 Views on the Edge ............................19 Definitions of Data Log Values and Views ......................19 Edge Measurement Descriptors/Variants ......................21 Docking ................................22 Communicating & Downloading Data ....................... 22 Customizing Setup Parameters in DMS ......................23 Dosimeter Setting .............................
- Page 9 Figure 1-1: Sample measurement display ......................... 1 Figure 1-2: Illustration of how the dosimeter operates and processes ..............2 Figure 1-3: Parameter setup screen for Model eg5 ....................6 Figure 2-1: Identifying your equipment ........................7 Figure 2-2: Powered on with measurement view displayed ..................8 Figure 2-3: Edge Keypad ............................
- Page 10 Table of Contents Figure 3-4: Communicating—connecting a docked Edge to a PC ................22 Figure 3-5: New Hardware wizard for Edge Dock ....................23 Figure 3-6: Dosimeter screen ..........................24 Figure 3-7: C-A measurement setup ........................26 Figure 3-8: Edge display screen ..........................28 Figure 3-9: Edge security setting ..........................
-
Page 11: Sira Certification: Ec Type-Examination Certificate
CHAPTER 1: Introduction Dosimetry SIRA Certification: EC Type-Examination Certificate 1: Introduction Dosimetry Measuring noise in the workplace is an important element of hearing conservation programs and noise reduction programs. With a noise dosimeter, you can assess and determine a worker’s daily exposure to noise levels. -
Page 12: Noise Dosimeter
1: Introduction Overview Noise Dosimeter What is a noise dosimeter and how does it compute measurements? Essentially, a noise dosimeter is composed of the following: a microphone with a preamplifier, a weighted network, fast or slow response time, an internal clock, calculator, and memory to store logged data. -
Page 13: Range Of Sound
1: Introduction Overview Range of Sound Sound pressure is measured in decibels, or tenths of a Bel. Sound pressure level is indicated as dB SPL. Since the human ear can detect sounds with an extensive range of amplitude, a decibel scale is used to simplify the measurement results. For example, the ratio between the threshold of hearing and threshold of pain in the human ear if measured in true energy is 10,000,000 times! The same range using the dB scale is 0–140 dB referenced to 20 µPa (Micropascals). -
Page 14: Applications Of The Edge
1: Introduction Overview Applications of the Edge The Edge has a cable-free, mounted microphone that converts sound pressure into an electrical signal. This signal is conditioned, monitored, and integrated over time in order to provide a host of automatically calculated values that can be used in occupational and environmental noise assessments. -
Page 15: Noise Assessment Steps
1: Introduction Overview Noise Assessment Steps Perform a task-based work flow analysis of unacceptable “noisy” areas and list regulations/codes you will follow. Observe facility/areas and jot down areas of concern. Check with standards and noise ordinance regulations in your region/city. ... -
Page 16: Eg5 Overview
Figure 1-3. The models selectable in the 5-bay charger section is dependent on if you selected the eg3 / eg4 or eg5 models. DMS will display a green circle with a checkmark indicating a docked, powered on Edge with the serial name. -
Page 17: 2: Getting Started
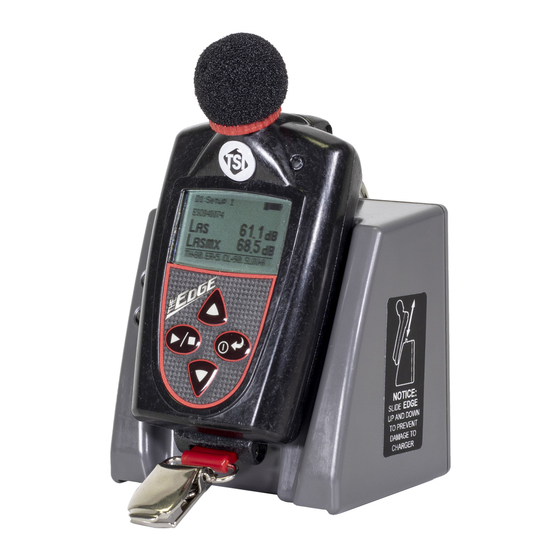
CHAPTER 2: Getting Started Checking the Equipment 2: Getting Started This chapter is designed to guide you through basic information you will need to begin logging your studies. Checking the Equipment If your instrument was sent to you in a storage case, remove all the packaging and become acquainted with the following equipment so you can quickly get started with your noise studies. -
Page 18: Turning On
1. To turn on the Edge, press the on/off and enter button. The Edge splash screen (see Figure 2-3 for an example, page 10) will appear indicating the model (i.e. “eg5”) and firmware version. The screen will be in the measurement view. LED Indicator Battery indicator icon If icon is fully shaded, this indicates full battery power (approx. -
Page 19: Led Indicator
2: Getting Started Turning off LED Indicator There is a three-color LED indicator on the Edge, located to the right of the TSI logo. Table 2-1 explains when and why the LED indicator color will appear. NOTE: The LED indicator can be disabled via DMS (see “Chapter 3, "Setting up the Edge via DMS".) LED indicator... -
Page 20: Display And Keypad
2: Getting Started Display and Keypad Display and Keypad The keypad is used to run and stop your studies, view your measurement values, and power on and off the dosimeter. Diagram The following diagram explains the features on the display and keypad. Windscreen and microphone LED indicator ... -
Page 21: Tsi Detection Mangement Software (Dms)
2: Getting Started TSI Detection Mangement Software (DMS) TSI Detection Mangement Software (DMS) TSI Detection Management Software (DMS) is a software application designed by TSI that runs under the Windows operating system. You can use DMS for a variety of functions related to the Edge dosimeter and with many other TSI instruments. -
Page 22: Docking Station Components
2: Getting Started Docking Station Functionality Docking Station Components The table below explains the EdgeDock1 or EdgeDock5 LED indicators, power connector, USB connector, and contact pins. Docking station components Explanation Charging indicator Identifies if the dosimeter is “charging” or “fully charged”. A red blinking LED indicates the dosimeter is charging. -
Page 23: Powering Edgedock1 Or Edgedock5
2: Getting Started Docking Station Functionality Powering EdgeDock1 or EdgeDock5 Powering EdgeDock1 or EdgeDock5 Assemble the charger adapter and plug adapter as illustrated in Figure 2-5. (It will be the same process for an EdgeDock5.) Plug the charger adapter directly into the wall (electrical wall plate). Plug the opposite end into the power connector (or jack) of the EdgeDock1. -
Page 24: Charging Your Dosimeter
2: Getting Started Docking Station Functionality Charging your Dosimeter The number of hours you have used your dosimeter from your last charge will impact your total charge time. For example, if the battery clock indicator (see “Checking battery power” for more information) displays 20 hours remaining on the battery and you want to charge the battery, the approximate charging time is 2 hours. -
Page 25: Mounting The Docking Station To A Wall
2: Getting Started Docking Station Functionality Mounting the Docking Station to a Wall The docking station is equipped with two single screw slots in case you want to mount the docking station to the wall. The figure below displays the backside of the single bay dock. Screw slots Used to mount to a wall Figure 2-8: Backside of EdgeDock1... - Page 26 2: Getting Started Docking Station Functionality (This page intentionally left blank)
-
Page 27: 3: Setting Up The Edge Via Dms
3: Setting up the Edge via DMS Noise Studies The eg5 model comes equipped with three customizable user setups. You have the option to customize the parameters for threshold values, exchange rate values, filtering, C-A measuring, an upper limit value, and a criterion level. -
Page 28: Understanding What Data Is Stored
3: Setting up the Edge via DMS Understanding what Data is Stored Understanding what Data is Stored When you are running noise dosimetry studies, there are two types of data stored on the dosimeter which include the summary data and time history (or Logged) data. Summary Data Summary data represents values that occurred over the entire run of the study. -
Page 29: Logging
3: Setting up the Edge via DMS Views on the Edge Logging The eg5 model only logs at one minute intervals and includes the following measurements: Meter 1 logs Lavg/Leq • Meter 2 logs Lavg/Leq Meter 3 logs Lavg/Leq •... - Page 30 3: Setting up the Edge via DMS Views on the Edge Views on the Edge Explanation Time-weighted average—is the sound level (in dB) that is accumulated for any time period but with its average level computed over an 8-hour period. TWA is usually measured with A- weighting, Slow response, and a 5 dB exchange rate.
-
Page 31: Edge Measurement Descriptors/Variants
Explanation Memory storage symbol— eg5—the eg5 model displays the total memory storage remaining in hours and minutes. For example, if it displays the memory symbol 100:50 this represents 100 hours and 50 minutes of memory storage remaining on the dosimeter. -
Page 32: Docking
3: Setting up the Edge via DMS Docking Docking Communicating & Downloading Data By using your docking station, USB cable, software, and your dosimeter, you can quickly communicate between the software and the dosimeter. There are two methods for communicating which are: ... -
Page 33: Customizing Setup Parameters In Dms
NOTE: The following DMS settings apply to the eg5 model. If you are also using other models (eg3/eg4) and have them docked in a 5-bay charger, they will appear in the “Edge Bay Charger”... -
Page 34: Dosimeter Setting
Dosimeter Setting Dosimeter Setting The Edge general settings are used to set up the instrument with basic parameters. The eg5 model features three dosimeters in one with three customized, user-defined settings. Please refer to the General Edge parameters table below for details. With the Edge 5, you have the option of setting up three virtual dosimeters. -
Page 35: Table 3-3: Dosimeter Fields Explained For The Edge
3: Setting up the Edge via DMS Dosimeter Setting Description Dosimeter Setting *NOTE: refer to Glossary for more detailed information. Projected Time A selectable time parameter via the up/down arrows or type in a value. The projected time value is used to make projected dose calculation for the dose measurement. -
Page 36: Setting Up And Viewing C-A Measurements
Dosimeter Setting Setting up and Viewing C-A Measurements With the eg5 model, you have the option of enabling C-A measurement and viewing the values in tables and charts (also called “panels”). For your setup parameters, C-A is selected via the Setup button of DMS’s dosimeter screen. A... -
Page 37: Dose % Indicator Led
3: Setting up the Edge via DMS Customizing Setup Parameters in DMS Dose % Indicator LED The Edge is equipped with a multifunction LED indicator located to the right of the TSI logo. Aside from its communication-related functions while in the dock station, it can be used as a Heartbeat to indicate the dosimeter run state. -
Page 38: Display Setting
3: Setting up the Edge via DMS Display Setting Display Setting The display screen is used to customize the parameters which will appear on your Edge. It is organized by two columns, the “Display position” and the “Item to Display” and includes a “Set selected Items” selection/drop down box. -
Page 39: Security Setting
3: Setting up the Edge via DMS Security Setting Security Setting The security setting is a type of “locking” feature (or secure run feature) that enables you to password protect the instrument to prevent users from inadvertently terminating a study. Initially, this feature is set through the software and turned on once in run mode by pressing run/stop key three consecutive times. -
Page 40: Auto Run Setting
3: Setting up the Edge via DMS Auto Run Setting Auto Run Setting With the Edge auto-run mode, you can program up to two auto start and auto stop configurations when start date and duration parameters are enabled. This is useful if you want to pre-set the instruments to run and stop for a specific time period, such as a week-long study. -
Page 41: Firmware Update
3: Setting up the Edge via DMS Firmware Update Firmware Update Edge firmware updates are performed in DMS when the instruments are docked, communicating, and the update key is selected. Please follow the steps below prior to updating your Edge(s). NOTE: This feature enables you to update all of your docked Edges (when powered on and not in run mode). -
Page 42: Edge: Miscellaneous Setup
3: Setting up the Edge via DMS Edge: Miscellaneous Setup Edge: Miscellaneous Setup The Edge miscellaneous setup screens can be used to set/get the Date Time of the instrument and set/get its identity string. Setting/Getting the Date Time Set the date time of the instrument on the Date-Time tab of the Miscellaneous setup screen. -
Page 43: Saving And Sending Configurations
3: Setting up the Edge via DMS Saving and Sending Configurations Saving and Sending Configurations With the Edge, there are saved setup profiles used to quickly access and apply to The Edge(s). The steps below explain how to save the configuration settings in DMS and how to send to the instrument. There is also a Get Configuration feature which is used to pull the setup from the instrument into the software. - Page 44 3: Setting up the Edge via DMS Saving and Sending Configurations (This page intentionally left blank)
-
Page 45: 4: Running And Operating
CHAPTER 4: Running and Operating Overview of running a study 4: Running and Operating As explained in Chapter 3, the view of your display is customizable via DMS. NOTE: The subsequent sections show examples of views which you may have disabled on your dosimeter. -
Page 46: Positioning The Edge On Your Shirt
4: Running and Operating Positioning the Edge on your Shirt Positioning the Edge on your Shirt Depending on what accessories you ordered with the Edge, you may have either clips on the top and bottom of the dosimeter or some other type of mounting device. (Refer to Chapter 6, “Contact/Service Information”). -
Page 47: Checking Battery Power
4: Running and Operating Checking Battery Power Checking Battery Power Typically, the life of the battery is approximately 40 hours nominal without LED activated (see Appendix A for specific specifications). It is recommended to perform a daily download of the measured data while simultaneously charging the battery for maximum efficiency. -
Page 48: Calibrating
4: Running and Operating Calibrating Calibrating It is recommended to calibrate your dosimeter before you run your study(ies) and after your study(ies) to ensure highly accurate measurement results. The steps below address how to calibrate for either a pre or post calibration. ... -
Page 49: Resetting The Dosimeter
4: Running and Operating Resetting the Dosimeter Resetting the Dosimeter The Edge can be reset through the dosimeter keypad or via DMS. This will clear out all of the data history to ensure you have sufficient memory space on the Edge for new studies. The steps below outline how to reset your dosimeter. -
Page 50: Adjusting The Contrast On The Edge
4: Running and Operating Adjusting the Contrast on the Edge Adjusting the Contrast on the Edge Contrast 1. Ensure the meter is Off. 2. Turn the meter on by pressing the button. 3. When the splash screen appears, press and hold the buttons until the splash screen disappears. -
Page 51: Running Studies
4: Running and Operating Starting a Run Running Studies With a couple pushes on the keypad buttons, you will be running and viewing your studies. After you’re done recording studies, you can load the study data into DMS to manipulate, analyze, save, and create reports. -
Page 52: Stopping A Study
4: Running and Operating Indicators/Icons on the Display Stopping a Study While the dosimeter is running, you can end the study by pressing and holding the stop button. How to stop a noise study While running, press and hold the button. -
Page 53: Locking Or Securing
4: Running and Operating Locking or Securing Locking or Securing How to lock or secure 1. Turn the dosimeter on and press the button to begin logging your study. 2. To enable the lock, press button three consecutive times within one second intervals. ... - Page 54 4: Running and Operating Unlocking (This page intentionally left blank)
-
Page 55: 5: Viewing Your Studies In Dms
CHAPTER 5: Viewing your Studies in DMS Downloading Data 5: Viewing your Studies in DMS The focus of this chapter is to discuss how to view your studies via Detection Management Software. The first section explains how to retrieve your studies from the dosimeter, and the subsequent sections will then walk you through viewing, organizing, and customizing your studies. -
Page 56: Figure 5-3: Downloading In Dms With The Edge
5: Viewing your Studies in DMS Downloading Data 5. Select Noise Dosimetry (see 1), Edge (see 2), and Edge 5 (see 3). Select the docked Edge (s) to download (see 4). 6. Click button. In the status field, it will state download is successful. ... -
Page 57: Viewing Data And Data Finder Page
5: Viewing your Studies in DMS Viewing Data and Data Finder Page Viewing Data and Data Finder Page When you download the data via the the download feature, the data is stored and viewable via the data finder page with advanced charting, tables, and reporting capability. The information is viewable in customizable graphs and/or with measurements/parameters displayed on the top navigational bar. -
Page 58: Report View
5: Viewing your Studies in DMS Report View Report View button provides a quick link to view/print the Edge data. To customize the data, refer to the next session, panel view page. Click to print the report. Edge, logged data chart displayed in DMS report (scroll through to view the online report if... -
Page 59: Panel Layout View(Charts/Tables)
5: Viewing your Studies in DMS Panel Layout View(charts/tables) Panel Layout View(charts/tables) When you are in the data finder page (see above), select either the Analyze button or double-click on a session/study to view the data in charts and tables as displayed in Figure 5-6. The measurements and parameters will be displayed in charts and tables which may be customized for analysis and/or reporting purposes. -
Page 60: Quick Tips With Panels (Charts/Tables)
5: Viewing your Studies in DMS Panel Layout View(charts/tables) Quick Tips with Panels (charts/tables) To stretch the panel, click on one of the grips along the panel’s edges and drag the mouse. The panel will expand or shrink when resizing. ... -
Page 61: 6: Technical Support/Customer Service
CHAPTER 6: Technical Support/ Customer Service 6: Technical Support/ Customer Service Replacing Microphone and Windscreen Attaching/Detaching The Edge features a field replaceable microphone and a screw-on removable windscreen. NOTE: If you ordered an Edge kit, extra windscreen(s) will be included in your case. Attaching/Detaching the windscreen and microphone 1. -
Page 62: Hard Hat Attachment Kit
6: Technical Support/ Customer Service Attaching/Detaching Hard Hat Attachment Kit The following instructions explain how to assemble and attach the hard hat kit to a standard hard hat. Hard Hat Attachment kit A. Epaulette mount B. Hard hat mount Using a 3/32” hex wrench, twist the top shoulder bolt counterclockwise to loosen and remove the bolt and the clip. -
Page 63: Contact/Service Information
6: Technical Support/ Customer Service Technical Support Contacts Contact/Service Information This section gives directions for contacting TSI Incorporated for technical information and directions for returning the Edge 5 Personal Noise Dosimeter for service. Technical Support Contacts If you have any difficulty setting or operating the instrument, or if you have technical or application questions about this system, contact TSI’s Technical Support. -
Page 64: Returning For Service
6: Technical Support/ Customer Service Returning for Service Returning for Service Visit our website at http://rma.tsi.com and complete the on-line “Return Merchandise Authorization” form or call TSI at 1-800-680-1220 (USA) or (651) 490-2860, or 001 651 490-2860 (International) for specific return instructions. Customer Service will need the following information: ... -
Page 65: A: Specifications
CSA International (US and Canada) certificate number: 2283414 MSHA Approval number: 18-A100008-0 Safety Markings Manufacturer TSI Incorporated Equipment/model eg5 Dosimeter Code Ex ia I/IIC 143ºC IP65 Ambient temp. range: -10ºC<Tamb<+50ºC (Alternate Code) Ex ia I/IIC T4 IP65 Ambient temp. range: -10ºC<Tamb<+40ºC Certificate number IECEx SIM 08.0012... -
Page 66: Power/Electrical Characteristics
Appendix A Power/Electrical Characteristics Power/Electrical Characteristics Life Up to 40 hours of continuous operation at normal operation without LED activated under reference to environmental conditions when full capacity batteries are installed. It is recommended to charge the battery frequently for maximum efficiency. Type Lithium Polymer (Flat cell) Memory capacity... -
Page 67: Edgedock1 And Edgedock5
Appendix A EdgeDock1 and EdgeDock5 EdgeDock1 and EdgeDock5 EdgeDock1 and EdgeDock5 are powered by a 12-volt charger adapter with international plug adapters. The backside of the Edge slides into the hook of the EdgeDock1 or EdgeDock5 with the mounting clasps rotating to a 90-degree angle (which will rest on a table/work area). Additionally, the EdgeDock1 (or EdgeDock5) are equipped with two single screw slots for wall mounting purposes. -
Page 68: Measurements
(Lmn), Peak Value (Lcpk), Exposure, Run Time, TWA, UL Time, Lc-a Measurement Parameters Dosimeters Up to three dosimeters at once (eg5), each with its own assignable profile (via DMS only). RMS Range 70 to 140 dB RMS Weighting... -
Page 69: Edge Block Diagram
Appendix A Edge Block Diagram Edge Block Diagram Analog Board... - Page 70 Appendix A Edge Block Diagram Edge Block Diagram (continued)
-
Page 71: Warranty
Appendix A Warranty Warranty (For country-specific terms and conditions outside of the USA, please visit www.tsi.com.) Seller warrants the goods, excluding software, sold hereunder, under normal use and service as described in the operator's manual, to be free from defects in workmanship and material for 12 months, or if less, the length of time specified in the operator's manual, from the date of shipment to the customer. - Page 72 Appendix A Warranty (This page intentionally left blank)
-
Page 73: B: Glossary Of Terms
APPENDIX Appendix B B: Glossary of Terms B: Glossary of Terms Background Noise, effects of Background noise can cause considerable error in measurement when its level is high relative to the level of a noise source of interest. If you can make measurements both with and without the contribution of a noise source of interest, you can mathematically subtract the background noise from the combined measurement, yielding the level of the noise source of interest alone. -
Page 74: Figure B-1: C-A Weighting Response Curve
Appendix B B: Glossary of Terms The C-A measurement is an Lavg that enhances the low- frequency components of the sound signal. It is the result of subtracting an A-weighted Lavg from a simultaneously collected C-weighted Lavg and is sometimes used as the NRR (noise reduction rating) factor to determine if hearing protection devices are adequate for usage in the field. - Page 75 Appendix B B: Glossary of Terms Crest Factor Crest Factor is the ratio of the instantaneous peak value of a wave to its RMS value. This is a performance specification of a meter’s ability to process signals that have peaks that are substantially higher than their RMS averages.
- Page 76 Appendix B B: Glossary of Terms Example: OSHA uses an Exchange Rate of 5 dB. Suppose the TWA is 100 dB. The dose would double for each 5 dB increase over the Criterion Level of 90 dB. The resulting dose is therefore 400%. If the TWA was instead equal to 80 dB then the dose would halve for each 5 dB below the Criterion Level.
- Page 77 Appendix B B: Glossary of Terms Lavg (Average Level) Lavg is the average sound level measured over the run time. This becomes a bit confusing when thresholds are used. Any sound below the threshold is not included in this average. Remember that sound is measured in the logarithmic scale of decibels therefore the average cannot be computed by simply .adding the levels and dividing by the number of samples.
- Page 78 Appendix B B: Glossary of Terms Measurements must always be at least 5 dB above the Noise Floor to be valid. Therefore, the lowest valid measurements of the dosimeter are approximately 40 dB on A-Weighting and 50 dB on C-Weighting. Peak Level Peak is the highest instantaneous sound level that the microphone detects.
- Page 79 Appendix B B: Glossary of Terms SEL/Lxe (Sound Exposure Level) The sound exposure level averages the sampled sound over a one second period. Assuming the sampled run time to be greater than one second, SEL is the equivalent one-second noise that would be equal in energy to the noise that was sampled.
- Page 80 Appendix B B: Glossary of Terms Weighting (A, C, Z, etc.) “A”, “B”, “C”, “Z” and LINEAR are the standard weighting networks available. These are frequency filters that cover the frequency range of human hearing (20 Hz to 20 kHz). “A” weighting is the most commonly used filter in both industrial noise applications (OSHA) and community noise regulations.
-
Page 81: C: Measurement Equations
APPENDIX Appendix C C: Measurement Equations C: Measurement Equations... - Page 82 Appendix C C: Measurement Equations Variables used in equations...
- Page 83 INDEX Index INDEX Edge Dock New hardware wizard ......... 23 Attaching EdgeDock1 ............... 45 the Edge ............. 36 EdgeDock1 and EdgeDock5 ........22 eg4 ................6 Background Noise, effects of Memory storage ..........21 Defined ............... 63 model explained ............ 6 Battery Exchange Rate Checking .............
- Page 84 Index Running a study Overview ............. 35 Noise Floor Defined ............... 67 Securing run mode ........... 43 Options menu ............. 39, 40 Defined ............... 69 Overload ..............42 Sound pressure ............3 Splash screen ............8 Standards ..............3 packing instructions ..........54 Stop mode ..............
- Page 85 TSI Incorporated – Visit our website www.tsi.com for more information. Tel: +1 800 874 2811 India Tel: +91 80 67877200 Tel: +44 149 4 459200 China Tel: +86 10 8219 7688 France Tel: +33 1 41 19 21 99 Singapore Tel: +65 6595 6388 Germany Tel: +49 241 523030...
Need help?
Do you have a question about the EG5 and is the answer not in the manual?
Questions and answers