Table of Contents
Advertisement
Quick Links
Instruction Manual and
Experiment Guide for the
PASCO scientific Model
OS-8537 and OS-8539
EDUCATIONAL SPECTROPHOTOMETER
ACCESSORY KIT AND EDUCATIONAL
SPECTROPHOTOMETER SYSTEM
© 1998 PASCO scientific
®
10101 Foothills Blvd. • Roseville, CA 95747-7100 USA
Phone (916) 786-3800 • FAX (916) 786-8905 • web: www.pasco.com
012-06575A
3/98
N T
N T
O U
O U
M
M
E R
E R
R IZ
R IZ
L A
L A
P O
P O
$10.00
better
ways to
teach science
Advertisement
Table of Contents

Related Manuals for Pasco Scientific OS-8537


Summary of Contents for Pasco Scientific OS-8537
- Page 1 Instruction Manual and 012-06575A 3/98 Experiment Guide for the PASCO scientific Model OS-8537 and OS-8539 EDUCATIONAL SPECTROPHOTOMETER ACCESSORY KIT AND EDUCATIONAL SPECTROPHOTOMETER SYSTEM R IZ R IZ © 1998 PASCO scientific $10.00 better ® 10101 Foothills Blvd. • Roseville, CA 95747-7100 USA...
-
Page 3: Table Of Contents
012-06575A Educational Spectrophotometer Table of Contents Section Page Copyright, Warranty, and Equipment Return ............. ii Quick Start ......................1 Introduction ...................... 3 Description ....................... 4 Set Up Mounting the Rotary Motion Sensor ............5 Mounting the Degree Plate and Light Sensor Arm ........6 More Information About the Degree Plate ........... -
Page 4: Copyright, Warranty And Equipment Return
Copyright Notice Equipment Return The PASCO scientific manual for the Model OS-8537 Should this product have to be returned to PASCO Educational Spectrophotometer Accessory Kit and OS- scientific, for whatever reason, notify PASCO scientific 8539 Educational Spectrophotometer System is copy- by letter or phone BEFORE returning the product. -
Page 5: Quick Start
012-06575A Quick Start Educational Spectrophotometer Quick Start The following pages give an overview of the Spectrophotometer equipment setup. Step One: Prepare the Rotary Motion Sensor by removing the thumbscrew, three-step pulley, and Spectrophotometer Base rod clamp. Put the Pinion on the shaft. thumbscrew three-step pulley Rotary Motion Sensor... - Page 6 Educational Spectrophotometer Quick Start 012-06575A Step Five: Put the Spectrophotometer Base onto one Step Eight: Set up the experiment in the end of the Optics Bench. ScienceWorkshop program. 1. Select the Light Sensor for Analog Channel A. 2. Select the Rotary Motion Sensor for Digital Channels 1 and 2.
-
Page 7: Introduction
About This Manual This manual describes the PASCO OS-8537 Educational Spectrophotometer Accessory Kit and the PASCO OS-8539 Educational Spectrophotometer System. The OS-8537 Accessory Kit is designed to be mounted on the Optics Bench of the OS-8515 Basic Optics System. Components of the Kit... -
Page 8: Description
Educational Spectrophotometer 012-06575A Components of the System The OS-8539 Educational Spectrophotometer System includes the items in the Spectrophotometer Accessory Kit plus the following: Optics Bench (60 cm) Rotary Motion Sensor (CI-6538) High Sensitivity Light Sensor (CI-6604) Aperture Bracket (OS-8534) Rotary Motion Sensor Aperture Bracket R IZ DIN-to-DIN cable... -
Page 9: Set Up
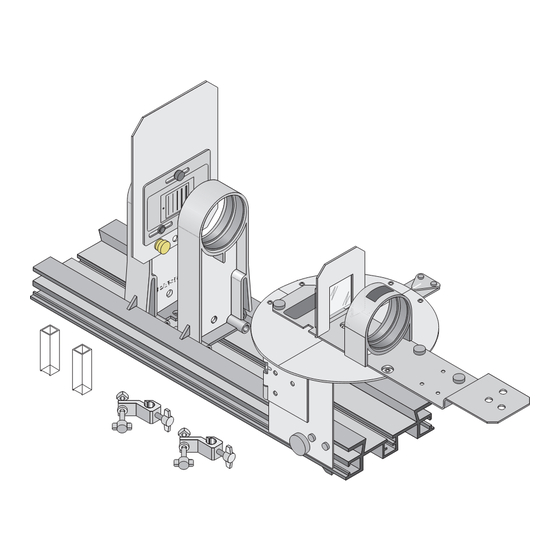
012-06575A Educational Spectrophotometer The Grating disperses the beam of Diffraction Grating Optics Bench light into a first order spectrum Collimating Lens Grating Mount and higher order spectra. The higher order spectra are broader Light Sensor Arm and less bright than the first order Focusing Lens spectra, and may overlap. -
Page 10: Mounting The Degree Plate And Light Sensor Arm
Educational Spectrophotometer 012-06575A Remove the two small thumbscrews from the threaded Spectrophotometer Base storage holes on the side of the Spectrophotometer Base and set them aside for the moment. Remove the Pinion from the storage post on the opposite side of the Spectro- photometer Base and set the Pinion aside for a moment (see Fig. -
Page 11: Mounting The Aperture Bracket Light Sensor Mount And Light Sensor
012-06575A Educational Spectrophotometer 1. Remove the Light Sensor Arm from the Degree Plate by unscrewing the two small thumbscrews. (You can store the thumbscrews in the empty threaded holes on the Light Sensor Arm.) Turn the Degree Plate so the zero degree mark is exactly aligned with the index mark on the arm that extends from the Spectrophotometer Base. -
Page 12: Mounting The Grating Mount
Educational Spectrophotometer 012-06575A Rotate the Aperture Disk on the front of the Light Sensor Mount so that the narrowest slit is in line with the opening to the sensor. Connect one end of the DIN-to-DIN cable that is included with the High Sensitivity Light Sensor to the DIN connector on the end of the sensor. -
Page 13: Mounting The Collimating Slits And Lens
012-06575A Educational Spectrophotometer holds the clamp onto a rod. Optics Bench Fixed Angle: To mount the clamp on the bench so it is parallel to the square nut bench (at a fixed angle), put the clamp on the bench with the spacer Align the square nut on the opposite side of the clamp from the square nut. -
Page 14: Mounting The Grating
Educational Spectrophotometer 012-06575A the beam’s path. Check to see that the light beam’s width is about the same at each point along its path. Note that the light may not be in focus during this process. If the light beam is not perfectly vertical, loosen the small thumbscrew that holds the Collimating Slits slide and adjust the slide, or loosen the brass thumbscrews that hold the Collimating Slits Plate onto the holder and adjust the plate until the collimated beam is vertical. -
Page 15: Procedures
012-06575A Educational Spectrophotometer Procedures Grounding 1. If you use an AC powered spectral light source, plug the power cord for the light source into a different outlet than the outlet used for your ScienceWorkshop interface and computer. 2. For a very dim light source you may need to use the 100 GAIN setting on the High Sensitivity Light Sensor and the 100x Sensitivity setting in the ScienceWorkshop program. -
Page 16: General Information About The Light Sensor
Educational Spectrophotometer 012-06575A Expression for the Angular Position Divide by 60 if the small and the radius of the small post on the Pinion*. of the Rotary Motion Sensor post of the Pinion is used, or The ratio is approximately 60 to 1. If the larger put in the exact value of the diameter section at the bottom of the Pinion is ratio of radii. -
Page 17: Calibrating The Grating
012-06575A Educational Spectrophotometer Mercury spectrum For example, measure the difference in angle between these two lines. One-half of the difference is the angle, θ, to use for calculating the wavelength, λ. central ray Figure 24: Measure the Angles for Both First Order Spectral Patterns. other side of the central ray. -
Page 18: Other Information
Educational Spectrophotometer 012-06575A rotation is 6˚, the angular resolution is 6˚ divided by 1440, or one quarter of a minute (0.25’) or fifteen seconds of arc. This translates to a wavelength resolution of 2 nm, given a grating line spacing of approximately 1666 nm for the Diffraction Grating included with the Spectrophotometer. -
Page 19: Activity 1: Emission Spectrum
Educational Spectrophotometer Activity 1: Emission (Bright Line) Spectrum EQUIPMENT NEEDED – Spectrophotometer System (OS-8539) – Spectrophotometer Kit (OS-8537) – High Sensitivity Light Sensor (CI-6604) – Rotary Motion Sensor (CI-6538) – Basic Optics Bench (part of OS-8515) – Aperture Bracket (OS-8534) –... - Page 20 Educational Spectrophotometer 012-06575A Procedure In this activity, the High Sensitivity Light Sensor measures the relative intensity of colors of light in an emission spectrum produced by light from a mercury vapor light source passing through a grating. The Rotary Motion Sensor measures the angle, θ, of each band or “bright line”...
- Page 21 012-06575A Educational Spectrophotometer 3. In the ScienceWorkshop program, use the Expression for the Angular Position Divide by 60 if the small of the Rotary Motion Sensor post of the Pinion is used, or Calculator to create a calculation of Actual put in the exact value of the Angular Position based on the Angular Posi- ratio of radii.
- Page 22 Educational Spectrophotometer 012-06575A 6. Set the GAIN select switch on top of the light sensor to 100 and repeat the data collection procedure. Analyze the Data • Refer to the User’s Guide for your version of ScienceWorkshop for detailed information on using ScienceWorkshop for data analysis.
-
Page 23: Activity 2: Absorption Spectrum
Educational Spectrophotometer Activity 2: Absorption (Dark Line) Spectrum EQUIPMENT NEEDED – Spectrophotometer System (OS-8539) – Spectrophotometer Kit (OS-8537) – High Sensitivity Light Sensor (CI-6604) – Rotary Motion Sensor (CI-6538) – Basic Optics Bench (part of OS-8515) – Aperture Bracket (OS-8534) –... - Page 24 Educational Spectrophotometer 012-06575A 2. Put an empty cuvette in front of the cloth hood Cuvette High Sensitivity Light Sensor binder clips Light Source between the sensor and the back of High Sensitivity Light Sensor the Aperture Disk. Make sure that the smooth sides of the cuvette are HIGH SENSITIVITY LIGHT SENSOR...
- Page 25 012-06575A Educational Spectrophotometer 1. Darken the room. Examine the spectrum closely. Determine which of the two first order spectral patterns is brightest. 2. Use the Light Sensor Arm on the Spectrophotometer to turn the Degree Plate until the light sensor is beyond the last color in the brightest first order spectral pattern.
- Page 26 Educational Spectrophotometer 012-06575A Data Table Record your data here: θ θ ∆θ θ = ∆θ/2 λ = d sin θ “Dark Line” Questions 1. What color corresponds to the wavelength for each “dark line” in your absorption spectrum? 2. How does the color or colors that are absorbed out of the continuous spectrum compare to the naked eye color of your liquid sample? Extensions Repeat the process for a different liquid sample, such as chlorophyll extracted from a spinach leaf.
-
Page 27: Teacher's Guide
012-06575A Educational Spectrophotometer Teacher’s Guide Activity 1: Emission (Bright Line) Spectrum Notes 1. A mercury vapor light source may take up to 20 minutes to warm up, so it is a good idea to turn it on as soon as possible. 2. - Page 28 Educational Spectrophotometer 012-06575A blue yellow green violet Mercury spectrum blue-green central ray Figure TG-1: Example of Mercury Spectrum Hydrogen Spectrum central ray Figure TG-2: Example of Hydrogen Spectrum with Approximate Wavelengths on Horizontal Axis...
- Page 29 012-06575A Educational Spectrophotometer Teacher’s Guide (continued) Activity 2: Absorption (Dark Line) Spectrum Notes 1. The light source from the PASCO Introductory Optics System or the light source from the PASCO Basic Optics System can be used as the incandescent source. 2.
- Page 30 Educational Spectrophotometer 012-06575A Copper Sulfate Absorbtion Cologne Absorption continuous continuous spectrum spectrum absorption spectrum absorption spectrum Figure TG-5: Example of Absorption Spectrum for a Figure TG-6: Example of Absorption Copper Sulfate Solution Spectrum for Cologne...
-
Page 31: Technical Support
• If your problem is computer or software related, mail: PASCO scientific please note: 10101 Foothills Blvd. Title and Revision Date of the software. Roseville, CA 95747-7100 USA Type of computer (make, model, speed).
Need help?
Do you have a question about the OS-8537 and is the answer not in the manual?
Questions and answers