Table of Contents
Advertisement
Quick Links
Advertisement
Table of Contents

Related Manuals for Foxfury Lighting Solutions Taker B10


Summary of Contents for Foxfury Lighting Solutions Taker B10
- Page 1 TAKER B10 940K-010S PRODUCT MANUAL...
-
Page 2: Table Of Contents
TABLE OF CONTENTS INTRODUCTION Taker B10 Reference Guide Physical Characteristics & Warnings BATTERY Battery Installation and Replacement Battery Life OPERATION Operational Modes ASSEMBL Y Assembling Mount to Clamp Inserting/Removing from the Holder FEATURES Pressure Switch Tilt Multiple Lights on One Shield... -
Page 3: Taker B10 Reference Guide
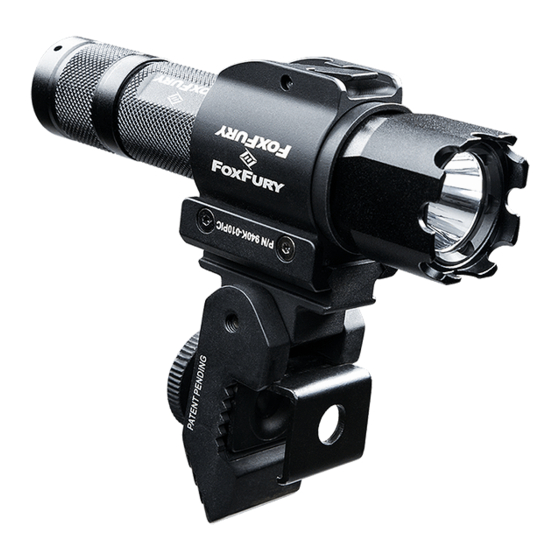
TAKER B10 REFERENCE GUIDE SIDESLIDE FLASHLIGHT (P/N 940-010FI) LOCKING GROOVE POWER/MODE SWITCH ANTI-ROLL HEAD TAILCAP HANDLE STRIKE BEZEL LANYARD HOLE RUBBER SLEEVE ASSEMBLED B10 PICATINNY C-CLAMP (WITHOUT FLASHLIGHT) CLAMP PICATINNY RAIL RELEASE LEVER TILT THUMBSCREW ADJUSTMENT SCREW HOLDER PICATINNY MOUNT... -
Page 4: Physical Characteristics & Warnings
PHYSICAL CHARACTERISTICS Please read below before using your Taker B10 as it relays beneficial operating and safety information. B10 FULL ASSEMBL Y (WITH FLASHLIGHT) (P/N 940K– 010S) DIMENSIONS 4.7 x 1.5 x 5.5 in (119 x 38 x 140 mm) WEIGHT 12.7 oz (360 g) (with no battery) -
Page 5: Battery
BATTERIES The Taker B10 flashlight requires one (1) 18650 battery or two (2) CR123 batteries. Mixing of new and used, or different brand batteries is not recommended as this could lead to leakage or explosion. BATTERY INSTALLATION AND REPLACEMENT TAILCAP –... -
Page 6: Operational Modes
Begin with the Picatinny Mount. Using the provided 2mm Hex Key , loosen ONL Y two (2) of the Mount Screws (see “Taker B10 Reference Guide” on pg. 3 for location). NOTE: The Mount Screws do NOT need to be completely removed in order to mount. -
Page 7: Inserting/Removing From The Holder
INSERTING/REMOVING FROM THE HOLDER The flashlight is easily securable and removable by using the Release Lever. TO INSERT THE FLASHLIGHT INTO THE HOLDER: Insert the flashlight by pushing it into the beveled opening on the front of the Holder. Once locked, the Release Lever falls into a groove on the handle, securing the flashlight in place. -
Page 8: Features
Pressure Switch. 60º TIL T The Picatinny C-Clamp of the Taker B10 can tilt 30º (60º total) on both sides. This makes it easier to chose direction of light. MUL TIPLE LIGHTS ON ONE SHIELD... - Page 9 To adjust the angle of the B10, use the provided Hex Key (4mm) to loosen the Tilt Adjustment Screw (see “Taker B10 Reference Guide” on pg. 3 for location). Then adjust the angle of the Picatinny Mount to desired position.
-
Page 10: Warranty
WARRANTY AND OTHER INFORMATION PRODUCT DURABILITY FoxFury, LLC is not responsible for any injury or damage caused during the use of this product. Usage of this product must be IPX7 supervised by an adult when it is being used by a minor. Meets NFPA 1971 Guidelines and can Any FoxFury product should sustain exposure to 500°F (260°C) for... -
Page 11: Contact Foxfury
VOID if this Product has been altered or modified in any way (including but not limited to attempted warranty repair without authorization from Foxfury and/or alteration/removal of the serial number). To expedite warranty concerns, we encourage the end user to register their FoxFury Product at www.foxfury .com/pages/ warranty-registration. - Page 12 FOXFURY .COM 10/2018...
Need help?
Do you have a question about the Taker B10 and is the answer not in the manual?
Questions and answers