Advertisement
Quick Links
ENGLISH
Exposure Modes
Instruction Manual
For the exposure mode settings, follow the instructions in the manual provided with your
camera.
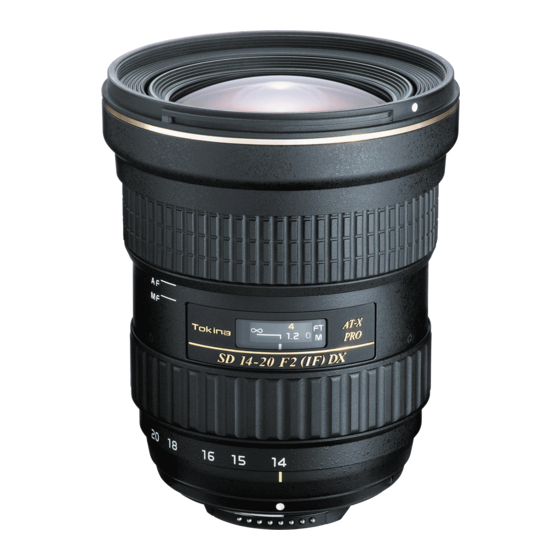
AT-X 14-20mm F2 PRO DX
Filters
Use the appropriate sized threaded filters with these lenses. Be sure your filters are clear
before taking a photo. Perfect photographs cannot be taken if the filter is dirty or when
water droplets or other foreign particulates are on the filter. Clean the filter thoroughly
before taking photographs.
This Tokina's DX lenses are
* Always use one filter at a time. If two or more filters are used together, or when a thick
filter such as a polarized filter is used, vignetting (darkening at the corners of the
designed exclusively for use
exposed image) may occur.
with DSLR cameras having an
APS-C sized image sensor.
Using this lens with a DSLR
Caution Regarding the Use of a Built-in Flash
camera which has an larger image
sensor than APS-C, or with a SLR
If the camera's built-in flash is used, the light of the built-in flash will be partially obstruct-
ed by the lens, so the picture shows a large shaded area at the bottom of the image.
camera designed for silver-halide
Therefore, it is advisable to use an external flash when this lens is attached.
film, will cause vignetting.
Flash Photography (Red-eye Phenomenon)
When photographing people with the aid of a flash, their eyes sometimes show as red in
the image. This is called the "red-eye phenomenon. " Follow your camera manual instruc-
tions on how to remove red eye.
Descriptions of Parts
* Depending on the lens model, you may hear a sound from inside the lens when the
lens is shaken lightly. This is the sound of the ball bearings that are designed to
❶ Manual Focusing Ring
❻ Center Index
smooth the action of the focus ring. It does not indicate a problem with the general
❷ Focus Distance Scale
❼ Auto Focus (AF) Position
functioning of the lens.
❸ Focus Distance Index
❽ Manual Focus (MF) Position
❹ Zoom Ring
❾ Hood Attachment Index
❺ Focal Length Scale
■ Attaching a lens hood
Unlike a SLR camera using a silver halide film, a digital SLR camera produces a large
How to Attach/Detach the Lens
measure of reflection due to its imaging sensor. It is therefore recommended that
a lens hood be attached when you're taking photographs with a digital SLR
Attach/detach the lens to/from your camera according to the instructions in the manual
camera. Especially when a wide-angle lens is used, a lens hood should be
provided with your camera.
attached even indoors.
* When attaching/detaching the lens, be careful not to touch the electronic contacts on
the lens mounting surface nor crush these contacts by strong impact.
Basic Care and Storage
Focusing
•
Avoid any shocks or exposure to extreme high or low temperatures or high humidity.
The lens normally focuses automatically when the focus mode switch on the lens is set
•
For extended storage, choose a cool and dry place, preferably with good ventilation.
to the Auto focus (AF) position. If the clutch position is in the manual-focus (MF) mode,
To avoid damage to the lens coating, keep away from mothballs or naphthalene gas.
adjust the focus by looking into the finder and turning the manual focus ring. This lens
also supports focusing through the use of a focusing aid.
•
Do not use thinner, benzene or other organic cleaning agents to remove dirt or finge
prints from the lens elements. Clean by using a soft, moistened lens cloth or lens tissue.
■ Caution Regarding the Use of Super-Wide Angle Lenses.
•
This lens is not waterproof. When you use the lens in the rain or near water, keep it away
from getting wet. It is often impractical to repair the internal mechanism, lens elements
If you are using a super-wide angle lens in multi-point AF mode, it may not auto
and electric components damaged by water.
focus properly.
•
Sudden temperature changes may cause condensation or fog to appear on the surface
Since the depth of field of super-wide angle lens is very deep, the focus detection
of the lens. When entering a warm room from the cold outdoors, it is advisable to keep
becomes very difficult in the periphery of the frame.
the lens in the case until the temperature of the lens approaches room temperature.
If this is the case, use of the central AF sensor is recommended.
Technical Specifications
One-Touch Controllable Focus-Clutch Mechanism
Focal distance
<How to switch from the Auto focus position to manual focus position>
Depth of eld
The lens focus mode can be switched between the Auto focus (AF) and manual focus
Format
(MF) Positions at any time by moving the manual focus ring forward and backward.
Minimum aperture
* For both Nikon and Canon mounted lenses, it is
Optical structure (elements/groups)
possible to use manual focus without switching the
focus mode switch on either the camera body or the
Coating
lens to the manual position. In the Auto focus
Angle of view
position the manual focus ring turns freely.
Filter size
Minimum focus distance
Lens Hood
Maximum macro Magni cation
Number of aperture Diaphragms
A lens hood is designed to prevent the flares and ghost images that are caused by strong
diagonal or side rays striking the front of the lens. We recommend that you use a lens
Maximum diameter
hood to ensure clear, problem-free photo-
Overall length
Hood Attachment Index
▼mark
graphs and protect the lens.
Weight
<How to attach the lens hood>
Hood
To securely install the hood, align the
mark on the hood with the hood attach-
* The speci cation data is based on the use of the lens with a Nikon camera.
ment indicator (●) on the lens, and then
* The "
" mark (certi cation mark for conformance with the European export inspection
turn the hood clockwise, as viewed from
requirements) is shown on lenses containing electronic parts.
the front, until a click is heard.
Confirm that the ▼ mark on the hood is
aligned with the center index on the lens.
* When attaching the hood, turn it until you hear a "click" to ensure a secure fit.
If the hood is not attached properly, vignetting could occur.
DEUTSCH
Bedienungsanleitung
AT-X 14-20mm F2 PRO DX
Alle DX-Objektive sind exklus-
iv für Digitalkameras mit
Sensor im APS-C-Format konz-
ipiert
Die DX-Objektive von Tokina sind
ausschließlich zur Verwendung an
digitalen Spiegelreflexkameras mit
Sensor im APS-C-Format entwickelt
worden und zeichnen deshalb
einen exakt darauf abgestimmten
Bildkreis aus. Die Verwendung an
digitalen Spiegelreflex-Kameras mit
größerem Sensor oder an normalen
Kleinbild-Spiegelreflex-Kameras für herkömmlichen Kleinbildfilm führt zur
Vignettierung (Abschattung der Bildecken). Das gilt auch für APS- Spiegelre-
flex-Kameras für APS-Film, wenn als Bildformat nicht APS-C, sondern APS-H
(Vollformat) oder APS-P (Panorama) eingestellt ist.
Bezeichnung der Teile
❶ Ring zum manuellen Scharfstellen
❻ Brennweiten-Einstellindex
❷ Entfernungsskala
❼ Autofokus-Position (AF)
❸ Entfernungs-Einstellindex
❽ Manuellfokus-Position (MF)
❹ Zoomring (zur Brennweiteneinstellung)
❾ Index zum Aufsetzen der Streulichtblende
❺ Brennweitenskala
Abnehmen und Befestigen des Objektivs
Nehmen Sie das Objektiv von der Kamera ab und befestigen Sie es daran, wie es in der
Anleitung Ihrer Kamera beschrieben ist.
* Achten Sie beim Abnehmen und Befestigen des Objektivs immer darauf, dass Sie die
elektrischen Kontakte am Bajonettanschluß weder berühren noch harten Stößen
aussetzen.
Scharfeinstellen
Das Objektiv wird normalerweise automatisch scharfgestellt, wenn es auf Autofokus
(„AF"-Position des Umschalters) eingestellt ist. Bei Einstellung auf Manuell („MF"-Position)
stellen Sie durch Drehen des Fokussierrings unter Beobachtung des Sucherbildes scharf.
Sie können dabei auch eine Fokussierhilfe benutzen (z.B. LED-Anzeige).
■ Vorsicht bei Gebrauch von Ultraweitwinkelobjektiven
Wenn Sie ein Super/Ultraweitwinkelobjektiv bei Autofokus verwenden, kann es
unter Umständen im AF-Betrieb nicht auf die Peripherie (äußeren Ränder) des
Bildrahmens fokussieren.
Da die Tiefenschärfe bei Ultraweitwinkelobjektiven sehr groß ist, wird die Fokus-
erkennung in der Peripherie der Bildrahmen bei auf Mehrpunkt Autofokussierung
eingestellten Kameras sehr schwierig.
Wir empfehlen die Verwendung der Zentralfokussiereinstellung Ihrer Kamera, wenn
Sie Ultraweitwinkelobjektive bei Autofokussierung verwenden.
14 -20 mm
F2
APS-C
Fokussiermodus-Umschaltung mit einem Handgriff
F22
<So wird von Autofokus- auf manuelle Scharfeinstellung und umgekehrt
13 -11
umgeschaltet>
Der Scharfeinstell-Modus Ihres Objektivs kann jederzeit von AF auf MF und umgekehrt
Multi-coating
durch axiales Verschieben des Scharfstellrings (für AF = nach vorn, für MF = nach hinten)
91.68° - 70.75°
umgeschaltet werden.
82mm
* Bei Objektiven mit Nikon- oder Canon-Bajonett ist es
jederzeit aus dem AF-Modus heraus möglich, manuell zu
0.28 m (11.0 in.)
fokussieren, ohne daß zuvor an der Kamera oder an
1 : 8.36
einem Schalter des Objektivs eine Umschaltung nötig
9
ist. In der AF-Position (= Scharfstellring nach vorn
geschoben) ist der Ring frei drehbar. Er läuft dank einem
89.0 mm
Präzisionskugellager besonders geschmeidig.
106.0 mm
735 g (25.9 oz)
Streulichtblende
BH-823
Die Streulichtblende ist so konstruiert, dass sie Streulicht und Geisterbilder verhindert,
die sonst von schräg vorn und seitlich auf die Frontlinse einfallendem Licht verursacht
werden könnte. Wir empfehlen Ihnen, die Streulichtblende möglichst immer zu benut-
zen, um klare und kontrastreiche Fotos zu erzielen und Ihr Objektiv zu schützen.
Index zum Aufsetzen der
<Befestigen der Streulichtblende>
Streulichtblende
Setzen Sie die Streulichtblende zum
sicheren Befestigen so ans Objektiv, daß
die Markierung (
) auf der Streulicht-
blende mit der Markierung (●) vorn am
Objektiv fluchtet und arretieren Sie dann
die Streulichtblende durch eine Drehu-
ng im Uhrzeigersinn (von vorn gesehen)
bis
zum
hörbaren
Einrasten.
Vergewissern
Sie
sich,
daß
die
▼
Markierung
Brennweiten-Ein-
stellindex am Objektiv steht.
* Bei Anbringung der Blende diese soweit drehen, bis Sie ein "Klicken" hören, um
einen sicheren Sitz zu gewährleisten.
Wenn die Blende nicht angebracht wird, kann es zu Vignettierung kommen.
Belichtungsmethoden
Zur Einstellung des gewünschten Belichtungsmodus folgen Sie der Beschreibung in der
Bedienungsanleitung Ihrer Kamera.
Filter
Verwenden Sie für dieses Objektiv Einschraubfilter. Für perfekte Fotos muß nicht nur die
Frontlinse des Objektivs, sondern auch der Filter sauber und trocken sein. Reinigen Sie
ihn gegebenenfalls sorgfältig und wischen Sie Wassertropfen vorher ab.
* Verwenden Sie immer nur einen Filter. Wenn Sie zwei oder mehr Filter übereinander
schrauben oder auch bei manchem Polarisa-tionsfilter mit sehr dicker Fassung kann es
zur Vignettierung (Abschattung der Bildecken) kommen.
Vorsicht bei Aufnahmen mit eingebautem Blitz
Bei Kameras mit eingebautem Blitzgerät kann es zu teilweiser Abschattung des Motivs
durch das große Objektiv kommen (hier unbedingt die Streulichtblende abnehmen!). In
diesem Falle empfiehlt es sich, ein externes Blitzgerät zu verwenden (Reflektor liegt
höher!).
Vermeidung „roter Augen" bei Blitzaufnahmen
Wenn Menschen mit frontaler Blitzbeleuchtung fotografiert werden, kommt es – vor
allem bei Verwendung kamerainterner Blitzgeräte – oft zu roten Reflexen in den Augen-
pupillen. Dies läßt sich nur vermeiden, wenn der Blitzreflektor nicht zu nahe an der
Objektivachse liegt (der rote Reflex ist nichts anderes als das durch die Pupille von der
Kamera gesehene, vom „optischen System Auge" erzeugte Abbild des frontalen Blitzes
auf der roten Netzhaut). Auch aus diesem Grund empfiehlt sich die oben vorgeschlagene
Verwendung eines separaten Blitzgeräts, dessen Reflektor einen größeren Abstand von
der optischen Achse des Objektivs hat.
* Je nach Objektivmodell können Sie beim Schütteln des Objektivs evtl. ein leises
Geräusch aus seinem Inneren hören. Es rührt von den Kugeln des Kugellagers her,
das für den geschmeidigen Lauf des Scharfstellrings sorgt, und es bedeutet keines-
falls, daß etwas am Objektiv defekt, locker oder nicht in Ordnung wäre.
■ Verwendung der Streulichtblende
Die Streulichtblende soll helfen, schräg von vorn oder seitlich in die Frontlinse
einfallendes und daher kontrastminderndes und Geisterbilder erzeugendes
Streulicht abzuschwächen oder zu verhindern. Wir empfehlen, stets die Streulicht-
blende aufzusetzen, um ohne Probleme brillante Aufnahmen zu erzielen.
Außerdem kann sie platzsparend zur Aufbewahrung umgekehrt auf das Objektiv
aufgesetzt werden. Daher sollten Sie grundsätzlich die speziell auf Ihr Objektiv
abgestimmte Streulichtblende benutzen, die solches Störlicht wirksam abschirmt.
Sie bietet außerdem einen mechanischen Schutz vor Stoß und Fingerabdrücken.
Pflege und Aufbewahrung
•
Setzen Sie das Objektiv nicht harten Stößen, exterm hohen bzw. niedrigen Tempera-
turen oder hoher Luftfeuchtigkeit aus.
•
Wählen Sie für längere Lagerung einen kühlen, trockenen und möglichst gut
belüfteten Ort. Vermeiden Sie die Lagerung in der Nähe von Chemikalien, deren
Dämpfe die Vergütung angteifen könnten.
•
Verwenden Sie zur Entfernung von Schmutz oder Fingerabdrücken auf Glasflächen
keinesfalls Verdünner, Benzin oder andere organische Reinigungsmittel, sondern ein
sauberes, feuchtes Optik-Reinigungstuch oder Optik-Reinigungspapier.
•
Das Objektiv ist nicht wassergeschützt. Sorgen Sie deshalb bei Aufnahmen im Regen
oder in der Nähe von Wasser für ausreichenden Schutz. Die Reparatur eines Objektives
mit Wasserschaden ist häufig nicht möglich!
•
Temperaturschocks können zum Beschlagen des Objektives und seiner Glasflächen
führen Beim Wechsel aus der Kälte in ein geheiztes Zimmer empfiehlt es sich, das
Objektiv solange im Köcher oder der Fototasche zu belassen, bis es die Zimmertem-
peratur angenommen hat.
Technische Daten
Brennweitenbereich
14 bis 20 mm
Max. Blendenö nung
2 bei allen Brennweiten
Max. Aufnahmeformat
APS-C
Min. Blendenö nung
22 bei allen Brennweiten
Optischer Aufbau
13 Linsen in 11 Gruppen
Vergütung
vollvergütet, Frontlinse wasserabweisend spezialvergütet
Bildwinkel (diagonal)
91,68° - 70,75°
Filtergewinde
82 mm
Min. Aufnahmeabstand
0,28 m
Max. Abbildungsmaßstab
1 : 8.36
Irisblende
9 Blendenlamellen
Markierung
▼
Durchmesser
89.0 mm
Länge
106.0 mm
Gewicht
735 g
Gegenlichtblende
BH-823
* Die technischen Daten gelten für die Version mit Nikon-Bajonettanschluß.
* Das Zeichen
für die elektromagnetische Verträglichkeit (EMV) gemäß den europäischen
Normen ist auf allen Objektiven angegeben, die elektronische Teile enthalten.
Français
Modes d'exposition
Mode d'emploi
Pour le réglage des modes d'exposition, reportez vous au mode d'emploi de votre appareil.
Filtres
AT-X 14-20mm F2 PRO DX
Utilisez des filtres filetés de taille appropriée avec ces objectifs. Assurez-vous que vos
filtres soient nets avant de prendre une photo. Vous ne pourrez pas prendre de photogra-
phies parfaites si le filtre est sale ou présente des gouttes d'eau ou d'autres particules
étrangères. Nettoyez soigneusement le filtre avant de prendre des photos.
L'objectif DX est exclusive-
* N'utiliser qu'un filtre à la fois. Si deux filtres ou davantage sont utilisés en même temps,
ment conçu pour un appareil
ou si un filtre épais, comme un filtre polarisé est utilisé, un effet de vignettage (assom-
reflex de taille APS-C.
brissement aux coins de l'image) peut se produire.
Les objectifs DX de Tokina sont
exclusivement conçus pour une
Attention à l'utilisation du flash interne
utilisation avec des appareils
reflex comportant un capteur
Si vous faites usage du flash interne, la lumière sera partiellement bloquée par l'objectif,
d'image de taille APS-C. L'utilisa-
en ajoutant une importante zone d'ombre.
tion d'objectifs DX avec un reflex
De ce fait il est recommandé d'utiliser un flash externe avec cet objectif.
numérique
comportant
un
capteur d'une taille supérieure à
Photographie au flash (Yeux rouges)
APS-C, ou avec un reflex conçu
pour film argentique causera un
Quand vous photographiez des personnes au flash, vous obtenez parfois des yeux
effet de vignettage.
rouges sur les photographies. Reportez-vous au manuel de votre appareil pour plus
d'information afin d'éliminer le phénomène.
* En fonction de l'objectif, un son peut-être entendu de l'intérieur de l'objectif quand
Nomenclature
celui-ci est secoué légèrement. C'est le son des roulements à billes conçus pour le
mouvement régulier de la bague de mise au point. Ceci n'est pas un problème et
❶ Bague de mise au point manuelle
❻ Repère de montage
❷ Echelle de distance
❼ Position MAP auto (AF)
n'affecte pas le bon fonctionnement de l'objectif.
❸ Repère de distance
❽ Position MAP manuelle (MF)
❹ Bague de zoom
❾ Repère de montage du parasoleil
❺ Echelle de focale
■ Montage d'un parasoleil d'objectif
À la différence d'un appareil reflex argentique, un appareil reflex numérique
produit une grande mesure de réflexion à cause de son capteur d'image. Le
Montage / démontage de l'objectif
montage d'un parasoleil d'objectif est par conséquent recommandé lors de la
prise de vues avec un appareil reflex. En particulier en cas d'utilisation d'un
Merci de suivre les instructions fournies avec votre boîtier pour monter ou démonter
objectif grand angle, un parasoleil devrait être fixé même en intérieur.
l'objectif sur celui-ci.
* Quand vous montez / démontez l'optique, prenez soin de ne pas toucher les contacts
électroniques ni de les enfoncer par un choc ou en forçant.
Precautions Elementaires et Rangement
Mise au point
•
Ne pas exposer l'objectif aux chocs, ni à des températures extrèmes, ou à l'humidité.
La mise au point se fait automatiquement si l'objectif est réglé sur AF. Si l'objectif est en
•
Si l'objectif n'est pas utilisé pendant longtemps, choisir un endroit frais, sec et bien
mode manuel (MF) faire la mise au point en visant et en tournant la bague de mise au
ventilé. Ne pas placer l'objectif près de la naphtaline ou des produits anti-mites afin de
point. Cet objectif supporte l'aide à la mise au point si votre boîtier en est pourvu.
ne pas détériorer le revêtement multicouche des lentilles.
•
Ne pas utiliser de dissolvant, d'essence ou autre matière organique pour le nettoyage
■ Avertissement concernant l'utilisation d'objectifs
de saletés ou d'empreintes de doigts sur les éléments optiques.
ultra-grand angle.
•
Cet objectif n'est pas étanche. Si vous l'utilisez par temps de pluie ou près de l'eau,
veillez à ne pas le mouiller. Les réparations du mécanisme interne, des éléments
Si vous utilisez un objectif super ou ultra grand angle en auto-focus, il peut ne pas
optiques et/ou des éléments électriques ne sont pas toujours possibles en cas de
effectuer la mise au point sur la périphérie (bords extérieurs) du cadre en mode
dommages.
AF.
Comme la profondeur de champ d'un objectif ultra-grand angle est très élevée, la
•
Des écarts soudains de température peuvent causer de la condensation et de la buée
détection de mise au point à la périphérie de l'image devient difficile pour les
sur la lentille frontale. Lorsque vous pénétrez dans un local chauffé en venant d'un
appareils réglés en auto-focus multi-points.
extérieur froid, il est recommandé de placer l'objectif dans un étui jusqu'à ce que sa
Nous vous recommandons d'utiliser un paramètre de détection centrale de mise
température avoisine celle du local.
au point lors de l'utilisation d'auto-focus avec des objectifs ultra-grand angle.
Spécifications
Bague de mise au point One-Touch
Distance Focale
Ouverture maximale
<Comment basculer du mode Auto au mode Manuel de mise au point>
Le mode de mise au point peut-être modifié à tout instant entre le mode autofocus (AF)
Format
et le mode manuel (MF), il suffit de tirer la bague de mise au point en arrière ou en avant.
Ouverture minimum
* Que ce soit en monture Nikon ou Canon, il est possible
Construction optique (éléments/groupes)
d'utiliser le mode manuel sans passer par la commande de
mise au point du boîtier.
Couchage
En position autofocus, la bague tourne librement.
Angle de champ
Diamètre de ltre
Distance de MAP minimum
Parasoleil
Ratio de grossissement Macro
Nombres de lamelles de diaphragme
Le parasoleil est conçu pour éviter les rayons parasites (flare) et les images fantômes qui
apparaissent quand les rayons lumineux obliques atteignent la lentille frontale. L'usage
Diamètre maximum
du parasoleil est recommandé afin d'obtenir de meilleures images et de protéger l'objec-
Longueur totale
tif.
Marque
Repère de montage
Poids
du parasoleil
triangulaire
<Comment fixer le parasoleil>
Parasoleil
Afin de le fixer correctement, alignez la
marque "
" du parasoleil avec le repère
*Les spéci cations techniques sont basées sur l'utilisation de l'objectif en version Nikon.
de fixation de celui-ci sur l'objectif et
*La marque " " (marque de certi cation de conformité pour les produits Européens)
tournez-le dans le sens des aiguilles d'une
est a chée sur les optiques contenant des composants électroniques.
montre jusqu'au clic de butée.
La confirmation du bon montage est
donnée quand la marque triangulaire du
parasoleil est alignée avec le centre de
l'objectif.
* Quand vous fixez le parasoleil, tournez-le jusqu'à entendre un « clic » pour vous
assurer qu'il soit bien fixé.
Si le parasoleil n'est pas convenablement monté, un effet de vignettage peut se
produire.
5-68-10 Nakano, Nakano-ku, Tokyo 164-8616, Japan
14 - 20 mm
F2
APS-C
F22
13 - 11
Multicouches
91.68° - 70.75°
82mm
0.28 m
1 : 8.36
9
89.0 mm
106.0 mm
735 g
BH-823
www.tokinalens.com
2016 Sept.
Advertisement

Related Manuals for Tokina AT-X


Summary of Contents for Tokina AT-X
- Page 1 Zur Einstellung des gewünschten Belichtungsmodus folgen Sie der Beschreibung in der Pour le réglage des modes d'exposition, reportez vous au mode d'emploi de votre appareil. camera. Bedienungsanleitung Ihrer Kamera. AT-X 14-20mm F2 PRO DX Filtres AT-X 14-20mm F2 PRO DX Filter...
- Page 2 согласно инструкции manual de su cámara. фирмы-производителя камеры. 濾色鏡 AT-X 14-20mm F2 PRO DX AT-X 14-20mm F2 PRO DX AT-X 14-20mm F2 PRO DX Filtros 請選用螺旋式濾色鏡,如鏡片上有髒污或水滴,則會影響照片成像。請務必將鏡 Utilizar filtros de rosca con este objetivo. Si el filtro está sucio, tiene gotas de agua o 片清潔後,再進行拍照。...
Need help?
Do you have a question about the AT-X and is the answer not in the manual?
Questions and answers