Physio Control LUCAS 3 Instructor Manual
Chest compression system
Hide thumbs
Also See for LUCAS 3:
- Instructions for use manual (44 pages) ,
- Quick reference manual (1 page)
Table of Contents
Advertisement
Quick Links
Advertisement
Table of Contents

Related Manuals for Physio Control LUCAS 3


Summary of Contents for Physio Control LUCAS 3
- Page 1 LUCAS 3 Chest Compression System ® P H Y S I O - C O N T R O L Instructor Guidebook T R A I N I N G Classroom and Hands-On Training This is not the complete instructions for use. Refer to Operating Instructions for complete device information including directions for use, intended use and warnings.
- Page 2 LUCAS 3 Chest Compression System ® Instructor Guidebook...
- Page 3 LUCAS 3 Chest Compression System ® P H Y S I O - C O N T R O L Instructor Guidebook T R A I N I N G Classroom and Hands-On Training Physio-Control, Inc. Redmond, Washington U.S.
-
Page 5: Table Of Contents
Contents Instructor Notes Preface Chapter 1: Instructor Training Preparation Things to Know Before Each Training Session ..........11 Facility Planning and Logistics ..............11 What You Need ....................12 Device Preparation and Readiness ...............13 Chapter 2: Classroom Training Introduction and Overview Introductions ....................17 Agenda Review .....................17 Videos ......................17 Device Overview ...................18... -
Page 7: Instructor Notes
Instructor Notes: This Instructor Guidebook is an introduction to the basic operations of the LUCAS 3 chest compression system and acts as a guide for conducting classroom and hands-on training in a manner consistent with training provided by Physio-Control. Refer to the Instructions For Use (IFU) for complete directions for use, indications, contraindications, warnings, cautions and technical specifications. -
Page 11: Chapter 1: Instructor Training Preparation
1 / INSTRUCTOR TRAINING PREPARATION Instructor Training Preparation THINGS TO KNOW BEFORE EACH TRAINING SESSION Who is your audience? There may be a combined audience of both prehospital and hospital providers. It is helpful to know whether the audience you will be instructing will be EMTs, Paramedics, Nurses, etc., to tailor your examples and discussion to be the most relevant for the audience present. -
Page 12: What You Need
LUCAS 3 User Performance Evaluation form § LUCAS 3 Chest Compression System Training Quiz § LUCAS 3 Device Training Answer Key and Annotated Test § LUCAS 3 Device - First Use Preparation Video § LUCAS 3 Device - Prehospital Application Video §... -
Page 13: Device Preparation And Readiness
1 / INSTRUCTOR TRAINING PREPARATION DEVICE PREPARATION AND READINESS Prior to each training session, ensure all LUCAS devices are checked and ready for use. Always complete device preparation to allow at least four hours for charging batteries. Make sure a Suction Cup is attached to the Piston. Make sure the Patient Straps are attached. -
Page 17: Chapter 2: Classroom Training
All videos available for streaming and downloading at www.physio-control.com/LUCAS. LUCAS 3 Chest Compression System - First Use Preparation This video provides an overview of the LUCAS device first time assembly, standard §... -
Page 18: Device Overview
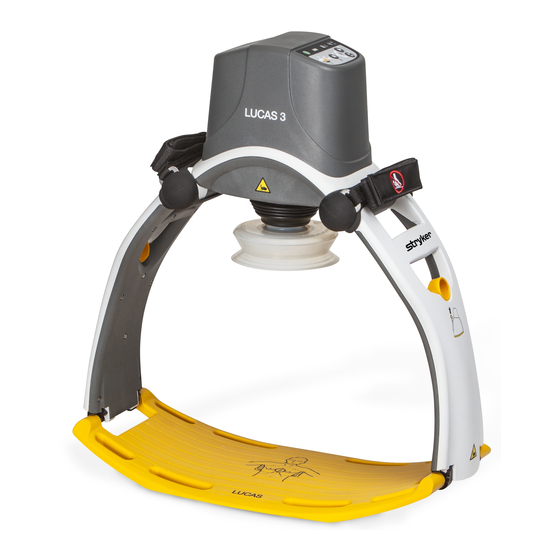
LUCAS 3 Chest Compression System ® Instructor Guidebook DEVICE OVERVIEW LUCAS Chest Compression System The LUCAS Chest Compression System is a portable tool designed to overcome problems identified with manual chest compressions. The LUCAS device assists rescuers by delivering effective, consistent and continuous chest compressions as recommended in the American Heart Association Guidelines for CPR and the European Resuscitation Council guidelines... - Page 19 2 / CLASSROOM TRAINING INTRODUCTION AND OVERVIEW Side Effects The International Liaison Committee on Resuscitation (ILCOR) states these side effects of CPR: “Rib fractures and other injuries are common but acceptable consequences of CPR given the alternative of death from cardiac arrest. After resuscitation, all patients should be reassessed and re-evaluated for resuscitation-related injuries.”...
-
Page 20: Comprehensive In-Depth Device And Operation Overview
LUCAS 3 Chest Compression System ® Instructor Guidebook COMPREHENSIVE IN-DEPTH DEVICE AND OPERATION OVERVIEW Instructor Notes: Begin with a complete LUCAS chest compression system packed in the Carrying Case on a table at the front of the room and visible to the attendees. As you review each component and aspect of operation, physically remove the component from the case and demonstrate to the audience. - Page 21 2 / CLASSROOM TRAINING INTRODUCTION AND OVERVIEW Back Plate Instructor Notes: Remove the Back Plate from the case, explain what the picture on the Back Plate means and where the claw locks attach. The graphic on the Back Plate is intended to provide a reminder of where to orient the Back Plate in relation to the patient, and where to position the Piston and Suction Cup.
- Page 22 LUCAS 3 Chest Compression System ® Instructor Guidebook There is a storage compartment in the middle of the Carrying Case that can hold a spare battery and a battery charger. The Stabilization Strap is also placed in the bag where it can be easily accessed. When returning the Stabilization Strap to the Carrying Case, loosen the strap and roll it for the next use.
- Page 23 2 / CLASSROOM TRAINING INTRODUCTION AND OVERVIEW The Pressure Pad is at the end of the Piston. The Pressure Pad acts as the heel of your hand when performing manual CPR, it is what makes contact with the chest when performing compressions.
- Page 24 LUCAS 3 Chest Compression System ® Instructor Guidebook The Release Rings – The Release Rings operate the Claw Locks, which attach the § Upper Part to the Back Plate. These are used for removing the LUCAS device from the Back Plate. However, before applying the Upper Part, you should pull the Release Rings once to make sure the claw locks are open, then release the Rings.
- Page 25 2 / CLASSROOM TRAINING INTRODUCTION AND OVERVIEW Control Panel The Control Panel is intended to be simple and easy to use, and after you turn the device on, the steps are numbered 1 through 3. The ON/OFF button is in the top left of the Control Panel in the gray bar. Push and hold this button for one second to power up or power down the LUCAS device.
- Page 26 LUCAS 3 Chest Compression System ® Instructor Guidebook On the top of the Control Panel, in the middle of the gray bar, are the MUTE button and the Alarm indicator Pushing the MUTE button will mute the alarm for 60 seconds. If you push this button when the device is powered OFF, the Battery indicator will show the charge status of the battery.
- Page 27 2 / CLASSROOM TRAINING INTRODUCTION AND OVERVIEW To minimise interruptions, having a charged spare LUCAS battery in the carrying case is always recommended. When the battery gets low during operation, it can be replaced by a new one without turning the device off. To change the battery during operation: Press PAUSE to temporarily stop compressions Pull the Battery out and then upwards to remove it...
- Page 28 LUCAS 3 Chest Compression System ® Instructor Guidebook Instructor Notes: Make sure the LUCAS device is on. Demonstrate the too small patient alarm by slowly pulling the Suction Cup down until device alarms with three fast signals. Slowly lift the Suction Cup until the signals stop and then leave the Suction Cup there to demonstrate the approximate sternum height of a patient that is too small for the device.
-
Page 29: Application Demonstration
2 / CLASSROOM TRAINING INTRODUCTION AND OVERVIEW APPLICATION DEMONSTRATION Instructor Notes: Put a half manikin (Brad™ CPR Manikin or comparable) on the floor or table and ask for a volunteer to help by performing manual chest compressions while you apply the LUCAS device. - Page 30 LUCAS 3 Chest Compression System ® Instructor Guidebook Apply LUCAS device to the patient Always apply the device with minimal interruptions in compressions. This can be done in two brief pauses. Remove the Back Plate from the Carrying Case. Temporarily stop manual CPR while placing the Back Plate under the patient, immediately below the armpits.
- Page 31 2 / CLASSROOM TRAINING INTRODUCTION AND OVERVIEW Attach the Support Leg that is nearest you to the Back Plate. Move the other Support Leg through the arms of the responder doing manual CPR and stop manual CPR while you attach the Support Leg to the Back Plate. Ask your partner to assist with attaching the second Support Leg if needed.
- Page 32 LUCAS 3 Chest Compression System ® Instructor Guidebook Adjust the height of the Suction Cup to set the Start Position. This is the position where the LUCAS device will start its two-inch compressions, and the point where it will return the chest for full recoil. Make sure the LUCAS device is in ADJUST mode Ÿ...
- Page 33 2 / CLASSROOM TRAINING INTRODUCTION AND OVERVIEW To move a patient, the LUCAS device can be used on a backboard, carrying sheet or other transportation device. After you have made a decision about what equipment you will use and where to put the transportation device, you can prepare to lift the patient. (Note: The LUCAS device cannot be connected directly to a backboard.
- Page 34 LUCAS 3 Chest Compression System ® Instructor Guidebook After defibrillation, make sure the Suction Cup is still in the correct position. If necessary, adjust the position. Always follow your protocols regarding defibrillation. Note: Chest compressions interfere with ECG interpretation. Push PAUSE to temporarily stop compressions before you perform a rhythm check with a manual defibrillator or analysis with an AED.
- Page 35 2 / CLASSROOM TRAINING INTRODUCTION AND OVERVIEW Q&A, 15 minute break Instructor Notes: Prepare for transition to small group hands-on training and application practice. Depending on the number of students, divide the room into groups of no more than six students for every instructor by counting off around the room sequentially up to the number of groups (e.g., if there are 36 people in the class, there will be six groups of six, so have each person count sequentially up to six, then start over).
-
Page 39: Chapter 3: Small Group Hands-On Training And Application Practice
§ Understand the importance of resuming manual CPR if the device alarms or does not § operate properly Successfully complete the LUCAS 3 User Performance Evaluation § Reproduce the hands-on training for their own staff § ROLES, RESPONSIBILITIES AND EXPECTATIONS... -
Page 40: Detailed Step-By-Step Overview
LUCAS 3 User Performance Evaluation form Ÿ LUCAS 3 Chest Compression System Training Quiz Ÿ LUCAS 3 Device Training Answer Key and Annotated Test Ÿ LUCAS 3 Device - First Use Preparation Video Ÿ LUCAS 3 Device - Prehospital Application Video Ÿ... - Page 41 Suction Cup correctly. Verbalises “Resume manual CPR” to other rescuer Lifts Upper Part of LUCAS 3 device from case and pulls once on the Release Rings to check the claw locks are open, then lets go of Rings...
- Page 42 LUCAS 3 Chest Compression System ® Instructor Guidebook Key points: § Let go of the Release Rings when attaching the Upper Part to the Back Ÿ Plate. Pulling them once is only to ensure that the Claw Locks are open and will snap onto the Back Plate.
- Page 43 3 / SMALL GROUP HANDS-ON TRAINING AND APPLICATION PRACTICE Key points: § Reiterate the purpose of the Stabilization Strap is to help secure the correct Ÿ position during operation, and should not be tightened more than needed. Delay the application of the Stabilization Strap if it prevents or delays any medical Ÿ...
-
Page 44: Real-Time Application Demonstration
LUCAS 3 Chest Compression System ® Instructor Guidebook Key points: § Compressions cause artifact in the rhythm – as soon as rhythm check or AED Ÿ analysis is complete, compressions can be resumed. After shock is delivered, you should always check placement of the Suction Cup to Ÿ... -
Page 45: Student Device Application
LUCAS device application. COMPLETING THE USER PERFORMANCE EVALUATION Ask each student to provide you with their LUCAS 3 User Performance Evaluation form. As each student demonstrates applying the LUCAS device, follow along on their User Performance Evaluation form and mark whether each step was completed. -
Page 46: Training Evaluation
LUCAS 3 Chest Compression System ® Instructor Guidebook Student Teach-Back Students must demonstrate their ability to perform the detailed step-by-step overview of how to apply the LUCAS device prior to the end of the hands-on training and application practice. Each student will take turns acting as the instructor while the instructor takes the role of the student. - Page 47 3 / SMALL GROUP HANDS-ON TRAINING AND APPLICATION PRACTICE...
-
Page 51: Chapter 4: Training Evaluation
When all quizzes have been completed, review the answers to the quiz as a group, using the Answer Key as a guide. The students will also be provided with a LUCAS 3 Device Training Answer Key and Annotated Test. This is a version of the training quiz that includes the correct answers highlighted in yellow. -
Page 55: Appendix A: Important Contacts
APPENDIX A / IMPORTANT CONTACTS Physio-Control Customer Service http://www.physio-control.com Select your country at the top of the page and select ‘Contact Us’. General LUCAS 3 Device Inquiries Product Manager, LUCAS Chest Compression System LUCAS3@physio-control.com... -
Page 59: Appendix B: Frequently Asked Questions
Appendix A: Important Contacts and contact your local Physio-Control representative. For product-related questions not addressed below, please contact: http://www.physio-control.com. Select your country at the top of the page and select ‘contact us’ or send an email to the LUCAS Product Manager at LUCAS3@physio-control.com. - Page 60 LUCAS 3 Chest Compression System ® Instructor Guidebook : Q Can the LUCAS device be used on trauma patients? : A There is no contraindication for trauma. Traumatic injuries can be of varying types and severities, so the professional rescuer who is treating the individual patient must use clinical judgment to determine when or when not to provide chest compressions.
- Page 61 : Q Can the LUCAS device be used in a helicopter? : A The LUCAS 3 device has been tested according to EN 13718-1:2014 Medical vehicles and their equipment - Air ambulances Part 1: Requirements for medical devices used in air ambulance.
- Page 62 L, M and H tests done on the LUCAS 2 device. The LUCAS 3 device retains the same form, fit and function as the LUCAS 2 device and tests done show the LUCAS 3 and LUCAS 2 devices have similar type of electromagnetic performance.
-
Page 63: Frequently Asked Questions
: Q If the AHA or ERC guidelines change to recommend a different compression depth or rate, will the LUCAS device be updated? : A Physio-Control is committed to implementing the latest standards of care in our products, and has a solid track record of offering updates to our products to meet the AHA/ERC Guidelines. - Page 64 LUCAS 3 Chest Compression System ® Instructor Guidebook : Q What is the typical runtime for a fully-charged LUCAS Battery? : A Typical runtime for a fully charged LUCAS Battery is 45 minutes. : Q If unused, how long does the charge in a fully charged battery last when left in the Carrying Case? : A About 1 year.
-
Page 65: Frequently Asked Questions
APPENDIX B / FREQUENTLY ASKED QUESTIONS : Q Are the operating and storage temperatures of the Battery the same as for the LUCAS device? : A The operating temperature of the Battery is the same as for LUCAS device when it is installed in the device. -
Page 69: The 2010/2015 Aha Guidelines On Resuscitation In The Cath Lab
APPENDIX C / LUCAS IN THE CATH LAB The LUCAS Device in the Cath Lab The LUCAS chest compression system facilitates the transportation of the patient to the cath lab, and allows for catheterization and cath lab intervention during ongoing LUCAS chest compressions. -
Page 70: The Lucas Device In The Cath Lab
LUCAS 3 Chest Compression System ® Instructor Guidebook THE LUCAS DEVICE IN THE CATH LAB The LUCAS device is mainly made of radiotranslucent materials (transparent to x-ray), except for the Hood and the Piston, and a fully radiotranslucent cath lab Back Plate that does not interfere with the angiogram is available. - Page 71 RAO-PA and RAO-PA Caudal planes with workable lateral views. Although the photographs below show a LUCAS 2 Device, there is no difference in views as the LUCAS 3 device support legs and PCI plate are similar to those of the LUCAS 2 device.
- Page 72 LUCAS 3 Chest Compression System ® Instructor Guidebook Cranial view LUCAS 2 chest compression system allows for visualization of the coronary arteries in cranial views. The shadow of the Lucas Suction Cup may be partially visible. RAO -3° CRA 32° Caudal view LUCAS 2 chest compression system allows for visualization of the coronary arteries caudal views.
- Page 73 APPENDIX C / LUCAS IN THE CATH LAB Straight posterior-anterior view The straight posterior-anterior view cannot be used when the LUCAS device Upper Part is attached. RAO -1° CAU 25° LUCAS PCI Back Plate (without Upper Part attached, in precautionary placement) allows for full visualization of arterial tree.
-
Page 77: References
Yost D, Gonzales L, Lick C, et al. Abstract 38: North American LUCAS Evaluation: prehospital use of a mechanical chest compression system. Circulation. 2010;122. A38. (Poster on file at Physio-Control.) Rubertsson S, Lindgren E, Smekal D, et al. Mechanical chest compressions and simultaneous defibrillation vs conventional cardiopulmonary resuscitation in out-of- hospital cardiac arrest: The LINC Randomized Trial. - Page 78 A systematic review. Resuscitation. 2015;85:44-48. Case Study. Nearly 3 hours of chest compressions by LUCAS buys time to save patient. 2014; Physio-Control GDR 3318844_A. Images courtesy of Dr. Sydney Lo, Director, Liverpool Hospital Cardiac Catheterization Lab, Sydney, Australia.
- Page 80 Physio-Control is now part of Stryker. For further information please contact your local Physio-Control representative or visit our website at www.physio-control.com Physio-Control Headquarters Physio-Control Operations Physio-Control Physio-Control 11811 Willows Road NE Netherlands B.V. UK Sales Ltd Australia Pty Ltd Redmond, WA 98052 USA Galjoenweg 68 35 Great St Helen’s...
Need help?
Do you have a question about the LUCAS 3 and is the answer not in the manual?
Questions and answers