Bien Air iOptima Installation Instructions Manual
Hide thumbs
Also See for iOptima:
- Instructions for use manual (72 pages) ,
- Instructions for use manual (84 pages)
Table of Contents
Advertisement
Quick Links
Advertisement
Table of Contents

Related Manuals for Bien Air iOptima


Summary of Contents for Bien Air iOptima
- Page 1 ENG INSTALLATION INSTRUCTIONS. REF 2100320-0000/2018.06...
- Page 2 Set iOptima REF 1700704-001 1x REF 1x REF 1x REF 1x REF 1x REF 1x REF REF 1502475-001 1600677-001 1600809-001 1601074-001 1500666-001 1502568-001 1300067-001 Set iOptima REF 1700705-001 2x REF 2x REF 1x REF 1x REF 1x REF 1x REF...
- Page 3 Options REF 1502620-001 REF 1502621-001 REF 1502622-001 REF 1502623-001 REF 3300409-001 REF 3300404-001 REF 3300403-001 REF 1000031-001 REF 1502567-001 REF 1307467-001 REF 2100320-0000/2018.06 iOptima • © Bien-Air Dental SA...
- Page 4 REF 2100320-0000/2018.06 iOptima • © Bien-Air Dental SA...
-
Page 5: Table Of Contents
Intended use .........2 Lock settings ......19 Notation .........2 Integration checklist ..20 Electromagnetic compatibility for Maintenance ......21 iOptima INT ......3 General information, Electromagnetic compatibility warnings ........3 guarantee and references 21 Electromagnetic compatibility – General information ....21 emissions & immunity ....4 Terms of guarantee ....21... -
Page 6: Symbols
ENG Installation instructions 1 Symbols Sign Description Sign Description Refer to the accompanying CE Marking with number of the documents for the correct use of the notified body. product.(www.bienair.com/ifu.) Manufacturer. Serial number. Separate collection of electric and Reference number. electronic equipment. ... -
Page 7: Electromagnetic Compatibility For Ioptima Int
CAUTION The iOptima INT complies with the EMC requirements according to IEC 60601-1-2. Radio transmitting equipment, cellular phones, etc., should not be used in the immediate vicinity of the device, since this could affect its operation. The device is... -
Page 8: Electromagnetic Compatibility - Emissions & Immunity
3.2 Electromagnetic compatibility – emissions & immunity Guidance and manufacturer’s declaration – Electromagnetic emissions iOptima is intended for use in the electromagnetic environment specified below. The customer or the user of iOptima should ensure that it is used in such an environment. Emissions test... - Page 9 Guidance and manufacturer’s declaration – Electromagnetic immunity The iOptima is intended for use in the electromagnetic environment specified below. The customer or the user of the iOptima must ensure that it is actually used in such an environment. Electromagnetic environment -...
- Page 10 INT is used exceeds the RF compliance level mentioned above, the iOptima INT should be observed to verify that it is operating normally. If abnormal operation is observed, additional measures may be necessary, such as...
-
Page 11: Description
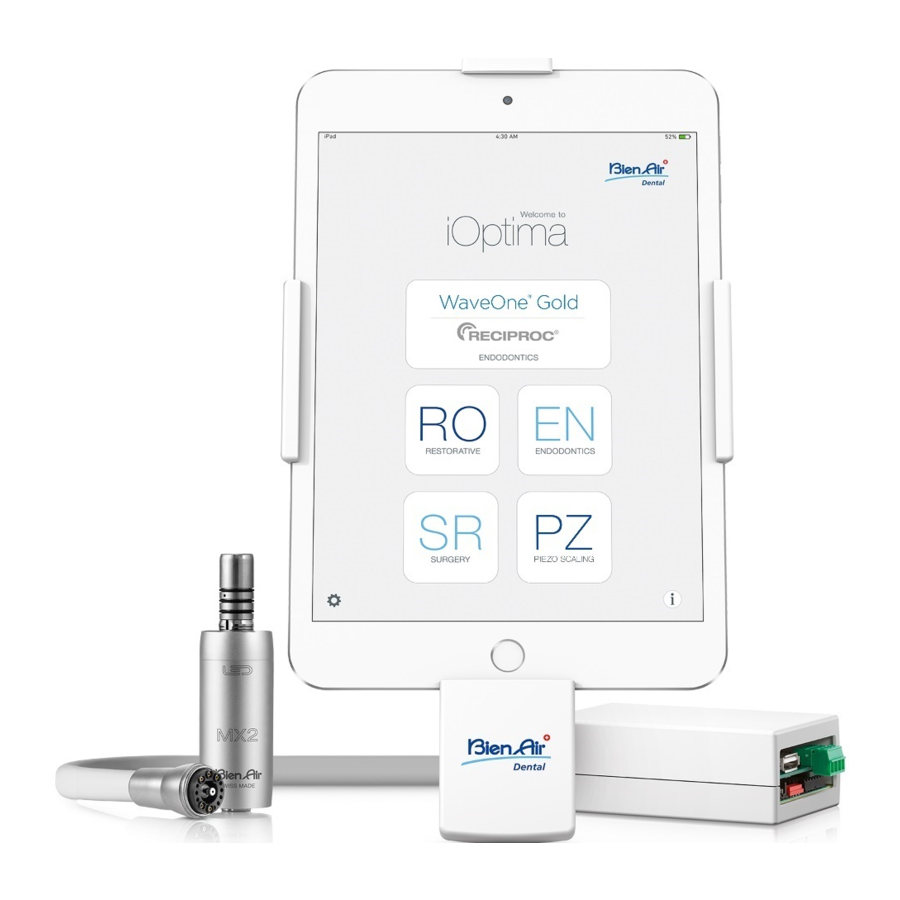
4 Description 4.1 System overview Electronically controlled integrated unit for dentistry allowing operation of multiple micromotors (MX2) with variable speed using the dental unit pedal. It is essential to connect a compatible iPod Touch® or iPad Mini® using the lighting connector with the provided docking station. -
Page 12: Environmental Protection And Information For Disposal
Electric insulation class Class I per IEC 60601-1 (apparatus protected against electric shocks). Important: Consult the Instructions for Use of the following devices: Device Motor MX2 LED 2100199 1600677-001 Hose MX2 2100223 1600809-001 Control DMX3 set 2100278 1600903-001 4.3 Environmental protection and information for disposal This device must be recycled. -
Page 13: Installation
5 Installation CAUTION Before use, please read these installation instructions and the iOptima operating instructions (2100279) carefully. Switch ON only when the system is ready for use. To conform with IEC 60601-1-2 standards, take into account the different routes of the wires through the unit (bend, fold, section etc) and only use the transformer provided with the kit or the unit’s power supply (Refer to “5.3 DMX3 wiring”... -
Page 14: Dental Unit Pedal Connection
5.2 Dental unit pedal connection Connect either a pneumatic (0–3 bar / 0-43.5 psi) (1) or an electrical (0–5 Vdc) (2) dental unit pedal according to the following: FIG. 3 5.3 DMX3 wiring Note: Refer to the corresponding diagram on the following pages. ... - Page 15 • protect the opening with cable pass-through protection. FIG. 9 FIG. 10 K. Connect the Lightning cable to the Apple device. L. Connect the power supply cable. M. Configure the board through the App according to the iOptima application set- tings chapter.
-
Page 16: Dmx3 With 1 Mx2 Motor Diagram
5.3.2 DMX3 with 1 MX2 motor diagram iOptima Int wiring diagram 1 M Power Supply PMP90-16-k24 Cable 230 VAC REF 1500666 REF1300067 80 - 230VAC Kit fixation iPod/iPad REF1502475 DMX3 REF 1601015 Top box REF 1307249 Bottom box REF 1307248... - Page 17 MX2 motor ref. 1601074 Note: The iOptima INT system is only compliant to the IEC60601-1 standard when used with the power supply ref. 1500666 provided by Bien-Air and mounted inside the dental unit. The use of any other power supply type is prohibited and may prove dangerous and mounted inside the dental unit.
-
Page 18: Dmx3 With 2 Mx2 Motors Procedure
5.3.3 DMX3 with 2 MX2 motors procedure A. Drill a hole of diameter 12 mm in the unit to install the Power supply reset switch (1502568). B. Connect together: Power supply reset switch (1502568), Power Supply PMP90 (1500666) (1) and Power Outlet Cable (1300067). FIG. - Page 19 • protect the opening with cable pass-through protection. FIG. 18 FIG. 19 N. Connect the Lightning cable to the Apple device. O. Connect the power supply cable. P. Configure the board through the App according to the iOptima application set- tings chapter.
-
Page 20: Dmx3 With 2 Mx2 Motors Diagram
5.3.4 DMX3 with 2 MX2 motors diagram iOptima Int wiring diagram 2 M Power Supply PMP90-16-k24 Cable 230 VAC REF 1500666 REF 1300067 80 - 230VAC Kit fixation iPod/iPad REF1502475 Assembly DMS + air switches in box REF 1502569 DMX3 REF 1601015... - Page 21 MX2 motors REF 1601075 Note: The iOptima INT system is only compliant to the IEC60601-1 standard when used with the power supply ref. 1500666 provided by Bien-Air and mounted inside the dental unit. The use of any other power supply type is prohibited and may prove dangerous and mounted inside the dental unit.
-
Page 22: Ioptima Application Settings
6 iOptima application settings 6.1 Display integrator's menus A. Go to the Settings page and swipe up to display the integrator’s menus. FIG. 20 6.2 Board configuration A. Tap Board configuration and enter the password «1959» to display the Board configuration page. -
Page 23: Change Motor
6.2.1 Change motor A. Tap the holder with the motor to change, select the motor or No motor con- nected. B. Select whether the motor is active when the holder switch is closed or open and tap OK to acknowledge configuration is done. FIG. -
Page 24: Integration Checklist
• Check on the iPod/iPad that the maximum speed reachable is 40’000rpm • Check that the power supply reset switch works Note: If you answered NO to any of the above questions, please do not use the sys- tem and refer to Troubleshooting procedures on the iOptima application. -
Page 25: Maintenance
• 12 months for the hose • 12 months for the power supply • 12 months for the electronic 9 General boards • 24 months for the iOptima information, elements • 36 months for series MX2 LED guarantee and electric micromotors from the date of invoicing. -
Page 26: References
9.3.1 Set supplied (see cover page) iOptima set REF 1700731-001 iOptima set REF 1700704-001 Designation Designation 1600809-001 MX2 Micromotor hose (2x) 1502475-001 iOptima iDevice fixation 1502568-001 Power supply reset switchs (1x) 1500666-001 Power supply PMP90 (1x) 1600677-001 MX2 Micromotor (1x) 3P cable system, US/Asia, 1300067-001 1600809-001 MX2 Micromotor hose (1x) length 2.00 m (1x) - Page 27 REF 2100320-0000/2018.06 iOptima • © Bien-Air Dental SA...
- Page 28 Bien-Air USA, Inc. ba-uk@bienair.com 5 Corporate Park Suite 160 Tel. +86 10 6567 0651 Irvine, CA 92606 USA Phone +1 800-433-2436 Fax +86 10 6567 8047 ba-beijing@bienair.com Phone +1 949-477-6050 Fax +1 949-477-6051 dental@bienair.com REF 2100320-0000/2018.06 iOptima • © Bien-Air Dental SA...
Need help?
Do you have a question about the iOptima and is the answer not in the manual?
Questions and answers