Advertisement
Quick Links
page 1 of 21
Technology for Vacuum Systems
Instructions for use
ME 4R
Diaphragm pump
Documents are only to be used and distributed completely and unchanged. It is strictly the users´ responsibility to check carefully
the validity of this document with respect to his product. Manual-no.: 999122 / 02/09/2009
Advertisement

Related Manuals for vacuubrand ME 4R


Summary of Contents for vacuubrand ME 4R
- Page 1 1 of 21 Technology for Vacuum Systems Instructions for use ME 4R Diaphragm pump Documents are only to be used and distributed completely and unchanged. It is strictly the users´ responsibility to check carefully the validity of this document with respect to his product. Manual-no.: 999122 / 02/09/2009...
- Page 2 2 of 21 Dear customer, Your VACUUBRAND diaphragm pumps should support you for a long time without trouble and with maximal power. Thanks to our long practical experience we have much information how you could ensure powerful application and personal safety. Please read these instructions for use before the initial operation of your pump.
-
Page 3: Table Of Contents
page 3 of 21 Contents Safety information! ....................4 Technical data......................7 Use and operation ..................... 9 Troubleshooting ...................... 12 Replacing diaphragms and valves................. 13 Notes on return to the factory ................18 Health and safety clearance form ................19 Attention! Important notes! Not permitted! Misuse may cause damage. -
Page 4: Safety Information
page 4 of 21 Safety information! Remove all packing material, remove the product from its packing-box, remove the protective covers from the inlet and outlet ports and keep, inspect the equipment. If the equipment is damaged, notify the supplier and the carrier in writing within three days;... - Page 5 page 5 of 21 ☞ Ensure that the system design does not allow the exhaust pipeline to become blocked unintentionally. ☞ Avoid overpressure of more than 0.2 bar at the inlet in case inert gas is connected. ☞ The diameter of the inlet and outlet pipeline should be at the least as large as the diameter of the pump connection pipelines.
- Page 6 page 6 of 21 Motor is shut down by a thermal cutout in the winding. ☞ Manual reset is necessary. Switch off the pump or isolate the equipment from mains. Identify and eliminate the cause of failure. Wait approx. five minutes before restarting the pump.
-
Page 7: Technical Data
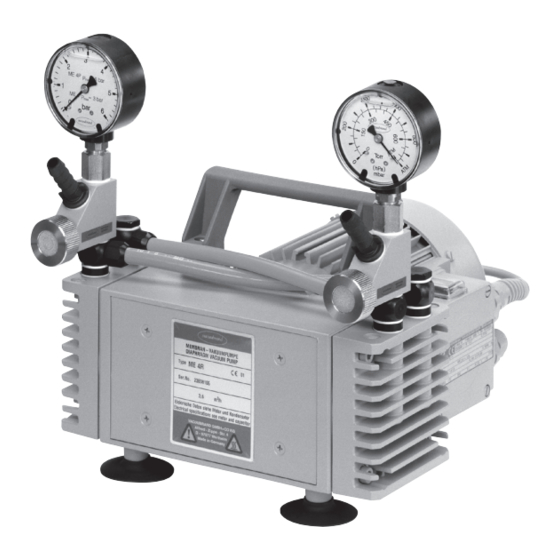
page 7 of 21 Technical data i t l < ° ° v i t l l a t t i l l a o l l , t l We reserve the right for technical modification without prior notice! Documents are only to be used and distributed completely and unchanged. - Page 8 8 of 21 ME 4R handle vacuumeter overpressure manometer on/off switch mains cable outlet with pressure adjustment device motor rating plate inlet with vacuum pump rating plate adjustment device dispensing screw Documents are only to be used and distributed completely and unchanged. It is strictly the users´ responsibility to check carefully...
-
Page 9: Use And Operation
page 9 of 21 Use and operation Installing in a vacuum system: ☞ Avoid throttling losses by using connecting pipes with large diameter and keep them as short as possible. ☞ Reduce the transmission of vibration and prevent loading due to rigid pipelines. Insert elastic hoses or flexible elements as couplings between the pump and rigid pipes. - Page 10 page 10 of 21 B: Manometer with pin Ventilate the manometer by lifting the pin. Do not remove the pin completely! ☞ Repeat if necessary until dial doesn’t show a pressure dif- ference with measuring connection ventilated to atmosphere. C: Manometer with bore at the rear side Pierce the hole at the rear side of the manometer.
- Page 11 page 11 of 21 The motor is shut down by a thermal cutout in the winding. ☞ Manual reset is necessary. Switch off the pump or isolate the equipment from mains. Identify and eliminate the cause of failure. Wait approx. five minutes before restarting the pump.
-
Page 12: Troubleshooting
page 12 of 21 Troubleshooting s l i . y l u l i n i l n i l o l l y f i i l e l i a y l t i t l t i s y l t n i l l n i... -
Page 13: Replacing Diaphragms And Valves
page 13 of 21 Replacing diaphragms and valves All bearings are encapsulated and are filled with long-life lubricant. Under normal op- erating conditions, the pump is maintenance free. The valves and the diaphragms as well as the motor capacitors are wear parts. If the rated ultimate vacuum is no longer achieved, the pump interior, the diaphragms and the valves must be cleaned and the diaphragms and valves must be checked for cracks or other damage. - Page 14 page 14 of 21 Cleaning and inspecting the pump heads: ➨ Detach manometer from adjustment device using open-end wrenches w/f 14 and 17. ➨ Unscrew hollow bolt at adjustment device with open-end wrench w/f 17 whilst steadying fitting with a second open- end wrench (w/f 20).
- Page 15 Optimum torque for the diaphragm support disc: 6 Nm. ☞ The optimum torque is achieved if the pointer in the handle of the VACUUBRAND face wrench shows to the longer mark- ing line. Documents are only to be used and distributed completely and unchanged. It is strictly the users´ responsibility to check carefully...
- Page 16 page 16 of 21 Assembling pump heads: ➨ By turning eccentric bushing (front of connecting rod), bring connecting rod into a position in which diaphragm is in con- tact with housing and centred with respect to bore. Reassemble in reverse order. ➨...
- Page 17 page 17 of 21 ➨ Use open-end wrench (w/f 17) and assemble screw-in fit- tings at all pump heads. Steady fitting with a second open- end wrench (w/f 20). ➨ Screw on manometer, align it and tighten with open-end wrenches w/f 14 and 17. If the pump does not achieve the ultimate pressure: ☞...
-
Page 18: Notes On Return To The Factory
page 18 of 21 Notes on return to the factory Repair - return - DKD calibration Safety and health of our staff, laws and regulations regarding the handling of danger- ous goods, occupational health and safety regulations and regulations regarding safe disposal of waste require that for all pumps and other products the ”Health and safety clearance form”... -
Page 19: Health And Safety Clearance Form
Tel.: +49 9342 808-0 - Fax: +49 9342 808-450 E-Mail: info@vacuubrand.de © 2001 VACUUBRAND GMBH + CO KG Printed in Germany Documents are only to be used and distributed completely and unchanged. It is strictly the users´ responsibility to check carefully... - Page 20 Déclaration de conformité Membranpumpe / Diaphragm pump / Pompe à membrane ME 4R (230V; 696152) Hiermit erklären wir, dass das oben bezeichnete Gerät in Konzeption und Bauart sowie in der von uns in Verkehr gebrachten Ausführung den grundlegenden Anforderungen der zutreffenden, aufgeführten EU- Richtlinien entspricht.
- Page 21 Tel.: +49 9342 808-0 - Fax: +49 9342 808-450 -Technology for Vacuum Systems- E-Mail: info@vacuubrand.de © 2009 VACUUBRAND GMBH + CO KG Printed in Germany Web: www.vacuubrand.com Documents are only to be used and distributed completely and unchanged. It is strictly the users´ responsibility to check carefully...
Need help?
Do you have a question about the ME 4R and is the answer not in the manual?
Questions and answers