Table of Contents
Advertisement
Quick Links
PT3500-HB/PT3700-HB
High Bright Beam Splitter Teleprompter
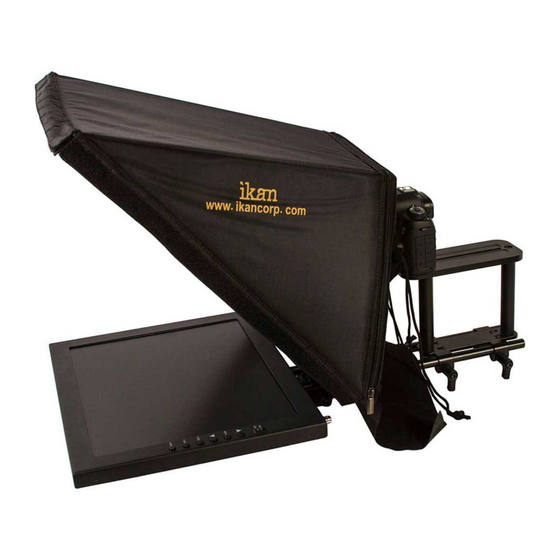
What's Included
1 x Teleprompter Base Assembly w/ Glass
1 x Camera Mount Assembly
1 x Hood
1 x High Bright LCD Monitor w Power Supply
2 x 200mm Riser Rods
1 x PrompterPro 4 Software
1 x 5/32 Hex Key
2 x DRS-01
4 x Cork Strips
www.ikancorp.com | 1.713.272.8822 | sales@ikancorp.com
Quick Start Guide
because we're filmmakers too
Advertisement
Table of Contents

Related Manuals for Ikan PT3500-HB


Summary of Contents for Ikan PT3500-HB
- Page 1 Quick Start Guide PT3500-HB/PT3700-HB High Bright Beam Splitter Teleprompter What’s Included 1 x Teleprompter Base Assembly w/ Glass 1 x Camera Mount Assembly 1 x Hood 1 x High Bright LCD Monitor w Power Supply 2 x 200mm Riser Rods...
-
Page 2: Assembly Steps
Assembly Steps Step 1 Place teleprompter base assembly on a flat surface. Step 2 It is recommended to level the glass at a 45˚ angle, however you can position the glass at any angle that suits your needs. because we’re filmmakers too www.ikancorp.com | 1.713.272.8822 | sales@ikancorp.com... - Page 3 Step 3 Slide the camera mount assembly onto the 15mm rods. The tripod mount has 3 sets of holes that allow you to mount the plate either towards the front or rear to help balance the teleprompter better. For larger cameras it is recommended to have the plate toward the rear. For smaller cameras it is recommended to have the place toward the front.
- Page 4 Step 4 Attach the camera to the mount. Slide the camera mount to the preferred position and secure all thumb screws. DSLR Camcorder If the camera is required to be positioned higher, you can replace the pre-installed 130mm rods with the 200mm riser rods. Use the included 5/32”...
- Page 5 Step 5 The hood uses magnets to attach to the aluminum frame instead of velcro, making for a quick and reliable attachment/detachment every time. because we’re filmmakers too www.ikancorp.com | 1.713.272.8822 | sales@ikancorp.com...
- Page 6 Button Configuration & Signal Inputs Power Switch I = On = Off Toggle up to adjust settings Acess monitor settings: Brightness, Contrast, etc. MENU Toggle down to adjust settings Flip image horizontally FLIP High-Definition Multimedia Interface HDMI Input Connection Video Graphics Array DE15 Connection Composite VIDEO...
-
Page 7: Glass Removal
Foam Case To make your teleprompter more portable, we packed it in a reusable, high-quality foam. The shape and size of the foam was designed to fit into Ikan’s PT-CASE. ** DO NOT THROW AWAY FOAM CASE ** Glass Removal Glass can be removed from the frame by removing the two Phillips head screws. -
Page 8: Specifications
Specifications PT3500-HB PT3700-HB Aspect Ratio Aspect Ratio Brightness 1000 cd/m2 Brightness 1000 cd/m2 Build Material Aluminum / Steel Build Material Aluminum / Steel Contrast Ratio 500:1 Contrast Ratio 500:1 Diagonal 15” Diagonal 17” Input Signal Composite BNC, VGA, HDMI Input Signal... -
Page 9: Learn More
Damage caused by abuse or misuse, dismantling, or changes to the product not made by the company. • Damage caused by natural disaster, abnormal voltage, and environmental factors, etc. ©2018 ikan Corporation. All rights reserved because we’re filmmakers too www.ikancorp.com | 1.713.272.8822 | sales@ikancorp.com...
Need help?
Do you have a question about the PT3500-HB and is the answer not in the manual?
Questions and answers