
Related Manuals for Vanco 12x3 Multi-Function Switch/Scaler


Summary of Contents for Vanco 12x3 Multi-Function Switch/Scaler
- Page 1 12x3 Multi-Function Switch/Scaler Vanco Part Number: 280595 Technical Support www.vanco1.com • techsupport@vanco1.com • 800-626-6445...
-
Page 2: Dear Customer
DEAR CUSTOMER Thank you for purchasing this product. For optimum performance and safety, please read these instructions carefully before connecting, operating or adjusting this product. Please keep this manual for future reference. This product is 100% inspected and tested in the United States to verify HDMI performance parameters. - Page 3 FEATURES The 280595 12x3 Multi-Function Switch/Scaler offers the highest compatibility among composite, component, DVI, VGA, HDMI and S-Video to CVBS & HDMI in the market. This unique device supports analog and digital conversion and scaling. With the embedded advanced de-interlacer, interlaced video inputs such as component, composite and S-Video, can be further improved.
-
Page 4: Specifications
SPECIFICATIONS Input Video bandwidth ..........HDMI:225 MHz, DVI/VGA:165 MHz, Component: 74.25MHz Output Video bandwidth ..........297MHz Audio support ............HDMI: bypass to HDMI output/ SPDIF output/ stereo output, SPDIF: bypass to HDMI output or SPDIF output, Stereo: bypass to HDMI output or stereo output ESD protection ............ -
Page 5: Panel Descriptions
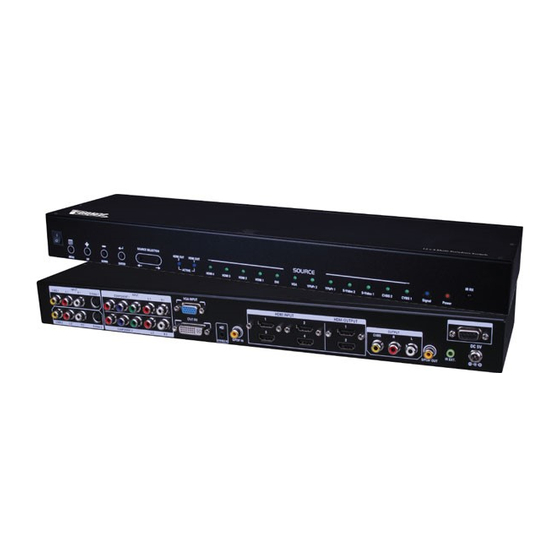
PANEL DESCRIPTIONS 1. OSD Control Panel 2. Input Source Fast Switching 3. Output Status 4. Selected Source Indicator 5. Signal Indicator 6. Power Indicator 7. IR Sensor 8. CVBS1 Source 9. CVBS2 Source 10. S-Video1 Source 11. S-Video2 Source 12. Analog Audio1 Source (for CVBS1/S-Video2 Source) 13. -
Page 6: Connect And Operate
CONNECT AND OPERATE 1. Connect your source(s) to the appropriate type of input. 2. Connect your output(s) to the appropriate type of output. 3. Connect the audio output to a third party amp or audio system (optional). 4. For control, use the IR EXT with the appropriate provided IR EXT cable, or use a DB9 connection for RS232 control. -
Page 7: Ir Remote Control
IR REMOTE CONTROL BUTTON FUNCTION Power On/OFF EXIT Exit Menu MENU Menu on STATUS Source and resolution information ENTER Enter key MUTE Turn off the output’s audio Up Key Right Key Left Key Down key Aspect ratio Aspect ratio change 4K2K Select 4K2K output resolution 1080p... - Page 8 CONNECT AND OPERATING THE SOFTWARE SOFTWARE INTERFACE Select Com port Enter to find com port Select Source 3. Setup Output Resolution 4. Setup Output color space If Source is DVI, it shows DVI audio selection. In selection you can choose S/PDIF or Stereo. www.vanco1.com...
- Page 9 6. If Source is VGA, it might have color swap issue, please use the VGA color swap function to adjust. 7. Setup Aspect Ratio - ColorTone 8. Setup Color Figure 9. Adjust Image. 800-626-6445...
-
Page 10: Troubleshooting
3. If you are still encountering issues, attempt the “hot-plug” concept. With all of the HDMI cables disconnected, turn on the source and plug in the HDMI cable into it’s output, then power up the Vanco unit and plug the HDMI cable into it’s input, finally turn on the display and plug the HDMI cable from the receiver into it. -
Page 11: Limited Warranty
If repairs are needed during the warranty period the purchaser will be required to provide a sales receipt/sales invoice or other acceptable proof of purchase to the seller of this equipment. The seller will then contact Vanco regarding warranty repair or replacement. - Page 12 Vanco® International 506 Kingsland Drive Batavia, Illinois 60510 call: 800.626.6445 fax: 630.879.9189 visit: www.vanco1.com...
Need help?
Do you have a question about the 12x3 Multi-Function Switch/Scaler and is the answer not in the manual?
Questions and answers