Table of Contents

Subscribe to Our Youtube Channel
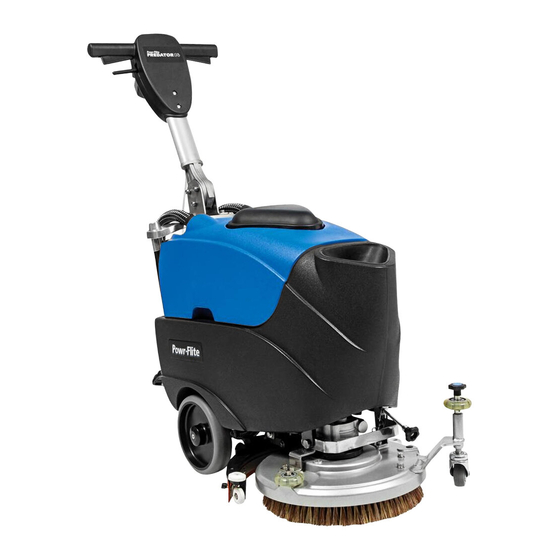
Related Manuals for Powr-Flite PAS14G


Summary of Contents for Powr-Flite PAS14G
- Page 1 OPERATOR’S MANUAL Automatic Scrubber PAS14G WARNING: OPERATOR MUST READ AND UNDERSTAND THIS MANUAL COMPLETELY BEFORE OPERATING THIS EQUIPMENT. © Tacony Corporation, All rights reserved PAS14G-MAN 05/2018 Save These Instructions...
-
Page 2: Table Of Contents
Contents Getting to know the machine ....................3 Product information ....................4 1.1 Important safety advice .................4 1.2 Non intended use of the machine ..............4 1.3 General warnings about batteries ..............4 1.4 Guidelines for the operator ................5 1.5 Transporting the machine ................5 1.6 Symbols &... -
Page 3: Getting To Know The Machine
Getting to know the machine 1. Handle 11. Brush guard 2. Control panel 12. Brush 3. Squeegee lifting lever 13. Squeegee 4. Lever for starting brush rotation 14. Recovery tank drain hose and/or dispensing water 15. Vacuum hose 5. Handle adjusting lever 16. -
Page 4: Product Information
corners. 1. Product Information • Keep hair, loose clothing, fingers and all parts of body This commercial automatic scrubber is designed for the away from openings and moving parts. scrubbing/cleaning of hard floors in indoor areas. • Keep cord away from heated surfaces. •... -
Page 5: Guidelines For The Operator
To move the machine to the work area lock handle and 1.4 Guidelines for the operator tilt backwards to raise the front off the floor, and wheel WARNING into position. Operators must be fully trained in the use of the machine in accordance with these instructions, CAUTION –... -
Page 6: Charging The Batteries
• Remove the recovery water tank (Fig 2). • Let the batteries charge until the “Green” LED comes on, then remove the plug and wind the battery charging around the cable holder (Fig 5). Fig 2 • Connect the battery connectors (Fig 3 & 4). Fig 5 NOTE: 10 hours are required for complete battery charge. -
Page 7: Filling The Solution Tank
before refilling the solution tank. 3. Controls The operating controls are located on the handle. (Fig 9). The icons adjacent to each switch identify the functions. ➋ ➌ ➊ ➍ Fig 7 IMPORTANT Never allow the cleaning head to rest on Fig 9 the brush or drive disc and pad when not in use. 1 - LEDs status of battery charge The LED lights will indicate the charging status. -
Page 8: Operation
5 (R) 5 (L) Fig 12 Fig 10 • Check the status of the battery charge by pressing brush switch 3. (Fig 9) 5 – Brush rotating and/or water dispensing lever • Check that the water filter is clean and free of debris (Fig 13). Pressing and holding lever 5 will start the rotation of the brush. -
Page 9: Using The Machine
• Washing, brushing, drying cycle with vacuum motor OFF. Scrub floor again, picking up Press button 2 to start the vacuum, button 4 (Fig 9) to the solution. release solution and press the lever 5 (Fig 10) to start • WARNING - If foam or liquid is leaking, turn machine the cycle. -
Page 10: Draining And Cleaning The Recovery Tank
letting all the water drain out. 5.2 Draining and cleaning the recovery tank • Wash the inside of the tank, leaving the drain cap open At the end of the cleaning cycle or when the recovery and adding clean water though the front opening. tank is full, it is necessary to empty the tank by •... -
Page 11: Prolonged Machine Standstill
• When storing the machine for long periods, remove the inverting them. brush and put the squeegee in the up position. • Replace all the components in reverse order. • Store the machine in a dry indoor area only. 6.1 Prolonged machine standstill •... -
Page 12: Replacing The Fuses (Fig 25)
7.3 Changing the brushes or pad drivers (Fig 24) • Lift the machine up slightly at the front • To remove a brush/pad driver: grasp the brush/pad driver and rotate it sharply CW. To install a brush/pad driver, grasp the brush/pad driver and turn it sharply CCW onto the clutch. -
Page 13: Operations To Perform Weekly
Do not initially return the product as this could result in transit damage. Fig 26 3. Neither Powr-Flite nor its distributors shall be liable for any incidental or consequential loss. • Make sure that the solution tap is fully closed. Refer 4. -
Page 14: Technical Specification
Oil resistent squeegee blades Anti-oil (1 pair of blades) Squeegee front & rear blades 95.0051.00 Oil resistent squeegee blades Anti-oil (5 pair of blades) IMPORTANT: Genuine accessories are only available from Powr-Flite authorized Service Agents or Powr-Flite Customer Services Department... -
Page 15: Fault Diagnosis
Turn on the tap located at the bottom Tap turned off of the machine Filter blocked Clean the filter Solenoid valve does not Call Powr-Flite technical support work Insufficient floor cleaning Unsuitable brushes or Use brushes or detergents which are detergent suitable for the type of floor or dirt to be cleaned... - Page 16 1 year from date of purchase on workmanship, motor, and parts. In case you, as our customer, meet any trouble with your machine, contact a Powr-Flite representative, who will be happy to be of service to you and will take care of any warranty issues. This warranty covers normal use and does not cover damage which occurs in shipment or failure resulting from altercation, accident, misuse, abuse, neglect or improper maintenance.
Need help?
Do you have a question about the PAS14G and is the answer not in the manual?
Questions and answers