Table of Contents
Advertisement
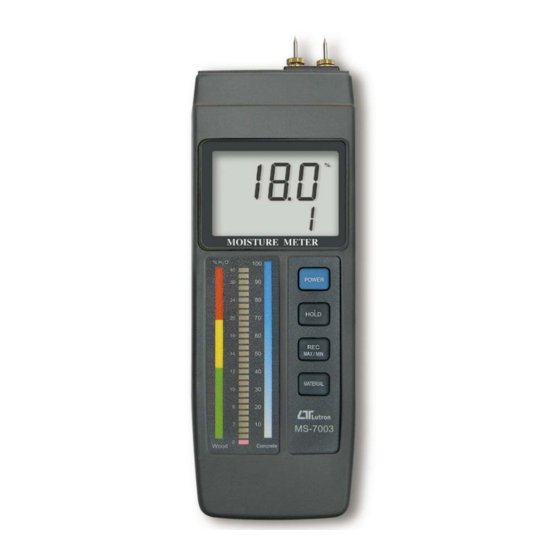
all in one, bar graph, LED + LCD
MOISTURE METER
Model : MS-7003
OPERATION MANUAL
Your
purchase
MOISTURE METER marks a
step forward for you into
the
field
of
measurement.
this MOISTURE METER is a
complex
and
instrument,
its
structure will allow many
years of use if proper
operating techniques are
developed.
Please
the following instructions
carefully and always keep
this manual within easy
reach.
of
this
precision
Although
delicate
durable
read
Advertisement
Table of Contents

Related Manuals for Lutron Electronics MS-7003


Summary of Contents for Lutron Electronics MS-7003
- Page 1 LED + LCD MOISTURE METER Model : MS-7003 Your purchase this MOISTURE METER marks a step forward for you into field precision measurement. Although this MOISTURE METER is a complex delicate instrument, durable structure will allow many...
-
Page 2: Table Of Contents
TABLE OF CONTENTS 1 FEATURES..............1 2 SPECIFICATIONS............1 3 FRONT PANEL DESCRIPTION........3 3-1 Display............... 3 3-2 Red LED bar graph indicator 3-3 Power button............3 3-4 Hold button............3 3-5 REC ( MAX/MIN ) button........3 3-6 Material button..........3 3-7 Test pins.............3 3-8 Protection cover.......... -
Page 3: Features
1. FEATURES * Designed to check the moisture level of wood, concrete, and other non-wood material. * 6 % to 40 % moisture range on wood. * 0 to 100% relative moisture value for Concrete and other non-wood material. * Red LED bar graph indicator and LCD digital display. * All in one, meter build in the test pins. - Page 4 Circuit Custom one-chip of microprocessor LSI circuit. Display LCD size : 51 mm x 37 mm Digit size : 16 mm ( 0.62 " ) Material/ Material 1 : Range 0 to 100% relative moisture value for Concrete. and other non-wood material. Material 2 : 6 % to 40 % moisture range on wood.
-
Page 5: Front Panel Description
3. FRONT PANEL DESCRIPTION Fig. 1 3-1 Display 3-2 Red LED bar graph indicator 3-3 Power button 3-4 Hold button 3-5 REC ( MAX/MIN ) button 3-6 Material button 3-7 Test pins 3-8 Protection cover 3-9 Lock nut for test pin 3-10 Input socket for external probe 3-11 Battery compartment/Cover 3-12 Stand... -
Page 6: Measuring Procedure
4. MEASURING PROCEDURE If the test pins ( 3-7, Fig. 1 ) are not installed to the probe head & packed separately, please refer the following diagram to fix the test pins into the probe. 4-1 Measurement by selecting the different material 1)Power on the meter by pushing the "... - Page 7 3)It is recommended that the test pins are inserted to a minimum depth of 2 mm into the material under test. If a depth of 2 mm can not be obtained, then insert the test pins to their maximum achievable depth. Fig.
-
Page 8: Other Functions
4-2 Other Functions 1)Data Hold * During measurement, pushing the " Hold button " ( 3-4, Fig. 1 ) will hold the display values & the LCD will show the " D.H " symbol. * To cancel the Data Hold function, Press the "... -
Page 9: Maintenance
4-3 Optional separate probe If intend to use the sperate probe to make the moisture measurement, just prepare the separate probe ( MP-31, optional, 3-13, Fig. 1 ) and connect the probe plug into the " Input socket " ( 3-10, Fig. 1 ) 5. -
Page 10: Auto Power Disable
6. AUTO POWER DISABLE The meter is built the " Auto power shut off " function in order to prolong the battery life. The meter will switch off automatically If none of any function buttons are pressed within approx. 10 minutes. If the user intend to disable the "...
Need help?
Do you have a question about the MS-7003 and is the answer not in the manual?
Questions and answers