Table of Contents
Advertisement
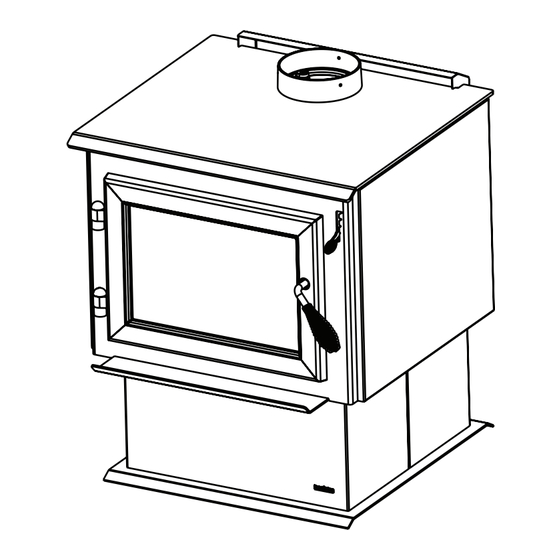
MODEL:
WS18-AU
WOOD BURNING
APPLIANCE
•
WARNING
If the information in these instructions
is not followed exactly, a fire may result
causing property damage, personal injury,
or death.
•
Do not store or use gasoline or other flammable
vapors and liquids in the vicinity of this or any other
appliance.
•
Do not over fire - If heater or chimney connector
glows, you are over firing. Over firing will void your
warranty.
•
Comply with all minimum clearances to combustibles
as specified. Failure to comply may cause house fire.
Consumer Care 1-877-427-3316 - Prior to calling, please
have the model and serial number of the unit you are
calling about. This information can be found at the front of
the unit.
www.heatilator.com
DO NOT DISCARD THIS MANUAL
Important operating
•
and maintenance
instructions
included.
7056-153F • 20 August, 2018
Owner's Manual
Installation and Operation
WS18
CAUTION
Read, understand and
follow these instructions
for safe installation and
operation.
Hot glass and appliance will cause burns.
•
Do not touch glass until it is cooled
•
Use leather gloves when reloading fuel
•
NEVER allow children to touch glass
•
Keep children away
•
CAREFULLY SUPERVISE children in same room as
appliance.
•
Alert children and adults to hazards of high
temperatures
•
High temperatures may ignite clothing or other
flammable materials.
•
Keep clothing, furniture, draperies and other
flammable materials away.
Fire Risk.
For use with solid wood fuel only.
Other fuels may over fire and generate poisonous
gases (i.e. carbon monoxide).
•
Leave this
manual with party
responsible for use
and operation.
WARNING
HOT SURFACES!
Glass and other surfaces are hot during
operation AND cool down.
WARNING
1
Advertisement
Table of Contents

Related Manuals for Heatilator ECO CHOICE WS18-AU


Summary of Contents for Heatilator ECO CHOICE WS18-AU
- Page 1 Other fuels may over fire and generate poisonous calling about. This information can be found at the front of gases (i.e. carbon monoxide). the unit. 7056-153F • 20 August, 2018 www.heatilator.com...
-
Page 2: Sample Of Serial Number / Safety Label
Heatilator EcoChoice WS18 NOTE: Clearances may only be reduced by means approved by the regulatory authority having jurisdiction A. Sample of Serial Number / Safety Label LOCATION: Back of appliance ITEM PART NUMBER PART NAME ECO CHOICE WOODFIRE COMPLIANCE LABEL... -
Page 3: Table Of Contents
E. Snap Disc Replacement ....24 F. Tube Channel Assembly Replacement ..25 Heatilator is a registered trademark of Hearth & Home Technologies. www.heatilator.com... -
Page 4: Warranty Policy
Heatilator EcoChoice WS18 B. Warranty Policy AUSTRALIAN WARRANTY INFORMATION Hearth & Home Technologies Inc (HHT) 352 Mountain House Road | Halifax, PA 17032 | (717-362-9080) HHT extends the following manufacturer’s warranty for HHT gas, wood, pellet, coal and electric hearth appliances that are purchased from an HHT authorized dealer. - Page 5 Heatilator EcoChoice WS18 OTHER RIGHTS The HHT manufacturer’s warranty is in addition to other rights and remedies that you may have under Australian law. Our goods come with guarantees that cannot be excluded under the Australian Consumer Law. You are entitled to a replacement or refund for a major failure and for compensation for any other reasonably foreseeable loss or damage.
-
Page 6: Quick Start Guide
Heatilator EcoChoice WS18 C. Quick Start Guide 10 Pieces of Newspaper, 10-20 Pieces of Dry Kindling ITEMS NEEDED FOR FIRST FIRE: and a Few Pieces of Dry Split Wood. OPEN AIR ADD NEWSPAPER LOAD WOOD CONTROL HIGH ADD KINDLING WARNING! Risk of Fire... -
Page 7: Listing And Code Approvals
Heatilator EcoChoice WS18 Listing and Code Approvals A. Appliance Certification D. Non-Combustible Materials Material which will not ignite and burn, composed of any Model: WS18 AU Wood Appliance combination of the following: Laboratory: HRL Technology Steel Concrete Plaster Tile Hardwood to HCMG/14/004... -
Page 8: Operating Instructions
Heatilator EcoChoice WS18 User Guide Operating Instructions WARNING HOT SURFACES! Glass and other surfaces are hot during operation AND cool down. Hot glass and appliance will cause burns. • Do not touch glass until it is cooled • Use leather gloves when loading fuel. -
Page 9: Fire Safety
Heatilator EcoChoice WS18 B. Fire Safety D. Combustible/Non-combustible Materials To provide reasonable fire safety, the following should be • Combustible Material given serious consideration: Material made of or surfaced with wood, compressed 1. Install at least one smoke detector on each floor of paper, plant fibers, plastics, or any material capable your home to ensure your safety. -
Page 10: Burning Process
Heatilator EcoChoice WS18 F. Burning Process 3. Final Stage In recent years there has been an increasing concern The final stage of burning is the charcoal stage. This occurs about air quality. Much of the blame for poor air quality when the flammable gases have been mostly burned and only charcoal remains. -
Page 11: Burn Rate Air Controls
Heatilator EcoChoice WS18 H. Burn Rate Air Controls I. Burn Rates and Operating Efficiency • The air supply enters at the upper front of the firebox, WARNING near the top of the glass door. • This preheated air supplies the necessary fresh oxygen Risk of Fire. -
Page 12: Building A Fire
Heatilator EcoChoice WS18 J. Building A Fire 9. When ready to reload, It is best to set the Burn Rate Air Control in the High position before reloading. WARNING • This livens up the coal bed and reduces excessive emissions (opacity/smoke). -
Page 13: Correct Baffle & Blanket Placement
Heatilator EcoChoice WS18 INCORRECT POSITIONS K. Correct Baffle & Blanket Placement WARNING Fire Risk. Firebox damage due to improper baffle placement is not covered by warranty. Operate the wood burning appliance with the baffle in the correct position only. Not doing so could result in: •... -
Page 14: Wood Fuel
Heatilator EcoChoice WS18 L. Wood Fuel Seasoned Wood • Cut logs to size • Split to 6 inches (152 mm) or less in diameter WARNING • Air dry to a moisture content of not more than 20% Soft wood - about nine months to dry Fire Risk. -
Page 15: Blower Operating Instructions
Heatilator EcoChoice WS18 M. Blower Operating Instructions NOTE: If your wood appliance is equipped with an optional blower, you should follow these Blower guidelines: Burn Rate Air Control Snap Disc Handle Up = Open Handle Down = Closed Figure 15.2 - Snap Disc Location 8. -
Page 16: Opacity (Smoke)
Heatilator EcoChoice WS18 O. Opacity (Smoke) P. Negative Pressure This is the measure of how cleanly your appliance is WARNING burning. Opacity is measured in percent; 100% opacity is when an object is totally obscured by the smoke column Asphyxiation Risk. -
Page 17: Frequently Asked Questions
Heatilator EcoChoice WS18 Q. Frequently Asked Questions ISSUES SOLUTIONS When first operated, this appliance may release an odor for the first several hours. This is Odor from appliance caused by the curing of the paint and the burning off of any oils remaining from manufacturing. -
Page 18: Maintenance And Service
Heatilator EcoChoice WS18 Maintenance and Service A. Quick Reference Maintenance Guide CAUTION! Start the first inspection after the first 2 months of use, or if performance changes, and adjust your schedule Allow the appliance to completely cool down before accordingly. Maintenance is required for safe operation and performing any cleaning or maintenance. -
Page 19: General Maintenance
Heatilator EcoChoice WS18 B. General Maintenance 2. Disposal of Ashes • Frequency: When ash is within 44mm of firebox lip 1. Creosote (Chimney) Cleaning • By: Homeowner • Frequency: Every 2 months during heating season or Ashes should be placed in a metal container with a tight as recommended by a certified chimney sweep;... - Page 20 Heatilator EcoChoice WS18 5. Firebrick Inspection 4. Glass Cleaning • Frequency: After each ash removal • Frequency: As desired • By: Homeowner • By: Homeowner Replace the firebrick if they become, cracked, broken, Clean glass with a non-abrasive glass cleaner. Abrasive crumbly and/or if there is a 1/4 inch (6.35mm) gap between...
-
Page 21: Troubleshooting Guide
Heatilator EcoChoice WS18 Troubleshooting Guide With proper installation, operation, and maintenance your wood appliance will provide years of trouble-free service. If you do experience a problem, this troubleshooting guide will assist you or a qualified service person in the diagnosis of a problem and the corrective action to be taken. -
Page 22: Service Parts Replacement
Heatilator EcoChoice WS18 Service Parts Replacement A. Glass Replacement B. Firebrick Replacement 1. Ensure that the fire is out and the appliance is cool to The firebox is lined with high quality firebrick, which has the touch. exceptional insulating properties. There is no need to use a 2. -
Page 23: Door Handle Assembly
Heatilator EcoChoice WS18 C. Door Handle Assembly 1. Install washer on door handle shaft. 2. Slide door handle through door. 3. Install second washer(s) as shown in Figure 23.1. 4. Install key in groove. 5. Align groove in latch cam with key; slide latch cam over shaft 6. -
Page 24: Snap Disc Replacement
Heatilator EcoChoice WS18 E. Snap Disc Replacement 1. Disconnect power supply. Locate the snap disc bracket assembly at the bottom left rear corner of the appliance (Figure 24.1). 2. A magnet holds the bracket to the appliance. Pull the bracket down away from the appliance to expose the snap disc. -
Page 25: Tube Channel Assembly Replacement
Heatilator EcoChoice WS18 F. Tube Channel Assembly Replacement Removing Tube Channel Assembly NOTE: Service Space 1. Remove the baffle protection channel, ceramic blanket In order to replace the tube channel assembly a and the 2 baffle boards (See instructions on page 22). -
Page 26: Installer's Guide
Heatilator EcoChoice WS18 Installer’s Guide Getting Started A. Design and Installation Considerations B. Fire Safety To provide reasonable fire safety, the following should be Consideration must be given to: given serious consideration: • Safety 1. Install at least one smoke detector on each floor of •... -
Page 27: Tools And Supplies Needed
Heatilator EcoChoice WS18 F. Draft WARNING Draft is the pressure difference needed to vent appliances successfully. When a appliance is drafting successfully, all Fire Risk. combustion by products are exiting the home through the Hearth & Home Technologies disclaims any chimney. -
Page 28: Install Checklist
Heatilator EcoChoice WS18 G. Install Checklist ATTENTION INSTALLER: Follow this Standard Work Checklist This standard work checklist is to be used by the installer in conjuction with, not istead of, the instructions contained in this installation manual. _________________________________________________________________________________ Customer: ______________________________________________________________________________... -
Page 29: Dimensions And Clearances
Heatilator EcoChoice WS18 Dimensions and Clearances A. Appliance Dimensions NOTE: Flue Collar size is 6 inch (152mm) diameter (ID) 19-1/16 in. (484 mm) 25 in. (635mm) 9-5/16 in. 12-1/2 in. (236 mm) (317mm) 14-13/16 in. (376 mm) 13-13/16 in. 9-9/16 in. -
Page 30: Hearth Protection Requirements
Heatilator EcoChoice WS18 B. Hearth Protection Requirements C. Firebox Installation Heatilator WS18 does not require a insulating Floor 1. If a separate floor protector is being used position Protector, as they are tested and comply with the minimum now. Place the firebox on the floor protector to suit the Floor Protector requirements of AS/NZS 2918:2001. -
Page 31: Clearances To Combustibles
Heatilator EcoChoice WS18 D. Clearances to Combustibles MINIMUM CLEARANCES TO COMBUSTIBLE MATERIALS in Millimeters Note: A, C, and F Dimensions are to the center of the flue collar WS18 AU Wood Appliance INSTALLATION DOUBLE WALL PIPE 1055 1219 1379 Figure 31.2 Figure 31.1... -
Page 32: Venting And Chimney Systems
Heatilator EcoChoice WS18 Venting and Chimney Systems A. Locating Your Appliance & Chimney and ceiling attic joists and rafters. • Locate termination cap away from trees, adjacent Location of the appliance and chimney will affect structures, uneven roof lines and other obstructions. -
Page 33: Minimum Height Of Flue System Exit
Heatilator EcoChoice WS18 B. Minimum Height of Flue System Exit 3000mm more than 3000mm or less 600mm 3000mm minimum 3000mm increase from 1000mm minimum until clear within 3000mm of flue top increase as necessary until nothing within 3000mm of fluetop any nearby structure Figure 33.1... -
Page 34: Chimney Termination Requirements
Heatilator EcoChoice WS18 C. Chimney Termination Requirements 8. Refer to steps 1 and 2 under Firebox Installation on page 8. • Flue pipe installed crimp/narrow end down 9. Prepare the ceiling plate and place upside down over • Outer casings installed crimped/narrow end up. (Critical the flue spigot. -
Page 35: General Flue System Instructions
Heatilator EcoChoice WS18 D. General Flue System Instructions WARNING 1. Unpack the Flue Mounted Shield, detach the three brackets and familiarize yourself with the illustrations. Fire Risk. 2. Using a sharp knife or razor blade, carefully cut through Do NOT pack insulation or other combustibles the plastic film on the “inside face”... -
Page 36: Tested Flue Systems
Heatilator EcoChoice WS18 H. Tested Flue Systems , as per AS/NZS 2918:2001 ADD Cowl Casing Cover oversized casing cover minimum 25mm gap is necessary between flue pipe casing & Spider Bracket combustible material Non combustible material Hebel block or 12mm... -
Page 37: Un-Tested Flue Systems
Heatilator EcoChoice WS18 I. Un-Tested Flue Systems , as per AS/NZS 2918:2001, 4.6.3(b) ADD Cowl AS/NZS2918:2001 Casing Cover Un-tested flue with sloped ceiling Spider Bracket penetration greater than 30° from horizontal A = 25mm Approved Flashing 4.6.3(b) Fig 4.6 = downward distance of casing and 3 x ø... -
Page 38: Appliance Set-Up
Heatilator EcoChoice WS18 Appliance Set-up A. Outside Air Kit Installation 5. Floor Installation Alternative: In some instances you may not be able to install the flex pipe as show in A source of air (oxygen) is necessary in order for Figure 38.1. -
Page 39: Door Handle Assembly
Heatilator EcoChoice WS18 B. Door Handle Assembly C. Blower Installation (Optional) 1. Align holes in mounting flange of blower with bolt holes Install spring handle using a counter-clockwise motion until in appliance. Blower should be positioned at bottom of the spring handle has a 51mm clearance from bend of rear outer skin as shown in Figure 39.2. -
Page 40: As/Nzs 2918:2001 General Notes
Heatilator EcoChoice WS18 AS/NZS 2918:2001 General Notes WARNINGS WARNING: THE APPLIANCE AND FLUE SYSTEM SHALL BE INSTALLED IN ACCORDANCE WITH AS/NZS 2918 AND THE APPROPRIATE REQUIREMENTS OF THE RELEVANT BUILDING CODE OR CODES. WARNING: APPLIANCES INSTALLED IN ACCORDANCE WITH THIS STANDARD SHALL COMPLY WITH THE REQUIREMENTS OF AS/NZS 4013 WHERE REQUIRED BY THE REGULATORY AUTHORITY, I.E. -
Page 41: Reference Materials
Heatilator EcoChoice WS18 Reference Materials A. Maintenance & Service Log Date of Service Performed By Description of Service www.heatilator.com 7056-153F • 20 August, 2018... - Page 42 Heatilator EcoChoice WS18 Date of Service Performed By Description of Service www.heatilator.com 7056-153F • 20 August, 2018...
-
Page 43: Exploded Drawing
Heatilator EcoChoice WS18 B. Exploded Drawing WS18-AU Service Parts Beginning Manufacturing Date: May 2014 Free Standing Wood Stove Ending Manufacturing Date: Active Part number list on following page. 04/18 www.heatilator.com 7056-153F • 20 August, 2018... -
Page 44: Service Parts
Heatilator EcoChoice WS18 C. Service Parts WS18-AU Service Parts Beginning Manufacturing Date: May 2014 Ending Manufacturing Date: Active Hearth and Home IMPORTANT: THIS IS DATED INFORMATION . Parts must be ordered from a dealer or distributor. Technologies does not sell directly to consumers . -
Page 45: Accessories
Heatilator EcoChoice WS18 D. Accessories WS18-AU Service Parts Beginning Manufacturing Date: May 2014 Ending Manufacturing Date: Active IMPORTANT: THIS IS DATED INFORMATION. Parts must be ordered from a dealer or distributor. Hearth and Home Technologies does not sell directly to consumers. Provide model number and serial number when requesting service parts from your dealer or distributor. - Page 46 Hearth & Home Technologies 352 Mountain House Road Halifax, PA 17032 Division of HNI INDUSTRIES Please contact your Heatilator dealer with any questions or concerns. For the number of your nearest Heatilator dealer log onto www.heatilator.com CAUTION DO NOT DISCARD THIS MANUAL...
Need help?
Do you have a question about the ECO CHOICE WS18-AU and is the answer not in the manual?
Questions and answers