Table of Contents
Advertisement
Quick Links
Advertisement
Table of Contents

Related Manuals for Acelity V.A.C.ULTA 4


Summary of Contents for Acelity V.A.C.ULTA 4
- Page 1 USER MANUAL For Clinicians Do not discard. Please retain this user manual for future reference. For additional copies, in the US, visit www.acelity.com, www.veraflo.com and www. vaculta.com or contact KCI at 1-800-275-4524. Outside the US, visit www.kci-medical.com. Rx Only...
-
Page 3: Important Safety Information Accompanies This Device
Dressing cartons. If there are questions, or if the safety information is missing, immediately contact your local KCI representative. Additional product information can be found at www.acelity.com, www.veraflo.com or www.vaculta.com (US), www.kci-medical.com (OUS). As with all prescription medical devices, failure to follow product instructions or adjusting... -
Page 5: Table Of Contents
Table of Contents Important Safety Information Accompanies This Device ....................................3 Warnings: Important Information For Users ...........................................11 Colors Used in this Manual ..............................................11 Introduction ........................................................13 V.A.C.ULTA™ Therapy System Key Features and Benefits ..................................16 V.A.C.ULTA™ Therapy Unit Component Identification ......................................18 Alert and Alarm Symbols ...............................................20 Preparation for Use ....................................................23 Charge Battery ....................................................23 Therapy Unit Placement .................................................25... - Page 6 V.A.C. VERAFLO™ Therapy Paused .............................................52 V.A.C. VERAFLO™ Therapy Alerts and Alarms ......................................53 V.A.C. VERAFLO™ Therapy Blockage Alert ........................................54 V.A.C. VERAFLO™ Therapy Blockage Alarm (Therapy Interrupted) ...............................55 V.A.C. VERAFLO™ Therapy Canister Full Alarm (Therapy Interrupted) ............................56 V.A.C. VERAFLO™ Therapy Canister Not Engaged Alarm ..................................57 V.A.C.
- Page 7 V.A.C.® Therapy Therapy Inactive Alarm ........................................92 V.A.C.® Therapy Leak Alarm ..............................................93 V.A.C.® Therapy Leak Alarm (Therapy Interrupted) ....................................94 V.A.C.® Therapy Low Pressure Alarm (Therapy Interrupted) ................................95 V.A.C.® Therapy V.A.C. VERALINK™ Not Engaged Alert ..................................96 V.A.C.® Therapy Solution Bag / Bottle Empty Alert ....................................97 V.A.C.®...
- Page 8 Confirm Settings Screen - ABTHERA™ Therapy ....................................128 Home Screen - ABTHERA™ Therapy ..........................................129 Information Screens - ABTHERA™ Therapy ......................................130 ABTHERA™ Therapy Alerts ..............................................131 ABTHERA™ Therapy Blockage Alert ..........................................132 ABTHERA™ Therapy Blockage Alert (Therapy Interrupted) ................................133 ABTHERA™ Therapy Canister Full Alert ........................................134 ABTHERA™...
- Page 9 View Patient History Screen ..............................................163 Export Patient History Screen ............................................164 View Graph - Wound Area (cm ) Screen ........................................165 Delete Patient History Screen ............................................166 Wound Imaging ..................................................167 Imaging Screen ..................................................168 Analyzing Images - Touch Corners of Reference Square ................................171 Analyzing Images - Trace Wound Perimeter ......................................172 Analyzing Images - Image Area Depth ........................................174 Delete Images ....................................................175 Therapy History Screen ................................................177...
-
Page 11: Warnings: Important Information For Users
Warnings: Important Information For Users In order for KCI products to perform properly, KCI recommends the following conditions. Failure to comply with these conditions will void any applicable warranties. • Use this product only in accordance with this manual and applicable product labeling. •... -
Page 13: Introduction
Introduction The V.A.C.ULTA™ Negative Pressure Wound Therapy System is an integrated wound management system that provides: V.A.C.® Negative Pressure Wound Therapy • V.A.C. VERAFLO™ Instillation Therapy • PREVENA™ Incision Management Therapy • ABTHERA™ SENSAT.R.A.C.™ Open Abdomen Therapy • (4). Refer to the V.A.C.ULTA™ Negative Pressure Wound Therapy System (V.A.C.ULTA™ Therapy System) Safety Information that accompanies the V.A.C.ULTA™... - Page 14 V.A.C. VERAFLO™ Instillation Therapy: Phases of V.A.C. VERAFLO™ Therapy (Start Phase: Instill) Draw Instill V.A.C.® Soak Therapy*** Down* Fluid** Cycle repeats for duration of therapy * SEAL CHECK™ Leak Detector ** Fill Assist allows the user to monitor initial wound fill by manually starting and stopping instillation to determine correct instill volume after dressing is applied.
- Page 15 ABTHERA™ SENSAT.R.A.C.™ Open Abdomen Therapy: ABTHERA™ Therapy Mode Negative Pressure Profile 100 - 150 mmHg Target Continuous 0 mmHg ABTHERA™ Therapy The ABTHERA™ SENSAT.R.A.C.™ Open Abdomen Dressing is available for use with the option provided by the V.A.C.ULTA™ Therapy System. The V.A.C.ULTA™...
-
Page 16: V.a.c.ulta™ Therapy System Key Features And Benefits
V.A.C.ULTA™ Therapy System Key Features and Benefits Therapy Selection - Allows user to select V.A.C. VERAFLO™, V.A.C.®, PREVENA™ ABTHERA™ Therapies. Fill Assist (V.A.C. VERAFLO™ Therapy)- Allows the user to monitor the initial wound fill by manually starting and stopping instillation to determine the appropriate instill volume after the dressing is applied. Once determined, this volume will be the set V.A.C. - Page 17 Additional Features Touch Screen User Interface: The touch screen user interface allows for easy navigation through operational and help menus. A screen guard is available to help prevent unintentional changes. A settings lock is available to prevent patient access to therapy settings.
-
Page 18: V.a.c.ulta™ Therapy Unit Component Identification
V.A.C.ULTA™ Therapy Unit Component Identification Power Button Canister Release Button Touch Screen Unit Serial Number Label Battery Changing Indicator Light Speaker USB Port SD Card Slot Stylus V.A.C.ULTA™ Therapy Unit - Front Solution Container Hanger Arm Unit Hanger Knob Solution Container Hanger Arm Lock Unit Hanger Arm V.A.C.ULTA™... - Page 19 Instillation Tubing Retention Groove Carry Handle Solution Container Hanger Arm Lock Instill Pump V.A.C. VERALINK™ Cassette Pivot Slot V.A.C.ULTA™ Therapy Unit - Left Canister Bellows (Seals) V.A.C.ULTA™ Therapy Unit Power Connection V.A.C.ULTA™ Therapy Unit - Right...
-
Page 20: Alert And Alarm Symbols
Alert and Alarm Symbols Alert / Alarm V.A.C. VERAFLO™ V.A.C.® PREVENA™ ABTHERA™ Therapy Therapy Therapy Therapy Blockage ALERT ALERT ALERT ALERT Blockage (Therapy Interrupted) ALARM ALARM ALERT ALERT Canister Full ALARM ALARM ALERT ALERT Canister Not Engaged ALARM ALARM ALERT ALERT Therapy Inactive ALARM... - Page 21 Alert / Alarm Symbol V.A.C. VERAFLO™ V.A.C.® PREVENA™ ABTHERA™ Therapy Therapy Therapy Therapy Battery Low ALERT ALERT ALERT ALERT Battery Critical ALARM ALARM ALERT ALERT Battery Exhausted ALARM ALARM ALERT ALERT Internal Temperature ALERT ALERT ALERT ALERT ºC System Error ALARM ALARM ALERT...
-
Page 23: Preparation For Use
Preparation for Use Charge Battery The V.A.C.ULTA™ Therapy Unit comes with its own power supply and a rechargeable battery. The battery is not user accessible or serviceable. The power supply has a two-part cord, one that plugs into an AC wall outlet and one that plugs into the V.A.C.ULTA™ Therapy Unit. - Page 24 Plug the AC power cord into the DC power supply. Plug the AC wall plug into an AC wall outlet. DC power supply must remain accessible at all times to allow for immediate disconnect from power source, if necessary. Locate the arrow on the charging cord connector. The arrow should face up as the connector is plugged into the power connection on the V.A.C.ULTA™...
-
Page 25: Therapy Unit Placement
A plug indicator appears on screen while the unit is plugged into a wall outlet. Plug Indicator Battery Charging It should take approximately four hours to fully recharge the battery. To maximize battery life, keep the unit plugged in whenever possible. When the V.A.C.ULTA™... -
Page 26: Attaching The Therapy Unit To An I.v. Pole
Attaching the Therapy Unit to an I.V. Pole Hold the V.A.C.ULTA™ Therapy Unit by the carry handle, grip the hanger knob and pull the hanger arm out (1). Place the hanger around the I.V. pole and allow the hanger to close, pulling the unit onto the I.V. pole (2). Ensure that the pole is in the vertical rubber groove (at both top and bottom) on the rear of the V.A.C.ULTA™... -
Page 27: Attaching The Therapy Unit To A Bed Footboard
Attaching the Therapy Unit to a Bed Footboard Hold the V.A.C.ULTA™ Therapy Unit by the carry handle, grip the hanger knob and pull the hanger arm out (1). Place the hanger over the footboard. Allow the hanger to close, pulling the unit onto the footboard (2). Turn the hanger knob to lock the hanger arm in place (3). -
Page 28: Attaching The V.a.c. Veralink™ Cassette
Attaching the V.A.C. VERALINK™ Cassette For use only with the V.A.C.® Therapy when using the Dressing Soak Feature or V.A.C. VERAFLO™ Therapy. V.A.C. VERALINK™ Cassette Basket V.A.C. VERALINK™ Cassette Release Tab (TOP) V.A.C. VERALINK™ Cassette Tubing V.A.C. VERALINK™ Cassette Pivot Connection (BOTTOM) Tubing Spike Remove the V.A.C. -
Page 29: Attaching Solution Bag / Bottle
Attaching Solution Bag / Bottle For use only with the V.A.C.® Therapy when using the Dressing Soak Feature or V.A.C. VERAFLO™ Therapy Extend Solution Container Hanger Arm: Fully lift the solution container hanger arm lock (1). Raise solution container hanger arm (2). Depending on unit, either rotate the handle 180 degrees (3A) or flip the handle up (3B). -
Page 30: Hang Solution Bag / Bottle
Hang Solution Bag / Bottle For use only with the V.A.C.® Therapy Dressing Soak Feature or V.A.C. VERAFLO™ Therapy. Ensure cassette tubing is routed in the retention groove on the unit handle by applying pressure to push tubing into the groove. Spike solution bag / bottle according to manufacturer’s instructions using the V.A.C. -
Page 31: Connect Instillation Line
Connect Instillation Line For use only with the V.A.C.® Therapy Dressing Soak Feature or V.A.C. VERAFLO™ Therapy. Refer to the appropriate dressing Instructions for Use for safety information and procedures to apply and change the dressing. Remove the cap from the end of the V.A.C. VERALINK™ Cassette tubing (1). -
Page 32: Canister Installation
Canister Installation When selecting canister size (300 mL, 500 mL, 1000 mL), consider the amount of wound exudate and selected therapy. If delivering V.A.C. VERAFLO™ Therapy, also consider the amount of wound instillation fluid and frequency of instillation. If delivering PREVENA™... - Page 33 Twist connectors until the locking tabs are fully engaged (4). Open all tubing clamps (5).
-
Page 34: Changing The Canister
Changing the Canister A canister may be changed under routine conditions or under alarm conditions. Under routine conditions the canister release button will NOT be flashing. When changing the canister DO NOT power off the V.A.C.ULTA™ Therapy Unit. Under Canister Full Alarm conditions, the canister release button (page 18) will be flashing, an alert / alarm screen (pages 56, 90, 116 and 134) will be displayed and therapy will be off (unit power remains on). - Page 35 Press the Canister Release Button. If the 300 mL ACTIV.A.C.™ Canister is used, it is NOT held in place by the cradle of the V.A.C.ULTA™ Therapy Unit. When removing the 300 mL ACTIV.A.C.™ Canister from the V.A.C.ULTA™ Therapy Unit, hold the canister FIRMLY before pressing the canister release button. Remove the canister from the therapy unit by lifting and pulling the canister away from the unit (4).
-
Page 37: Operation
Operation This chapter contains instructions for setting and adjusting functions of the V.A.C.ULTA™ Therapy Unit. Review all sections of this manual prior to product use. Carefully read the Indications, Contraindications, Warnings, and Precautions included with the unit prior to operating the V.A.C.ULTA™ Therapy Unit. Touch Screen The display on the front of the unit is touch sensitive. -
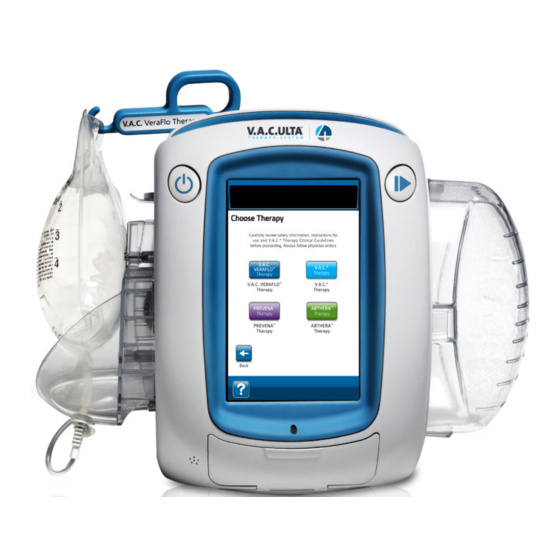
Page 38: V.a.c.ulta™ Therapy System - Therapy Options
V.A.C.ULTA™ Therapy System - Therapy Options The V.A.C.ULTA™ Therapy System can be used with four different therapies depending on physician orders: V.A.C.® Negative Pressure Wound Therapy (1): 25 - 200 mmHg Target V.A.C.® Negative Pressure Therapy (continuous) 25 mmHg 0 mmHg 50 - 200 mmHg Target Negative... - Page 39 PREVENA™ Incision Management Therapy (3): PREVENA™ Therapy Mode Negative Pressure Profile 125 mmHg Continuous 0 mmHg ABTHERA™ SENSAT.R.A.C.™ Open Abdomen Therapy (4): ABTHERA™ Therapy Mode Negative Pressure Profile 100 - 150 mmHg Target Continuous 0 mmHg...
-
Page 40: Touch Screen - Tabs
Touch Screen - Tabs The touch screen is divided into three sections, each marked by a separate tab. These tabs allow access to the different areas of the V.A.C.ULTA™ Therapy Unit’s software. History Tab (page 155) Therapy Tab (pages 50, 85, Utilities Tab (pages 74, 106, 110 and 129) 126 and 144) -
Page 41: Common Touch Screen Buttons
Common Touch Screen Buttons Most screens have one or more common control buttons. These are: Help - Access Help screens Screen Guard / Settings Lock- Activate the Screen Guard feature to prevent unintentional changes. This feature should be used when cleaning the touch screen (page 192). Select and hold for more than five seconds to activate or deactivate Settings Lock. -
Page 42: Power The V.a.c.ulta™ Therapy Unit On Or Off
Power the V.A.C.ULTA™ Therapy Unit On or Off The Power button is located in the upper left hand corner on the front of the unit (page 18). Press and hold the Power button until the light comes on to turn the V.A.C.ULTA™ Therapy Unit on. The unit will go Startup screen. -
Page 43: New Patient Screen
If the V.A.C.ULTA™ Therapy Unit has been previously set up and the Startup unit is power cycled (turned off then back on), the Screen Continue Therapy Checklist. will display Continue Therapy - Select to accept Warning Home and return to previously used therapy screen (pages 50, 85, 110 and 129). -
Page 44: Veraflo™ Therapy Configuration - Default Settings Overview
V.A.C. VERAFLO™ Therapy Configuration - Default Settings Overview V.A.C. VERAFLO™ Therapy using the Default settings. Refer to The following flow chart shows the basic steps required to configure the pages listed for detailed information about individual screens and options. Press and hold Power button until light comes on. -
Page 45: Veraflo™ Therapy Configuration - Advanced User Defined Settings Overview
V.A.C. VERAFLO™ Therapy Configuration - Advanced User Defined Settings Overview V.A.C. VERAFLO™ Therapy The following flow chart shows the basic steps required to configure with User defined settings including turning Fill Assist OFF. Refer to the following pages for detailed information about individual screens and options. Press and hold Power button until light... -
Page 46: Configure V.a.c. Veraflo™ Therapy - Advanced User Defined Settings
Configure V.A.C. VERAFLO™ Therapy - Advanced User Defined Settings These screens are used to configure the V.A.C.ULTA™ Therapy Unit V.A.C. VERAFLO™ Therapy: to deliver Target Pressure (mmHg) - (Default = 125 mmHg) • Prescribed negative pressure level for V.A.C.® Therapy phase. - Page 47 Next V.A.C. Select to continue to the VERAFLO™ Settings (page 2 of 2) screen. Restore Defaults Select to return all therapy settings to their defaults. Once all settings have been entered or defaults restored, select to continue to Confirm Settings screen.
-
Page 48: Fill Assist Screens
Fill Assist Screens These screens will display the status of the Fill Assist sequence. Drawdown can take up to two minutes and thirty seconds to prepare the dressing seal to minimize solution leak potential. During this drawdown, observe the dressing for leaks. The SEAL CHECK™ Leak Detector time is designed to help minimize the potential for leaks by pulling the drape against the skin and allowing the adhesive time to cure. - Page 49 Start / Stop Select again to stop solution delivery when suitable fill volume has been delivered to the wound bed. Overfilling wound may compromise dressing seals. to adjust the fluid volume if required. Fill Assist Select (3) to confirm the determined fluid volume as displayed on the screen and return to the Home screen (page 50).
-
Page 50: Home Screen - V.a.c. Veraflo™ Therapy
Home Screen - V.A.C. VERAFLO™ Therapy Home V.A.C. VERAFLO™ Therapy. It is used to This screen is the main screen displayed by the V.A.C.ULTA™ Therapy Unit during access important information about the Therapy Status. Status Bar History Tab (page 155) Therapy Tab (pages 50, 85, Utilities Tab (page 74) 110 and 129) -
Page 51: Information Screens - V.a.c. Veraflo™ Therapy
Information Screens - V.A.C. VERAFLO™ Therapy These screens will display the current therapy settings and a summary of therapy applied to the patient. Information Home Therapy Summary Select from the screen to continue to the tab. Use this tab to review the Therapy Start Date, Therapy Time, V.A.C.®... -
Page 52: Stop V.a.c. Veraflo™ Therapy Confirmation
Stop V.A.C. VERAFLO™ Therapy Confirmation Start / If therapy is being provided, select Stop Home from the screen to continue Stop Therapy Confirmation to the screen. Cancel Select to stop therapy. Select Home to return to the screen without stopping therapy. Instilled fluid will be removed;... -
Page 53: Veraflo™ Therapy Alerts And Alarms
V.A.C. VERAFLO™ Therapy Alerts and Alarms V.A.C. VERAFLO™ Therapy. The following alerts and alarms may appear on the touch screen during Alerts and alarms are accompanied by a repeating audible tone. Following initiation of therapy, if an audible tone is not heard when SEAL CHECK™ Leak Detector is displayed and Seal Audio tone is turned ON, the alarms may not be working properly. -
Page 54: Veraflo™ Therapy Blockage Alert
V.A.C. VERAFLO™ Therapy Blockage Alert Low Priority Alert - This alert screen appears when the V.A.C.ULTA™ Therapy Unit has detected a potential blockage in the V.A.C.® Therapy line. This alert will be accompanied by a repeating audible tone. To resolve this alert: Audio Pause Select to silence alert for... -
Page 55: Veraflo™ Therapy Blockage Alarm (Therapy Interrupted)
V.A.C. VERAFLO™ Therapy Blockage Alarm (Therapy Interrupted) Medium Priority Alarm - This alarm screen appears when a blockage is present in the V.A.C.® Therapy line. This alarm will be accompanied by a repeating audible tone. To resolve this alarm: Audio Pause Select to silence alarm for two minutes during troubleshooting. -
Page 56: Veraflo™ Therapy Canister Full Alarm (Therapy Interrupted)
V.A.C. VERAFLO™ Therapy Canister Full Alarm (Therapy Interrupted) Medium Priority Alarm - This alarm screen appears when the canister is full and should be replaced. This alarm will be accompanied by a repeating audible tone. To resolve this alarm: Audio Pause Select to silence alarm for two minutes during troubleshooting. -
Page 57: Veraflo™ Therapy Canister Not Engaged Alarm
V.A.C. VERAFLO™ Therapy Canister Not Engaged Alarm Medium Priority Alarm - This alarm screen appears when the canister is not fully inserted and / or properly latched. This alarm will be accompanied by a repeating audible tone. To resolve this alarm: Audio Pause Select to silence alarm for... -
Page 58: Veraflo™ Therapy Therapy Inactive Alarm
V.A.C. VERAFLO™ Therapy Therapy Inactive Alarm Medium Priority Alarm - This alarm screen appears when therapy (V.A.C. VERAFLO™ Therapy) has been off or paused for more than 15 minutes (with the unit powered on) . This alarm will be accompanied by a repeating audible tone. To resolve this alarm: Audio Pause Select... -
Page 59: Veraflo™ Therapy Leak Alarm
V.A.C. VERAFLO™ Therapy Leak Alarm Medium Priority Alarm - This alarm screen appears when a significant negative pressure leak has been detected. If this alarm is not resolved in three minutes, therapy will be interrupted. This alarm will be accompanied by a repeating audible tone. To resolve this alarm: Audio Pause Select... -
Page 60: Veraflo™ Therapy Leak Alarm (Therapy Interrupted)
V.A.C. VERAFLO™ Therapy Leak Alarm (Therapy Interrupted) Medium Priority Alarm - This alarm screen appears when a detected negative pressure leak has not been resolved and therapy has been interrupted. This alarm will be accompanied by a repeating audible tone. To resolve this alarm: Audio Pause Select... -
Page 61: Veraflo™ Therapy Low Pressure Alarm (Therapy Interrupted)
V.A.C. VERAFLO™ Therapy Low Pressure Alarm (Therapy Interrupted) Medium Priority Alarm - This alarm screen appears when the V.A.C.ULTA™ Therapy Unit has not reached the target therapy negative pressure setting and negative pressure at the wound may be below set pressure, potentially compromising therapeutic benefits. This alarm is accompanied by a repeating audible tone. -
Page 62: Veraflo™ Therapy V.a.c. Veralink™ Not Engaged Alert
V.A.C. VERAFLO™ Therapy V.A.C. VERALINK™ Not Engaged Alert Low Priority Alert - This alert screen appears when the V.A.C. VERALINK™ Cassette is not fully seated and / or properly latched. This alert will be accompanied by a repeating audible tone. During V.A.C. -
Page 63: Veraflo™ Therapy Solution Bag / Bottle Empty Alert
V.A.C. VERAFLO™ Therapy Solution Bag / Bottle Empty Alert Low Priority Alert -This alert screen appears when there is no instillation fluid in the solution bag / bottle. This alert will be accompanied by a repeating audible tone. During V.A.C. VERAFLO™ Therapy the V.A.C.ULTA™ Therapy Unit will transition to the Soak Phase upon initiation of this alert and will continue to the V.A.C.®... -
Page 64: Veraflo™ Therapy Fill Assist Inactive Alert
V.A.C. VERAFLO™ Therapy Fill Assist Inactive Alert Low Priority Alert - This alert screen appears if the Fill Assist volume has not been accepted within 15 minutes of using Fill Assist. This alert will be accompanied by a repeating audible tone To resolve this alert: Audio Pause Select... -
Page 65: Veraflo™ Therapy Pressure Deviation Alarm (Therapy Interrupted)
V.A.C. VERAFLO™ Therapy Pressure Deviation Alarm (Therapy Interrupted) Medium Priority Alarm - This alarm screen appears when the wound site positive pressure has exceeded its allowable limits. This alarm will be accompanied by a repeating audible tone. During V.A.C. VERAFLO™ Therapy the V.A.C.ULTA™ Therapy Unit will transition to the Soak Phase upon initiation of this alarm and will continue to the V.A.C.®... -
Page 66: Veraflo™ Therapy Instill Tube Blockage Alert (Therapy Interrupted)
V.A.C. VERAFLO™ Therapy Instill Tube Blockage Alert (Therapy Interrupted) Low Priority Alert - This alert screen appears when a blockage is present in the instillation line of the V.A.C. VERAT.R.A.C.™ Pad or V.A.C. VERAT.R.A.C. DUO™ Tube Set. This alert will be accompanied by a repeating audible tone. During V.A.C. - Page 67 Ensure therapy is ON by checking the Start / status bar (page 50). If not, select Stop to restart therapy. If alarm condition cannot be resolved, contact KCI. Certain KCI Dressings must be replaced with an alternate dressing if therapy is interrupted or off for more than two hours.
-
Page 68: Veraflo™ Therapy Battery Low Alert
V.A.C. VERAFLO™ Therapy Battery Low Alert Low Priority Alert - This alert screen appears approximately two hours before the battery power level is too low to support continued operation of the V.A.C.ULTA™ Therapy Unit. This alert will be accompanied by a repeating audible tone. To resolve this alert: Audio Pause Select... -
Page 69: Veraflo™ Therapy Battery Critical Alarm
V.A.C. VERAFLO™ Therapy Battery Critical Alarm Medium Priority Alarm - This alarm screen appears approximately 30 minutes before the battery power level is too low to support continued operation of the V.A.C.ULTA™ Therapy Unit. This alarm will be accompanied by a repeating audible tone. To resolve this alarm: Audio Pause Select... -
Page 70: Battery Exhausted Alarm
Battery Exhausted Alarm Medium Priority Alarm - This alarm screen appears when the battery power level is too low to power on the V.A.C.ULTA™ Therapy Unit. To resolve this alarm: Connect the therapy unit to a wall outlet using KCI supplied power supply to recharge battery. -
Page 71: Veraflo™ Therapy Internal Temperature Alert
V.A.C. VERAFLO™ Therapy Internal Temperature Alert Low Priority Alert - This alert screen appears when the internal temperature of the V.A.C.ULTA™ Therapy Unit is outside its specified limits. This alert will be accompanied by a repeating audible tone. Therapy will continue while this alert is active. The touch screen will be turned off after five minutes of inactivity. -
Page 72: Veraflo™ Therapy System Error Alarm (Therapy Interrupted) (After Power On)
V.A.C. VERAFLO™ Therapy System Error Alarm (Therapy Interrupted) (after Power On) Medium Priority Alarm - This alarm screen appears when there is a system fault within the V.A.C.ULTA™ Therapy Unit after it has been powered on. Several different types of system errors may occur. A number will appear next to Error Code that represents the diagnostic code of the system fault. -
Page 73: System Error Alarm (At Power On)
System Error Alarm (at Power On) Medium Priority Alarm - This alarm screen appears when there is a system fault within the V.A.C.ULTA™ Therapy Unit while the unit is powering on. “00000001” represents the diagnostic code of the system fault. This alarm will be accompanied by a repeating audible tone. -
Page 74: Utilities Tab - V.a.c. Veraflo™ Therapy
Utilities Tab - V.A.C. VERAFLO™ Therapy Utilities Tab Use the screen to set preferences for the V.A.C.ULTA™ Therapy Unit. Certain selections are available no matter what therapy is active. Those selections are discussed in the Utilities Tab chapter. Selections that are unique to the selected therapy are detailed below. -
Page 75: Dressing Soak
Dressing Soak Use to soak the dressing with solution in preparation for a dressing change. If the Dressing Soak tool is available for selection, the Dressing Soak icon on the Home screen or Utilities Tab (V.A.C. VERAFLO™ Therapy V.A.C.® Therapy only ) will be blue. - Page 76 Dressing Soak selected during Instill Phase: Dressing Soak Home Select from the Utilities Tab screen or to continue to the Dressing Soak screen. Ensure that both the V.A.C.® canister tubing and instillation line are properly connected. Ensure that all four tubing clamps are open. Ensure that the canister has adequate capacity remaining for the dressing change.
- Page 77 Dressing Soak selected during Soak Phase: Dressing Soak Home Select from the Utilities Tab screen or to begin Dressing Soak. Ensure that both the V.A.C.® canister tubing and instillation line are properly connected. Ensure that all four tubing clamps are open. Ensure that the canister has adequate capacity remaining for the dressing change.
- Page 78 Dressing Soak selected during V.A.C.® Therapy Phase: Ensure that the instillation line is properly connected. Ensure that all four tubing clamps are open. Ensure that the V.A.C. VERALINK™ Cassette is properly installed (page 28). Ensure that the canister has adequate capacity remaining for the dressing change.
-
Page 79: Test Cycle
Test Cycle V.A.C. VERAFLO™ Therapy Use to complete an abbreviated cycle. Each phase of the cycle will be tested to ensure system is set up and functioning correctly. Ensure that both the V.A.C.® Canister tubing and instillation line are properly connected (page 31). Ensure that all four tubing clamps are open (pages 31 and 33). -
Page 81: Therapy Configuration - Default Settings Overview
V.A.C.® Therapy Configuration - Default Settings Overview V.A.C.® Therapy The following flow chart shows the basic steps required to configure using the default settings. Refer to the following pages for detailed information about individual screens and options. New Patient Confirm Settings SEAL CHECK™... -
Page 82: Therapy Configuration - Advanced User Defined Settings Overview
V.A.C.® Therapy Configuration - Advanced User Defined Settings Overview V.A.C.® Therapy The following flow chart shows the basic steps required to configure with User defined settings. Refer to the following pages for detailed information about individual screens and options. Press and hold Power button until light comes on. -
Page 83: Therapy Settings Screen
V.A.C.® Therapy Settings Screen This screen allows the user to configure the V.A.C.ULTA™ Therapy V.A.C.® Therapy: Unit to deliver Target Pressure (mmHg) - (Default = 125 mmHg) • V.A.C.® Therapy. Prescribed negative pressure level for Target Pressure can be set from 25 - 200 mmHg in 25 mmHg increments. - Page 84 Once all settings have been entered, Confirm select to continue to the Settings screen. This screen allows the user to review the therapy settings that V.A.C.® Therapy were selected on the Settings screen. to adjust above or below values shown. Advanced Settings Select to return to the...
-
Page 85: Home Screen - V.a.c.® Therapy
Home Screen - V.A.C.® Therapy Home V.A.C.® Therapy. It is used to access This screen is the main screen displayed by the V.A.C.ULTA™ Therapy Unit during important information about the status of therapy. Status Bar History Tab (page 155) Therapy Tab (pages 50, 85, Utilities Tab (page 106) 110 and 129) Information... -
Page 86: Information Screens - V.a.c.® Therapy
Information Screens - V.A.C.® Therapy These screens will display the current therapy settings and a summary of therapy applied to the patient. Information Home Therapy Summary Select from the screen to continue to the tab. Use this tab to review the Therapy Start Date and Therapy Time. If the Log feature is used, the date and time for Canister Last Changed, Cassette Last Changed, Dressing Last Changed and Solution Last Changed will also be displayed. -
Page 87: Therapy Alerts And Alarms
V.A.C.® Therapy Alerts and Alarms V.A.C.® Therapy. The following alerts and alarms may appear on the touch screen during Alerts and alarms are accompanied by a repeating audible tone. Following initiation of therapy, if an audible tone is not heard when SEAL CHECK™ Leak Detector is displayed and Seal Audio tone is turned ON, the alarms may not be working properly. -
Page 88: Therapy Blockage Alert
V.A.C.® Therapy Blockage Alert Low Priority Alert - This alert screen appears when the V.A.C.ULTA™ Therapy Unit has detected a potential blockage. This alert will be accompanied by a repeating audible tone. To resolve this alert: Audio Pause Select to silence alert for two minutes during troubleshooting. -
Page 89: Therapy Blockage Alarm (Therapy Interrupted)
V.A.C.® Therapy Blockage Alarm (Therapy Interrupted) Medium Priority Alarm - This alarm screen appears when a blockage is present in the V.A.C.® Therapy line. This alarm will be accompanied by a repeating audible tone. To resolve this alarm: Audio Pause Select to silence alarm for two minutes during troubleshooting. -
Page 90: Therapy Canister Full Alarm (Therapy Interrupted)
V.A.C.® Therapy Canister Full Alarm (Therapy Interrupted) Medium Priority Alarm - This alarm screen appears when the canister is full and should be replaced. This alarm will be accompanied by a repeating audible tone. To resolve this alarm: Audio Pause Select to silence alarm for two minutes during troubleshooting. -
Page 91: Therapy Canister Not Engaged Alarm
V.A.C.® Therapy Canister Not Engaged Alarm Medium Priority Alarm - This alarm screen appears when the canister is not fully inserted and / or properly latched. This alarm will be accompanied by a repeating audible tone. To resolve this alarm: Audio Pause Select to silence alarm for... -
Page 92: Therapy Therapy Inactive Alarm
V.A.C.® Therapy Therapy Inactive Alarm Medium Priority Alarm - This alarm screen appears when therapy Therapy) has been off or paused for more than 15 (V.A.C.® minutes (with the unit powered on). This alarm will be accompanied by a repeating audible tone. To resolve this alarm: Audio Pause Select... -
Page 93: Therapy Leak Alarm
V.A.C.® Therapy Leak Alarm Medium Priority Alarm - This alarm screen appears when a significant negative pressure leak has been detected. If this alarm is not resolved in three minutes, therapy will be interrupted. This alarm will be accompanied by a repeating audible tone. To resolve this alarm: Audio Pause Select... -
Page 94: Therapy Leak Alarm (Therapy Interrupted)
V.A.C.® Therapy Leak Alarm (Therapy Interrupted) Medium Priority Alarm - This alarm screen appears when a detected negative pressure leak has not been resolved and therapy has been interrupted. This alarm will be accompanied by a repeating audible tone. To resolve this alarm: Audio Pause Select to silence alarm for... -
Page 95: Therapy Low Pressure Alarm (Therapy Interrupted)
V.A.C.® Therapy Low Pressure Alarm (Therapy Interrupted) Medium Priority Alarm - This alarm screen appears when the V.A.C.ULTA™ Therapy Unit has not reached the target therapy negative pressure setting and negative pressure at the wound may be below set pressure, potentially compromising therapeutic benefits. This alarm is accompanied by a repeating audible tone. -
Page 96: Therapy V.a.c. Veralink™ Not Engaged Alert
V.A.C.® Therapy V.A.C. VERALINK™ Not Engaged Alert Low Priority Alert - This alert screen appears when the V.A.C. VERALINK™ Cassette is not fully seated and / or properly latched. This alert will be accompanied by a repeating audible tone. The V.A.C.ULTA™ Therapy Unit will continue to attempt to apply therapy during this alert. To resolve this alert: Audio Pause Select... -
Page 97: Therapy Solution Bag / Bottle Empty Alert
V.A.C.® Therapy Solution Bag / Bottle Empty Alert Low Priority Alert -This alert screen appears when there is no instillation fluid in the solution bag / bottle. This alert will be accompanied by a repeating audible tone. To resolve this alert: Audio Pause Select to silence alert for... -
Page 98: Therapy Pressure Deviation Alarm (Therapy Interrupted)
V.A.C.® Therapy Pressure Deviation Alarm (Therapy Interrupted) Medium Priority Alarm - This alarm screen appears when the wound site positive pressure has exceeded its allowable limits. This alarm will be accompanied by a repeating audible tone. To resolve this alarm: Audio Pause Select to silence alarm for... -
Page 99: Therapy Instill Tube Blockage Alert (Therapy Interrupted)
V.A.C.® Therapy Instill Tube Blockage Alert (Therapy Interrupted) Low Priority Alert - This alert screen appears when a blockage is present in the instillation line of the V.A.C. VERAT.R.A.C.™ Pad or V.A.C. VERAT.R.A.C. DUO™ Tube Set. This alert will be accompanied by a repeating audible tone. To resolve this alert: Audio Pause Select... -
Page 100: Therapy Battery Low Alert
V.A.C.® Therapy Battery Low Alert Low Priority Alert - This alert screen appears approximately two hours before the battery power level is too low to support continued operation of the V.A.C.ULTA™ Therapy Unit. This alert will be accompanied by a repeating audible tone. To resolve this alert: Audio Pause Select... -
Page 101: Therapy Battery Critical Alarm
V.A.C.® Therapy Battery Critical Alarm Medium Priority Alarm - This alarm screen appears approximately 30 minutes before the battery power level is too low to support continued operation of the V.A.C.ULTA™ Therapy Unit. This alarm will be accompanied by a repeating audible tone. To resolve this alarm: Audio Pause Select... -
Page 102: Battery Exhausted
Battery Exhausted Medium Priority Alarm - This alarm screen appears when the battery power level is too low to power on the V.A.C.ULTA™ Therapy Unit. To resolve this alarm: Connect the therapy unit to a wall outlet using KCI supplied power supply to recharge battery. -
Page 103: Therapy Internal Temperature Alert
V.A.C.® Therapy Internal Temperature Alert Low Priority Alert - This alert screen appears when the internal temperature of the V.A.C.ULTA™ Therapy Unit is outside its specified limits. This alert will be accompanied by a repeating audible tone. Therapy will continue while this alert is active. The touch screen will be turned off after five minutes of inactivity. -
Page 104: Therapy System Error Alarm (Therapy Interrupted) (After Power On)
V.A.C.® Therapy System Error Alarm (Therapy Interrupted) (after Power On) Medium Priority Alarm - This alarm screen appears when there is a system fault within the V.A.C.ULTA™ Therapy Unit after it has been powered on. Several different types of system errors may occur. A number will appear next to Error Code that represents the diagnostic code of the system fault. -
Page 105: System Error Alarm (At Power On)
System Error Alarm (at Power On) Medium Priority Alarm - This alarm screen appears when there is a system fault within the V.A.C.ULTA™ Therapy Unit while the unit is powering on. “00000001” represents the diagnostic code of the system fault. This alarm will be accompanied by a repeating audible tone. -
Page 106: Utilities Tab - V.a.c.® Therapy
Utilities Tab - V.A.C.® Therapy Utilities Tab Use the screen to set preferences for the V.A.C.ULTA™ Therapy Unit. Certain selections are available no matter what therapy is active. Those selections are discussed in the Utilities Tab chapter. Selections that are unique to the selected therapy are detailed below. -
Page 107: Dressing Soak
Dressing Soak Use Dressing Soak to soak the dressing with solution in preparation for a dressing change. The V.A.C. VERALINK™ Cassette (page 28) must be installed for the Dressing Soak tool to be available. Ensure that the instillation line is properly connected. Ensure that all four tubing clamps are open. -
Page 109: Prevena™ Therapy Configuration - Overview
PREVENA™ Therapy Configuration - Overview PREVENA™ Therapy. Refer to the following pages for detailed The following flow chart shows the basic steps required to configure information about individual screens and options. SEAL CHECK™ Leak Detector Press and hold Power buton New Patient Confirm Settings screen... -
Page 110: Home Screen - Prevena™ Therapy
Home Screen - PREVENA™ Therapy Home PREVENA™ Therapy. It is used to access This screen is the main screen displayed by the V.A.C.ULTA™ Therapy Unit during important information about the status of therapy. Status Bar History Tab (page 155) Therapy Tab (page 50, 85, Utilities Tab (page 126) 110 and 129) Information... -
Page 111: Information Screens - Prevena™ Therapy
Information Screens - PREVENA™ Therapy These screens will display the current therapy settings and a summary of therapy applied to the patient. Information Home Therapy Summary Select from the screen to continue to the tab. Use this tab to review the Therapy Start Date and Therapy Time. If the Log feature is used, the date and time for Canister Last Changed and Dressing Last Changed will also be displayed. -
Page 113: Prevena™ Therapy Alerts
PREVENA™ Therapy Alerts PREVENA™ Therapy. The following alerts may appear on the touch screen during Alerts are accompanied by a repeating audible tone. Following initiation of therapy, if an audible tone is not heard when SEAL CHECK™ Leak Detector is displayed and Seal Audio tone is turned ON, the alerts may not be working properly. -
Page 114: Prevena™ Therapy Blockage Alert
PREVENA™ Therapy Blockage Alert Low Priority Alert - This alert screen appears when the V.A.C.ULTA™ Therapy Unit has detected a potential blockage. This alert will be accompanied by a repeating audible tone. To resolve this alert: Audio Pause Select to silence alert for two minutes during troubleshooting. -
Page 115: Prevena™ Therapy Blockage Alert (Therapy Interrupted)
PREVENA™ Therapy Blockage Alert (Therapy Interrupted) Low Priority Alert - This alert screen appears when a blockage is present. This alert will be accompanied by a repeating audible tone. To resolve this alert: Audio Pause Select to silence alert for two minutes during troubleshooting. -
Page 116: Prevena™ Therapy Canister Full Alert
PREVENA™ Therapy Canister Full Alert Low Priority Alert - This alert screen appears when the canister is full and should be replaced. This alert will be accompanied by a repeating audible tone. To resolve this alert: Audio Pause Select to silence alert for two minutes during troubleshooting. -
Page 117: Prevena™ Therapy Canister Not Engaged Alert
PREVENA™ Therapy Canister Not Engaged Alert Low Priority Alert - This alert screen appears when the canister is not fully inserted and / or properly latched. This alert will be accompanied by a repeating audible tone. To resolve this alert: Audio Pause Select to silence alert for... -
Page 118: Prevena™ Therapy Therapy Inactive Alert
PREVENA™ Therapy Therapy Inactive Alert Low Priority Alert - This alert screen appears when therapy Therapy) has been off or paused for more than 15 minutes (PREVENA™ (with the unit powered on) . This alert will be accompanied by a repeating audible tone. To resolve this alert: Audio Pause Select... -
Page 119: Prevena™ Therapy Leak Alert
PREVENA™ Therapy Leak Alert Low Priority Alert - This alert screen appears when a significant negative pressure leak has been detected. This alert will be accompanied by a repeating audible tone. To resolve this alert: Audio Pause Select to silence alert for two minutes during troubleshooting. -
Page 120: Prevena™ Therapy Battery Low Alert
PREVENA™ Therapy Battery Low Alert Low Priority Alert - This alert screen appears approximately two hours before the battery power level is too low to support continued operation of the V.A.C.ULTA™ Therapy Unit. This alert will be accompanied by a repeating audible tone. To resolve this alert: Audio Pause Select... -
Page 121: Prevena™ Therapy Battery Critical Alert
PREVENA™ Therapy Battery Critical Alert Low Priority Alert - This alert screen appears approximately 30 minutes before the battery power level is too low to support continued operation of the V.A.C.ULTA™ Therapy Unit. This alert will be accompanied by a repeating audible tone. To resolve this alert: Audio Pause Select... -
Page 122: Battery Exhausted
Battery Exhausted Low Priority Alert - This alert screen appears when the battery power level is too low to power on the V.A.C.ULTA™ Therapy Unit. To resolve this alert: Connect the therapy unit to a wall outlet using KCI supplied power supply to recharge battery. -
Page 123: Prevena™ Therapy Internal Temperature Alert
PREVENA™ Therapy Internal Temperature Alert Low Priority Alert - This alert screen appears when the internal temperature of the V.A.C.ULTA™ Therapy Unit is outside its specified limits. This alert will be accompanied by a repeating audible tone. Therapy will continue while this alert is active. The touch screen will be turned off after five minutes of inactivity. -
Page 124: Prevena™ Therapy System Error Alert (Therapy Interrupted) (After Power On)
PREVENA™ Therapy System Error Alert (Therapy Interrupted) (after Power On) Low Priority Alert - This alert screen appears when there is a system fault within the V.A.C.ULTA™ Therapy Unit after it has been powered on. Several different types of system errors may occur. A number will appear next to Error Code: that represents the diagnostic code of the system fault. -
Page 125: System Error Alert (At Power On)
System Error Alert (at Power On) Low Priority Alert - This alert screen appears when there is a system fault within the V.A.C.ULTA™ Therapy Unit while the unit is powering on. “00000001” represents the diagnostic code of the system fault. This alert will be accompanied by a repeating audible tone. -
Page 126: Utilities Tab - Prevena™ Therapy
Utilities Tab - PREVENA™ Therapy Utilities Tab Use the screen to set preferences for the V.A.C.ULTA™ Therapy Unit. Certain selections are available no matter what therapy is active. Those selections are discussed in the Utilities Tab chapter. Selections that are unique to the selected therapy are detailed below. -
Page 127: Abthera™ Therapy Overview
ABTHERA™ Therapy Overview ABTHERA™ Therapy. Refer to the following pages for detailed The following flow chart shows the basic steps required to configure information about individual screens and options. SEAL CHECK™ Leak Detector Startup Confirm Settings screen screen screen Press and hold Power buton until light comes on. -
Page 128: Confirm Settings Screen - Abthera™ Therapy
Confirm Settings Screen - ABTHERA™ Therapy This screen allows the user to adjust the Target Pressure the ABTHERA™ V.A.C.ULTA™ Therapy Unit will deliver during Therapy: Target Pressure (mmHg) - (Default = 125 mmHg) • ABTHERA™ Therapy. Prescribed negative pressure level for Target Pressure can be set to 100, 125 or 150 mmHg. -
Page 129: Home Screen - Abthera™ Therapy
Home Screen - ABTHERA™ Therapy Home ABTHERA™ Therapy. It is used to access This screen is the main screen displayed by the V.A.C.ULTA™ Therapy Unit during important information about the status of therapy. Status Bar History Tab (page 155) Therapy Tab (page 50, 85, 110 Utilities Tab (page 144) and 129) Leak Detection... -
Page 130: Information Screens - Abthera™ Therapy
Information Screens - ABTHERA™ Therapy These screens will display the current therapy settings and a summary of therapy applied to the patient. Information Home Therapy Summary Select from the screen to continue to the tab. Use this tab to review the Therapy Start Date and Therapy Time. If the Log feature is used, the date and time for Canister Last Changed and Dressing Last Changed will also be displayed. -
Page 131: Abthera™ Therapy Alerts
ABTHERA™ Therapy Alerts ABTHERA™ Therapy. The following alerts may appear on the touch screen during Alerts are accompanied by a repeating audible tone. Following initiation of therapy, if an audible tone is not heard when SEAL CHECK™ Leak Detector is displayed and Seal Audio tone is turned ON, the alerts may not be working properly. -
Page 132: Abthera™ Therapy Blockage Alert
ABTHERA™ Therapy Blockage Alert Low Priority Alert - This alert screen appears when the V.A.C.ULTA™ Therapy Unit has detected a potential blockage. This alert will be accompanied by a repeating audible tone. To resolve this alert: Audio Pause Select to silence alert for two minutes during troubleshooting. -
Page 133: Abthera™ Therapy Blockage Alert (Therapy Interrupted)
ABTHERA™ Therapy Blockage Alert (Therapy Interrupted) Low Priority Alert - This alert screen appears when a blockage is present. This alert will be accompanied by a repeating audible tone. To resolve this alert: Audio Pause Select to silence alert for two minutes during troubleshooting. -
Page 134: Abthera™ Therapy Canister Full Alert
ABTHERA™ Therapy Canister Full Alert Low Priority Alert - This alert screen appears when the canister is full and should be replaced. This alert will be accompanied by a repeating audible tone. To resolve this alert: Audio Pause Select to silence alert for two minutes during troubleshooting. -
Page 135: Abthera™ Therapy Canister Not Engaged Alert
ABTHERA™ Therapy Canister Not Engaged Alert Low Priority Alert - This alert screen appears when the canister is not fully inserted and / or properly latched. This alert will be accompanied by a repeating audible tone. To resolve this alert: Audio Pause Select to silence alert for... -
Page 136: Abthera™ Therapy Therapy Inactive Alert
ABTHERA™ Therapy Therapy Inactive Alert Low Priority Alert - This alert screen appears when therapy Therapy) has been off or paused for more than 15 minutes (ABTHERA™ (with the unit powered on). This alert will be accompanied by a repeating audible tone. To resolve this alert: Audio Pause Select... -
Page 137: Abthera™Therapy Leak Alert
ABTHERA™ Therapy Leak Alert Low Priority Alert - This alert screen appears when a significant negative pressure leak has been detected. This alert will be accompanied by a repeating audible tone. To resolve this alert: Audio Pause Select to silence alert for two minutes during troubleshooting. -
Page 138: Abthera™ Therapy Battery Low Alert
ABTHERA™ Therapy Battery Low Alert Low Priority Alert - This alert screen appears approximately two hours before the battery power level is too low to support continued operation of the V.A.C.ULTA™ Therapy Unit. This alert will be accompanied by a repeating audible tone. To resolve this alert: Audio Pause Select... -
Page 139: Abthera™ Therapy Battery Critical Alert
ABTHERA™ Therapy Battery Critical Alert Low Priority Alert - This alert screen appears approximately 30 minutes before the battery power level is too low to support continued operation of the V.A.C.ULTA™ Therapy Unit. This alert will be accompanied by a repeating audible tone. To resolve this alert: Audio Pause Select... -
Page 140: Battery Exhausted
Battery Exhausted Low Priority Alert - This alert screen appears when the battery power level is too low to power on the V.A.C.ULTA™ Therapy Unit. To resolve this alert: Connect the therapy unit to a wall outlet using KCI supplied power supply to recharge battery. -
Page 141: Abthera™ Therapy Internal Temperature Alert
ABTHERA™ Therapy Internal Temperature Alert Low Priority Alert - This alert screen appears when the internal temperature of the V.A.C.ULTA™ Therapy Unit is outside its specified limits. This alert will be accompanied by a repeating audible tone. Therapy will continue while this alert is active. The touch screen will be turned off after five minutes of inactivity. -
Page 142: Abthera™ Therapy System Error Alert (Therapy Interrupted) (After Power On)
ABTHERA™ Therapy System Error Alert (Therapy Interrupted) (after Power On) Low Priority Alert - This alert screen appears when there is a system fault within the V.A.C.ULTA™ Therapy Unit after it has been powered on. Several different types of system errors may occur. A number will appear next to Error Code: that represents the diagnostic code of the system fault. -
Page 143: System Error Alert (At Power On)
System Error Alert (at Power On) Low Priority Alert - This alert screen appears when there is a system fault within the V.A.C.ULTA™ Therapy Unit while the unit is powering on. “00000001” represents the diagnostic code of the system fault. This alert will be accompanied by a repeating audible tone. -
Page 144: Utilities Tab - Abthera™ Therapy
Utilities Tab - ABTHERA™ Therapy Utilities Tab Use the screen to set preferences for the V.A.C.ULTA™ Therapy Unit. Certain selections are available no matter what therapy is active. Those selections are discussed in the Utilities Tab chapter. Selections that are unique to the selected therapy are detailed below. -
Page 145: Seal Check™ Leak Detector Overview
SEAL CHECK™ Leak Detector Overview The SEAL CHECK™ Leak Detector is used to help find negative pressure leaks. Home Access the SEAL CHECK™ Leak Detector from the screen. The SEAL CHECK™ Leak Detector will also automatically run during the initial Drawdown phase once therapy has been initiated. Most leaks occur: •... -
Page 146: Seal Check™ Leak Detector - V.a.c. Veraflo™ Therapy
SEAL CHECK™ Leak Detector - V.A.C. VERAFLO™ Therapy Ensure that both the V.A.C.® Canister tubing and instillation line are properly connected. Ensure that all four tubing clamps are open. Ensure the V.A.C. VERALINK™ Cassette is properly installed (page 28), if applicable. Ensure that the canister is properly installed (page 32). -
Page 147: Seal Check™ Leak Detector - V.a.c.® Therapy
SEAL CHECK™ Leak Detector - V.A.C.® Therapy Ensure that the V.A.C.® Canister tubing is properly connected. Ensure that both tubing clamps are open. Ensure that the canister is properly installed (page 32). Once therapy has been initiated, select SEAL CHECK™ Leak Detector. -
Page 148: Seal Check™ Leak Detector - Prevena™ Therapy
SEAL CHECK™ Leak Detector - PREVENA™ Therapy Ensure that the V.A.C.® Canister tubing is properly connected. Ensure that both tubing clamps are open. Ensure that the canister is properly installed (page 32). Once therapy has been initiated, select SEAL CHECK™ Leak Detector. -
Page 149: Seal Check™ Leak Detector - Abthera™ Therapy
SEAL CHECK™ Leak Detector - ABTHERA™ Therapy Ensure that the V.A.C.® Canister tubing is properly connected. Ensure that both tubing clamps are open. Ensure that the canister is properly installed (page 32). Once therapy has been initiated, select SEAL CHECK™ Leak Detector. -
Page 150: Log - V.a.c. Veraflo™ Therapy
Log - V.A.C. VERAFLO™ Therapy Use this tool to record important information about dressing and component application / changes. The information will be recorded in the Therapy History Report (page 177). Number of Foam Pieces - Select the number of foam pieces used in the wound at dressing application or dressing change. -
Page 151: Log - V.a.c.® Therapy
Log - V.A.C.® Therapy Use this tool to record important information about dressing and component application / changes. The information will be recorded in the Therapy History Report (page 177). Number of Foam Pieces - Select the number of foam pieces used in the wound at dressing application or dressing change. -
Page 152: Log - Prevena™ Therapy
Log - PREVENA™ Therapy Use this tool to record important information about dressing and component application / changes. The information will be recorded in the Therapy History Report (page 177). Number of Foam Pieces - Select the number of foam pieces used in the wound at dressing application or dressing change. -
Page 153: Log - Abthera™ Therapy
Log - ABTHERA™ Therapy Use this tool to record important information about dressing and component application / changes. The information will be recorded in the Therapy History Report (page 177). Number of Foam Pieces - Select the number of foam pieces used in the wound at dressing application or dressing change. -
Page 155: History Tab Screen
History Tab Screen History Tab Use the screen to access History (Patient, Therapy and Alarm) and the Wound Imaging Tool. Status Bar Therapy Tab (page 50, 85, 110 Utilities Tab (page 74, 106, and 129) 126 and 144) Therapy Summary Patient History (page 163) Therapy History (page 177) Imaging (page 167) -
Page 156: Patient History Or Imaging Configuration (First Time Use) - Overview
Patient History or Imaging Configuration (First Time Use) - Overview The following flow charts show the basic steps required to establish an access code and start a new patient history log. Refer to the following pages for more detailed information about individual screens and options. Create New Access Create New Patient History Tab... -
Page 157: Patient History Or Imaging Configuration (New Access Code) - Overview
Patient History or Imaging Configuration (New Access Code) - Overview Enter Access Code Create Patient History History Tab screen screen. screen. History Tab Reset With selected, Select (page 160) Select Patient History select to create a new Patient delete current Patient History button (page 155). -
Page 158: Patient History
Patient History Use the Patient History screens to create a new access code and start a new patient history log, view patient history, delete patient history, export patient history, and view a wound image area graph. Create New Patient History History Select the tab (page 155). -
Page 159: Access Patient History
Access Patient History Once an access code is created, it must be entered to access Patient History. History Select the tab (page 155). Patient History History Tab Select from the screen (page Enter Access Code 155) to continue to the screen. -
Page 160: Create New Access Code
Create New Access Code In order to create a second patient history log, a new access code must be created. When a second access code is created, all previously recorded patient history will be deleted. History Select the tab (page 155). Patient History History Tab Select... - Page 161 New Access Code Select the field and use the on-screen keyboard to enter an access code. The access code must be at least six characters long. Record the access code. It will be needed each time patient history is accessed. Confirm Access Code Select the field and re-enter the...
-
Page 162: Patient History Screen
Patient History Screen Use the Patient History Screen to view, export, or delete a Patient History log (e.g. wound imaging information and disposable component changes). Status Bar Therapy Tab (page 50, 85, Utilities Tab (page 74, 106 110 and 129) 126 and 144) View Patient History View Wound Area Graph... -
Page 163: View Patient History Screen
View Patient History Screen View Patient History Use the screen to view and add short notes about the patient’s treatment. For a new patient history log, this screen will not have any event entries. View History Patient History Select from the screen (page View Patient History 162) to continue to the... -
Page 164: Export Patient History Screen
Export Patient History Screen Export Patient History Use the screen to export patient history to a USB Drive or SD Card. Export History Patient History Select from the screen Export Patient History (page 162) to continue to the screen. Insert the desired memory device (USB Drive or SD Card) into the proper port on the front of the V.A.C.ULTA™... -
Page 165: View Graph - Wound Area (Cm ) Screen
View Graph - Wound Area (cm ) Screen View Graph - Wound Area (cm Use the screen to view a graph of the measured wound area over time. View Graph Patient History Select from the screen (page View Graph - Wound Area (cm 162) to continue to the screen. -
Page 166: Delete Patient History Screen
Delete Patient History Screen Delete Patient History Use the screen to delete patient history data from the V.A.C.ULTA™ Therapy Unit’s memory. Delete History Patient History Select from the screen Delete Patient History (page 162) to continue to the warning screen. Cancel Select to confirm deletion or... -
Page 167: Wound Imaging
Wound Imaging Use the Wound Imaging feature to aid in recording the wound healing process. Wound imaging area and volume calculation features are not intended to be exact measurements and are not intended for use in the diagnosis and treatment of wounds. Accessories required to use this feature include: •... -
Page 168: Imaging Screen
Imaging Screen Imaging Use the screen to upload images for calculating wound area and volume and to delete images from the V.A.C.ULTA™ Therapy Unit. Uploading Images History Tab Imaging From the screen (page 155), select Imaging continue to the screen. Enter Patient History access code (page 159). - Page 169 Down Use the arrows to display the desired folder or image in the window. If the desired image is in a folder, display the available folders with the Down arrows and select the desired Folder. Use the Down arrows to display the desired image.
- Page 170 Once image is successfully transferred, remove the memory device. Exit Upload Successful Select on the Touch Corners screen to continue to the of Reference Square screen.
-
Page 171: Analyzing Images - Touch Corners Of Reference Square
Analyzing Images - Touch Corners of Reference Square Use the supplied stylus to touch each corner of the reference Touch Corners of square displayed in the image window on the Reference Square screen. When the last corner of the reference square is touched, the corner points will be joined by a highlighted line. -
Page 172: Analyzing Images - Trace Wound Perimeter
Analyzing Images - Trace Wound Perimeter Use the supplied stylus to trace a line around the wound Trace area to be analyzed in the image window on the Wound Perimeter screen. Reset If an error is made during tracing, select to trace the wound area again. - Page 173 Once the wound area has been traced, select to continue to the Imaging Area screen. Add Area Trace Wound Select to continue back to the Perimeter screen if there is an additional wound area to be traced. Continue Select if all wound area(s) have been traced. Image Area Select to continue to the...
-
Page 174: Analyzing Images - Image Area Depth
Analyzing Images - Image Area Depth Select the approximate depth of each wound area traced. / -, as applicable to adjust above and below values shown. Back Add Imaging Select to return to the Area screen. Select to save wound imaging data to the patient’s history. -
Page 175: Delete Images
Delete Images History Tab Imaging From the screen (page 155), select Imaging continue to the screen. Enter Patient History access code. A Patient History Log must be created prior to using the Imaging feature. Refer to the Create New Patient History section (page 158) of this manual for more information. - Page 176 Select to delete the image from the V.A.C.ULTA™ Therapy Unit’s memory. Cancel Select Select to return to the Image for Deletion screen. Once the image is successfully deleted, Select Image for Deletion screen will be displayed. Select another image Back to delete, or select to return to the Imaging...
-
Page 177: Therapy History Screen
Therapy History Screen View Therapy History screen displays the patient’s therapy information in date, time and event columns (e.g. therapy starts / stops, therapy settings and disposable component changes). The date is in descending order and time is displayed using the twenty- four hour clock format. -
Page 178: Alarm History Screen
Alarm History Screen View Alarm History screen displays alarm information for the V.A.C.ULTA™ Therapy Unit in date, time and event columns (e.g. alarms and disposable component changes). The date is in descending order and time is displayed using the twenty-four hour clock format. -
Page 179: Export History Screen
Export History Screen Export History Use the screen to export therapy and alarm history to a memory device (USB or SD Card). Insert the desired memory device (USB or SD Card) into the proper port on the front of the V.A.C.ULTA™ Therapy Unit (page 18). -
Page 180: Data Transfer Errors
Data Transfer Errors If the V.A.C.ULTA™ Therapy Unit detects an error during data transfer, the unit will display a Transfer Error screen. The V.A.C.ULTA™ Therapy Unit is not compatible with USB Drives or SD Cards which have U3 software pre-installed. U3 software must be uninstalled prior to use. Export Transfer Error If the screen appears, the possible reasons... -
Page 181: Utilities Tab
Utilities Tab Utilities Tab Use the screen to set preferences for the V.A.C.ULTA™ Therapy Unit. Refer to pages 74, 106, 126 and 144 for details on features. V.A.C. VERAFLO™ Therapy V.A.C.® Therapy PREVENA™ Therapy ABTHERA™ Therapy Utilities Tab The following options are available from any therapy mode on the Home screen: Regional Settings - Use to set the language, units of measure, number format and date format displayed by the V.A.C.ULTA™... -
Page 182: Regional Settings Screen
Regional Settings Screen Regional Settings Use the screen to set the language, unit of measure, number format and date format displayed by the V.A.C.ULTA™ Therapy Unit. Utilities Select the tab (page 181). Regional Settings Utilities Tab Select from the screen Regional Settings (page 181) to continue to the screen. -
Page 183: About And Contact Information Screen
About and Contact Information Screen About Contact Information Use the screen to access information about the V.A.C.ULTA™ Therapy Unit, including the software version and KCI contact information. Utilities Select the tab (page 181). About & Contact Information Utilities Select from the About screen (page 181) to continue to the Contact Information... -
Page 184: Screen Calibration Screen
Screen Calibration Screen Screen Calibration Use the screen to calibrate the V.A.C.ULTA™ Therapy Unit’s touch screen. If screen inputs are not correctly recognized, it may be necessary to calibrate the touch screen. Utilities Select the tab (page 181). Screen Calibration Utilities Tab Select from the... - Page 185 Once Step 4 of screen calibration is Screen Calibration complete, the Complete screen will appear. If necessary, Reset Screen Calibration select on the Complete screen to repeat calibration. Utilities Tab Select to return to the screen.
-
Page 186: Date & Time Settings Screen
Date & Time Settings Screen Date & Time Settings Use the screen to set the current date and time. Utilities Select the tab (page 181). Date & Time Utilities Tab Select from the screen (page 181) Date & Time Settings to continue to the screen. -
Page 187: Screen Brightness Screen
Screen Brightness Screen Screen Brightness Use the screen to adjust the brightness of the V.A.C.ULTA™ Therapy Unit’s touch screen. Utilities Select the tab (page 181). Screen Brightness Utilities Tab Select from the screen Screen Brightness (page 181) to continue to the screen. -
Page 188: Leak Alarm Threshold Screen
Leak Alarm Threshold Screen Leak Alarm Threshold Use the screen to set the leak rate threshold that triggers the Leak Alarm. This option is available in the V.A.C. VERAFLO™ Therapy and V.A.C.® Therapy modes only. Utilities Select the tab (page 181). Leak Alarm Threshold Utilities Tab Select... -
Page 189: Confirm Serial Number
Confirm Serial Number This screen appears when the V.A.C.ULTA™ Therapy Unit is powered on and the serial number stored in the unit’s memory is corrupt or missing. To resolve: Compare serial number on unit’s serial number label (page 18) to displayed serial number. If serial number is incorrect, use the on-screen keyboard to re-enter the unit’s serial number label. -
Page 191: Care And Cleaning
Care and Cleaning Standard Precautions The following are the KCI recommended daily and weekly cleaning and infection control procedures for the V.A.C.ULTA™ Therapy Unit. Always follow Standard Precautions. Standard Precautions are designed to reduce the risk of transmission of microorganisms from both known and unknown sources of infection. -
Page 192: Cleaning The Touch Screen
Cleaning the Touch Screen Lock Home Select on the screen (page 50, 85, 110 and 129) Lock to activate Screen Guard. The icon will close. Use a soft, non-abrasive cloth to gently clean the touch screen. Do not use any liquid to clean the touch screen. Do not use excessive force to clean the touch screen. -
Page 193: Explanation Of Symbols Used
Explanation of Symbols Used CAUTION: Federal (US) Warning or Caution statement of law restricts this device Rx Only possible hazard to system, patient to sale/rental by or on or staff the order of a physician Important Operational Information Manufacturer Refer to User Manual Catalog Number No protection against ingress IPX1... -
Page 194: Specifications
Specifications Specifications subject to change without notice. Classification Equipment not suitable for use in the presence of a flammable anesthetic mixture with air, oxygen or nitrous oxide, or an oxygen enriched environment. V.A.C.ULTA™ Therapy Unit Continuous Operation Type BF Applied Part Class I equipment IPX1 Power Supply... -
Page 195: Electromagnetic Compatibility
Electromagnetic Compatibility Electromagnetic Interference - Although this equipment conforms with the intent of the directive 2004/108/EC in relation to Electromagnetic Compatibility (EMC), all electrical equipment may produce interference. If interference is suspected, move equipment away from sensitive devices or contact the manufacturer. Portable and mobile RF communications equipment can effect medical electrical equipment. - Page 196 Guidance and Manufacturer’s Declaration - Electromagnetic Immunity The V.A.C.ULTA™ Therapy Unit is intended for use in the electromagnetic environment specified below. The customer or user of the V.A.C.ULTA™ Therapy Unit should assure that it is used in such an environment. Immunity Test IEC 60601 Test Level Compliance level...
- Page 197 Guidance and Manufacturer’s Declaration - Electromagnetic Immunity The V.A.C.ULTA™ Therapy Unit is intended for use in an electromagnetic environment specified below. The customer or user of the V.A.C.ULTA™ Therapy Unit should assure that it is used in such an environment. Immunity Test IEC 60601 Test Level Compliance Level...
-
Page 198: Customer Contact Information
For questions regarding this product, supplies, maintenance, or additional information about KCI products and services, please contact KCI or a KCI authorized representative, or: In the US call 1-800-275-4524 or visit www.acelity.com, www.veraflo.com or www.vaculta.com KCI USA, Inc. 12930 IH 10 West, San Antonio, TX 78249 Outside the US... - Page 200 KCI USA, Inc. 12930 IH 10 West San Antonio, TX 78249 USA 1-800-275-4524 www.acelity.com www.veraflo.com www.vaculta.com All trademarks designated herein are proprietary to KCI Licensing, Inc., its affiliates, and / or licensors. Copyright 2017 KCI Licensing, Inc. All Rights Reserved. 416700 Rev C 7/2017...
Need help?
Do you have a question about the V.A.C.ULTA 4 and is the answer not in the manual?
Questions and answers
Use duration
The use duration for Acelity part number 4 is not specified in the provided context.
This answer is automatically generated