Table of Contents
Advertisement
USER ' ' S MANUAL
TWO-HEAD AUTOMATIC
EMBROIDERY MACHINE
FOUR-HEAD AUTOMATIC
EMBROIDERY MACHINE
SIX-HEAD AUTOMATIC
EMBROIDERY MACHINE
EIGHT-HEAD AUTOMATIC
EMBROIDERY MACHINE
SIX-HEAD AUTOMATIC
EMBROIDERY MACHINE
(Compact Type)
SWF/E-Series
S S u u n n S S t t a a r r C C O O . . , , L L T T D D . .
M M M M E E - - 1 1 1 1 0 0 1 1 0 0 3 3
Advertisement
Table of Contents

Subscribe to Our Youtube Channel
Related Manuals for SWF E-Series


Summary of Contents for SWF E-Series
- Page 1 EMBROIDERY MACHINE (Compact Type) SWF/E-Series S S u u n n S S t t a a r r C C O O . . , , L L T T D D . . M M M M E E - - 1 1 1 1 0 0 1 1 0 0 3 3...
- Page 2 1. THIS IS AN INSTRUCTION FOR SAFE USE OF AUTOMATIC EMBROIDERY MACHINES. READ THOROUGHLY BEFORE USE. 2. CONTENTS IN THIS INSTRUCTION MAY CHANGE, WITHOUT PRIOR NOTICE, FOR IMPROVEMENT OF MACHINE QUALITY AND THUS MAY NOT CORRESPOND TO THE MACHINE YOU PURCHASED.
-
Page 3: Table Of Contents
FUNCTIONS FOR BASIC MACHINE OPERATION ............. 5-1 5-1) LAMP ON THREAD TENSION ADJUSTMENT BOARD ..........5-1 5-2) NEEDLE STOP CLUTCH...................... 5-2 5-3) LAMP ON COLOR CHANGE BOX(SWF/E-UH1508)............5-3 5-4) UPPER THREADING AND TENSION ADJUSTMENT ............ 5-4 5-5) LOWER (BOBBIN) THREADING AND TENSION ADJUSTMENT ........ 5-7 5-6) BOBBIN WINDER ........................ - Page 4 CHAPTER 6 MAINTENANCE AND INSPECTION ................6-1 6-1) CHECK POINTS FOR REGULAR INSPECTION .............. 6-1 6-2) CLEANING ........................... 6-1 6-3) OIL SUPPLY ......................... 6-3 6-4) DRIVE BELT TENSION ....................... 6-8 CHAPTER 7 MACHINE ADJUSTMENTS .................... 7-1 7-1) ADJUSTING THE TRIMMERS ................... 7-1 7-1-1) ADJUSTING THE POSITION OF THE TRIMMING CAM (INSERT ANGLE OF MOVABLE BLADE) ............
-
Page 5: Chapter 1 Safety Rules
CHAPTER SAFETY RULES The following set of safety rules categorized as , and indicates possibilities of DANGER WARNING CAUTION physical or property damages if not fully observed. : These safety instructions MUST be observed to be safe from danger when installing, delivering, or DANGER repairing the machine. -
Page 6: 1-2) Installation
2) Using a Forklift Make sure that size and weight of the forklift is sufficient to support the machine. Use the pallet to place the machine so that its center is on the forklift arm (see [Fig.1-2]). Lift the machine carefully so that the machine does not tilt to either side. -
Page 7: 1-3) Machine Operation
1-4) REPAIR Only SWF-trained and selected repair engineers should do repair work. 1) Turn OFF the power before cleaning or repairing the machine. Wait for 4 minutes so the machine electricity is completely discharged. -
Page 8: 1-5) Placement Of Warning Stickers
Fire or death may be caused by high voltage electric shock. Don’t open the cover except for service man assigned by SWF. When open the cover turn off power and wait for 6 minutes. Injury may be caused by winding. -
Page 9: 1-6) Contents Of Warning Stickers
Fire or death may be caused by high voltage electric shock. Don’t open the cover except for service man assigned by SWF. When open the cover turn off power and wait for 6 minutes. -
Page 10: Installation And Machine Assembly
CHAPTER INSTALLATION AND MACHINE ASSEMBLY Install your machine in an appropriate environment and with adequate electrical supply. Failure to follow the directions may result in machine malfunction. 2-1) ENVIRONMENT ① 0∼40°C (32∼104°F) when the machine is in operation 1) Temperature: ②... -
Page 11: 2-3) Leveling The Machine
2-3) LEVELING THE MACHINE The machine must be accurately leveled (especially front and back) to prevent the needle from moving out of position. 1) Use the adjusting bolts installed at the four stands to level the machine (front, rear, left, and right). Use a level gauge. -
Page 12: 2-4) Assembly Of Peripheral Devices
2-4) ASSEMBLY OF PERIPHERAL DEVICES 1) Assembling Upper Thread Stand Spool plate support thread holder [Fig.2-4] 2) Assembling Operation Box Operation box [Fig.2-5] [Fig.2-6]... -
Page 13: 2-5) Table Assembly
2-5) TABLE ASSEMBLY 1) Unscrew the eight clamps underneath the table and the bolts to disassemble the table. Table support Bolts [Fig.2-7] 2) Adjust the table support at an appropriate height and fasten the bolts. Table Table support bolts Table height Work type board tubular... - Page 14 3) Insert the table and fasten the bolts and the clamps. Table support Bolts [Fig.2-9] [CAUTION] The table should not be higher than the upper side of the needle plate by 0.5mm for board frame work. If the height difference is over 0.5mm, unfasten the table support bolts, adjust the height, and fasten the bolts back.
-
Page 15: 2-6) Frame Assembly
2-6) FRAME ASSEMBLY 2-6-1) Tubular Frame 1) Unfasten screws on the tubular frame 2/3, install the tubular frame in the groove of the frame connection plate, and fasten the bolt. [CAUTION] Do not install the tubular frame too close from the X frame. Keep the space at around 2mm. Frame connection plate Tubular frame Fixing hole... -
Page 16: 2-6-2) Border Frame
2-6-2) Border Frame 1) Unfasten screws on the tubular frame 2/3 and remove the frame. Tubular frame Fixing bolts [Fig.2-12] 2) Adjust the table height at an appropriate level for border frame work. (See 2.5) TABLE ASSEMBLY) 3) Unfasten screws on the border frame 2/3 and install the border frame in the groove of the X frame connection plate. -
Page 17: Parts Of The Machine
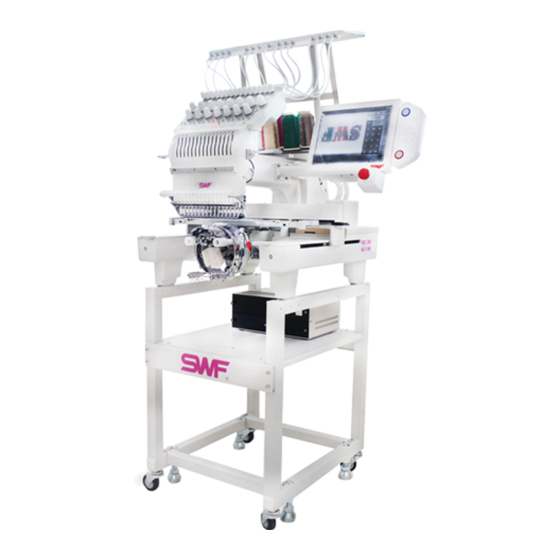
CHAPTER PARTS OF THE MACHINE 3-1) SWF/E-U SERIES [Fig.3-1] Machine Body Color Change Y-axis driving system Encoder Table Upper thread holder Emergency stop Main power switch Upper thread stand Head S/B button Leveling base Main shaft drive motor Thread tension... -
Page 18: 3-2) Swf/E-Uh1508-45
3-2) SWF/E-UH1508-45 [Fig.3-2] Main Body Color Change Emergency stop Leveling base Table Upper thread holder S/B button Sub support Upper thread stand Head Tubular frame Thread detector Main shaft drive Thread tension Border frame Emergency power motor adjustment board Controller box... -
Page 19: Functions And Features
CHAPTER FUNCTIONS AND FEATURES 01) EXPANDED MEMORY SIZE The machine can store a maximum of 100 designs. The basic memory size is 2 million stitches. 02) MIRROR IMAGE CONVERSION AND DESIGN DIRECTION You can turn the design from 0°to 359°in the increments of 1°and also reverse the design in the X direction (mirror image). - Page 20 12) AUTOMATIC DETECTION OF UPPER AND LOWER THREAD BREAKS ① Spring Type ① The upper and the lower threads are detected by two separate devices. The machine stops automatically when the upper thread breaks or the lower thread is out of the needle (lower thread detector is optional for all machines except for single-head).
-
Page 21: Chapter 5 Functions For Basic Machine Operation
CHAPTER FUNCTIONS FOR BASIC MACHINE OPERATION 5-1) LAMP ON THREAD TENSION ADJUSTMENT BOARD 1) Switch ① For normal operation, turn the toggle switch on to turn on the indicator lamp. ② If the machine stopped after detecting a thread break, move the frame back to the location of the thread break using STOP button and restart the machine to pick up stitching (design edit). -
Page 22: 5-2) Needle Stop Clutch
3) Deletion of Thread-Break Detection Function Poor function of the thread detecting roller due to foreign substances around it may result in wrong and frequent detections, causing inefficiency of work. In this case, you can turn off the detecting function by turning off the toggle switch at the end of the thread tension adjustment board. -
Page 23: 5-3) Lamp On Color Change Box(Swf/E-Uh1508)
(SWF/E-UH1508) 5-3) LAMP ON COLOR CHANGE BOX Needle position lamp on the color change box blinks at the needle bar currently in operation. Needle set lamp blinks when the needle reaches the center of the needle hole on the plate (roller is positioned at the straight line of the color change cam) (see [Fig.5-3] on relationship between the lamp and the line of the color change cam). -
Page 24: 5-4) Upper Threading And Tension Adjustment
5-4) UPPER THREADING AND TENSION ADJUSTMENT 1) Upper Threading Upper thread stand Upper thread (from the upper thread stand) Sub thread adjuster Thread tension adjustment board Thread detecting roller Thread detecting board Take-up lever spring Rotary tension disk Main thread tension adjuster Upper thread guide Thread guide... - Page 25 Threading the sub Threading the thread Threading the main Threading around the tension adjuster detector roller tension adjuster needle Thread holder Thread guide spring (lower) Thread Sensing Roller One and Thread Guide Disk half turn One turn (Pass through the Rotary Tension Disk middle of shaft) Fix the upper thread...
- Page 26 3) Take-Up Spring CORRECT WRONG Connect between the take-up spring and the stopper. Take-up spring unable to connect with the stopper Stopper (due to dust or foreign substances in the stopper.) Take-up spring [Fig.5-8] ① Take-up Spring Functions Difference in the length of the upper thread pulled by the take-up lever and pulled by the hook creates tension or looping.
-
Page 27: 5-5) Lower (Bobbin) Threading And Tension Adjustment
5-5) LOWER (BOBBIN) THREADING AND TENSION ADJUSTMENT 1) Lower Threading ① Use cotton yarn (#80-#120) for your lower thread. ② Threading the bobbin: ⓐ Insert the threaded bobbin into the bobbin case with the thread coming out from the case slot. Pull the thread through the thread guide. - Page 28 5-6) THREAD WINDER 1) Lower thread winding ① Insert the bobbin into the thread winder shaft as in [Fig. 5-12]. Wind the bobbin 5-6 times by hand in the thread winding direction. Then press the start button, and the thread winding begins. Knob Thread tension adjusting nut Tension adjusting holder...
- Page 29 3) Adjustment of bobbin thread status ① The thread should be wound around the bobbin in parallel. Otherwise, loosen the tightening screw for the thread winder's tension adjusting holder and move the thread guide body left or right for Thread tension adjustment.
-
Page 30: 5-7) Precautions In Using Floppy Disks Or Usb Memory Sticks
5-7) Precautions in using floppy disks or USB memory sticks Make sure to meet the following conditions when using the above devices. 1) You can use pre-formatted disks, but be sure to use disks of recognized quality. 2) You can use USB memory sticks of FAT 16 (file system). The machine does not accommodate FAT 32. -
Page 31: 5-9) Deleting Floppy Disks And Usb Memory Stick
For writing the designs onto floppy disks and USB memory sticks are available. 5-11) RETURN TO PREVIOUS LOCATION IN UNEXPECTED BLACKOUTS Your SWF machine goes back to the location of stop to pick up stitching when the power comes back on after unexpected blackouts. -
Page 32: 5-12) Needle-Hook Timing Control
5-12) NEEDLE-HOOK TIMING CONTROL 1) Needle ① It is very important to select the right needle for the type of thread and fabric used. ② Inappropriate needle may cause bad embroidery, thread breaks, skipped stitches, etc. ③ For normal embroidery, use a DB×K5 needle. [CAUTION] DB K5 needle has an eye twice larger than that of DB1 (used for normal sewing). - Page 33 ② When inserting the needle, make sure that the groove Needle insert hole of the needle is facing front. Shaft of the needle should be inserted completely into the needle bar. Front groove of the needle groove [Fig.5-19] [CAUTION 1] For special threads such as artificial silk, turn the needle slightly to the right to prevent thread breaks (see [Fig.5-20]).
- Page 34 4) Relationship between Needle and Hook ① Adjusting Timing between Needle and Hook Default timing of the needle and the hook is set by the main shaft angle of 200° and varies as below. Hook point Top point of hook Hook point Top edge of the needle eye circumference...
- Page 35 [CAUTION] Functions by Needle Shape ① Size of the hole and groove differs by needle. • Front groove: protects the thread from the heat of the Front groove sewing friction (which may cause thread breaks). • Back groove: helps regulate the hook timing and prevents looping.
- Page 36 5) Relationship between the Take-up Lever and the Hook Hook point timing is directly related to thread tension and thread breaks. The following pictures show the location of hook when the take-up lever starts to move up from the lower dead stop (main shaft rotation angle: 292°). FAST HOOK TIMING Groove of the hook is in the (A) range.
-
Page 37: 5-13) Assembly And Functions Of Thread Detector
5-13) ASSEMBLY AND FUNCTIONS OF THREAD DETECTOR 5-13-1) Functions of Thread Detector Detection of the breaks of upper or lower threads prevents ill quality embroidery. The thread- break detector unit contains rollers that sense the smooth feeding of the thread. Any dust, thread remnants, etc. will interfere the rollers’... -
Page 38: Maintenance And Inspection
Once a week ② Around the movable blade and the fixed blade [How to Clean] Once in 3-7 days ③ Remove the needle plate and pull the movable blade forward (see picture). Use the SWF brush to remove dirt and dust. - Page 39 Hook Guide rail to the take-up lever Fixed blade Movable blade [Fig.6-1]...
-
Page 40: 6-3) Oil Supply
CAUTION Sun Star is not responsible for machine damages or wear-outs caused by insufficient oiling. CAUTION 1) Oil supply Use the SWF sewing machine oil (Spindle Oil) or ISO-standard VG18. 2) Manual oil supply Where to Oil Oiling cycle Ref. Fig. - Page 41 Once in 2 days b. driver pin of presser foot c. driver shaft of needle bar [Fig.6-3] [CAUTION] • Use the SWF sewing machine oil (Spindle Oil) or ISO-standard VG18. • Oil just enough to damp the tape in the oil tank.
- Page 42 Oiling lever [Fig.6-4] [CAUTION] • Use the SWF sewing machine oil (Spindle Oil) or ISO-standard VG18. • Make sure to fill the oil tank to the middle point between HIGH and LOW. • Do not oil with both of the...
- Page 43 ③ Grease supply Make sure to turn OFF the main power during the grease supply. CAUTION Use high-quality mineral-based lithium grease. Where to Grease Greasing cycle Reference Fig. Inside the arm Take-up lever drive cam Once in 3 months Needle bar drive cam Needle bar controller Driving plate for the upper thread holder Once in 1 months...
- Page 44 Turn OFF the main power during the grease supply. CAUTION Use lithium-type grease (JIS No.2) - Albania No.2. Where to Grease Greasing cycle Reference Fig. Once in 2 months X-axis LM guide (2 on each side) Once in 2 months Y-axis LM guide (2 on each side) Once in 2 months Sub Y drive LM guide (1 on one side)
-
Page 45: 6-4) Drive Belt Tension
6-4) DRIVE BELT TENSION Turn OFF the main power when inspecting drive belt tension. CAUTION Too weak or too tight tension on the drive belt may cause machine malfunction or damages (abnormal wear-out of drive unit). Inspect the driver belt on a regular basis. Location for inspection Inspection cycle Reference... -
Page 46: Chapter 7 Machine Adjustments
CHAPTER MACHINE ADJUSTMENTS Turn OFF the main power when adjusting the machine. WARNING 7-1) ADJUSTING THE TRIMMERS 7-1-1) Adjusting the Position of the Trimming Cam (Insert Angle of Movable Blade) The movable blade is started by the trimmer cam in the angle it is inserted. As one of the basic trimming functions, it arranges the upper thread tails in the needle after trimming. -
Page 47: 7-1-2) Adjusting Blade Tension
7-1-2) Adjusting Blade Tension Make sure to check and adjust the cross-tension of the movable and the fixed blades after replacement or repair. ① Checking the cross tension Manually move the movable blade and cut the upper Movable blade and the lower threads. Check the cross-section of the thread cut. -
Page 48: 7-3) Adjusting Upper Thread Holding Unit
7-3) ADJUSTING UPPER THREAD HOLDING UNIT 1) Checking the assembly of upper thread holding lever and upper thread holder plate ① Stroke of the upper thread holder driver plate in the upper thread holder base should be 1mm from the base when the upper thread holding solenoid is on. -
Page 49: 7-4) Picker Adjustment
7-4) PICKER ADJUSTMENT If the position or the starting height of the picker is incorrect, the machine may not be able to separate the upper and the lower thread and cut them both, resulting in short upper thread. ① Adjusting the picker position Manually move the picker so it touches the bobbin. -
Page 50: 7-5) Adjusting Upper Thread Holder
7-5) ADJUSTING UPPER THREAD HOLDER Wiper return sensor ① Adjusting the sensor springs (when wiper does not return) Ⓐ Open the wiper motor cover. Of the two #1 carve sensor rings, align the center of the rear Sensor sensor spring with #1 carve on the block adjustment ring on the shaft. -
Page 51: 7-6) Adjusting Low-Noise Presser Foot
1. The assembly pin should smoothly move right and left with the three screws fastened. 2. The assembly unit and the assembly pin are not for commercial sale. 3. Contact your SWF dealer if you must adjust the location of the cam. Take-up lever... -
Page 52: 7-7) Relationship Between Presser Foot And Needle
2) Adjusting the Height of the Presser Foot ① Check the relationship between the presser foot and the needle/embroidery material. Turn the main shaft lever to position the needle at the Presser foot holder lowest point (178°). Remove the head cover and Screw unfasten the screws on the presser foot so it moves up and down. -
Page 53: 7-8) Correct Position Of Needle
7-8) CORRECT POSITION OF NEEDLE ① Make sure to check the position of the needle - it may change during machine delivery or leveling. First check if the needle is bent. Then turn the main shaft lever to set the shaft at around 130°. Position the needle at the lower dead stop and check if the needle is at the center of the needle hole on the plate. -
Page 54: 7-9) Adjusting Half-Turn Film For Color Change
(see [Fig.7-18(a)]). ② For SWF/E-UH1508-45, the machine will stop automatically if any of the needle setting lamp or needle position lamp blinks. In this case, use a box spanner to adjust the position of the color change cam so the roller is at the center of the cam on the straight line (when the needle is at the center of the needle hole on the plate). -
Page 55: 7-10) Jump Motor Adjustment
7-10) JUMP MOTOR ADJUSTMENT Adjustment is required for new or malfunctioning jump motor. 1) Adjusting the Standby Position (adjusting Jump crank roller motor base) ① Unscrew motor base ([Fig.7-19]) and adjust so that the jump crank roller is 0.3mm 0.3mm away from the controller. Fasten the screw. -
Page 56: 7-11) Adjusting Drive Belt Tension
Manufacturer: UNITTA [CAUTION] Drive belt tension can be adjusted only by trained SWF engineers. Make sure to turn OFF the machine during the adjustment. ① Push the X frame plate to the driven pulley ([Fig.7-21]) and check the drive belt tension on the Y-axis. Use the sound wave tension gauge. -
Page 57: 7-11-2) X-Axis Timing Belt
7-11-2) X-Axis Timing Belt ① Push the frame plate fully to the right ([Fig.7-22]). Check the drive belt tension on X-axis using the sound wave tension gauge. ② Tension on the X-axis timing belt should measure as below on the sound wave measurer when you pluck the middle of the belt with your finger. -
Page 58: 7-12) Lamp (Optional)
7-12) LAMP (OPTIONAL) 7-12-1) Lamp Socket Adjustment (4-head) Standard lamp for SWF machines measures 580mm in length. If you have to use 590mm lamp for certain purposes, adjust the lamp in the following order. ① Unfasten the three screws on the socket. -
Page 59: Chapter 8 Troubleshooting
CHAPTER TROUBLESHOOTING DANGER CAUTION Inspect/repair the machine by the guideline when in machine failures. Error Type Cause Inspection & Repair Reference Operation failure Loose belt tension / belt Adjust belt tension / change belt damage Power failure or short-circuit Check fuse in main shaft motor of fuse and change fuse Failure to sense signals for... - Page 60 Error Type Cause Inspection & Repair Reference Bad Color ① Incorrect position of needle Refer to user’ s manual Set main shaft angle back at Change stop 100° , if you manually moved it for cleaning, inspection or repair. ② Failure to sense signals for Run manual color change and needle position or 1 rotation check if signal lamps (needle...
- Page 61 Error Type Cause Inspection & Repair Reference Poor detection Poor connection of take- Clean the spring and the plate, of upper thread up spring and thread or adjust the spring tension. detector plate Poor connection & quality Check the plate connection and of tension adjusting plate change the circuit board Bad Motor and bad motor...
- Page 62 Error Type Cause Inspection & Repair Reference Thread breaks Stitch is too small/dense Re-punch design tape Check design for thread Frequent thread break in Re-punch after checking the same spot design Correct the stitches on operation box Inadequate needle size Change needle for thread Needle damage (bent,...
- Page 63 Error Type Cause Inspection & Repair Reference Bad thread (weak, Change thread uneven thickness, poorly Check the thread used. twisted, old) How to select thread. •Select soft thread with ever thickness and stable tension. •Choose left-twisted thread. Right-twisted thread Change to left-twisted thread Z-direction: left twist S-direction: right twist left-twist prevents...
- Page 64 Error Type Cause Inspection & Repair Reference Dent on thread path on Remove dent or change the hook and bobbin case case Narrow space between Adjust space Set it at 0.5-0.7mm for hook holder and groove smooth feeding of upper for hook holder (on hook) thread Insufficient oil in hook...
- Page 65 Error Type Cause Inspection & Repair Reference Skipped Bent needle Stitches Inadequate needle size Change needle for thread Incorrect installation of Adjust installation needle Poor timing of needle and Adjust timing hook Large gap between needle groove and hook point Incorrect lower dead stop Adjust the lower dead stop Damaged hook point...
- Page 66 Error Type Cause Inspection & Repair Reference Poor stitch Weak upper thread Adjust tension tension tension Uneven upper thread Clean main and sub tension tension due to foreign adjusters in the thread tension substances adjusting plate Weak lower thread Adjust tension tension Uneven lower thread Clean bobbin case and check...
- Page 67 Needle failure - Change needle worn out/damaged needle tip needle is too large for thread Needle hole is too large Use adequate size of needle SWF/ needle holes for needle are 2.0mm Trimming failure Poor connection/quality of Check and change solenoid and...
- Page 68 Error Type Cause Inspection & Repair Reference Trimmer return Poor connection of sensor Check connection failure Bad circuit board Change circuit board Bad sensor or sensor change sensor position. clean around the sensor Dirty area around the adjust location of the sensor sensor.
- Page 69 Error Type Cause Inspection & Repair Reference Short upper Upper thread is trimmed check upper thread tension The default is Medium thread after too short and comes Long Medium length trimming unthreaded of trimmed thread in data set- Upper thread is trimmed Medium Short too long and thread tail...
-
Page 70: Chapter 9 Block Diagram
CHAPTER BLOCK DIAGRAM 1) BLOCK DIAGRAM OF SWF/E-U SERIES (Excluding SWF/E-UH 1508-45) - Page 71 2) Block Diagram of SWF/E-UH1508-45...
Need help?
Do you have a question about the E-Series and is the answer not in the manual?
Questions and answers