
Subscribe to Our Youtube Channel
Related Manuals for TSI Instruments FHC50


Summary of Contents for TSI Instruments FHC50
- Page 1 FUME HOOD CONTROLLER/MONITOR MODEL FHC50/FHM10 OPERATION AND SERVICE MANUAL P/N 6003830, REVISION G MARCH 2016...
- Page 3 FUME HOOD CONTROLLER/MONITOR MODEL FHC50/FHM10 OPERATION AND SERVICE MANUAL P/N 6003830, REVISION G MARCH 2016 U.S. AND CANADA OTHER COUNTRIES Sales & Customer Service: Sales & Customer Service: (800) 874-2811/(651) 490-2811 (001 651) 490-2811 Fax: Fax: (651) 490-3824 (001 651) 490-3824...
- Page 5 Copyright TSI Incorporated / 2010-2016 / All rights reserved. Part number 6003830/ Revision G / March 2016 LIMITATION OF WARRANTY AND LIABILITY (effective February 2015) (For country-specific terms and conditions outside of the USA, please visit www.tsi.com.) Seller warrants the goods, excluding software, sold hereunder, under normal use and service as described in the operator's manual, to be free from defects in workmanship and material for 24 months, or if less, the length of time specified in the operator's manual, from the date of shipment to the customer.
- Page 6 TRADEMARKS TSI, TSI logo, V , are registered trademarks of TSI Incorporated. ELOCI BACnet is a trademark of ASHRAE. Modbus is a registered trademark of Modicon, Inc. ® LonWorks is a registered trademark of Echelon Corporation.
-
Page 7: Table Of Contents
Quick Keys ...................... 11 Keystroke Procedure ..................11 Programming Example ..................12 Hardware Configurations ..................13 Model FHC50 Controller Modes ..............13 Model FHM10 Fume Hood Monitor Modes ............. 14 Menu and Menu Items ..................15 CONFIGURE MENU ..................17 SETPOINT/ALARM CONSTRAINTS .............. - Page 8 Object ....................80 Node Object Network Variables ..............80 Fume Hood Controller Object Network Variables ........... 80 Description of LON SNVTs ................82 ® FHC50 BACnet MS/TP Protocol Implementation Conformance Statement..83 ® BACnet MS/TP Object Set ................85 APPENDIX C ..........................89 Wiring Information ....................
-
Page 9: How To Use This Manual
Important information about unit operation. Access Code Model FHM10 Fume Hood Monitors and FHC50 Fume Hood Controllers have an access code to limit unauthorized access to the menu system. The access code can be turned on or off through ACCESS CODE menu item. - Page 10 (This page intentionally left blank)
-
Page 11: Part One
A sash sensor then measures the vertical opening of the fume hood sash. As an option, the Model FHC50 can use a sidewall sensor to monitor or trim the face velocity when calculated from sash position and exhaust flow rate. -
Page 12: Useful User Information
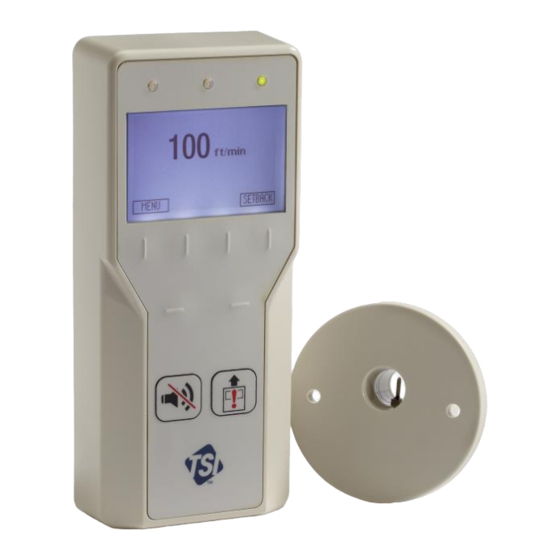
Yellow Light The yellow light is on to indicate that the Model FHC50 controller is muted or in setback mode. The LCD display will read “Setback” or “Mute” at the top of the screen to indicate the meaning of the yellow light. -
Page 13: Display Screen
Display Screen The LCD display is highly configurable and can display various critical information including actual face velocity, exhaust flow rate, alarm status, menu options, and error messages. In addition, the LCD display shows various soft key labels that enable user interaction and programming the unit. -
Page 14: Operator Keys
Configuration Software. Alarms The Model FHC50 controller has visual (red light) and audible alarms to inform you of changing fume hood conditions. The alarm levels (set points) are determined by facilities staff, which could be Engineering, Industrial Hygiene, or a facilities group depending on how the safety staff is organized. -
Page 15: Audible Alarm-Emergency Key
Diagnostics menu. Due to the different Model FHM10 monitors and Model FHC50 controllers available, the above information is needed to accurately answer your questions. For the name of your local TSI representative or to talk to TSI service personnel, please call TSI at (800) 874-2811 (U.S. - Page 16 (This page intentionally left blank) Part One...
-
Page 17: Part Two
Part Two Technical Section The Fume Hood Controller is ready to use after being properly installed and calibrated. The calibration procedure should take less than 15 minutes. Figure 2 shows the Digital Interface Module (DIM) which is programmed with a default configuration that can be easily modified to fit your application. -
Page 18: Software Programming
Software Programming Programming the Model FHC50 controller is quick and easy if the programming keys are understood, and the proper keystroke procedure is followed. The programming keys are defined first, followed by the required keystroke procedure. At the end of this section is a programming example. -
Page 19: Quick Keys
Quick Keys There are two dedicated adjustment keys on the front of the unit (refer to Figure 3) that become active when accessing a menu item. These keys change choices of a menu item while that item is highlighted on the display. The left adjustment key will decrease the value of an item, and the right adjustment key will increase the value of an item. -
Page 20: Programming Example
Programming Example The following example demonstrates the keystroke sequence. In this example the low alarm set point will be changed from 80 ft/min to 60 ft/min. Unit is in normal operation. ft/min SETBACK MENU Press the MENU key to gain access to the menus. -
Page 21: Hardware Configurations
The Model FHM10 Fume Hood Monitor can be field-configured to monitor face velocity or flow rates, while the Model FHC50 Fume Hood Controller can be field-configured to control face velocity or flow rates. These models feature a configuration wizard to easily select the desired monitor or controller configuration. -
Page 22: Model Fhm10 Fume Hood Monitor Modes
NORMAL & FACE SETBACK VELOCITY FLOW PARAMETERS ANALOG CONTROL SETTING METHOD METHOD DISPLAYED OUTPUT INPUT 1 TYPES 9) FLOW Flow Venturi Flow Flow Rate Night 6PTVENTURI Valve (No Setback** Feedback) 10) SASHPOS Face Velocity Sash- Venturi Velocity Vertical LOMVENTURI With Flow Position Valve With Change*... -
Page 23: Menu And Menu Items
Menu and Menu Items The Model FHM10 monitor and Model FHC50 controller are very versatile devices which can be configured to meet your specific application. This section lists all of the menu items available to program and change (except diagnostics menu). Changing items is accomplished by using the keypad or through communications with the Building Automation System. - Page 24 SELF TEST RESET SETTINGS RESET ALL CALIBS Figure 5: Menu Items – Model FHC50 Controller BALANCE FLOW submenu only appears if flow sensor is enabled (FLOW DEVICE not set to NONE). Items in NETWORK SETTINGS submenu depend on NET PROTOCOL setting. See NETWORK SETTINGS item description for details.
-
Page 25: Configure Menu
Using the CONFIG WIZARD will also 1) Sidewall only configure inputs and outputs for the selected sequence of 2) Sidewall 1) Sidewall only FHM10 and FHC50 operations. Refer to the Hardware Configurations section to see PressFlow the inputs and outputs. - Page 26 The NORM CTRL MODE item selects the measurement on CONTROL MODE MODE VelSashPos which the control function is based during NORMAL (Occupied) VelSide+Sash Mode. FHC50 Only Flow If this item is set to: VelSidewall The controller will control face velocity using a sidewall sensor. VelSashPos...
- Page 27 All SETBACK-related alarms are still active with this configuration, unless set to OFF. NOTE: To shutdown a fume hood with the Model FHC50 controller, set the SETB CTRL MODE item to FixedPos and the SETBACK POS item to 0%.
- Page 28 The FLOW DEVICE item shows the type of air flow device being None DEVICE (Read-only value) used for flow based measurements and control. Choose: FHM10 and FHC50 Lin Flo Sta None No flow device installed, or there is to be no flow Press Flo Sta information used by the controller.
- Page 29 Use the Vel, Flow Flow DISPLAY UNITS item to choose the units of measure: FHM10 and FHC50 None Displays only the current face velocity. Vel, Flow Displays both the current face velocity and the current flow.
- Page 30 AUDIBLE ALARM alarm sounds when the controller enters emergency mode. If set to ON, the audible alarm will sound intermittently to indicate an FHM10 and FHC50 emergency. If set to OFF, the audible alarm will not sound in emergency mode.
- Page 31 ANALOG OUTPUT SIGNAL will represent. If ANALOG OUT 0 to 10000 cfm TYPE is set to velocity, the ANALOG OUT F.S. item can be set FHM10 and FHC50 between 0 to 1000 ft/min. If ANALOG OUT TYPE is set to flow 100% to 105% rate, the ANALOG OUT F.S.
- Page 32 FHM10 and FHC50 SPECIALS MENU SPECIALS The SPECIALS MENU item is used to set the Model FHC50 MENU controller for certain custom configuration. Access to the FHC50 Only SPECIALS MENU item is restricted with a password. Contact...
- Page 33 0 cfm the setting of menu item NORMAL CONTROL MODE. The FHC50 Only FHC50 controller will maintain this set point when normal operating conditions exist. If NORMAL CONTROL MODE = VelSideWall, VELSashPos or VelSide+Sash, enter a face velocity set point between 60 to 980 ft/min.
- Page 34 0 cfm depending on the setting of menu item SETBACK CONTROL FHC50 Only MODE. The FHC50 controller will maintain this set point when normal operating conditions exist. If SETBACK CONTROL MODE = VelSideWall, VELSashPos or VelSide+Sash, enter a value between 60 to 980 ft/min.
- Page 35 WARNING: The Model FHC50 may not maintain the fume hoods average face velocity at the SETPOINT item value when a MINIMUM FLOW has been programmed.
- Page 36 WARNING: The Model FHC50 may not maintain the fume hoods average face velocity at the SETPOINT item value when a MAX FLOW has been programmed.
- Page 37 Normal mode. A high flow alarm condition is defined as when the exhaust flow is greater than the high flow alarm set FHM10 and FHC50 point during Normal mode. NOTE: The HI FLOW ALARM must be at least 50 cfm greater than the SETPOINT.
-
Page 38: Setpoint/Alarm Constraints
2. The controller has been designed so that the LOW ALARM set point must be set at least 20 ft/min below the control SETPOINT when the FHC50 is set for face velocity control and 50 cfm when the FHC50 is set for flow control. For example, if the control SETPOINT is 100 ft/min, the LOW ALARM set point cannot be greater than 80 ft/min. -
Page 39: Interface Menu
MAC ID The MAC ID item sets the Device ID. FHM10 and FHC50 BACnet AUTO BAUD When the AUTO BAUD item is selected, the FHC50 will automatically set its baud rate for BACnet MS/TP FHM10 and FHC50 communications. SERVICE PIN... - Page 40 FHM10 and FHC50 event a foreign network tool inadvertently acquires a Model FHC50 and installs it with network management authentication. The Model FHC50 controller’s owner will then be unable to reclaim the Model FHC50 over the network. CALIBRATION MENU SOFTWARE...
- Page 41 The BALANCE MODE item is used to enter a BALANCE NONE MODE sub-menu. After a flow device has been calibrated, FHC50 Only the BALANCE MODE screen can be used to compare the Measured Flow against the Actual Flow as determined by a pitot tube traverse.
- Page 42 FLOW DEVICE FLOW DEVCE = Lin Flo Sta Press Flo Sta This item displays the FLOW DEVICE that was previously SELECTED Press Flo Sta selected through the CONFIG WIZARD item. (Read-only value) LOM Venturi FHM10 and FHC50 6pt Venturi Calculated...
- Page 43 For round ducts For rectangular ducts WARNING: If the proper FLO STA AREA is not programmed into the Model FHC50, the flow measurement will be incorrect. Thus, all the other information that uses the flow measurement, such as the flow alarms and percent sash open, will also be incorrect.
- Page 44 Set this item to match the pressure transducer used. FHM10 and FHC50 NOTE: If a pressure transducer with a 1-5 V output is used, select 0 to 5V. If a pressure transducer with a...
- Page 45 For round ducts For rectangular ducts WARNING: If the proper FLO STA AREA is not programmed into the Model FHC50, the flow measurement will be incorrect. Thus, all the other information that uses the flow measurement, such as the flow alarms and...
- Page 46 VALUE FLOW DEVICE FLOW DEVCE = Lin Flo Sta LOM Venturi This item displays the FLOW DEVICE that was previously SELECTED Press Flo Sta (Read-only selected through the CONFIG WIZARD item. LOM Venturi value) FHM10 and FHC50 6pt Venturi Calculated...
- Page 47 When this menu item is entered, the controller will prompt the user to verify that they want to do this by FHM10 and FHC50 displaying the message “Are You Sure.” Entering YES resets the flow calibration factors for this flow device to defaults and shows the message “Changes Saved.”...
- Page 48 0 to 10000 cfm 0 cfm FLOW through the venturi valve when it is fully open. The display FHM10 and FHC50 will indicate a volumetric flow rate. Adjust the displayed value to match the flow through the venturi valve. NOTE:...
- Page 49 Lin Flo Sta 6Pt Venturi SELECTED selected through the CONFIG WIZARD item. Press Flo Sta (Read-only LOM Venturi value) FHC50 Only 6pt Venturi Calculated RESET FLOW FLOW RESET The RESET CAL menu item zeroes out the flow calibration NONE CALIBRATION adjustments.
- Page 50 POSITION 2 FLOW without feedback. When this item is entered, the display will indicate a volumetric flow rate. Adjust the displayed value to FHC50 Only match the flow through the venturi valve when the venturi valve is at the 20% OPEN position.
- Page 51 POSITION 4 FLOW without feedback. When this item is entered, the display will indicate a volumetric flow rate. Adjust the displayed value to FHC50 Only match the flow through the venturi valve when the venturi valve is at the 60% OPEN position.
- Page 52 POSITION 6 FLOW without feedback. When this item is entered, the display will indicate a volumetric flow rate. Adjust the displayed value to FHC50 Only match the flow through the venturi valve when the venturi valve is at the 100% OPEN position.
- Page 53 When this menu item is entered, the controller will prompt the user to verify that they want to do this by FHC50 Only displaying the message “Are You Sure.” Entering YES resets the flow calibration factors for this flow device to defaults and shows the message “Changes Saved.”...
- Page 54 Each % of SENSITIVITY represents 1 ft/min (5 cfm) that the face velocity (flow rate) must be away from set point before the FHC50 controller enters PID control (fast control). For example, if the SENSITIVITY is set to 80% and the set point...
- Page 55 DIRECT SIGNAL output direction. As an example: if the control system closes REVERSE the exhaust damper instead of opening the damper, this FHC50 Only option will reverse the control signal to now open the damper. Kc VALUE Kc VALUE Kc = 0 to 1000 Kc = 100 The Kc VALUE item changes the gain control coefficient.
- Page 56 (This page intentionally left blank) Part Two...
-
Page 57: Calibration
(optional). The Fume Hood Monitor or Controller must be calibrated, after being installed on the fume hood, to provide accurate indication of fume hood face velocity and/or exhaust flow. The FHM10 Monitor and FHC50 Controller will warn the user with a display message if it has not been calibrated. -
Page 58: Sash Position Calibration
4. Controller will prompt “Raise sash to 24 inches height then press .” Open the sash(es) to the 24-inch height and press the key. a. The FHC50 controller will display the following items: Desired Flow Flow set point to achieve desired face velocity... -
Page 59: Flow Calibration
5. Controller will prompt “Lower sash to 12 inches height then press .” Lower the sash(es) to the 12-inch height, so the fume hood bypass (if present) is just covered, and press the key. a. The FHC50 controller will display the following items: Flow set point to achieve desired face velocity Desired Flow... - Page 60 Flow Station Pressure Transducer Zero 1. Disconnect tubing between pressure transducer and flow station. 2. Select FLO STA PRESS ZERO menu item. 3. Press the ENTER ( ) soft key. Flow zero procedure, which takes 10 seconds, is automatic. During the 10 second flow zero procedure, the display will indicate the current flow station pressure transducer voltage.
- Page 61 High Flow Calibration 1. Enter CALIBRATION FLOW menu and raise the sash height to approximately 18 inches (sash stop). 2. Select FLO STA HI CAL to enter a submenu with the following items: Damper position for low flow calibration FLO STA LO SETPT Voltage from pressure transducer during Flow Station PRESS ZERO VOLTAGE Pressure Transducer Zero...
- Page 62 LOM Venturi Calibration NOTE: LOM Venturi Valves are optional and may not be installed in your system. 1. Obtain the venturi valve minimum and maximum flow, either by reading the label on the venturi valve or by performing duct traverses when the venturi valve is fully closed and fully opened.
-
Page 63: Sash Opening Calibration
5. Controller will display current sash pot position and prompt “Fully open sash then press .” Open the sash and press the key. After opening the sash and pressing the , controller will count down for 5 seconds while it allows control to stabilize. 6. -
Page 64: Optimizing Controller Performance
Optimizing Controller Performance The Model FHC50 controller uses both integral and PI control methods. Integral control (slower control signal) is used when the controller is near set point. Integral control provides stability when natural system fluctuations occur such as operators working at hoods and lab doors opening. -
Page 65: System Component Inspection
WARNING If you are using a liquid to clean the sensor, turn off power to the Model FHC50. Do NOT apply power before velocity sensor completely dries. Do NOT use compressed air to clean the velocity sensors. -
Page 66: Replacement Parts
Electric Actuator Troubleshooting Section The Model FHM10 Fume Hood Monitor and FHC50 Fume Hood Controller is designed to be trouble free. However, installation problems or interaction with other HVAC components may cause system problems. The system is easy to troubleshoot if an organized approach to evaluate the system is taken. - Page 67 Confirming physical installation is correct All of the hardware components need to be installed properly. Review the installation instructions and verify components are installed properly at the correct location. This is easily done when the wiring is checked. Verifying mechanical components Verifying all TSI components are operating correctly requires following a simple procedure.
-
Page 68: Diagnostics Menu
0 VDC displayed equals zero flow. 10 VDC displayed equals maximum flow. NOTE: FHM10 monitors and FHC50 controllers can be field configured so 5 VDC displayed equals maximum flow. Part Two... - Page 69 Menu Item Description Show Flow SHOW FLOW The SHOW FLOW INPUT item is used to display the current measured or calculated rate of the fume hood exhaust flow in cfm, l/s or m /hr. NOTE: If flow does not match actual readings, recalibrate flow. Analog Output ANALOG OUT The ANALOG OUT item varies the analog output from the unit.
- Page 70 Menu Item Description Setback Input IN# NIGHT SETB The IN# NIGHT SETB item reads the current state of a setback contact input. This item will only be displayed when the corresponding INPUT SEL # item has been set to NIGHT SETB under the CONFIGURE menu. When this item is entered, the display will indicate either OPEN or CLOSED.
-
Page 71: Troubleshooting Chart
Troubleshooting Chart Symptom Possible Cause Corrective Action Display is blank. Fuse is blown. Measure voltage at pins 1 and 2 on DIM 4-pin connector. The voltage should nominally be: 24 to 40 VDC when using TSI electric actuators. 24 to 30 VAC when using motor speed drives. If correct voltage is measured, internal DIM fuse is probably blown. - Page 72 Troubleshooting Chart Symptom Possible Cause Corrective Action Menu soft key DISPL Press left and right quick- not displayed. SOFTKEYS set keys and right-most soft key to OFF. simultaneously to gain access to menu system. Set DISPL SOFTKEYS item in CONFIGURE menu to ON. Need to display Select SELF TEST item in model number...
- Page 73 Troubleshooting Chart Symptom Possible Cause Corrective Action Controller is not Bad actuator or Go into DIAGNOSTICS menu, CONTROL OUT item. A controlling. valve (damper or number between 0% OPEN and 100% OPEN will be displayed. Pressing the key increases the number. (continued) valve linkage Pressing the ...
- Page 74 Troubleshooting Chart Symptom Possible Cause Corrective Action “Check the Poor sensor Verify the sensor cable is correctly plugged into the DIM Sensor Cable” connections. and sensor. Connector is polarized but can be forced on flashing on backwards. display. Defective sensor. Disconnect the velocity sensor cable from the back of DIM.
- Page 75 SELECT key. Selecting GO UNCONFIG will reset the FHC50’s authentication key, allowing the SERVICE PIN ® to install or reclaim the FHC50 to the LonWorks network. Alarm relays do Alarms are Enter the Set Points menu. Verify that the alarm that is not work.
- Page 76 If speed is too slow see steady velocity. manual section: Optimizing Controller Performance adjust accordingly to eliminate problem. Displayed Exhaust system Turn DIM to emergency if using a Model FHC50 velocity wildly unstable. controller. If velocity stabilizes, exhaust system is not fluctuating. unstable. Laboratory Check location of supply air diffusers.
- Page 77 “LON Release control at BMS to clear. OVERRIDE ON” Communications on the display have taken control of FHC50. WARNING: Adequate face velocity may not be maintained while LON overrides the control signal. “EMERGENCY” Unit put into Verify chemical spill or other reason on the display.
- Page 78 Troubleshooting Chart Symptom Possible Cause Corrective Action Error message Internal error in Clear error using Self_Test item in DIAGNOSTICS menu. on display. monitor or If error recurs, return unit to factory. controller. Error messages: ADC Read Error Interrupt Fail Error ...
-
Page 79: Specifications
Appendix A Specifications* Digital Interface Module Display Range ........0 to 1,000 ft/min (0 to 5.08 m/s) 0 to 10,000 cfm (0 to 4,720 l/s, 0 to 16,990 m /hr) Resolution ......... 1 ft/min (0.01 m/s) 1 cfm (1 l/s, 1 m /hr) Inputs Type ........... - Page 80 Velocity Sensor Range ........0 to 1,000 ft/min (0 to 5.08 m/s) Resolution ........1 ft/min (0.00508 m/s) Temperature Compensation Range ........55 to 95°F Power Dissipation ...... 0.09 watts at 0 ft/min. (0 m/s) 0.14 watts at 100 ft/min. (0.508 m/s) 2.75 in.
-
Page 81: Network Communications
Skipping numbers in the sequence will not cause any communication problems. If a variable is not used by the particular FHC50 configuration, it will be reported with a value of -1. All variables are outputted in English units: ft/min, and cfm. If the DDC system is to display different units, the DDC system needs to make the conversion. - Page 82 Modbus Communications (continued) FHC50 Variable List Holding Register Read / Feature (Decimal) Range Unit Write Notes Face Velocity 40001 0 to 1000 Current Face 40002 0 to 1000 Velocity Setpoint Flow Rate 40003 0 to 10000 Current Flow Rate 40004...
- Page 83 Modbus Communications (continued) Holding Register Read / Feature (Decimal) Range Unit Write Notes Normal Low Flow 40031 0 to 10000 Alarm Setpoint Normal High Flow 40032 0 to 10000 Alarm Setpoint Setback Low Flow 40033 0 to 10000 Alarm Setpoint Setback High Flow 40034 0 to 10000...
- Page 84 Modbus Communications (continued) Holding Register Read / Feature (Decimal) Range Unit Write Notes Not used on Not Used 40052 standard configuration. Not used on Not Used 40053 standard configuration. 0: Velocity Sidewall Sensor 1: Face Velocity Sash Position Setback Control 2: Velocity 40054 0, 1...
-
Page 85: N2 Communications Description Of Variables
Address of the desired point. Address Change of Status The FHC50 has the ability to change control set points locally. The alarm set points need to be based on the controllers control set point (AI #2). The unit can (COS) - Face Velocity be changed from Normal Mode to Setback Mode. -
Page 86: Variable Map
Supported Commands Command Response Request Device ID Returns 0x10 Synchronize Time Command Acknowledged. There is no internal clock to synchronize. Poll without/With Ack Message Any change of status is returned Read Analog Input Command Variable value Read Binary Input Command Variable value Read Analog Output Command Variable Value... - Page 87 Feature Unit cfm or L/s Setback High Flow Alarm Setpoint Setback Damper Position Setpoint High Sash Position Alarm Setpoint 0: English Units (fpm, cfm) 1: Metric Units (m/s, m Units Value 2: Metric Units (m/s, l/s) 0: Inactive Low Velocity Alarm Status 1: Active 0: Inactive High Velocity Alarm Status...
-
Page 88: Lonworks Object
® LonWorks Object Node Object Network Variables SNVT Description SNVT Name SNVT Type Number nviRequest SNVT_obj_request nviSetTime SNVT_time_stamp nvoStatus SNVT_obj_status nvoAlarm SNVT_alarm AL_LOW_LMT_1 Low Face Velocity Alarm AL_HIGH_LMT_1 High Face Velocity Alarm AL_LOW_LMT_2 Low Exhaust Flow Alarm AL_HIGH_LMT_2 High Exhaust Flow Alarm AL_ALM_CONDITION Sash Alarm Fume Hood Controller Object Network Variables... - Page 89 SNVT Description SNVT Name SNVT Type Number Setback Face Velocity Setpoint nvoSetbFVSetp SNVT_speed_mil Normal Low Face Velocity Alarm nvoNormLoFVAlmSetp SNVT_speed_mil Setpoint Normal High Face Velocity Alarm nvoNormHiFVAlmSetp SNVT_speed_mil Setpoint Setback Low Face Velocity Alarm nvoSbLoFVAlmSetp SNVT_speed_mil Setpoint Setback High Face Velocity Alarm nvoSbHiFVAlmSetp SNVT_speed_mil Setpoint...
-
Page 90: Description Of Lon Snvts
Description of LON SNVTs SNVT Command Supported Action nviEmergency: EMERG_NORMAL Sets NORMAL mode EMERG_PURGE Sets EMERGENCY mode NOTE: All other commands set NORMAL mode SNVT Command Supported Action nviControlMode: OC_OCCUPIED Sets NORMAL mode OC_STANDBY Sets SETBACK mode OC_UNOCCUPIED Sets SETBACK mode NOTE: All other commands set NORMAL mode SNVT Command Supported... -
Page 91: Fhc50 Bacnet Ms/Tp Protocol Implementation Conformance Statement
MS/TP Protocol Implementation Conformance Statement Date: April 7, 2010 Vendor Name: TSI Inc. Product Name: Fume Hood Controller Product Model Number: FHC50-BAC Applications Software Version: 1.0 Firmware Revision: 1.0 BACnet Protocol Revision: 2 Product Description: TSI's Fume Hood Fume Hood Controller provides a closed-loop VAV control system for proper lab hood containment. - Page 92 Standard Object Types Supported: Optional Writable Dynamically Dynamically Properties Properties (Data Createable Deletable Supported Type) Analog Input Analog Value Present_Value (Real) Active_Text, Binary Input Inactive_Text Active_Text, Present_Value Binary Value Inactive_Text (Enumerated) Multi-state Input State_Text State_Text Present_Value Multi-state Value (Unsigned Int) Object Name Device Object (Char String)
-
Page 93: Bacnet Ms/Tp Object Set
® BACnet MS/TP Object Set Object Device Read/ Feature Type Instance Units Range Write Notes 0 to 1000 Analog Face Velocity Input 0 to 5.08 0 to 10000 Analog Flow Rate 0 to 16990 Input 0 to 4719 Damper or Valve Analog 0 to 100 Position... - Page 94 Object Device Read/ Feature Type Instance Units Range Write Notes 0 to 10000 Setback Low Analog Flow Alarm 0 to 16990 Value Setpoint 0 to 4719 0 to 10000 Setback High Analog Flow Alarm 0 to 16990 Value Setpoint 0 to 4719 Min.
- Page 95 Object Device Read/ Feature Type Instance Units Range Write Notes 1: Exit Emergency Mode Emergency Mode Multi-State 2: Enter 1; 2; 3 Emergency Mode 3: Normal 1: Exit Setback Mode Setback Mode Multi-State 2: Enter Setback 1; 2; 3 Mode 3: Normal 1: fpm and cfm Units Value...
- Page 96 (This page intentionally left blank) Appendix B...
-
Page 97: Wiring Information
Appendix C Wiring Information Back Panel Wiring Input/Output/ PIN # Description Communication 1, 2 Input 24 VAC to power Digital Interface Module (DIM). 3, 4 Output 0 to 10 VDC fume hood exhaust control signal. See menu item CONTROL SIG Not used on fume hood monitor. - Page 98 Figure 7: Wiring Diagram—Model FHC50-01 Controller Appendix C...
- Page 99 Figure 8: Wiring Diagram—Model FHC50-02 Controller Wiring Information...
- Page 100 Figure 9: Wiring Diagram—Model FHC50-03 Controller Appendix C...
- Page 101 Figure 10: Wiring Diagram—Model FHC50-04 Controller Wiring Information...
- Page 102 Figure 11: Model FHM10-01 Monitor Wiring Appendix C...
- Page 103 Figure 12: Model FHM10-02 Monitor Wiring Wiring Information...
- Page 104 (This page intentionally left blank) Appendix C...
-
Page 105: Access Codes / Password
Appendix D Access Codes / Password The Model FHM10 Fume Hood Monitor and FHC50 Fume Hood Controller may prompt the user to enter an access code to enter the menu system. The access code screen is shown below in Figure 13. To enter the access code, use the: ... - Page 106 (This page intentionally left blank) Appendix C...
- Page 107 TSI Incorporated – Visit our website www.tsi.com for more information. Tel: +1 800 874 2811 India Tel: +91 80 67877200 Tel: +44 149 4 459200 China Tel: +86 10 8219 7688 France Tel: +33 1 41 19 21 99 Singapore Tel: +65 6595 6388 Germany Tel: +49 241 523030...
Need help?
Do you have a question about the FHC50 and is the answer not in the manual?
Questions and answers