
Related Manuals for Viessmann Commander 5300


Summary of Contents for Viessmann Commander 5300
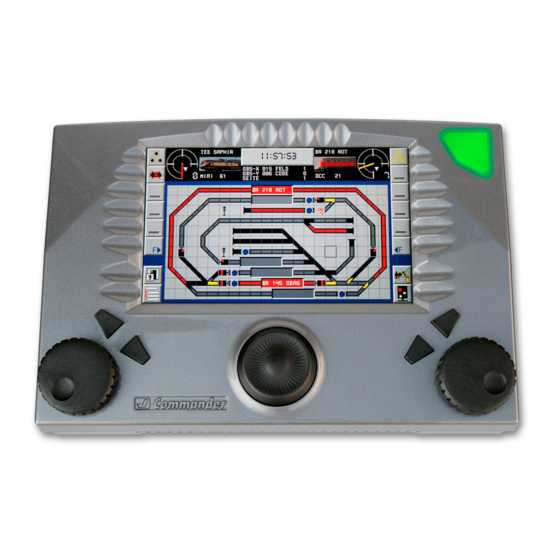
- Page 1 Commander Reference Manual 5300 Commander Reference Manual Commander Reference Manual version 1.0 from 2009-12-03, page 1...
-
Page 2: Automatic Operation Shuttle Train
Lenz Elektronik GmbH, Gießen (Germany). All other trade marks are ownership of the respective owner of the legal rights. Any copy or reproduction of this documentation is only allowed on the prior written authority of Viessmann. Commander Reference Manual version 1.0 from 2009-12-03, page 2... -
Page 3: Table Of Contents
Commander Reference Manual Table of Content 1.0.1 Multifunction Button Switching on – Switching off 1.0.2 Multifunction ButtonEmergency Stop Functions 1.1.1.1 Running a train Control panels 1.1.1.2 Running a train Selection of a locomotive 1.1.1.3 Running a train Control of a locomotive 1.1.1.4 Running a train Additional functions of a locomotive 1.1.1.5... - Page 4 Commander Reference Manual 2.4.6 Route Editor Index Card 5 – switching track function 2.4.7 Route Editor Index Card 6 – destination contacts 2.4.8 Route Editor Index Card 7 – cancellation commands 2.4.9 Route Editor Index Card 8 – safety matrix 2.4.10 Route Editor Index Card 9 –...
-
Page 5: Multifunction Button Switching On - Switching Off
Commander Reference Manual 1.0.1 Multifunction Button Switching on – Switching off Introduction The illuminated multifunctional pushbutton on the Light Button Description top right of the Commander serves as on / off and emergency stop key. Device is off You switch the Commander on and off by this illu- minated pushbutton. -
Page 6: Multifunction Buttonemergency Stop Functions
Commander Reference Manual 1.0.2 Multifunction Button Emergency Stop Functions Emergency Stop functions The Commander is equipped with stepwise wor- king emergency stop functions to stop all trains on your layout immediately. You can activate the different emergency stop func- tions via the multifunctional button. You‘ll find the description of procedure and functions below. -
Page 7: Running A Train Control Panels
Commander Reference Manual 1.1.1.1 Running a train Control panels Introduction The control panels guarantee a comfortable con- Emergency Stop trol of your locomotives. The ergonomic arrange- If you want to stop a single actually cont- ment enables you to operate and control your loco- rolled locomotive immediately, just press the motives ambidextrously. -
Page 8: Running A Train Selection Of A Locomotive
Commander Reference Manual 1.1.1.2 Running a train Selection of a locomotive Introduction The Commander has an integrated database with 1000 locomotive-data records. Each record con- Scroll through tains details about the locomotive address, de- lists and data- scription/design series among other information base. -
Page 9: Running A Train Control Of A Locomotive
Commander Reference Manual 1.1.1.3 Running a train Control of a locomotive Introduction The speed control knobs of the Commander are Notice: equipped with an intelligent function which enables you to comfortably control locomotives even with A locomotive controlled by a control panel 128 speed steps. -
Page 10: Running A Train Additional Functions Of A Locomotive
Commander Reference Manual 1.1.1.4 Running a train Additional functions of a locomotive Introduction Additional functions of a locomotive are all those Priority-function keys functions which are not directly connected with the The five priority- function keys are always traction motor control. displayed on the control panel and thus im- You can dispose of different additional functions mediately accessible. -
Page 11: Running A Train Multiple-Unit Running (Multiple Heading)
Commander Reference Manual 1.1.1.5 Running a train Multiple-unit running (multiple heading) Introduction The Commander is equipped for the multiple hea- Multiple heading editor ding-function. The traction of the train is accomplis- hed by several coupled locomotives then, e.g. in The set up of a multiple-unit running is exe- case of heavy traffic. - Page 12 Commander Reference Manual Procedure ► Assign the first engine determined for the multi- ple heading to one of the two control panels. ► Push the touch field “multiple heading” in the menu “additional functions” (see the previous framed field). You are now in the multiple hea- ding editor.
-
Page 13: Switching Devices Turnouts And Signals
Commander Reference Manual 1.1.2.1 Switching Devices Turnouts and Signals Introduction Procedure ► Touch the symbol of the functional model (turn- The track diagram offers you a most comfortable possibility of switching turnouts and signals. Two out or signal) you want to switch on the track operations must be carried out to have a direct ac- diagram. -
Page 14: Switching Devices Uncoupling Rails
Commander Reference Manual 1.1.2.2 Switching Devices Uncoupling rails Introduction With the Commander you can also comfortably Impulse excitation time control uncoupling rails directly on the track dia- of the uncoupling device gram. To avoid switching by an accidental touch on the other side, you have to execute two operations: Most of the uncoupling devices have sole- noid drives. -
Page 15: Switching Devices Accessories
Commander Reference Manual 1.1.2.3 Switching Devices Accessories Introduction Accessories like lamps, lanterns, house-lighting or How to connect moving figurines can also be controlled easily by the accessories the track diagram of the Commander. You have to to the switching carry out two operations in order to avoid errors by decoder an accidental touch and to have immediate access All accessories... - Page 16 Commander Reference Manual Commander Reference Manual version 1.0 from 2009-12-03, page 16 1.1.2.4...
-
Page 17: Switching Switching Routes Manually
Commander Reference Manual 1.1.2.5 Switching Switching routes manually Introduction You can not only control single articles (locomo- Route editor tives, turnouts, signals, accessories….) with the Commander. The feature “route control” enables The formation and programming of routes in you to call up series of articles on the track diagram the route editor is the precondition for the ex- by tipping on few touch fields and to exploit routes ploitation of routes. - Page 18 Commander Reference Manual ► Push the “start” key. The Commander carries out the switching com- The corresponding field on the track diagram mands for the route. If the route includes details will indicate an “S”, visualizing that it has been concerning destination feedback modules and run- chosen as starting point for a route.
-
Page 19: Automatic Operation Basics
Commander Reference Manual 1.1.3 Automatic Operation Basics Introduction With the Commander you can control layouts of Tip: any size automatically either time controlled or de- The Commander must have all information pending on events (incidents/actions). The automa- concerning your layout as basis for the auto- tic operation (fully,-semi-) covers running of trains, matic operating mode. - Page 20 Commander Reference Manual 1.1.3 Automatic Operation Basics Procedure You can start the automatic operating mode if all necessary conditions are accomplished. Emplacement of the locomotives to their starting position Emplace hand controlled all trains to their intended starting positions and enter them in the respective train identification fields (ZNR-fields).
-
Page 21: Automatic Operation Block Sections
Commander Reference Manual 1.1.3.1 Automatic Operation Block sections Introduction Block sections, also called train sequence sections, The following example divides an oval journey are part of the train protection system. They ensure route in three blocks. This implies that two trains at a secure running on the main lines. - Page 22 Commander Reference Manual Parameters of the first route: Card Field Value Explanation / Comment Route number Block 1 ► Block 2 Comment Mode fully automatic activation contact 1 RM 1 RM = feedback module activation contact 2 respect contacts 1 RM 2 RM = feedback module command 1...
-
Page 23: Automatic Operation Block Sections (2)
Commander Reference Manual 1.1.3.1 Automatic Operation Block sections (2) Explanation The preceding example demonstrates the ope- a running section and a short stop section (approx. rating principle of a block section. In reality such 2 locomotive lengths) in front of the signal. This en- a section is also equipped with signals ensuring sures that the trains don’t stop at the moment they the entry into a block respectively turnouts cutting... - Page 24 Commander Reference Manual Card Field Value Explanation / Comment cancellation command 1 Zug-ID wstop Stop! keep direction of travel cancellation command 2 Signal 1 to red lock entry to the actual block safety matrix pos. 1 route 2 ensures the correct order safety matrix pos.
-
Page 25: Automatic Operation Shuttle Train
Commander Reference Manual 1.1.3.2 Automatic Operation Shuttle train (1) Introduction The next pages show you various examples of The illustration shows the corresponding track dia- shuttle train service. gram visualized on the display of the Commander. ► simple shuttle train service with one train The first route switches the journey route from the ►... - Page 26 Commander Reference Manual Parameters of the first route: Card Field Value Explanation / Comment Route number departure left ► entry right Comment Mode fully automatic activation contact 1 RM 1 RM = feedback module activation contact 2 RM 2 respect contacts 1 RM 3 respect contacts 2 RM 4...
- Page 27 Commander Reference Manual 1.1.3.2 Automatic Operation Shuttle train (2) Description The example of “shuttle train service with two al- This operation needs four routes. Two routes are set up for each direction of travel. The first route ternating trains” shows you how to automate e.g. a controls the journey from the first departure track secondary line with two alternating trains.
- Page 28 Commander Reference Manual Card Field Value Explanation / Comment destination contact 1 RM 8 destination contact 2 cancellation command 1 signal 13 to red cancellation command 2 Zug-ID ustop reverses direction of travel cancellation command 3 lock route 2 for 10 seconds locks journey back for 10 sec.
- Page 29 Commander Reference Manual Parameters of the third route: Card Field Value Explanation / Comment Route number exit track 2 HBF ► Comment entry secondary line terminus Mode fully automatic activation contact 1 RM 1 RM = feedback module activation contact 2 RM 2 respect contacts 1 RM 5...
- Page 30 Commander Reference Manual Card Field Value Explanation / Comment switching track function 1 RM 5 switching track function 2 Zug-ID wmini switching track function 3 RM 1 switching track function 4 Zug-ID wstop destination contact 1 RM 1 destination contact 2 cancellation command 1 signal 11 to red cancellation command 2...
- Page 31 Commander Reference Manual 1.1.3.2 Automatic Operation Shuttle train (3) Description This example shows the installation of a shuttle journey to the corresponding terminal station. The train service with an intermediate station. The inter- return journey of both trains to the respective de- mediate station with two tracks makes the meeting parture station is executed in the reverse order.
- Page 32 Commander Reference Manual Card Field Value Explanation / Comment destination contact 1 RM 5 destination contact 2 cancellation command 1 signal 11 to red cancellation command 2 lock route 2 for 10 seconds stopping time at the platform safety matrix pos. 1 route 4 lock route to the opposite direction...
- Page 33 Commander Reference Manual Parameters of the third route: Card Field Value Explanation / Comment Route number exit station 3 ► entry station 2 Comment lower track Mode fully automatic activation contact 1 RM 10 RM = feedback module activation contact 2 RM 9 respect contacts 1 RM 6...
- Page 34 Commander Reference Manual Card Field Value Explanation / Comment destination contact 1 RM 1 destination contact 2 cancellation command 1 signal 13 to red cancellation command 2 lock route 1 for 10 seconds locks journey back for 10 sec. safety matrix pos. 1 route 1 protection against activation of both directions simultaneously...
-
Page 35: Automatic Operation Shadow Station Control
Commander Reference Manual 1.1.3.3 Automatic Operation Shadow station control Description The example of “shadow station control” shows the In case you want to have more than the five descri- principle control structure of a shadow station with bed tracks, the expansion is easy to realize. Each several tracks. - Page 36 Commander Reference Manual Parameters of the second route: Card Field Value Explanation / Comment Route number ESig ► shadow station track 2 Comment Mode fully automatic activation contact 1 RM 1 RM = feedback module activation contact 2 respect contacts 1 RM 2 respect contacts 2 RM 4...
- Page 37 Commander Reference Manual Card Field Value Explanation / Comment switching track function 1 RM 12 switching track function 2 Zug-ID wstop destination contact 1 RM 12 destination contact 2 cancellation command 1 signal 11 to red cancellation command 2 lock route 8 for 10 seconds lock exit for 10 seconds Lock other entries safety matrix pos.
- Page 38 Commander Reference Manual Parameters of the fifth route: Card Field Value Explanation / Comment Route number ESig ► shadow station track 5 Comment Mode fully automatic activation contact 1 RM 1 RM = feedback module activation contact 2 respect contacts 1 RM 2 respect contacts 2 RM 7...
- Page 39 Commander Reference Manual Card Field Value Explanation / Comment Lock entry to the track at the safety matrix pos. 1 route 1 same time Lock other simultaneous safety matrix pos. 2 route 7 safety matrix pos. 3 route 8 departures... safety matrix pos.
- Page 40 Commander Reference Manual Parameters of the eighth route: Card Field Value Explanation / Comment Route number shadow station track 3 ► ASig Comment Mode fully automatic activation contact 1 RM 12 RM = feedback module activation contact 2 respect contacts 1 RM 15 respect contacts 2 RM 16...
- Page 41 Commander Reference Manual Parameters of the ninth route: Card Field Value Explanation / Comment Route number shadow station track 4 ► ASig Comment Mode fully automatic activation contact 1 RM 13 RM = feedback module activation contact 2 respect contacts 1 RM 15 respect contacts 2 RM 16...
- Page 42 Commander Reference Manual Card Field Value Explanation / Comment switching track function 1 RM 18 switching track function 2 Zug-ID wstop destination contact 1 RM 18 destination contact 2 cancellation command 1 signal 21 to red Lock entry to the track at the safety matrix pos.
-
Page 43: Displaying Modes Of The Commander Locomotive Mode
Commander Reference Manual 1.2.1 Displaying modes of the Commander Locomotive mode General remarks The Commander can display four different opera- Changing the displaying mode ting modes which will be explained in this chapter. You call up the menu “displaying modes” You can control the different operations individu- by the key “displaying options”... -
Page 44: Displaying Modes Of The Commander Locomotive And Track Diagram Mode
Commander Reference Manual 1.2.2 Displaying modes of the Commander Locomotive and track diagram mode Mode « locomotives and track diagram » Changing the displaying mode You can control locos, turnouts and signals as well You call up the menu “displaying modes” as routes by this combined operating mode. -
Page 45: Displaying Modes Of The Commander Track Diagram Mode
Commander Reference Manual 1.2.3 Displaying modes of the Commander Track diagram mode Mode « track diagram » The track diagram mode displays the track dia- Changing the displaying mode gram on the maximum possible screen area. The track diagram is composed out of quadrangular You call up the menu “displaying modes”... -
Page 46: Displaying Modes Of The Commander Direct Mode
Commander Reference Manual 1.2.4 Displaying modes of the Commander Direct mode Direct mode This mode imitates the keyboard of classic digital Changing the displaying mode command stations. By a simply tipping you have di- You call up the menu “displaying modes” rect access to turnout and signal addresses. -
Page 47: Displaying Modes Of The Commander Route Indication
Commander Reference Manual 1.2.5 Displaying modes of the Commander Route indication Route indication This displaying mode ensures the observation of Changing the displaying mode the fully automatic operating mode. The Comman- You call up the menu “displaying modes” der display shows you a synoptic chart of all activa- by the key “displaying options”... -
Page 48: Displaying Modes Of The Commander Zoom Function
Commander Reference Manual 1.2.6 Displaying modes of the Commander Zoom function Overview Procedure ► Touch the zoom-menu touch field at the bottom You can enlarge every one of the three track dia- grams in different zoom steps. The zoom menu of- left. -
Page 49: Operating Modes Overview
Commander Reference Manual 1.3.1 Operating modes Overview Introduction Important tip: All editors are blocked in case that you ex- The Commander allows you to control the whole ploit an automatically operating mode. range of operations on a layout easily and comfor- tably. -
Page 50: Operating Modes Application Of The Operating Modes
Commander Reference Manual 1.3.2 Operating modes Application of the operating modes Introduction The selection of the operating mode is executed in the menu “operating modes” by a tipping on the respective touch field. The corresponding activa- ted symbol is represented on the main display of the Commander and signalizes the actually chosen operating mode. -
Page 51: Locomotive Editor Overview
Commander Reference Manual Locomotive Editor Overview Introduction Locomotive specifications The Commander saves all locomotive specifica- This editor enables you to administer your locos with the database of the Commander. You have tions in its database. A great part of the adjust- 1000 loco data records at your disposal. - Page 52 Commander Reference Manual Locomotive Editor Overview ► Choose the respective function “CV” The illustration down below shows you an overview of the fields displayed in the locomotive editor (in- (programming track) or “POM” (main track). dex card 1). The adjustment options offered by the different in- dex cards of the locomotive editor are explained in Calling up the editor the next chapters.
-
Page 53: Locomotive Editor Index Card 1 - Picture And Name
Commander Reference Manual 2.1.1 Locomotive Editor Index Card 1 ‒ picture and name Overview This index card enables you to adjust the following features: Function Adjustment Options Memory Available for digital format Mot. old / Mot. new / DCC C / D Mot. - Page 54 Commander Reference Manual ► Select the field you want to edit. Adjustment of the address A keyboard with character- fields pops up and (Motorola by DIP-switches): the chosen editing field is illuminated red. The address of older locomotive decoder in the ►...
-
Page 55: Locomotive Editor Index Card 2 - Additional Functions
Commander Reference Manual 2.1.2 Locomotive Editor Index Card 2 ‒ Additional functions Overview This index card enables you to adjust the following features: Function Adjustment Options Memory Available for additional functions from the list (s. affix) Setting of function keys C / D Mot. - Page 56 Commander Reference Manual Procedure Assignment to the additional function keys: Please note: ► Press the desired additional function key (F01 – The selection list of the additional func- F12). The key will begin to twinkle. tions shows you the symbols of all functions that are principally possible.
-
Page 57: Locomotive Editor Index Card 3 - Driving Behaviour
Commander Reference Manual 2.1.3 Locomotive Editor Index Card 3 ‒ Driving behaviour Overview This index card is only available for DCC and enables you to adjust the following features: Function Adjustment Options Memory Available for Starting voltage (CV 2) 1 - 255 C / D Acceleration (CV 3) 1 - 255... -
Page 58: Locomotive Editor Index Card 4 - Decoder Setup
Commander Reference Manual 2.1.4 Locomotive Editor Index Card 4 ‒ decoder setup Overview This index card is only available in DCC and will enable you to adjust the following features: Function Adjustment Options Memory Available for Direction of running (CV 29) normal / inverted C / D Speed steps (CV 29) -
Page 59: Locomotive Editor Index Card 5 - Speed Step Ramp
Commander Reference Manual 2.1.5 Locomotive Editor Index Card 5 ‒ speed step ramp Introduction This index card is only available when operating in Alternatively: ► Select a column using the two arrow keys below the DCC digital format and enables you to adjust a specific speed step ramp for each loco separately. -
Page 60: Locomotive Editor Index Card 6 - Cv Programming
Commander Reference Manual 2.1.6 Locomotive Editor Index Card 6 ‒ CV programming Introduction Caution: Never execute modifications of the configu- This index card is only available when operating in ration variables (CV) when you are not ac- the DCC digital format and will enable you to adjust quainted with the subject in detail. -
Page 61: Locomotive Editor Index Card 7 - Speed Step Preselection
Commander Reference Manual 2.1.7 Locomotive Editor Index Card 7 ‒ speed step preselection Overview This index card enables you to adjust the following features: Function Adjustment Options Memory Available for Speed „MINI“ Running Speed Mot. / DCC Speed „NORM“ Running Speed Mot. - Page 62 Commander Reference Manual ► Execute the same procedure with the other Adjustment of the speeds speed steps. without a locomotive: Trial run of the speed step: The data of this index card are only memo- ► Put the respective locomotive on the program- rised in the Commander.
-
Page 63: Locomotive Editor Index Card 8 - Locomotive List
Commander Reference Manual 2.1.8 Locomotive Editor Index Card 8 ‒ locomotive list Introduction Specific data record selected from the data base and touch fields for adding it to the loco- The index card “edit locomotive list” enables you motive list or deleting it from the list. to organize the locomotives in the data base of the Commander. - Page 64 Commander Reference Manual Addition the locomotive to the list: ► Push the arrow pointing to the left in order to Touch fields: add the locomotive. The locomotive will be in- Add to locomotive list serted below the red marker. Deletion of the locomotive from the list (parking): Parking: delete from the loco-list ►...
-
Page 65: Turnout- And Signal Editor Overview
Commander Reference Manual 2.2.1 Turnout- and Signal Editor Overview Introduction The turnout- and signal editor enables you to con- diagrams in chapter 2.5 of the reference manual or figure turnouts, signals and other accessories of in the short instruction from page 25 on. your layout. -
Page 66: Turnout- And Signal Editor Adjustments
► LSB faded out. You only need the “LSB”-format when connecting a Tip: three-way turnouts and decoder to the Viessmann SpeedBus. The control signals with several aspects commands will be transmitted in the quick Speed- Bus-format to the decoder then. -
Page 67: Feedback Overview
The Commander can receive feedback infor- Direct mode: mation by the s88-Bus and the Viessmann SpeedBus. In this displaying mode the feed back information is indicated by red or green illuminated fields on the... -
Page 68: Feedback Assignment Of Addresses
Feedback by LSB The Commander can exploit every commercial s88 You can connect LSB, ExpressNet and Roconet feedback module (e. g. Viessmann 5217 and 5233) feedback modules to the SpeedBus. You cannot only transmit simple feedback information but also further ones (e.g. locomotive address, RailCom) Please note: when using the SpeedBus. -
Page 69: Feedback Editor Real And Virtual Feedback Decoder
Commander Reference Manual 2.3.3 Feedback Editor Real and virtual feedback decoder General comment ► Define for each feedback section separately if it The feedback editor enables you to set up the is used as impulse contact. Push the touch field feedback modules and to enter the feedback sec- “NOM”... -
Page 70: Feedback Editor Allocation Of Track Sections
Commander Reference Manual 2.3.4 Feedback Editor Allocation of track sections General comment ► Press the touch field “fade out feedback deco- You can enter an illumination for each feedback contact to the track diagram. The illuminated part der”. can contain and illuminate up to 45 track diagram fields. -
Page 71: Route Editor Overview
Commander Reference Manual 2.4.1 Route Editor Overview Introduction The Commander is equipped with an integrated introduction of light signals and automatic blocks and comprehensive automatic operating function. offers the possibility of free running on a route on Thus you can exploit block sections and shuttle principle. - Page 72 Commander Reference Manual Call up the menu “route editor” by pressing the sys- normal and maximum speed) for each locomotive tem- touch field (left down below). separately in this data base. Only one operation can be active at the same time, Slightly push the respective symbol next to the la- either “switch route”...
-
Page 73: Route Editor Index Card 1 And 1A
Commander Reference Manual 2.4.2 Route Editor Index Card 1 and 1a Application This index card enables you to administer a route. Those options concern the operating modes of the Commander. You will find more detailed information You determine number and name of the route in in chapter 1.3 “Operating modes”. - Page 74 Commander Reference Manual Procedure: ► Enter the route number and the explanatory Start- and destination buttons: comment using the alphanumeric screen key- The blue buttons in the track plans are desi- board. For the input of the route number you will gned for the manual call up of routes.
-
Page 75: Route Editor Index Card 2 - Calling Up
Commander Reference Manual 2.4.3 Route Editor Index Card 2 – Calling up Application You can call up and exploit routes manually or au- The setting up of the route is effected on the track tomatically. The automatic calling up is effected diagrams. - Page 76 Commander Reference Manual Procedure Leaf through to index card 2. The calling up area Feedback information: Occupied or free “call up route” consists of three sections. You can enter one or two feedback sections in the two sec- The Commander can exploit both feedback information (occupied, free) in order to call tions above.
-
Page 77: Route Editor Index Card 3 - Feedback
Commander Reference Manual 2.4.4 Route Editor Index Card 3 – feedback Application Procedure Leaf through to index card 3. The calling up area The Commander must know which feedback sec- “respect feedback” consists of several sections in tions are assigned to a route in order to ensure route protection on your layout. - Page 78 Commander Reference Manual Deletion of feedback modules: ► Push the touch field of the feedback module from which you want to delete the input It will be illuminated red. ► Then push the “delete”-key. The input of this specific field will be deleted. Commander Reference Manual version 1.0 from 2009-12-03, page 78 2.4.4...
-
Page 79: Route Editor Index Card 4 - Commands
Commander Reference Manual 2.4.5 Route Editor Index Card 4 – Commands Application Besides the turnouts of the direct communication track, switches and signals ensuring the flank pro- You enter all commands that are necessary for the tection are also switched in the correspondingly operations on the route in the index card “control- correct position. - Page 80 Commander Reference Manual indicates the adjusted command. On its left The loco control command is valid for the hand side the selection field shows the type of loco represented on the train identifica- tion field. The indication “LOK ZUG-ID” command (e.g. turnout, signal, loco, waiting pe- riod).
-
Page 81: Route Editor Index Card 5 - Switching Track Function
Commander Reference Manual 2.4.6 Route Editor Index Card 5 – switching track function Application Procedure The index card 5 enables you to assign switching The editing procedure for the input of feedback track functions to special feedback sections. The modules is nearly same as for the previous index Commander carries out a specific function when a cards. - Page 82 Commander Reference Manual Assignment to the feedback modules: Please note: ► Touch the track symbol on the left hand side A command assigned to a switching track function always consists of two parts! Always of the comment area associated with the com- enter: mand.
-
Page 83: Route Editor Index Card 6 - Destination Contacts
Commander Reference Manual 2.4.7 Route Editor Index Card 6 – destination contacts Application ► Touch the track symbol on the left hand side of Each route needs a starting- and a destination point. This index card enables you to define the de- the comment area associated with the feedback stination contacts, the end of the route. - Page 84 Commander Reference Manual Feedback information: Occupied or free The Commander can exploit both feedback information (occupied, free) in order to call up or cancel routes. The touch field area on the right shows you two optional keys for the two feedback infor- mation: Red = occupied.
-
Page 85: Route Editor Index Card 7 - Cancellation Commands
Commander Reference Manual 2.4.8 Route Editor Index Card 7 – cancellation commands Application This index card enables you to edit the cancellation commands) by means of the switching track commands for a route. When the train has finished function, though (see chapter 2.4.7). A typical lo- its journey on the communication track the respec- comotive command at the end of a route is for ex- tive route must be cancelled in order to open the... - Page 86 Commander Reference Manual Push the key “menu”. The index card 7 will open up Route locking commands: again. The respective switching command will be shown in the field “command” now. The selection You can lock other routes for a certain time while field to its left indicates the command type ( e.
-
Page 87: Route Editor Index Card 8 - Safety Matrix
Commander Reference Manual 2.4.9 Route Editor Index Card 8 – safety matrix Application Procedure For safety reasons some routes cannot be swit- Automatic locking: ched at the same time (e.g. exit tracks running pa- ► Push the “MTX ABGL”- key. The commander in- rallel in the station and leading to the same main track). - Page 88 Commander Reference Manual Commander Reference Manual version 1.0 from 2009-12-03, page 88 2.4.9...
-
Page 89: Route Editor Index Card 9 - Illumination
Commander Reference Manual 2.4.10 Route Editor Index Card 9 – Illumination Application The Commander can visualize requested and swit- switching it on or off by means of the two touch fields to the right. ched routes by illuminating the respective track sections yellow. - Page 90 Commander Reference Manual Commander Reference Manual version 1.0 from 2009-12-03, page 90 2.4.10...
-
Page 91: Track Diagram Editor Overview And Procedure
Commander Reference Manual 2.5.1 Track Diagram Editor Overview and procedure Introduction The track diagram editor enables you to draw or Please note : modify track diagrams. You can draw up and save Track diagrams can only be edited if the three different track diagrams. - Page 92 Commander Reference Manual How to edit track diagrams: Interconnection of track diagrams You can exploit the track diagram editor by means The drawn up track diagram on a page don‘t of the touch screen as well as by the navigator. The need to show a coherent diagram.
-
Page 93: Track Diagram Editor Explication Of The Symbol-Field Types
Commander Reference Manual 2.5.2 Track Diagram Editor Explication of the symbol-field types Introduction The Commander disposes of many different sym- them up. Most of the symbols are self-explanatory, bol field types for the representation on the track though. diagrams. They are assorted in categories. For the installation of double cross over turnouts The following synopsis will show you how to look please see the tip on the next page. - Page 94 Commander Reference Manual Semaphore signals block signal (Hp0 and Hp1) stop shunting (Sh0, Sh1) entry- / exit signal (Hp0, Hp1 and Hp2) signal with coupled semaphore waiting signal (Ra11) arms (Hp0 and Hp2) Fields with specific function starting point / destination key Uncoupling track for routes Additional fields...
-
Page 95: System Parameters Protocol Formats / Booster Adjustments
Commander Reference Manual 2.6.1 System Parameters Protocol formats / booster adjustments Introduction Define basic set-up adjustments of your Comman- process for DCC, due to the system. In case you der in the under-menu “system parameters” of the exclusively want to operate with the DCC-format it is advisable to deactivate the identification of Mär- system setup-menu. -
Page 96: System Parameters Starting Mode
Commander Reference Manual 2.6.2 System Parameters Starting mode Introduction Define basic set-up adjustments of your Comman- Starting (initial) track diagram representation der in the under-menu “system parameters” of the Define which track diagram the Commander is to system setup-menu. These adjustments normally represent after booting up by pushing the respec- have to be programmed only once when setting up tively associated indicator lamp. -
Page 97: System Parameters Language
Commander Reference Manual 2.6.3 System Parameters Language Introduction Define basic set-up adjustments of your Comman- To finish, save the adjustments you made on the der in the under-menu “system parameters” of the Commander using the diskette-symbol (key with system setup-menu. These adjustments normally disk and arrow pointing to the right). -
Page 98: System Parameters Model Time
Commander Reference Manual 2.6.4 System Parameters Model time Introduction Define basic set-up adjustments of your Comman- ► Slightly tip on either hour, minute or second indi- der in the under-menu “system parameters” of the cated in the field “model – time” (Modellzeit).The system setup-menu. -
Page 99: System Parameters Display
Commander Reference Manual 2.6.5 System Parameters Display Introduction Define basic set-up adjustments of your Comman- der in the under-menu “system parameters” of the system setup-menu. These adjustments normally have to be programmed only once when setting up the operating characteristics of the Commander. The menu “display”... - Page 100 Commander Reference Manual Display calibration Navigator calibration When switching on the Commander for the first The navigator enables you to adjust the cursor po- time or after a reset you must calibrate the display sition on the track diagram, to position the symbols in order to ensure an accurate functioning of the on the track diagram as well as to select locomoti- touch screen.
-
Page 101: E/A Device Editor Lsb Devices
Commander Reference Manual 2.7.1 E/A Device Editor LSB devices Introduction The input- and output device editor (E/A Device the same time. This number of devices is given by the address range of the ExpressNet. Editor) enables you to edit the devices connec- ted to the different bus-systems of the Comman- der. - Page 102 Commander Reference Manual Commander Reference Manual version 1.0 from 2009-12-03, page 102 2.7.1.1...
-
Page 103: E/A Device Editor S88 Devices
Commander Reference Manual 2.7.2 E/A Device Editor s88 devices Configuration of s88 devices On the second page of the E/A device editor you Note: can edit the s88 feedback bus. Enter the connected Respect absolutely the correct number of in- s88 modules here. - Page 104 Commander Reference Manual Commander Reference Manual version 1.0 from 2009-12-03, page 104 2.7.2...
-
Page 105: E/A Device Editor Roco Feedback Modules
Commander Reference Manual 2.7.3 E/A Device Editor Roco feedback modules Commander Reference Manual version 1.0 from 2009-12-03, page 105 2.7.3... - Page 106 Commander Reference Manual Commander Reference Manual version 1.0 from 2009-12-03, page 106 2.7.3...
-
Page 107: Software Update Basics
Required system characteristics (min.): up to date. Occasionally have a look at our internet PC (with Pentium-compatible processor, mi- page www.viessmann-commander.de to see if a nimum 500 MHz), 128 MB RAM, USB, SVGA software update is available for your version. The... -
Page 108: Software Update Procedure
Commander Reference Manual 3.1.2 Software Update Procedure When you have confirmed the security-query, the Attention: Please switch off Commander switches over to the update-mode. all energy saving options! The device is ready now to upload the new soft- Your computer definitely should not switch ware version. -
Page 109: Locomotive Picture Editor Overview
USB-interface. ► Change over to the register in which you have The Viessmann “loco picture editor” supports unpacked the program. the following data formats: bmp, jpg, pcx, tif. ► Start the program by a double- click on “loco The pictures you want to convert must have picture editor.exe”... -
Page 110: Locomotive Picture Editor Transfer Locomotive Pictures
Commander Reference Manual 3.2.2 Locomotive Picture Editor Transfer locomotive pictures Editing locomotive pictures Open a picture data-file in the “Locomotive- icon editor” on your PC. For this purpose touch the key “open data file” and select a picture. The respective picture will open up in the window 1. -
Page 111: Data Backup Backup Commander Data On Pc
PC-programs designed for the Commander al- You can safe all data of the Commander on a PC ways require the USB-driver version 2.0.0 or by means of the freeware PC-program “Viessmann higher (to be found on the Commander-web- Commander BackUp”. -
Page 112: Data Backup Restore Data To The Commander
Commander Reference Manual 3.3.2 Data Backup Restore data to the Commander Overview “Backup copy” means that the data saved on the PC are transferred back to the Commander me- mory. ► Open up the “backup”-program of your PC. ► Click on the rider “PC > Commander”. ►... -
Page 113: Factory Settings Restore Factory Default Settings
Commander Reference Manual Factory Settings Restore factory default settings System start When the Commander boots up the device will This is also the case if you have kept the given lo- comotives and have only modified their data re- load up the adjustments and system running data from the last session saved on its memory. - Page 114 Commander Reference Manual Factory Settings Restore factory default settings Procedure Calling up of the reset-menu: Selection of the reset options: ► Switch off the Commander. ► Select the respective option you want by means of the direction selection keys. ► Switch on the Commander. ►...
-
Page 115: Configuration Variables Cv-Table
Commander Reference Manual 4.4.1 Configuration Variables CV-table Introduction CV-table This chapter contains information for users of the The table shows all standard CVs and their func- digital system DCC only. Configuration variables, tions. Not standardized CVs can be exploited in- CVs (“Konfigurations-Variablen”) enable the ad- dividually by the decoder manufacturer. - Page 116 Commander Reference Manual 4.4.1 Configuration Variables CV-table CV-Nr. Function Description manufacturer ID A special code number is assigned to every deco- der-manufacturer by the NMRA. Thus it is possible to identify the manufacturer. This CV-value cannot be modified. motor control frequency This CV determines the motor control frequency.
-
Page 117: Symbol Table Universal Switching Touch Fields
Commander Reference Manual 4.5.1 Symbol Table Universal switching touch fields Information On this page you will find a complete overview of easy look at the touch field functions in this way. universal switching touch fields to be used for the You will find an overview of the most important touch fields in the short instruction. -
Page 118: Symbol Table Universal Switching Touch Fields
Commander Reference Manual 4.5.2 Symbol Table Universal switching touch fields Information On this page you will find an overview of the additi- The assignment of the functions to the touch fields onal functions locomotives may be equipped with. is carried out in the locomotive editor (s.a. chapter Not all decoder types and not every digital opera- 2.1.2). -
Page 119: Tips & Tricks Locomotives - Locomotive Lighting
Commander Reference Manual 5.1.1 Tips & Tricks Locomotives – locomotive lighting Introduction Flickering DCC locomotive lighting No transmission of the Märklin-Motorola format When the lighting of DCC locomotives is active an In case you operate with DCC-devices (locomoti- unwanted effect may occur if being operated by the ves and accessories) only, you can suppress the Commander, due to the emitted digital signal: the transmission of the Märklin-Motorola signal. -
Page 120: Tips & Tricks Accessories - Roco-Booster
Commander, according to the instruction. ► Insert a diode type1N4002 (e.g. Viessmann ref- erence nr. 6834), between the white cable core and the connection jack C, in accordance with the illustration below. -
Page 121: Tips & Tricks Accessories - Programming A Decoder
Tips & Tricks Accessories ‒ programming a decoder Introduction The Viessmann turnout-decoder 5209, 5212, 5231, 5235 and the Viessmann signals 4700, 4701, 4710, 4717 are equipped with a special feature which en- ables their operation by the digital systems “Delta” and “Roco-Lokmaus”. -
Page 122: Tips & Tricks Accessories - Three-Way Turnout
Connection You can control three-way turnouts with every sole- noid drive decoder suitable for DCC or MOT. We recommend to use the special Viessmann three-way turnout decoder 5235 (for Märklin C- track). When you use this decoder the turnout is correctly connected automatically. -
Page 123: Index
Commander Reference Manual Index Accessories Factory Settings Additional functions 9, 55 Feedback 46, 67, 77 Address 53, 65 Feedback modules Automatic Operation 19, 71 Virtual Reset Feedback sections Function standard Backup toggle Basic address trigger Block sections 21, 23 Booster 95, 120 Brightness Illumination... - Page 124 Commander Reference Manual Photo Train protection Picture Turnout 13, 65 Priority-function key Programming track Uncoupling rail Protocol format Update USB-driver RailCom Reset 50, 113 Restore VMAX Roco Voltage Roconet Route Automatic locking Manual locking Route indication Zoom Routes s88 device Safety matrix Semaphore signal Shadow station...
Need help?
Do you have a question about the Commander 5300 and is the answer not in the manual?
Questions and answers