
Subscribe to Our Youtube Channel
Related Manuals for Avery Weigh-Tronix E1070


Summary of Contents for Avery Weigh-Tronix E1070
- Page 1 Model E1070 Indicator E1070 User Instructions ENGLISH 43094-0015A e1 May 16, 2006 *43094-0015*...
- Page 2 E1070_rev2006_u.book...
- Page 3 The copyright and the foregoing restriction on reproduction and use extend to all media in which the information may be embodied. Avery Weigh-Tronix is a trading name of Weigh-Tronix, Inc Trademarks and acknowledgements Avery Weigh-Tronix, Avery Berkel, Dillon, NCI and Salter Brecknell are registered trademarks in certain jurisdictions.
- Page 4 CAUTION: DANGER OF EXPLOSION IF BATTERY IS INCORRECTLY REPLACED. REPLACE ONLY WITH THE SAME OR EQUIVALENT TYPE RECOMMENDED BY THE MANUFACTURER. DISPOSE OF USED BATTERIES ACCORDING TO THE MANUFACTURER'S INSTRUCTIONS. ATTENTION: IL Y A DANGER D'EXPLOSION S'IL Y A REMPLACEMENT INCORRECT DE LA BATTERIE, REMPLACER UNIQUEMENT AVEC UNE BATTERIE DU MÊME TYPE OU D'UN TYPE ÉQUIVALENT RECOMMANDÉ...
- Page 5 A copy of the original signed declaration for this instrument is available from: Avery Weigh-Tronix, Foundry Lane, Smethwick, West Midlands B66 2LP England...
- Page 6 Verklaring van Overeenstemming, afgegeven door een bevoegde instantie Een kopie van de originele ondertekende verklaring is verkrijgbaar door contact op te nemen met: Avery Weigh-Tronix, Foundry Lane, Smethwick, West Midlands B66 2LP England...
- Page 7 à fonctionnement non automatique a été vérifié par le fabricant ou avec une attestation de conformité délivrée par un organisme notifié. Une copie originale de la déclaration signée pour cet appareil est disponible à l’adresse suivante : Avery Weigh-Tronix, Foundry Lane, Smethwick, West Midlands B66 2LP England...
- Page 8 : Diese Erklärung gilt nur, wenn die nichtselbsttätige Waage vom Hersteller geeicht wurde oder in Verbindung mit einer Konformitätsbescheinigung einer benannten Stelle. Eine Abschrift der original unterschriebenen Konformitätserklärung ist unter untengenannter Adresse erhältlich von: Avery Weigh-Tronix, Foundry Lane, Smethwick, West Midlands B66 2LP England...
- Page 9 è stato verificato dal produttore o provvisto di un certificato di conformità rilasciato da un ente riconosciuto. Se richiesta, è disponibile una copia del certificato originale firmato presso: Avery Weigh-Tronix, Foundry Lane, Smethwick, West Midlands B66 2LP England...
- Page 10 Una copia del certificado de homologación que corresponde a este equipo se puede obtener en: Avery Weigh-Tronix, Foundry Lane, Smethwick, West Midlands B66 2LP England...
-
Page 11: Table Of Contents
Contents page Chapter 1: Safety and Warnings ................. 13 Installation and service (English)................13 Installatie en service (Dutch) .................. 15 Installation et Service (French)................17 Installation und Wartung (German) ................ 19 Installazione e manutenzione (Italian) ..............21 Instalación y Mantenimiento (Spanish) ..............23 Chapter 2: Introduction .................... - Page 12 Target Outputs ....................61 Counting......................... 62 Bulk Sampling ....................62 Dribble Sampling................... 63 Displaying Count Information ................ 63 Using Outputs in the Counting Application ........... 64 Peak Weighing ....................... 65 Using Outputs ....................65 Chapter 6: Communications..................66 Thermal Labels Print Formats............... 67 Chapter 7: Error Messages ..................
-
Page 13: Chapter 1: Safety And Warnings
Installations within Europe must use a socket which provides a minimum of IP56 protection to the plug / cable assembly. Care must be taken to ensure that the degree of protection provided by the socket is suitable for the environment. Model E1070 Indicator User Instructions... - Page 14 The following warning may be applicable to your machine. WARNING:This is a class A product. In a domestic environment this product may cause radio interference in which case the user may be required to take adequate measures. Model E1070 Indicator User Instructions...
-
Page 15: Installatie En Service (Dutch)
Zorg dat de apparatuur zich altijd op een vlak en effen oppervlak bevindt om te voorkomen dat deze op de grond valt. Model E1070 Indicator User Instructions... - Page 16 De volgende waarschuwing kan op uw apparaat van toepassing zijn. WAARSCHUWING: Dit is een klasse A-product. In huiselijke omgeving kan dit product radiostoring veroorzaken in welk geval de gebruiker de noodzakelijke maatregelen dient te nemen. Model E1070 Indicator User Instructions...
-
Page 17: Installation Et Service (French)
électrique ou de dommage à l'appareil, éteindre toujours la machine et la déconnecter de l'alimentation secteur. Pour éviter tout risque éventuel de chute de la machine, vérifier qu'elle soit placée sur une surface plane et à niveau. Model E1070 Indicator User Instructions... - Page 18 L'avertissement suivant pourrait concerner votre appareil. Attention. Ceci est un appareil de classe A. Dans un environnement domestique, cet appareil peut être la cause d'interférences radio. Dans ce cas, l'utilisateur peut être obligé de prendre les mesures adéquates. Model E1070 Indicator User Instructions...
-
Page 19: Installation Und Wartung (German)
Zum Schutz vor Stromschlägen und um Beschädigungen des Gerätes vorzubeugen, muss dieses vor der Durchführung von Wartungs- arbeiten ausgeschaltet und vom Netz getrennt werden. Um das Herunterfallen des Gerätes zu vermeiden, sollte dieses sicher auf einer ebenen und waagerechten Oberfläche platziert werden. Model E1070 Indicator User Instructions... - Page 20 Der folgende Warnhinweis trifft unter Umständen auf Ihr Gerät zu. WARNUNG: Bei diesem Gerät handelt es sich um ein Gerät der Klasse A. Dieses Gerät kann bei einem Betrieb in Wohngegenden Funkstörungen verursachen. Ist dies der Fall muss der Benutzer eventuell entsprechende Maßnahmen treffen. Model E1070 Indicator User Instructions...
-
Page 21: Installazione E Manutenzione (Italian)
Per evitare il rischio di caduta della macchina, laddove applicabile, assicurarsi che sia posizionata in modo sicuro su una superficie piana e orizzontale. Model E1070 Indicator User Instructions... - Page 22 Per la macchina è possibile che sia applicabile la seguente avvertenza. AVVERTENZA: questo è un prodotto di classe A. In un ambiente domestico, questo prodotto può causare interferenze radio e in tal caso è possibile che l'utente debba intraprendere misure adeguate. Model E1070 Indicator User Instructions...
-
Page 23: Instalación Y Mantenimiento (Spanish)
Instalaciones en Europa deben usar una toma de corriente que provea un mínimo de protección de IP56 a la conexión de enchufe / cable. Hay que asegurarse de que el grado de protección realizado por el enchufe corresponde a las exigencias del entorno. Model E1070 Indicator User Instructions... - Page 24 La siguiente advertencia se puede aplicar a su máquina. ADVERTENCIA: Esto es un producto de clase A. En un ambiente doméstico este producto puede causar interferencias radiofónicas, en cuyo caso podría ser necesario que el usuario adopte medidas adecuadas. Model E1070 Indicator User Instructions...
-
Page 25: Chapter 2: Introduction
Introduction The Model E1070 is a full function, high connectivity indicator for most weighing applications and process control situations. It is ideal for connected system weighing applications. The display includes a multi-segment fan graph for fast visual awareness for checkweighing. Also, the indicator can perform counting functions, peak weight functions, and act as a remote display. -
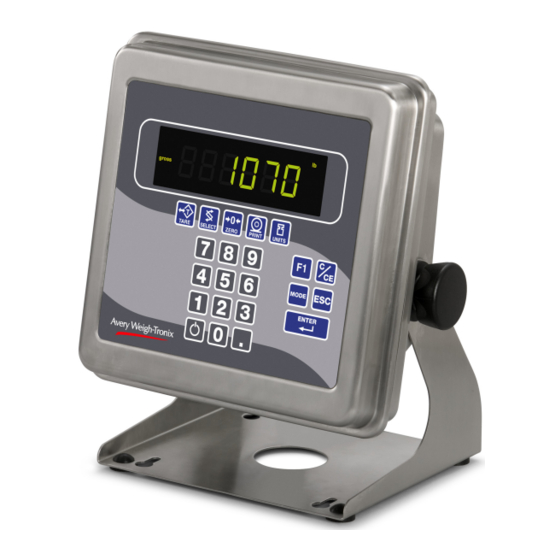
Page 26: Chapter 3: Front Panel
Front Panel Front Panel The front panel, shown in Figure 1, consists of the keys and display. Figure 3.1 E1070 front panel Keys Never press a key with anything The functions of the keys on the front panel are listed below. - Page 27 Press and hold for 3-5 seconds to see the name of the currently active application. Press the ESC key to escape a function or return to normal operation mode. Use to access the password display for the menu structure. Model E1070 Indicator User Instructions...
-
Page 28: Annunciators
Lights when net weight is displayed Tare Lights when tare weight is displayed Print Lights when print format sent through serial port OP 1 Lights when output one is activated OP 2 Lights when output two is activated Model E1070 Indicator User Instructions... - Page 29 Lights when pounds is the active unit of measure indicator. Checkweigher Lights when checkweighing application is active Green – The network connection has been established. Amber – The network is ready for a connection, but no connection has been established Model E1070 Indicator User Instructions...
-
Page 30: Chapter 4: Menu Mode
Menu Mode Menu Mode The E1070 has a User and a Supervisor menu you can use to perform tests on the indicator and to set up some indicator functions. Each is described below. User Menu Use the User menu to do the following: User menu password is 111. -
Page 31: Supervisor Menu
WARNING: Entering this menu and changing settings may affect operation of the indicator and may require a service call to correct. Be sure you want to change settings before doing so. Figure 4.2 Supervisor menu Model E1070 Indicator User Instructions... -
Page 32: Date (Set Date)
ENTER key. If you picked 0 (military time) in step 2, skip to step 5. If you picked 1 (AM/PM time) continue below… P? yes or P? no is displayed. P? yes for PM. P? no for AM. Model E1070 Indicator User Instructions... -
Page 33: Setup (Setup Menu)
Use the TARE or UNITS key to change the be accepted. channel number. Press the ENTER key when the correct channel number is displayed to enter the tare value for that channel. Model E1070 Indicator User Instructions... - Page 34 WARNING - Only do this if you are sure you want the information permanently removed! You may want to print out the report before clearing all the information. See step 2 above. Model E1070 Indicator User Instructions...
- Page 35 PERCENTAGE You set the percentage of a total batch for each ingredient and you can pick a batch size and each ingredient amount will be calculated automatically. Press the PRINT key… Current setting is displayed. Model E1070 Indicator User Instructions...
- Page 36 17. Key in values and press the ENTER key… the scale. BASIS is displayed. 18. Press the UNITS key… SETPT is displayed. Model E1070 Indicator User Instructions...
- Page 37 28. Press the UNITS key… CLEAR is displayed. Use this item to clear all the information stored for this application. WARNING - Only do this if you are sure you want the information permanently removed! Model E1070 Indicator User Instructions...
- Page 38 This is the sample tolerance. When a sample is 10/20 or 20/50). Preset tares are done, the upper and lower limits will automatically be disabled in the ±(sample tolerance) divisions from the target weight. Supervisor>Setup>App>PLU menu. Model E1070 Indicator User Instructions...
- Page 39 SURE? is displayed. This is asking if you are sure you want to clear the information. If you are, press the ENTER key. If you do not want to clear the data, press the SELECT key… CLEAR is displayed. 15. Press the SELECT key… TARGET is displayed. Model E1070 Indicator User Instructions...
- Page 40 13. Press the UNITS key… CLEAR is displayed. Use this item to clear all the information stored for this application. WARNING - Only do this if you are sure you want the information permanently removed! Model E1070 Indicator User Instructions...
- Page 41 If you are, press the ENTER key. If you do not want to clear the data, press the SELECT key… CLEAR is displayed. Press the SELECT key… TOP is displayed. Press the SELECT key… APP is displayed. Model E1070 Indicator User Instructions...
- Page 42 15. Toggle between OLOAD and ULOAD (overload) by using the TARE or UNITS key and press ENTER when your choice is displayed… Under both OLOAD and ULOAD are choices to view the counter (CNTR) or print (PRINT) the report. Model E1070 Indicator User Instructions...
- Page 43 Press the ENTER key when the choice you want is displayed… Display shows BUSY briefly then returns to PRINT. 22. Press the UNITS key… CLEAR is displayed. Use this to clear the log from memory. 23. Press PRINT to clear the log… SURE? is displayed. Model E1070 Indicator User Instructions...
-
Page 44: Test (Test Menu)
TEST (Test menu) Proceed to the next menu by pressing the UNITS key… TEST is displayed. This menu lets you view indicator information and test the display, keypad, serial ports, inputs and outputs. Model E1070 Indicator User Instructions... - Page 45 The display should show PASS. If there is a problem the display will show FAIL. 15. Press the SELECT key… PORT 1 is displayed. 16. Press the UNITS key… PORT 2 is displayed. Repeat steps to test port 2. 17. Press SELECT key… SERIAL is displayed. Model E1070 Indicator User Instructions...
- Page 46 25, the analog output voltage should read 2.5 volts. You can continue to key in other percentages, press ENTER and check the analog output voltage. 33. When you are finished testing the analog output, press the ESC key… A-OUT is displayed. Model E1070 Indicator User Instructions...
-
Page 47: Audit (Audit Counters) Menu
The next section of the Supervisor menu is the AUDIT submenu. This menu lets you view configuration and calibration audit counters. These counters menu cannot be changed, only viewed. Follow these steps to access each item in the AUDIT submenu: Model E1070 Indicator User Instructions... - Page 48 A number is briefly displayed, then CAL is displayed. This is the number of times this indicator has been calibrated. Press the SELECT key… AUDIT is displayed. This completes the AUDIT submenu and the Supervisor menu. Press the SELECT key to return to normal weighing mode. Model E1070 Indicator User Instructions...
-
Page 49: Chapter 5: Indicator Operations
Indicator Operations Press the MODE key to scroll The E1070 comes equipped with several weighing applications; through the activated applications. • General weighing (default setting) The name of the active application • Accumulator weighing will be briefly displayed or, press •... -
Page 50: Print Operations
Repeatedly press the SELECT key to scroll through gross, tare, and weight from the scale and press net modes. Remove the weight from the scale and press TARE to the TARE key. return to gross mode. Model E1070 Indicator User Instructions... -
Page 51: Using Outputs In The General Weighing Application
Repeat for the other outputs. You can skip the displayed output by Above Configured Value: pressing the ESC key. Outputs are OFF Annunciators are ON After OP3 has been set, or skipped, the indicator will automatically TIU3 Relays are OFF return to normal weighing mode. Model E1070 Indicator User Instructions... -
Page 52: Accumulator Weighing
Supervisor Menu on through the activated applications. page The name of the active application will be briefly displayed or, press and hold the MODE key for 3-5 seconds to see the name of the currently active application. Model E1070 Indicator User Instructions... -
Page 53: Using Outputs In The Accumulator Application
If enabled, you can use the output function while in the accumulator Accumulator Application application. Outputs are enabled in a password protected menu. Contact your local Avery Weigh-Tronix supplier or distributor for assistance. Follow these steps to set up to three outputs: Output operation in the With the indicator powered up, press and hold the SELECT key until…... -
Page 54: Batch Weighing
Continuous batching mode. This mode is very close to feature. the Auto mode but, in continuous mode another batch is started immediately after the previous batch has finished. In auto mode the user must press the F1 key to start each batch. Model E1070 Indicator User Instructions... - Page 55 ESC key. The batch type, batch mode, and ingredient basis cannot be changed through this shortcut. Contact your local Avery Weigh-Tronix supplier or distributor for assistance on creating a recipe. Examples of two batching routines are given on the next pages.
-
Page 56: Auto Batching By Weight
Press the F1 key… OP2 annunciator lights and output 2 activates. Add weight to the scale… When the weight reaches the percentage of the batch size set in the recipe for ingredient 2, OP2 annunciator light goes out. Model E1070 Indicator User Instructions... - Page 57 When the weight reaches the percentage of the batch size set in the recipe for ingredient 3, OP3 annunciator light goes out and output 3 deactivates. Empty the scale and repeat steps for the next batch. Model E1070 Indicator User Instructions...
-
Page 58: Checkweighing
This section applies if your indicator has the checkweighing application in Figure 5.1, will be lit when in the active. Applications are activated through a password protected menu. checkweighing mode as a Contact your local Avery Weigh-Tronix supplier or distributor for reminder that this application is assistance. active. -
Page 59: Limits Mode: Entering Upper And Lower Limits
Display toggles between HI and the upper weight tolerance, in the current unit of measure. 4th press Display toggles between LO and the lower weight tolerance, in the current unit of measure. 5th press Display returns to gross weighing mode. Model E1070 Indicator User Instructions... -
Page 60: Performing A Checkweighment In Limits Mode
You can repeatedly press the Repeat step for all products of this weight. SELECT key to view the items listed in the Sample and Limits modes on this page. Model E1070 Indicator User Instructions... -
Page 61: Using Outputs In Checkweigher Application
If enabled, you can use the output function while in the checkweigher Checkweigher Application application. Outputs are enabled in a password protected menu Contact your local Avery Weigh-Tronix supplier or distributor for assistance. Follow these steps to set up to three outputs: Standard Outputs With the indicator powered up in normal checkweighing mode, press and hold the SELECT key until…... -
Page 62: Counting
Applications are activated through a password protected menu. Contact The name of the active application your local Avery Weigh-Tronix supplier or distributor for assistance. will be briefly displayed or, press There are two types of sampling; bulk and dribble. See the... -
Page 63: Dribble Sampling
The Gross annunciator lights and gross weight is displayed. press SELECT - The Net annunciator lights and net weight is displayed. press SELECT - The Tare annunciator lights and tare weight is displayed. press SELECT - The count display returns. Model E1070 Indicator User Instructions... -
Page 64: Using Outputs In The Counting Application
Counting Application Outputs are enabled in a password protected menu. Contact your local Avery Weigh-Tronix supplier or distributor for assistance. Follow these steps to set up to three outputs: With the indicator powered up, press and hold the SELECT key until…... -
Page 65: Peak Weighing
If enabled, you can use the output function while in the peak application. Outputs are enabled in a password protected menu. Contact your local Avery Weigh-Tronix supplier or distributor for assistance. Follow these steps to set up to three outputs: With the indicator powered up, press and hold the SELECT key until…... -
Page 66: Chapter 6: Communications
Communications Communications The E1070 provides an RS-232 output for data transmission to a peripheral device. Contact your local Avery Weigh-Tronix supplier or distributor for assistance on RS-232 interface connections. The default serial port parameters If your indicator has a peripheral device connected, from the gross/net are 9600 baud, 8 databits, no parity weighing mode press the PRINT key to transmit the selected output(s). -
Page 67: Thermal Labels Print Formats
Format 1 label 1.25” Wide x 1.00” Long Format 2 label 2.50” Wide x 4.00” Long Format 3 label 4.00” Wide x 6.00” Long Print Format 4, same as above with barcode. Label Size: 2.50” Wide 4.00” Long Model E1070 Indicator User Instructions... - Page 68 Format 5 label 1.25” Wide x 1.00” Long Format 6 label 2.50” Wide x 4.00” Long Format 7 label 4.00” Wide x 6.00” Long Print Format 8, same as above with barcode. Label Size 2.50” Wide 4.00” Long Model E1070 Indicator User Instructions...
-
Page 69: Chapter 7: Error Messages
Display Description Over-range weight Under-range weight The unit cannot perform a function Displayed while a key is pressed when attempting to modify a sealed selection without edit privileges. Model E1070 Indicator User Instructions... -
Page 70: Chapter 8: Indicator Diagnostics
Press the UNITS key… ADC is displayed. This is the mV/V output of the connected analog scale. Press the PRINT key… The mV/V value is displayed. This value should increase as weight is applied to the scale. Model E1070 Indicator User Instructions... - Page 71 21. Press the PRINT key to see the number of times the configuration has been altered on this indicator. 22. Press the SELECT key… CFG is displayed. 23. Press the UNITS key… CAL is displayed. This stands for the calibration audit counter. Model E1070 Indicator User Instructions...
- Page 72 Indicator Diagnostics 24. Press the PRINT key… The number of times the indicator has been calibrated is displayed. 25. Press the ESC key twice… The display returns to normal operation mode. This completes the User menu. Model E1070 Indicator User Instructions...
-
Page 73: Chapter 9: Specifications
Specifications Power requirements Internal resolution • 85-265 Volts AC @ 0.3Amp maximum • 53,687,100 counts per mV/V per second • 50/60 Hz Harmonizer™ digital filtering Excitation • Fully programmable to ignore noise and vibration • +/- 5 volts DC Standard inputs •... - Page 74 Specifications Dimensions • 9.25" W x 9.25" H x 4.5" D (without mounting bracket) • 9.75" W x 11" H x 7" D (with mounting bracket) Weight • 8.5 lb, 4 kg Agencies • NTEP CC#04-031 Class III/IIIL:10,000 divisions • OIML Cert.
- Page 76 Avery Weigh-Tronix USA 1000 Armstrong Dr. Fairmont MN 56031 USA Tel: 507-238-4461 Fax: 507-238-4195 Email: industrial@weigh-tronix.com www.wtxweb.com Avery Weigh-Tronix UK Foundry Lane, Smethwick, West Midlands, England B66 2LP Tel: +44 (0)870 903 4343 Fax: +44 (0)121 224 8183 Email: info@awtxglobal.com...
Need help?
Do you have a question about the E1070 and is the answer not in the manual?
Questions and answers