
Subscribe to Our Youtube Channel
Related Manuals for Avery Weigh-Tronix 640XL


Summary of Contents for Avery Weigh-Tronix 640XL
- Page 1 Model 640 Series Indicators User Instructions NORTH AMERICA 43108-0019 Issue AE October 2009...
- Page 2 Avery Weigh-Tronix is a registered trade mark of the Avery Weigh-Tronix group of companies. This publication was correct at the time of going to print however, Avery Weigh-Tronix reserves the right to alter without notice the specification, design, price or conditions of supply of any product or service at any time.
-
Page 3: Table Of Contents
Getting Started ......................... 13 Mounting the Model 640 ....................14 Cable Connections ......................15 Model 640 and 640XL Bottom Panels ............... 15 Model 640M Lower Connector Options ..............16 Connector Pin Descriptions ..................17 Chapter 3 User Menu ..........................18 Editing The A-LIST ...................... - Page 4 Weighing Individual Animals with Standard Mode AUTO-LOC ......... 40 Weighing Individual Animals with Advanced Mode AUTO-LOC ....... 40 Printing ..........................42 Chapter 5 Test Menu ..........................45 Test Menu Summary ......................45 Access the Test Menu ..................... 46 Test Menu Items ......................46 VOLTS (Input voltage) ....................
-
Page 5: Chapter 1 General Information And Warnings
About this manual 1 General Information and Warnings 1.1 About this manual This manual is divided into chapters by the chapter number and the large text at the top of a page. Subsections are labeled as shown by the 1 and 1.1 headings shown above. The names of the chapter and the next subsection level appear at the top of alternating pages of the manual to remind you of where you are in the manual. -
Page 6: Installation
General Information and Warnings 1.2 Installation DANGER: RISK OF ELECTRICAL SHOCK. NO USER SERVICEABLE PARTS. REFER TO QUALIFIED SERVICE PERSONNEL FOR SERVICE. 1.2.1 Safe handling of equipment with batteries CAUTION: Danger of explosion if battery is incorrectly replaced. Replace only with the same or equivalent type recommended by the manufacturer. -
Page 7: Cleaning The Machine
Cleaning the machine 1.4 Cleaning the machine Table 1.1 Cleaning DOs and DON’Ts DO NOT Wipe down the outside of standard products Attempt to clean the inside of the machine with a clean cloth, moistened with water and Use harsh abrasives, solvents, scouring cleaners or a small amount of mild detergent alkaline cleaning solutions Spray the cloth when using a proprietary... -
Page 8: Fcc And Emc Declarations Of Compliance
General Information and Warnings 1.7 FCC and EMC declarations of compliance United States Table 1.2 This equipment has been tested and found to comply with the limits for a Class A digital device, pursuant to Part 15 of the FCC Rules. These limits are designed to provide reasonable protection against harmful interference when the equipment is operated in a commercial environment. - Page 9 FCC and EMC declarations of compliance Model 640 Indicator Series User Instructions...
-
Page 10: Chapter 2 Introduction
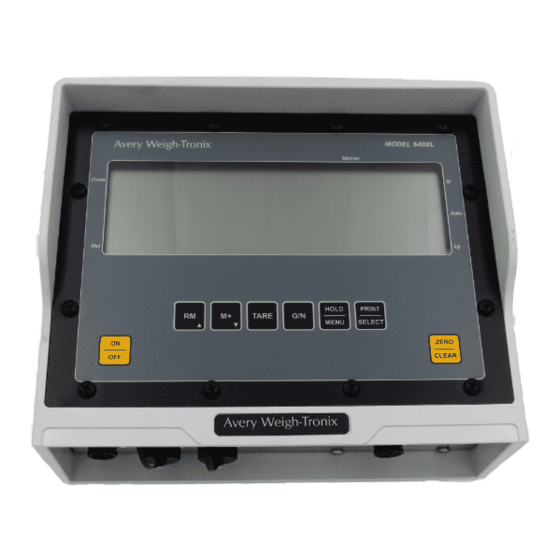
This manual covers the information you need to operate your Avery Weigh-Tronix Model 640 indicator and remote display products. Included in this manual are the Model 640, 640XL, 640M indicators and the RD40XL, RD40, and RD40RF remote displays. 2.1 Front Panel The Model 640 indicator face is shown in Figure 2.1. -
Page 11: Key Descriptions
Front Panel 2.1.1 Key Descriptions Key names will appear as bold, upper case words in this manual. Examples: TARE, G/N, etc. Annunciators will appear as italic words. Examples: G/N, Lb, etc. Displayed messages will appear as bold, italic words. Examples: HELLO, LO-BAT, etc. -
Page 12: Display Messages
Introduction AUTO Displayed if the unit is programmed for AUTO-LOC. AUTO-LOC is used in animal weighing applications. Reference Animal Weighing Using AUTO- LOC Feature on page Indicates the unit is weighing in kilograms. 2.2 Display Messages Following are the messages that may appear on the display and what they mean: Message Meaning HELLO... -
Page 13: Numeric Entry Procedure
Numeric Entry Procedure 2.3 Numeric Entry Procedure Anytime you need to enter numeric values, use the keys as described below. The note below will appear throughout areas of the manual to remind you of the key presses needed to enter numbers. EXAMPLE: To enter the number 5230: At the data entry screen, press the RM key several times until…... -
Page 14: Mounting The Model 640
SETUP menu to change the Configuration Code Number (CCN). This should get your system up and running properly. If you have further problems, call your local dealer or Avery Weigh-Tronix. 2.5 Mounting the Model 640 The Model 640 mounts on a quick-detach bracket. Weld or bolt the quick-detach... -
Page 15: Cable Connections
Cable Connections 2.6 Cable Connections Below are illustrations to help you make the proper connections to the different versions of the Model 640. 2.6.1 Model 640 and 640XL Bottom Panels Model 640 Indicator Series User Instructions... -
Page 16: Model 640M Lower Connector Options
Introduction 2.6.2 Model 640M Lower Connector Options 640M INDICATOR 640M INDICATOR 640M INDICATOR 640M INDICATOR 640M INDICATOR Single 5-Pin, W-T Power, w/RS232 & RD40RF Single AMP, AMP Power, w/RS232 & RD40RF Single 5-Pin & W/T Power Single AMP, AMP Power, RS232 Single 5-Pin, w/RS232 &... -
Page 17: Connector Pin Descriptions
Cable Connections 2.6.3 Connector Pin Descriptions Model 640 Indicator Series User Instructions... -
Page 18: Chapter 3 User Menu
User Menu 3 User Menu This section takes you through the User menu. You will use this menu to set many of the scale functions. Access this menu from the G/N mode by pressing the HOLD/MENU key for two beeps. See Figure 3.1. - Page 19 Below is a summary of the items in this menu, followed by a comprehensive explanation of each item: A-LIST Used to edit the memory accumulator descriptions A-STAT Used to access statistics of the memory accumulator channels CLR.ACC Use this to clear accumulator channels MEM.ENA Use this to disable or enable memory channel functions.
-
Page 20: Editing The A-List
User Menu 3.1 Editing The A-LIST The A-LIST item is only active if the MEM.ENA menu item is set to YES. If the application requires alphanumeric channel names, go through the memory channel list and edit their descriptions accordingly. For example, if you want to record grain cart loads from five different fields, then create a list of FIELD1, FIELD2, …FIELD3. -
Page 21: Accessing The Accumulator Statistics
Accessing the Accumulator Statistics Press SELECT when the desired name has been entered. The display will now show the channel name list. Repeat steps to edit more channel names. Press G/N three times to return to G/N weighing mode. 3.2 Accessing the Accumulator Statistics This item is only active if the MEM.ENA menu item is set to YES. -
Page 22: Clearing Accumulators
User Menu Press the PRINT/SELECT key … The statistics printout is transferred to the TDM or printer device. A sample is shown below: 04-25-2006 14:20:26 TOTAL WEIGHT: 1938370 lb AVG. WEIGHT: 44050 lb TOTAL COUNT: 44 Press the G/N key to return to A-STAT. Press G/N key again to return to G/N weighing mode. -
Page 23: Viewing Or Changing The Time
Viewing or Changing the Time Press the PRINT/SELECT key… WAIT is displayed while clearing, then MEM.CLR is briefly displayed, then unit returns to the G/N weighing mode. 3.4 Viewing or Changing the Time The Model 640 has standard battery backed time and date features. The time can be configured for 24 hour or 12 hour clock for printouts in the 640 menu, but must always be entered first as 24 hr entry: From the G/N mode, press and hold the HOLD/MENU key for two beeps (2... -
Page 24: Viewing Or Changing The Date
User Menu 3.5 Viewing or Changing the Date The indicator has battery backed time and date standard. The date can be entered as follows: From the G/N mode, press and hold the HOLD/MENU key for two beeps (2 sec), then release… A-LIST is displayed. -
Page 25: Entering / Viewing The Sleep Parameter
Entering / Viewing the Sleep Parameter 3.7 Entering / Viewing the Sleep Parameter The Model 640 has a sleep mode that can shut the unit off if the following conditions occur: The indicator doesn’t see any keys being pressed, or The weight hasn’t changed by more than 1% over the number of minutes that was entered for the sleep setting. - Page 26 User Menu Press the HOLD/MENU key to toggle between the two settings. Press PRINT/ SELECT when your choice is displayed. If you choose ON… LEVEL is displayed. Use this to set the illumination level of the backlight (10% to 100%). Press the PRINT/SELECT key to access the level…...
-
Page 27: Entering / Viewing The Language Selection (Not Currently Functioning)
Entering / Viewing the Language Selection (Not currently functioning) 3.9 Entering / Viewing the Language Selection (Not currently functioning) The Model 640 has a selectable language for the displayed messages and reports. From the G/N mode, press and hold the HOLD/MENU key for two beeps (2 sec), then release…... - Page 28 User Menu A sample report is shown below: ----------------------------- System Configuration Settings 04-25-2006 11:29:00 ----------------------------- PART 60259-0026 1.9.0 User's Menu ----------- VOLUME: HIGH SLEEP TIMER : BKLGHT: LEVEL : 100% NATION: ENGLSH MEM.ENA: 640 Setup Menu -------------- MODE CONFIG: S130 1.0 mV/V: 37470 lb O-CAP :...
-
Page 29: Chapter 4 Weighing Procedures
Simple Weighing 4 Weighing Procedures This section covers the procedures for different weighing processes. 4.1 Simple Weighing Press ON… Display shows HELLO then the current weight value is displayed. Press G/N and access gross mode… Live scale weight is displayed in the G/N weighing mode. Remove all material from the scale and press ZERO/CLEAR 0 is displayed, and the system is zeroed. -
Page 30: Loading Or Unloading Consecutive Net Amounts
Weighing Procedures Place the material to be weighed on the scale… Net weight is displayed. Remove the weighed material from the scale (leaving the tared item). Repeat steps through for each weighment using the same tare weight. To remove the tare weight, press the G/N key to return to gross weigh mode, then press the ZERO/CLEAR key…... -
Page 31: Using Memory Channels To Accumulate
Using Memory Channels to Accumulate Repeat steps through until complete. You may now view the G/N weight by pressing and holding the XM64 button, once. Releasing the button if within three seconds unit returns to the net mode showing zero. If you are done loading and now want to return to the G/N mode for unloading, press and hold the XM64 for more than three seconds. -
Page 32: Accessing Memory Channels
Weighing Procedures 4.5.2 Accessing Memory Channels From the G/N mode, press the RM^ key… MEM.001 is shown or the last accessed channel. This will now access the MEM.001 channel. If you want any other channel either use the HOLD/MENU key to scroll to the proper channel, or use the RM^ and the HOLD/MENU key to access directly to channel XX, then press PRINT/SELECT. - Page 33 Using Memory Channels to Accumulate Press PRINT/SELECT… WAIT is displayed, then MEM.CLR. Once the unit is done clearing accumulators CLR.ACC is displayed again. After the accumulators are cleared press G/N to return to the G/N weighing mode. Model 640 Indicator Series User Instructions...
-
Page 34: To Clear A Specific Memory Channel
Weighing Procedures 4.5.5 To Clear a Specific Memory Channel Access the proper memory channel. From the G/N mode, press and hold ZERO/CLEAR key until the second beep… MEM.XXX is displayed then MEM.CLR is displayed. MEM.XXX is now cleared. 4.5.6 To Print an Individual Memory Channel From the G/N mode, press the RM key…... - Page 35 Using Memory Channels to Accumulate Press PRINT/SELECT for 2 secs… PR-ALL is momentarily displayed and information is transmitted. The indicator will only print out memory channels that have accumulated weight amounts. Indicator returns to gross weighing mode. Mem channel printout 04-25-2006 14:17:19 MEM CH...
- Page 36 Weighing Procedures Figure 4.1 Menu Model 640 Indicator Series User Instructions...
-
Page 37: Manual Hold For Mobile Systems
Manual Hold for Mobile Systems 4.6 Manual Hold for Mobile Systems The Model 640 has a manual hold using the HOLD/MENU key to prevent a zero shift from occurring on any portable scale system (i.e. mixer, weigh cart, grain cart, etc.). To use the HOLD/MENU key to prevent any small zero shifts from occurring while moving a system over rough farm terrain, follow these steps. -
Page 38: How To Set Up Auto-Loc
Weighing Procedures Standard LOC Mode In standard mode, an animal’s weight is locked on the display until the animal leaves the scale. Advanced LOC Mode In advanced mode, an animal’s weight is locked on the display until the next animal comes onto the scale. - Page 39 Animal Weighing Using AUTO-LOC Feature Press the HOLD/MENU key several times until… AUT.LOC appears. The AUTO-LOC menu selection only shows up when a configuration code number turns on this feature. This menu item is where you choose standard or advanced LOCK, minimum weight (MIN.WT), and release tolerance (REL.TOL) appropriate for the livestock application.
-
Page 40: Weighing Individual Animals With Standard Mode Auto-Loc
Weighing Procedures You can exit the menu and return to normal weighing mode by repeatedly pressing the G/N key. If, during operation the AUTO-LOC feature seems very slow, this can be due to excessive weight fluctuations. In this case you can access the Setup menu and increase the FILTER-CONSTANT parameter until it works properly. - Page 41 Animal Weighing Using AUTO-LOC Feature The M640 will lock on an animals weight and stay locked even after the animal is off the scale. A new AUTO-LOC weight will only be retriggered upon placing the next animal on the scale. Turn indicator on use the G/N key to access the gross mode, and press the ZERO CLEAR key…...
-
Page 42: Printing
Weighing Procedures 4.9 Printing Press the PRINT key from G/N mode to print the currently configured print format 0-9 formats. The default print format is #3. To use any of the other nine formats, see the Service Manual on how to select formats, by changing the configuration code number (CCN). If the CHNAME parameter is set to ON, the current memory channel name will be added to the start of each print format. - Page 43 Printing Format 3 (default) Format 4 Format 5 Format 6 Format 7 Format 8 Model 640 Indicator Series User Instructions...
- Page 44 Weighing Procedures Format 9 Model 640 Indicator Series User Instructions...
-
Page 45: Chapter 5 Test Menu
Test Menu Summary 5 Test Menu 5.1 Test Menu Summary The test menu, shown in Figure 5.1,allows you to test the functions of the indicator shown below. VOLTS Monitor the input voltage of the indicator Do a LCD display test. KEYPAD Do a keypad test A / D... -
Page 46: Access The Test Menu
Test Menu 5.2 Access the Test Menu To access the Test menu, follow these steps: From the G/N mode, press and hold the HOLD/MENU key for three beeps (3 seconds), then release… SET.PAS is displayed. Use the numeric entry procedure, shown below, and enter the password 111… 111 is displayed. -
Page 47: Lcd (Lcd Display Test)
Test Menu Items 5.3.2 LCD (LCD Display test) Use this to perform a self test on the LCD, either a complete display test or a segment test. From VOLTS press menu… LCd is displayed. Press the PRINT/SELECT key… TEST is shown. Press the PRINT/SELECT key…... -
Page 48: A/D (View /Test A To D Counts)
Test Menu 5.3.4 A/D (View /Test A to D counts) From VOLTS, press menu… LCd is displayed. Press HOLD/MENU repeatedly until… A/d is shown. Press the PRINT/SELECT key… CNTS is shown. Press the PRINT/SELECT key… A/D raw counts are shown. Press the PRINT/SELECT key…... -
Page 49: Input (Testing The Input)
Test Menu Items Short the XMT to RCV and… LOOP will be displayed. Press PRINT/SELECT and… SERIAL is displayed. Press the G/N key… Returns to the G/N weighing mode. 5.3.6 INPUT (Testing the Input) From VOLTS, press menu… LCd is displayed. Press HOLD/MENU repeatedly until…... - Page 50 Test Menu Press PRINT/SELECT and… -0010 is displayed. This is the software dash number. Press the GN or PRINT/SELECT key… DASH is displayed. Press HOLD/MENU and… REV is displayed. This is the software revision number. Press PRINT/SELECT and… Rev A is displayed, for example. This is the software revision level. Press the GN or PRINT/SELECT key…...
-
Page 51: Chapter 6 Remote Displays & Xm64 Remote Transmitter
Remote Displays 6 Remote Displays & XM64 Remote Transmitter 6.1 Remote Displays The RD40/XL/RF are remote displays that are compatible with the Model 640 indicators. See the photos below. An RD40 output option is required on the Model 640 for interfacing. The interface cable plugs directly into the bottom of the Model 640. Any data displayed on the Model 640 is also displayed on the RD40. -
Page 52: Xm64 Wireless Remote Transmitter
Remote Displays & XM64 Remote Transmitter Figure 6.3 RD40RF remote display (wireless) 6.2 XM64 Wireless Remote Transmitter An optional radio remote transmitter (XM64) and receiver can be installed in either the Model 640/XL or the RD40XL. This option lets the user tare and access net amounts from a remote location, usually a front-end loader. -
Page 53: Chapter 7 Specifications
Display 6 digit, 14 segment, alpha-numeric LED green-yellow backlight, Ten adjustable brightness levels Model 640 - 1.1 inch (28mm) Model 640XL - 2.0 inch (50.8 mm) Display Rate Selectable 1, 2, or 5 times/second Unit of Measure lb or kg Excitation 5 volts, drives ten 350 –... - Page 54 Specifications Weight 5.2 lb / 2.4 kg 7.2 lb / 3.3 kg shipping weight Agencies FCC Class A CE marked Model 640 Indicator Series User Instructions...
-
Page 55: Chapter 8 Appendix: Quick Programming Guide
How to Verify the Scale is Weighing Properly 8 Appendix: Quick Programming Guide In most cases your Avery Weigh-Tronix Model 640 arrives from your dealer or distributor preprogrammed with a Configuration Code Number (CCN) that sets the Model 640 to work and weigh properly with the appropriate scale system, whether it is a TMR mixer, grain cart, livestock scale, weigh cart, platform scale, bin scale, or all other applications. - Page 56 Appendix: Quick Programming Guide The Model 640 indicator is precalibrated at Avery Weigh-tronix with appropriate code number specified by the OEM, or leaves with a factory calibration number of 18033. The following tables show how to establish a configuration code number to configure the Model 640 indicator: Find the specs which match your system to find the appropriate code number.
- Page 57 How to Verify the Scale is Weighing Properly Table 8.2 Table for 4th CCN Digit Print Formats Digit G w/ TD GTN w/TD (STD) CSV-G CSV-GTN CSV-G w/TD CSV-GTN w/TD Displayed Wt. Displayed Wt. w/TD The fourth digit of the CCN is found in Table 8.3. Table 8.3 Table for 5th CCN Digit units Auto-Loc...
-
Page 58: Configuration Code Numbers For Common Applications
In the case of other brands other than Avery Weigh-Tronix, two configuration code numbers must be entered into the Model 640:... -
Page 59: Viewing/Entering A Custom Calibration Number
How to Verify the Scale is Weighing Properly Example 1: Need to calibrate to 4 weigh bars with the following information: 1 weigh bar 2.0 mV/V = 5,000 lb Therefore 4 weigh bars would be 2.0 mV/V = 20,000 lb for the system CUSTOM calibration number needs to be weight value at .4mV/V or 4,000 lb. -
Page 60: How To Configure Filtering
Appendix: Quick Programming Guide Press the G/N key… Indicator returns to the G/N weighing mode. 8.2 How to Configure Filtering If you need to adjust the filtering on your Model 640 to counteract excessive movement or vibration on the scale system, follow these steps to access the FILTER menu item of the Setup menu and make needed changes. - Page 61 How to Configure Filtering Repeatedly press the HOLD/MENU key until… FILTER is displayed. There are two parts to filtering; Constant and Window. How to set these is explained below. How they affect weighing is explained in the Filtering note below. Filtering: Default settings;...
-
Page 62: Chapter 9 Appendix: Troubleshooting
WARNING: You must disconnect power from indicator before charging or jump starting a battery. If using a standard Avery Weigh-Tronix battery power cable, connect the BLACK wire to Ground and the WHITE wire to +12VDC. Always disconnect all cables connecting to the indicator before welding on any OEM equipment. -
Page 63: Indicator +/- Range Problem
Figure 9.1 Coin cell battery location on the main board Be sure to replace the battery(b1) with the same or equivalent type recommended by the manufacturer. Avery Weigh-Tronix PN of the battery is 60207-0013. Check All Incoming Cables: Now try pressing the ON/OFF key and see if the M640 will turn on. -
Page 64: Indicator Over Or Under Capacity Problem
Appendix: Troubleshooting 9.3 Indicator Over or Under Capacity Problem This situation occurs when the input from the weigh bars or load sensors exceed the capacity of the Model 640. If indicator shows either upper or lower dashes on the display, press ZERO/ CLEAR when the scale is empty to establish a zero weight readings. -
Page 65: Loss Of Data: Time & Date Or Memory Channels
640M and replace the coin cell battery (B1) on the main electronic board. See location in Figure 9.1. Be sure to replace the battery(b1) with the same or equivalent type recommended by the manufacturer. Avery Weigh-Tronix PN of the battery is 60207-0013. 9.7 How to Get Service Repairs... - Page 66 Appendix: Troubleshooting Model 640 Indicator Series User Instructions...
- Page 68 Avery Weigh-Tronix USA 1000 Armstrong Dr. Fairmont, MN 56031 USA Telephone: 507-238-4461 Facsimile: 507-238-8283 e-mail: ag@awtxglobal.com www.agscales.com...
Need help?
Do you have a question about the 640XL and is the answer not in the manual?
Questions and answers