
Subscribe to Our Youtube Channel
Related Manuals for Moxa Technologies UPort 1250I


Summary of Contents for Moxa Technologies UPort 1250I
- Page 1 UPort 1200/1400/1600 Series User’s Manual Edition 7.2, March 2018 www.moxa.com/product © 2018 Moxa Inc. All rights reserved.
- Page 2 UPort 1200/1400/1600 Series User’s Manual The software described in this manual is furnished under a license agreement and may be used only in accordance with the terms of that agreement. Copyright Notice © 2018 Moxa Inc. All rights reserved. Trademarks The MOXA logo is a registered trademark of Moxa Inc.
-
Page 3: Table Of Contents
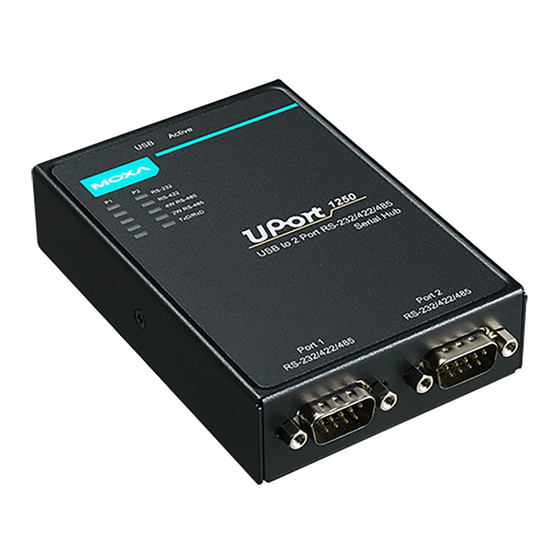
Ordering Information .......................... 1-2 Product Features ..........................1-3 Product Specifications ......................... 1-4 Panel Layout ............................1-6 UPort 1250 ..........................1-6 UPort 1250I ..........................1-6 UPort 1410/1450/1450I ....................... 1-6 UPort 1610-8/1650-8 ........................1-6 UPort 1610-16/1650-16 ....................... 1-7 Dimensions ............................1-7 UPort 1250 ..........................1-7 UPort 1250I .......................... -
Page 4: Introduction
ARDC (Automatic Recovery Data Communication) Ordering Information Product Features Product Specifications Panel Layout UPort 1250 UPort 1250I UPort 1410/1450/1450I UPort 1610-8/1650-8 UPort 1610-16/1650-16 Dimensions UPort 1250 UPort 1250I ... -
Page 5: Overview
The UPort 1400 series converters support both bus power and external power. The UPort 1250I, UPort 1600-8, and UPort 1600-16 converters support external power only. When using bus power, the UPort will get 500 mA through the laptop’s or workstation’s USB port. -
Page 6: Product Features
UPort 1200/1400/1600 Series Introduction Optional Accessories (can be purchased separately) Cables • CBL-USBA/B-100: USB Type A to USB Type B cable, 100 cm • CBL-F9M9-150: DB9 female to DB9 male serial cable, 150 cm • CBL-F9M9-20: DB9 female to DB9 males serial cable, 20 cm •... -
Page 7: Product Specifications
Serial Standards: UPort 1410/1610: RS-232 UPort 1250/1250I/1450/1450I/1650: RS-232/422/485 Connectors: DB9 male Serial Line Protection Optical Isolation Protection: 2 KV (UPort 1250I/1450I only) Performance Baudrate: 50 bps to 921.6 Kbps Serial Communication Parameters Data Bits: 5, 6, 7, 8 Stop Bits: 1, 1.5, 2... - Page 8 UPort 1250: 360 mA @ 5 VDC UPort 1410: 180 mA @ 5 VDC 12 to 48 VDC external power: UPort 1250I: 200 mA @ 12 VDC UPort 1410: 180 mA @ 12 VDC UPort 1450: 260 mA @ 12 VDC...
-
Page 9: Panel Layout
UPort 1200/1400/1600 Series Introduction Panel Layout UPort 1250 UPort 1250I UPort 1410/1450/1450I UPort 1610-8/1650-8... -
Page 10: Uport 1610-16/1650-16
UPort 1200/1400/1600 Series Introduction UPort 1610-16/1650-16 Dimensions UPort 1250 UPort 1250I... -
Page 11: Uport 1410/1450/1450I
UPort 1200/1400/1600 Series Introduction UPort 1410/1450/1450I UPort 1610-8/1650-8... -
Page 12: Uport 1610-16/1650-16
UPort 1200/1400/1600 Series Introduction UPort 1610-16/1650-16... -
Page 13: Driver Installation
Driver Installation In this chapter, we use Windows XP to illustrate how to install the UPort 1200/1400/1600 USB-to-serial converters. The procedures for other Windows platforms are essentially the same. We recommend installing the UPort driver first, before connecting the UPort to your computer’s USB port. The following topics are covered in this chapter: ... -
Page 14: Uport's Usb Usage Limitation
UPort 1200/1400/1600 Series Driver Installation UPort’s USB Usage Limitation 1. A maximum of 4 UPort converters can be connected to one PC host. Connecting more than 4 UPort converters will strain system resources and potentially destabilize the computer. 2. We recommend connecting the UPort directly to your PC’s USB port. 3. - Page 15 UPort 1200/1400/1600 Series Driver Installation 3. Click Next to create the program’s shortcuts in the indicated folder. 4. Click Install to proceed with installation.
-
Page 16: Hardware Description
PC and the UPort 1410/1450. The UPort 1450I requires external power. Using an External Power Source The UPort 1250I, UPort 1450/1450I, and UPort 1600-8 come with a power adapter for connecting to an external AC power source. UPort 1410 users can purchase a power adapter separately. The UPort 1600-16 comes with a power cord as a standard accessory. - Page 17 UPort 1200/1400/1600 Series Driver Installation Connecting to a Serial Device Use the proper serial cables to connect your serial devices to the UPort’s serial ports, which support the RS-232 and/or RS-422/485 interface. The UPort’s serial ports use DB9 male connector with standard pin assignment. Please see Chapter 3 for detail pin assignment.
- Page 18 UPort 1200/1400/1600 Series Driver Installation UPort 1200 DIP Switches UPort 1400 DIP Switches UPort 1600-8 DIP Switches UPort 1600-16 DIP Switches...
-
Page 19: Installing The Driver For The Converter
UPort 1200/1400/1600 Series Driver Installation Installing the Driver for the Converter NOTE The operating system will automatically detect the UPort when you plug it into one of your computer’s USB ports. If you have installed the latest UPort driver, the UPort and the UPort’s serial port will be installed automatically. - Page 20 UPort 1200/1400/1600 Series Driver Installation 3. Select Install the software automatically (Recommended), and then click Next to continue. 4. Wait while the installation wizard searches for the correct drivers. The next window that opens cautions you that although this software has not passed Windows logo testing, this driver has already been tested and shown that it can support the Windows operating system.
-
Page 21: Installing The Driver For The Ports
UPort 1200/1400/1600 Series Driver Installation 5. The next window shows the model name of the board, and indicates that Windows has completed the driver installation. Click Finish to proceed with the rest of the installation procedure. 6. Open Windows Device Manager to check that the installation was successful. The UPort USB-to-serial converter should appear under Multi-port serial adapters. - Page 22 UPort 1200/1400/1600 Series Driver Installation 2. Select Install the software automatically (Recommended), and then click Next to continue. 3. Wait while the installation wizard searches for the correct drivers. The next window that opens cautions you that although this software has not passed Windows logo testing, this driver has already been tested and shown that it can support the Windows operating system.
- Page 23 UPort 1200/1400/1600 Series Driver Installation 5. After all files have been copied to the system, the Completing the Found New Hardware Wizard window will open to indicate that it has finished installing driver. Click Finish to proceed with the rest of the installation.
-
Page 24: Configuring The Ports
UPort 1200/1400/1600 Series Driver Installation Configuring the Ports After the driver has been installed, use Windows’ Device Manager to configure the UPort serial ports. 1. With the System Properties window open, click on the Hardware tab, and then click on Device Manager. - Page 25 UPort 1200/1400/1600 Series Driver Installation The Ports Configuration page settings are described below. Port Settings Auto Enumerating COM Number If the “Auto Enumerating COM Number” checkbox is checked, COM numbers will be assigned automatically and in sequence to the ports. E.g., COM3 to Port 1, COM4 to Port 2, etc. If you do not enable this check box, only the first COM Number will be changed to new COM number list in the drop-down list box.
- Page 26 UPort 1200/1400/1600 Series Driver Installation Tx Mode Setting Factory Default Necessity Hi-Performance, Hi-Performance Required Classical To improve the write performance, you can select Hi-Performance mode. Under classical mode, the driver will not notify the user’s program that Tx is completed until all Tx data has been sent out from the UPort; this mode will cause lower throughput.
- Page 27 UPort 1200/1400/1600 Series Driver Installation View All Settings You can preview all ports settings with this function. Advanced Settings Serial transmission applications use names such as COM3 and COM4 to identify COM ports. Unfortunately, most USB-to-serial products are unable to use fixed COM names on the host PC. This means the names of the COM ports change when the USB-to-serial device is plugged into a different USB port, either on the same or a different PC, forcing the user to reconfigure the COM names manually from within the application.
- Page 28 UPort 1200/1400/1600 Series Driver Installation Restore Read all UPort settings as new settings. Click OK to activate. Clear Clear the UPort settings stored in the UPort. This operation is similar to resetting all settings to their factory defaults. The following settings will be saved to the UPort if you select Save: COM number, Friendly Name, Transmission Mode, FIFO settings, Fast Flush settings, and Interface.
- Page 29 UPort 1200/1400/1600 Series Driver Installation Locate Use this function to identify the UPort’s location, especially when two or more UPorts are installed in the same computer. This function will ask the UPort to flash the ready LED and turn on the Buzzer until you stop it. Fixed-base COM Moxa’s UPort 1200/1400/1600 Series Utility gives users a convenient tool for configuring and maintaining products from the UPort series.
- Page 30 UPort 1200/1400/1600 Series Driver Installation Fixed-base COM Mode” allows users to specify which COM number will be assigned first. In addition, COM numbers are assigned sequentially, and are not tied to specific UPort converters. For example, assume that you have set COM10 as the first COM number that will be assigned. If UPort D1 is plugged into your computer first, your computer will assign COM10 and COM11 to the UPort’s serial ports.
- Page 31 UPort 1200/1400/1600 Series Driver Installation For example, let’s assume that before you enable “Fixed-base COM Mode” you set the parameters of the UPort 1250 as follows: If you enable “Fixed-base COM Mode,” all parameters will be reset to their default values: At this point you can set serial parameters to the values needed for your application.
-
Page 32: Uninstalling The Uport
UPort 1200/1400/1600 Series Driver Installation Uninstalling the UPort If you want to remove the UPort, you just need to remove the device from Device Manager. The UPort driver will still stay alive enabling other UPort devices to keep working. 1. To uninstall the UPort, click Start Settings Control Panel System, select the Hardware tab, and then click Device Manager. -
Page 33: Uninstalling The Driver
UPort 1200/1400/1600 Series Driver Installation Uninstalling the Driver 1. To uninstall the driver, open the Control window, and click Add/Remove Programs. 2. Select Moxa UPort Windows Driver Ver1.4. Click the Remove button. 2-21... -
Page 34: Installing The Windows Ce Driver
UPort 1200/1400/1600 Series Driver Installation 3. Click OK to proceed with the un-installation procedure. Installing the Windows CE Driver In this section, we introduce installation procedures for the Windows CE 5.0 and Windows CE 6.0 drivers. Both Win CE 5.0 and Win CE 6.0 need the Win CE platform builder for installation. The only difference is that Win CE 6.0 also requires Visual Studio 2005. -
Page 35: Installation With An Installation Package For Win Ce 6.0
UPort 1200/1400/1600 Series Driver Installation Installation with an installation package for Win CE 6.0 Installation procedure Copy the UPort 1200/1400/1600 WinCE 6.0 driver package onto your computer and extract. Double click on the installation package and it will automatically copy the Mxser folder to C:\MOXAUPORT\wince600\Uport. 1. - Page 36 UPort 1200/1400/1600 Series Driver Installation 2. When the CE 6.0 OS Design Wizard starts, select CEPC: x86 for Board Support Packages. 2-24...
- Page 37 UPort 1200/1400/1600 Series Driver Installation 3. Under Design Templates and Design Template Variants, select your environment, such as PDA Device or Mobile Handheld, and then click Next. In Application & Media and Networking & Communication, also select your environment, such as .NET Compact Framework 2.0, ActiveSync, Quarter VGA Resources-Portrait Mode, or TCP/IPv6 Support.
- Page 38 UPort 1200/1400/1600 Series Driver Installation 2-26...
- Page 39 UPort 1200/1400/1600 Series Driver Installation 4. When the OS Design Project Wizard Complete screen appears, click Finish. The notification will pop up. Click “Acknowledge” to finish the project. 2-27...
- Page 40 UPort 1200/1400/1600 Series Driver Installation 5. Open the project you created. Click Project on top of the screen, and then select Add Existing Subproject. Switch the folder to “C:\MOXAUPORT\wince600\Uport” and add subprojects into your OS Design. Assign the pbpxml file to a different folder (i.e.mxupce6.pbpxml). 6.
- Page 41 UPort 1200/1400/1600 Series Driver Installation 7. Open “Build”, select “Advanced Build Commands” and “Build Sysgen”. This operation will take you a few minutes. 8. After building sysgen, select “Build” and “Make Run-Time Image” to create the WinCE OS image. Finally, copy your image file to the target Host.
-
Page 42: Installation With An Installation Package For Win Ce 5.0
UPort 1200/1400/1600 Series Driver Installation Installation with an installation package for Win CE 5.0 In this section, we describe how to install the Moxa Win CE 5.0 Driver on a Windows CE 5.0 operating system. 1. Obtain a copy of the UPort 1200/1400/1600 Series WinCE 5.0 driver package and extract it to your computer. - Page 43 UPort 1200/1400/1600 Series Driver Installation 4. Interface configuration. On the target device, configuration tool will be found in “StartProgramsMOXA UP Configuration Panel\UPort Configuration Utility”. 2-31...
-
Page 44: Removing The Moxa Win Ce 5.0/ Ce6.0 Driver
UPort 1200/1400/1600 Series Driver Installation Removing the Moxa Win CE 5.0/ CE6.0 Driver For Win CE 6.0 Driver: 1. Select the driver to remove. 2. Switch the folder to C:\ MOXAUPORT \ and double click “unins000.exe” to remove the installation folder. -
Page 45: Installation With A Cab File
UPort 1200/1400/1600 Series Driver Installation Installation with a CAB File Install the UPort 1200/1400/1600 series Win CE driver onto the target host. 1. If you do not have ActiveSync, install Microsoft ActiveSync in the source PC. Before running ActiveSync, use an RS-232 null modem cable to connect the WinCE Device (CEPC) and the PC. -
Page 46: Removing The Moxa Win Ce 5.0/ Ce6.0 Driver
UPort 1200/1400/1600 Series Driver Installation 3. Click on the “Explore” button in the ActiveSync window, and then copy the UPort_COM_v1.0_Setup.cab (Win CE 6.0) or UPort_COM_v1.1_Setup.cab (Win CE 5.0) file to the “Mobile/Target Device”. 4. Double click on the CAB file (UPort_COM_v1.0_Setup.cab (Win CE 6.0) or UPort_COM_v1.1_Setup.cab (Win CE 5.0)) to start installing the UPort 1200/1400/1600 Series WinCE driver. -
Page 47: Installing The Linux Driver
Linux kernel version 2.6.x and 3.x. Please check Moxa’s website (http://www.moxa.com) for the latest Linux kernel support. The Linux drivers support the following models: 2-port UPort Models UPort 1250: 2-port RS-232/422/485 USB-to-serial converter UPort 1250I: 2-port RS-232/422/485 USB-to-serial converter with isolation 4-port UPort Models UPort 1410: 4-port RS-232 USB-to-serial converter UPort 1450:... -
Page 48: Module Driver Configuration
UPort 1200/1400/1600 Series Driver Installation Module Driver Configuration We cover the following topics in this section: • Building the Moxa Driver • Installing the Moxa Driver Building the Moxa Driver Before using the Moxa driver, you will need to compile all of the source code. This only needs to be done once, unless you modify the source code. -
Page 49: Setting The Serial Parameters
UPort 1200/1400/1600 Series Driver Installation Setting the Serial Parameters After installing the Moxa Linux Driver, you will be able to configure parameters. 1. Serial Interface: The UPort 1250/1250I/1450/1450I/1650-8/1650-16 supports four interfaces: RS-232, RS-485 2W, RS-485 4W, RS-422. If you want to switch to a different interface, execute the setserial command to set the port’s interface. -
Page 50: Serial Port Pin Assignments
Serial Port Pin Assignments The UPort 1250/1250I have 2 RS-232/422/485 ports, the UPort 1410 has 4 RS-232 ports, the UPort 1450/1450I have 4 RS-232/422/485 ports, the UPort 1610-8/1610-16 have 8 or 16 RS-232 ports, and the UPort 1650-8/1650-16 has 8/16 RS-232/422/485 ports. DB9 Male RS-232 Port UPort 1410/1610-8/1610-16 RS-232...
Need help?
Do you have a question about the UPort 1250I and is the answer not in the manual?
Questions and answers