
Related Manuals for Jensen JTA-990


Summary of Contents for Jensen JTA-990
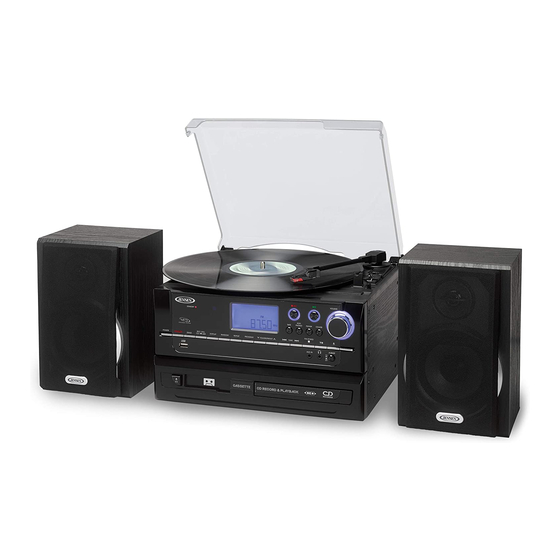
- Page 1 ALL IN ONE STEREO MUSIC SYSTEM WITH MP3 ENCODING MODEL: JTA-990 USER MANUAL PLEASE READ THIS USER MANUAL COMPLETELY BEFORE OPERATING THIS UNIT AND RETAIN THIS BOOKLET FOR FUTURE REFERENCE.
-
Page 2: Important Safety Instructions
WARNING TO PREVENT FIRE OR SHOCK HAZARD, DO NOT USE THIS PLUG WITH AN EXTENSION CORD, RECEPTACLE OR OTHER OUTLET UNLESS THE BLADES CAN BE FULLY INSERTED TO PREVENT BLADE EXPOSURE. TO PREVENT FIRE OR SHOCK HAZARD, DO NOT EXPOSE THIS APPLIANCE TO RAIN OR MOISTURE. The Caution Marking is located at the back enclosure of the apparatus. - Page 3 apparatus has been exposed to rain or moisture, does not operate normally, or has been dropped. 15. This appliance shall not be exposed to dripping or splashing water and that no object filled with liquids such as vases shall be placed on the apparatus. 16.
- Page 4 CAUTION Follow the advice below for safe operations. ON PROTECTION AGAINST LASER ENERGY EXPOSURE As the laser beam used in this compact disc player is harmful to the eyes, do not attempt to disassemble the casing. Stop operation immediately if any liquid or solid object should fall into the cabinet. ...
-
Page 5: Important Notes
IMPORTANT NOTES Avoid installing the unit in locations described below: Places exposed to direct sunlight or close to heat radiating appliances such as electric heaters. Places subject to constant vibration. Dusty, humid or moist places. COMPLIANCE WITH FCC REGULATIONS This device complies with Part 15 of the FCC Rules. -
Page 6: Dear Jensen® Customer
The serial number of this product is found on its back cover. You should note the serial number of this unit in the space provided as a permanent record of your purchase to aid in identification in the event of theft of loss. Model Number: JTA-990 Serial Number: ____________________... -
Page 7: Getting Started
GETTING STARTED SPEAKER CONNECTION 1. Insert the speaker cable ends (exposed wires) into the terminals located on the back of the main unit by pushing down the lever of the left speaker terminal and then the right speaker terminal 2. Connect the left speaker to the left speaker terminals with the red wire to L+ and the black wire to L -. -
Page 8: Location Of Controls
LOCATION OF CONTROLS MAIN UNIT 1. Turntable Dust Cover 2. LCD Display 3. Remote Sensor 4. Standby LED Indicator 5. Power Button 6. Erase Button 7. Finalize Button 8. Record 1/All button for encoding from CD to USB 9. USB Port 10. -
Page 9: Remote Control
REMOTE CONTROL Button description 1. Repeat In CD/USB mode: Press to activate CD Repeat 1/all 2. Random In CD/USB mode: Press to activate shuffle play function 3. Program In CD/USB mode: Press to activate programming function 4. Play/pause In CD/USB mode: Press to Start/Pause CD/USB playback In Recording/Encoding mode: Press to confirm function. -
Page 10: Battery Installation
11. Erase Press to erase file in USB thumb drive or CD-RW 12. Record 1/All from CD to USB Press to Record One/All tracks for encoding from CD to USB 13. Finalize Press to Finalize the CD-R/RW disc after recording 14. -
Page 11: Radio Operation
RADIO OPERATION MANUAL TUNING 1. Press the POWER button on main unit to turn on the unit. The display will show “HELLO” and then “---bUSY” for few seconds. Wait until the display shows FM frequency. The unit is in FM mode. -
Page 12: Phono Operation
PHONO OPERATION Note, Before Use: Lift up the turntable dust cover. Lift up the stylus protector as shown to the right. Be sure that the tone arm is unlocked from the tone arm rest before operating, and replace again when finished. 1. - Page 13 4. After the CD is read, the LCD display shows the total number and time of the tracks. If a CD is not recognized by the player or if no disc is loaded, the display will show “NO Cd”. NOTES: - Keep the CD disc tray closed when the system is not in use to prevent dirt and dust from entering the CD mechanism.
- Page 14 Play mode Indicator on LCD display Repeat all Repeat 1 Random Off mode -------------- CD disc programming Up to 32 tacks can be programmed for CD playback. Before programming tracks, be sure the CD system is in stop mode: 1.
- Page 15 CD RECORDING RECORDING FUNCTION ON CD Apart from the CD playback function, this unit can perform the CD recording function either from PHONOGRAPH, TAPE, AUX or USB modes. All recorded tracks will be stored in “AUDIO-CD” format. This unit can only copy a pre-recorded Audio CD to CD via “USB Buffering” method. IMPORTANT NOTE: Before starting the CD-to-CD Copying process via USB Buffering, you must insert the Included 2GB USB thumb drive into the USB port for copying an entire CD.
- Page 16 3. Press the REC button on remote control or main unit, the LCD display will show “---Cd” and icon. 4. Press the Play/Pause button to start recording, the “CD” icon will be flashing and the elapsed time will start counting. The system is recording now. 5.
- Page 17 - Record One Track in USB thumb drive i) Select the song you wish to record by using the TUNE/ or /TUNE button and/or FOLDER/PRE / button of the remote and the Play/Pause button to start playback. ii) Press the REC button to start recording, icon appears and CD icon is flashing. - Record All Tracks of USB thumb drive i) Press the Play/Pause button to start playback of the USB ii) Press the REC 1/ALL button once on the remote control, display will show “AUTO...
- Page 18 4. Select between recording the 1st track or an entire CD: - Press the REC button, the LCD display will show “ SEL 1” (the 1st track of the CD Disc). - Press the REC button again, the LCD display will show “ SEL ALL “ (the entire CD Disc).
-
Page 19: Important Notices
ii.) PAUSE / RE-START THE RECORDING PROCESS 1. To pause the recording process at any time, press the Play/Pause button on Remote Control. ‘---bUSY’ will flash for a second on the LCD display, the system will then generate a new recording track number and the recording process will pause. 2. - Page 20 The CD-R disc cannot be recorded again after finalizing. Finalized CD-R discs can be played in ordinary CD players, but finalized CD-RW disc may not play in ordinary CD players . Due to the variance of the compatibility of CD-R or CD-RW discs in the market, please change to other one if you find the recording performance of the existing one unacceptable.
-
Page 21: Usb Operation
performed on a CD-RW disc recorded from another system, but the ‘erase all’ function can be performed on a CD-RW disc recorded from another system. 1. Press the CD/USB button to select the CD mode. 2. Press the CD Door Open/Close button on the main unit to open the CD tray. - Page 22 3. Press the CD Door open/close button on main unit to open the CD tray. 4. Place your Audio CD (print side up) inside the CD tray. 5. Press the button to close the CD tray. The system will perform a search and the LCD display will show ‘---bUSY’.
- Page 23 ENCODE FROM CASSETTE TAPE 1. Press the TAPE button to select ‘TAPE’ mode. 2. Place a recorded Cassette tape into the Cassette Slot on the front panel of the main unit. Do not fully insert the tape. 3. Press the Record button once, the LCD display will show “---Cd”, press the button again until the display shows “---USb”.
-
Page 24: Deleting A Single File
Note: If the track number to be deleted is different than your selection, it is a track that was recorded by the JTA-990. If there is any concern about what files are being deleted, we recommend you insert the USB thumb drive into your computer and manually delete them that way. -
Page 25: Tape Operation
TAPE OPERATION GENERAL OPERATION 1. Press the “TAPE” button to select “TAPE” mode. 2. The system will start playback automatically after inserting the cassette tape. 3. Adjust the volume to the desired level. 4. Press the TAPE FAST FORWARD / EJECT button half way when playing, the tape will be advanced forward rapidly. -
Page 26: Auxiliary Input
AUXILIARY INPUT This unit provides an auxiliary audio signal input jack for connecting external audio devices like MP3 players, CD players and older, non-dockable iPods (except iPod shuffle 3 gen) so you can listen to your external source through the speakers of this system. 1. - Page 27 Check that there are no loose layers of tape visible through the cassette center window (see Fig. 1). Take up any loose layers, using a pencil or hexagonal barrelled ballpoint pen, before inserting the cassette into the machine (see Fig.2). ...
-
Page 28: Compact Disc Care
COMPACT DISC CARE Handle the disc only by its edges. Never allow your fingers to come in contact with the shiny, unprinted side of the disc. Do not attach adhesive tape, stickers etc., to the disc label. Clean the disc periodically with soft, lint-free, dry cloth. -
Page 29: Troubleshooting Guide
CAUTION: Never allow any water or other liquids to get inside the unit while cleaning. TROUBLESHOOTING GUIDE SHOULD YOU EXPERIENCE DIFFICULTIES IN THE USE OF THIS PLAYER PLEASE REFER TO THE FOLLOWING CHART OR CALL 1-800-777-5331 FOR CUSTOMER SERVICE. PROBLEM POSSIBLE CAUSE SOLUTION The unit is disconnected from the... -
Page 30: Specification
SPECIFICATION Power Requirement Main unit: AC120V~ 60Hz Remote control 2 x 1.5V “AAA” (UM-4) size batteries (included) Frequency Range Radio Band FM 87.5 ~ 108 MHz AM 520 ~ 1710 KHz USB PORT Support FAT 32 format, Up to 32 GB USB thumb drives. Power Consumption Main Unit: 42Watts... - Page 31 90 DAY LIMITED WARRANTY AND SERVICE VALID IN THE U.S.A. ONLY SPECTRA MERCHANDISING INTERNATIONAL, INC. warrants this unit to be free from defective materials or factory workmanship for a period of 90 days from the date of original customer purchase and provided the product is utilized within the U.S.A.
Need help?
Do you have a question about the JTA-990 and is the answer not in the manual?
Questions and answers