
Related Manuals for Jensen JTA-420


Summary of Contents for Jensen JTA-420
-
Page 1: User Manual
PORTABLE 3-SPEED STEREO TURNTABLE WITH BUILT-IN SPEAKERS USER MANUAL JTA-420 PLEASE READ THIS USER MANUAL AND SOFTWARE GUIDE COMPLETELY BEFORE OPERATING THIS UNIT AND RETAIN THIS BOOKLET FOR FUTURE REFERENCE. -
Page 3: Important Safety Instructions
WARNING TO PREVENT FIRE OR SHOCK HAZARD, DO NOT USE THIS PLUG WITH AN EXTENSION CORD, RECEPTACLE OR OTHER OUTLET UNLESS THE BLADES CAN BE FULLY INSERTED TO PREVENT BLADE EXPOSURE. TO PREVENT FIRE OR SHOCK HAZARD, DO NOT EXPOSE THIS APPLIANCE TO RAIN OR MOISTURE. - Page 4 Unplug this apparatus during lightning storms or when unused for long periods of time. Refer all servicing to qualified service personnel. Servicing is required when the apparatus has been damaged in any way, such as power-supply cord or plug is damaged, liquid has been spilled or objects have fallen into the apparatus, the apparatus has been exposed to rain or moisture, does not operate normally, or has been dropped.
-
Page 5: Compliance With Fcc Regulations
COMPLIANCE WITH FCC REGULATIONS This device complies with Part 15 of the FCC Rules. Operation is subject to the following two conditions: (1) this device may not cause harmful interference, and (2) this device must accept any interference received, including interference that may cause undesired operation. -
Page 6: Protect Your Furniture
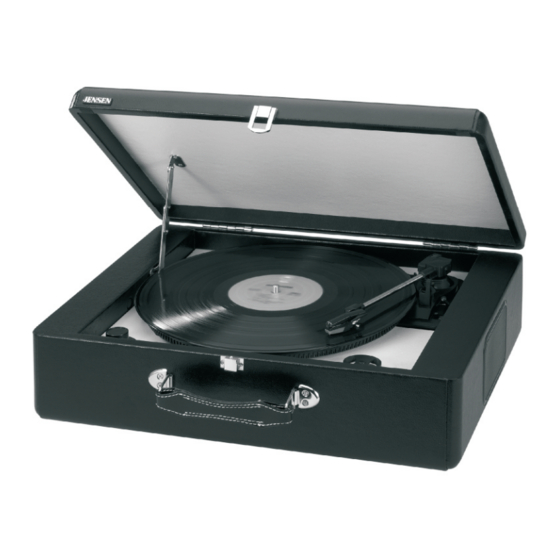
PROTECT YOUR FURNITURE This model is equipped with non-skid rubber 'feet' to prevent the product from moving when you operate the controls. These 'feet' are made from non-migrating rubber material specially formulated to avoid leaving any marks or stains on your furniture. - Page 7 6. Turntable 7. 45 RPM Record Adaptor 8. Transit Screw 9. Cue Lever 10. 33/45/78RPM Speed Selector 11. Tone Arm Rest/Holder 12. Tone Arm with Stylus 13 14 15 16 17 13. USB Port For Computer Connection 14. AUX IN Jack 15.
-
Page 8: Getting Started
GETTING STARTED IMPORTANT!! TO PROTECT THE TURNTABLE FROM DAMAGE DURING TRANSPORTATION, A SILVER TRANSIT SCREW IS LOCATED AT THE UPPER RIGHT OF THE TURNTABLE PLATFORM. BEFORE PLAYING, PLEASE USE A SCREW DRIVER TO TURN THE TRANSIT SCREW IN CLOCKWISE DIRECTION (SCREW GOING DOWN) COMPLETELY TO UNLOCK THE TURNTABLE TO LOCK THE TURNTABLE AGAIN FOR TRANSPOTATION, PLEASE TURN... - Page 9 3. Remove the opaque white plastic stylus cover from the phonograph stylus by sliding it in the direction of the arrow. Discard the stylus cover. 4. Remove the twist-tie that was used to secure the tone arm during shipment. 5. Release the tone arm lock lever.
-
Page 10: Auxiliary Input
STEREO PHONOGRAPH OPERATION Please Note - Before Use Cartrige Remove the stylus protector. Make sure that the tone arm is unlocked and free to move from the tone arm rest prior to operating. Lock the tone arm again when not in use. Stylus Assembly 1. -
Page 11: Line Out Connection
1. Set the PHONO/AUX mode selector locates on the back of the unit to AUX position. 2. Use an audio cable (included) with one 3.5 mm stereo plug on each end of the cable. 3. Plug one end into the AUX-IN jack on the main unit and the other end of the cable into the Line-out Jack or Headphone Jack of your external audio device. - Page 12 Set Recording Input Level (Use Windows XP Computer)
- Page 14 Running Audacity software Note: Please review the software license and distribution restrictions found on the software disc. Use of the Audacity software is subject to those conditions and restriction. For additional help with recording and editing music by using the Audacity software, please visit http://audacity.sourceforge.net/ 1.
- Page 15 4. Adjust the input and output volume by sliding the Input and Output Volume bars. Output Volume Input Volume 5. Click the record button to start recording, left and right tracks will show on your computer screen. If you cannot see the sound waves appear on the Interface when recording, adjust the Input volume.
-
Page 19: Specification
CUSTOMER SERVICE. PROBLEM POSSIBLE CAUSE SOLUTION AC Adaptor is not plugged into a wall outlet or the Plug the AC adaptor into a wall connector is not plugged outlet and plug the connector into the power supply jack into the supply jack on the unit. The unit does on the back of the unit. - Page 20 90 DAY LIMITED WARRANTY AND SERVICE VALID IN THE U.S.A ONLY and email address to expedite the process.
- Page 21 IF THE UNIT IS OUTSIDE THE WARRANTY PERIOD, please include a check for $50.00 to cover the cost of repair, handling and return postage. All out of warranty returns must be sent prepaid. It is recommended that you contact SPECTRA first at 1-800-777-5331 or by email at Custer@spectraintl.com for updated information on the unit requiring service.
Need help?
Do you have a question about the JTA-420 and is the answer not in the manual?
Questions and answers
What size drive belt do I need