TSC TTP-2410MT Quick Installation Manual
Hide thumbs
Also See for TTP-2410MT:
- User manual (87 pages) ,
- Service manual (52 pages) ,
- Programming manual (434 pages)
Advertisement
Quick Links
Quick Installation Guide
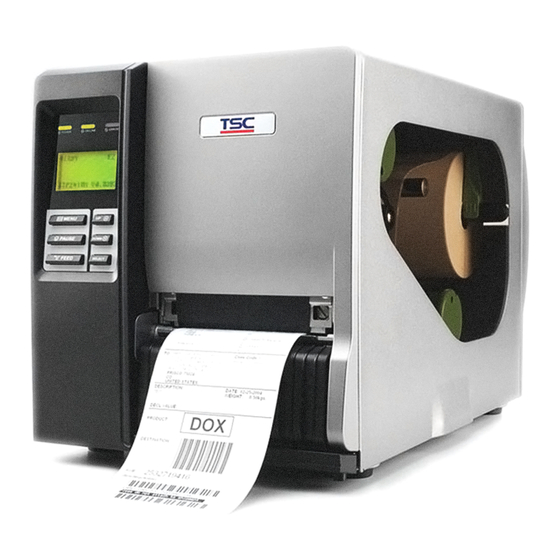
Printer Overview
LED indicators
LCD
Operation
Media view
buttons
Paper exit
window
chute
Note: The interface picture here is for reference only. Please refer to the product specification for the interfaces
availability.
Printer right side cover
Media guide bar
Ribbon rewind
spindle
Ribbon release
button
Internal rewind
spindle
Print head pressure
adjustment knobs
Ethernet interface
Fan-fold paper
SD card
entrance chute
socket
USB
interface
USB host
interface
RS-232C
interface
Power jack
socket
Print head
Ribbon
sensor
Platen
Label roll
guard
3" Label
Media sensor
supply spindle
Label guide
Print head
release lever
Ribbon supply
spindle
(Option)
Loading the Ribbon
GPIO
interface
(Option)
Centronics
interface
(1) Open the printer right side cover.
Push the print head release lever to
open the print head mechanism.
Power switch
(4) Wind the ribbon clockwise about
3~5 circles onto the ribbon rewind
spindle until it is smooth and
properly stretched.
Remove Used Ribbon
Damper
Media sensor
lock lever
(1) Break the ribbon between ribbon
guide plate and the ribbon rewind
spindle.
Page 1 of 2
(2) Install the ribbon onto the ribbon
(3) Wrap the ribbon onto the ribbon
supply spindle. Thread the ribbon
rewind spindle. Keep the ribbon
through the ribbon sensor slot and
flat and without wrinkles.
then through the open space in
between print head and platen.
* Loading path for ribbon
(5) Close the print head mechanism by
pushing the both sides of print head
mechanism. Make sure the latches
are engaged securely.
(2) Push the ribbon release button to
(3) Then, slide off the ribbon from
release the ribbon on the ribbon
ribbon rewind spindle.
rewind spindle.
Advertisement

Related Manuals for TSC TTP-2410MT


Summary of Contents for TSC TTP-2410MT
- Page 1 Quick Installation Guide Printer Overview Loading the Ribbon Ethernet interface Fan-fold paper SD card LED indicators entrance chute socket GPIO interface interface (Option) USB host interface Centronics interface (1) Open the printer right side cover. (2) Install the ribbon onto the ribbon (3) Wrap the ribbon onto the ribbon Push the print head release lever to supply spindle.
- Page 2 Loading the Media Control Panel Status Indication Keys Function Printer power off FEED Advances one label POWER Printer power on PAUSE Pause/Resume the printing process Printer is ready 1. Enter the menu Printer is paused ON-LINE 2. Exit from a menu or cancel a Blinking Printer is downloading MENU...
Need help?
Do you have a question about the TTP-2410MT and is the answer not in the manual?
Questions and answers