Advertisement
Quick Guide
You must read the Usage and Safety Precautions before use.
The Operation Manual can be downloaded from the ZOOM website
(https://www.zoom.jp/docs/L-20).
© 2018 ZOOM CORPORATION
Copying or reprinting this manual in part or in whole without permission is prohibited.
Product names, registered trademarks and company names in this document are the property of their respective companies. All
trademarks and registered trademarks in this document are for identification purposes only and are not intended to infringe on the
copyrights of their respective owners.
You might need this manual in the future. Always keep it in a place where you can access it easily.
The contents of this manual and the specifications of the product could be changed without notice.
Advertisement
Table of Contents

Related Manuals for Zoom LiveTrak L-20


Summary of Contents for Zoom LiveTrak L-20
- Page 1 Quick Guide You must read the Usage and Safety Precautions before use. The Operation Manual can be downloaded from the ZOOM website (https://www.zoom.jp/docs/L-20). © 2018 ZOOM CORPORATION Copying or reprinting this manual in part or in whole without permission is prohibited.
-
Page 2: Turning The Power On And Off
Turning the power on and off Connecting equipment and turning the power on 1 、 7 2 、 6 Confirm that the output devices connected to the are turned off. Confirm that is set to OFF . Plug the AD-19 adapter designed for this unit into an outlet. - Page 3 Turning the power on and off Set all knobs and faders to their minimum values. Connect instruments, mics, speakers and other equipment. HINT See the Operation Manual for connection examples. to ON. Turn on the output devices connected to the NOTE •...
-
Page 4: Setting The Date And Time
Setting the date and time The first time you turn the power on after purchase, you must set the date/ time. 2 、 3 Press This opens the display MENU screen. Select SYSTEM > DATE/TIME. Move cursor: Turn Confirm: Press Set the date and time. - Page 5 Outputting input sounds from output devices Outputting sound from speakers 3 、 5 to adjust the input signals while inputting sound from instru- ments and mics. NOTE Set them so that SIG indicators do not light red. SIG indicator Turn off (unlit) for the MASTER and the channels with sound you want to output.
- Page 6 Outputting input sounds from output devices Outputting sound from headphones Connect headphones to the PHONES jack. to adjust the volume. HINT The signal output from the PHONES jack can be set to MASTER, SOLO or MONITOR OUT A–F . Status Explanation MASTER The same signals as the MASTER OUT are output.
-
Page 7: Adjusting The Tone And Panning
Adjusting the tone and panning Press to light it for the channel for which you want to adjust tone and panning. Use the knobs and buttons to adjust the tone and panning. Adjusting the tone: Adjusting the panning: Reversing the polarity: NOTE To turn off all equalization at once, press to light it. -
Page 8: Using The Built-In Effects
Using the built-in effects has 20 types of send effects in 2 banks. 3 、 6 Turn to select the effect type, and press to confirm. Lit: Effect selected Press to turn it off, unmuting EFX1/EFX2 RTN. Set the EFX1/EFX2 RTN fader to 0. - Page 9 Using the built-in effects Press for a channel that you want to use the effect on to light it. to adjust the amount for each channel. Use the EFX1/EFX2 RTN fader to adjust the overall effect amount. to adjust the send effect parameters for EFX1/ EFX2 RTN.
-
Page 10: Preparing To Record
Preparing to record Inserting SD cards to OFF . Open the SD card slot cover, and insert an SD card all the way into the slot. To remove an SD card, push it further into the slot and then pull it out. NOTE •... - Page 11 Preparing to record Creating new projects manages recording and playback data in units called projects. Press This opens the display MENU screen. Select PROJECT > NEW PROJECT. Move cursor: Turn Confirm: Press to select YES, and press NOTE When a new project is created, it will start with the current mixer settings. HINT When the power is turned on, it will automatically load the last used project.
-
Page 12: Recording/Overdubbing And Playing Tracks
Recording/overdubbing and playing tracks has recorder functions that enable simultaneous recording of up to 22 tracks and simultaneous playback of up to 20 tracks. The input signals of every channel and from the master fader output can be recorded. These recordings can also be played back. Recording to turn overdubbing on or off. - Page 13 Recording/overdubbing and playing tracks Press to stop recording. NOTE • The signals recorded on each channel can be set to either before or after the compressor. • See the Operation Manual for information about punching in/out, automatic recording and pre-recording. •...
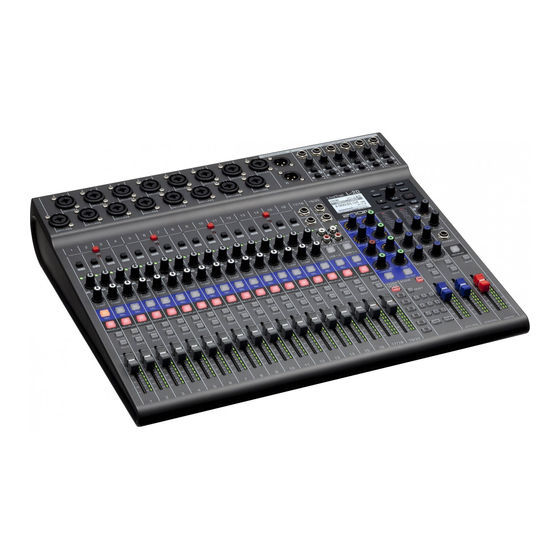
- Page 14 Mixer Mixer The mono channels have high-quality mic preamps and compressors. Each channel can also have 3-band EQ, LOW CUT, PAN, polarity reversal, and send amounts for 2 effects set. You can also set the bus monitored through the PHONES jack to MASTER, A–F or SOLO.
-
Page 15: Specifications
Specifications Number of in- Inputs Mono (MIC/LINE) put and output Stereo (LINE) channels Outputs MASTER OUT MONITOR OUT PHONES Inputs Mono Type XLR/TRS combo jacks (XLR: 2 HOT, TRS: TIP HOT) (MIC/LINE) Input gain PAD OFF: +16 – +60 dB PAD ON: −10 –... - Page 16 ZOOM CORPORATION 4-4-3 Kanda-surugadai, Chiyoda-ku, Tokyo 101-0062 Japan http://www.zoom.co.jp Z2I-3360-01...
Need help?
Do you have a question about the LiveTrak L-20 and is the answer not in the manual?
Questions and answers