Table of Contents
Advertisement
Quick Links
Operation Manual
You must read the Usage and Safety Precautions before use.
©2024 ZOOM CORPORATION
Copying or reprinting this manual in part or in whole without permission is prohibited.
Product names, registered trademarks and company names in this document are the property of their respective companies. All trademarks and
registered trademarks in this document are for identification purposes only and are not intended to infringe on the copyrights of their respective owners.
Proper display is not possible on grayscale devices.
Advertisement
Table of Contents

Related Manuals for Zoom LiveTrak L6


Summary of Contents for Zoom LiveTrak L6
- Page 1 Operation Manual You must read the Usage and Safety Precautions before use. ©2024 ZOOM CORPORATION Copying or reprinting this manual in part or in whole without permission is prohibited. Product names, registered trademarks and company names in this document are the property of their respective companies. All trademarks and registered trademarks in this document are for identification purposes only and are not intended to infringe on the copyrights of their respective owners.
-
Page 2: Notes About This Operation Manual
• Recording from copyrighted sources, including CDs, records, tapes, live performances, video works and broadcasts, without permission of the copyright holder for any purpose other than personal use is prohibited by law. ZOOM CORPORATION will not assume any responsibility related to infringements of copyrights. -
Page 3: Table Of Contents
Contents Notes about this Operation Manual........................2 L6 overview...................................5 Realizing high audio quality while mixing....................... 5 Functions of parts..............................10 Connection example..............................19 Signal flow...................................21 Preparing for use..............................24 Supplying power................................ 24 Making connections..............................27 Turning the power on/off............................35 Using the app................................36 Setting date and time, battery type and automatic power off... - Page 4 Connecting MIDI devices............................83 Making MIDI settings..............................85 Managing microSD cards............................90 Checking the microSD card state........................... 90 Formatting microSD cards............................91 Making various settings............................92 Setting the date and time............................92 Setting the type of batteries used..........................95 Turning the power off automatically (Auto Power Off)..................98 Restoring factory default settings........................
-
Page 5: L6 Overview
L6 overview Realizing high audio quality while mixing With dual A/D converter circuits and support for 32-bit float format, the L6 can maintain the highest audio quality while mixing. NOTE On the L6, only INPUT 1 and INPUT 2 jacks have dual A/D converter circuits. Inputs Dual A/D converter circuits allow input from the loudest to the quietest sounds without requiring gain adjustments. - Page 7 Dual A/D converter circuit overview For each input circuit, the L6 has two A/D converters with different input gains. This design enables mixing with high quality without the need to adjust input gain, which is normally indispensable. NOTE On the L6, only INPUT 1 and INPUT 2 jacks have dual A/D converter circuits. Providing amazing dynamic range By combining two A/D converters, a wide dynamic range not possible with a single A/D converter has been realized.
- Page 8 Switching between two A/D converters The L6 constantly monitors data from the two A/D converters and automatically selects the one that provides the best input results. Low noise No clipping Low noise because high-gain because low-gain because high-gain AD converter selected AD converter selected AD converter selected...
- Page 9 32-bit float WAV file overview The L6 can record input audio and mixed audio. This recorded audio is saved in a 32-bit float WAV file format. 32-bit float WAV files have the following advantages over conventional 16/24-bit WAV files. These advantages allow the recording audio quality to be preserved even when editing in a DAW or other software after recording.
-
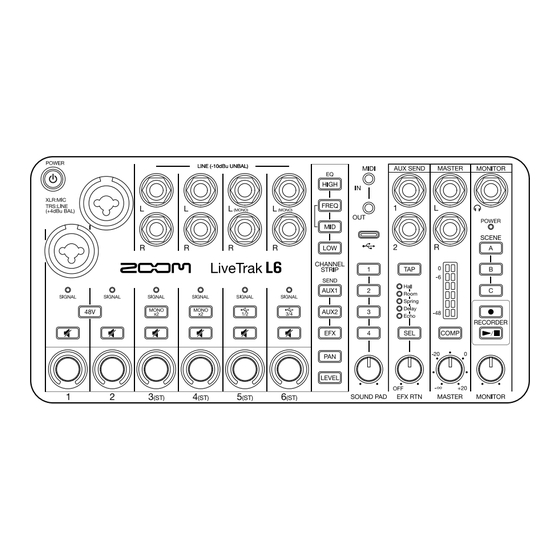
Page 10: Functions Of Parts
Functions of parts ❶ POWER button This turns the power on/off. ❷ Channel operation section (→ Channel operation section) Connect mics, synthesizers, effects and other equipment here. Conduct operations for each channel, including making input settings and adjusting tone, panning, levels and send amounts. ❸... - Page 11 ❺ Send effect section (→ Send effect section) Select the internal effect and adjust its level. External effects (2) can also be connected. ❻ Output section (→ Output section) Connect powered monitors or a PA system as well as headphones, and adjust the MASTER and MONITOR outputs.
- Page 12 ■ Channel operation section ❶ INPUT 1 and INPUT 2 jacks (mono channels) Connect mics and instruments, for example, to input them on channels 1 and 2. These can be used with XLR and TRS plugs. ❷ INPUT 3 (L/R) and INPUT 4 (L/R) jacks (stereo channels) Connect synthesizers and effects, for example, to input them in stereo on channels 3 and 4.
- Page 13 When using the L6 as an audio interface, press the (USB 1/2) button or (USB 3/4) button to light it, enabling input of stereo audio from a computer, smartphone or tablet on that channel. ❹ Equalizer buttons Press a button to select one for adjustment, lighting it, and then use the channel (encoders) to adjust the tone.
- Page 14 ⓬ Effect send buttons Press a button to select one for effect send level adjustment, lighting it, and then use the channel (encoders) to adjust the effect. • (AUX1) button: This adjusts the level sent to the effect connected to the AUX SEND 1 jack. •...
- Page 15 ■ Send effect section ❶ AUX SEND 1/2 jacks Connect external effects to these. These can be used with TRS plugs. ❷ TAP button When the “Delay” or “Echo” internal effect is selected, tapping this sets the delay time to the tapped tempo.
- Page 16 ■ Output section ❶ MASTER L/R output jacks Connect these to a PA system or powered monitors, for example, to output the stereo sound mixed on the L6. These can be used with TRS plugs. ❷ Master level meters These show the levels output from the MASTER L/R output jacks in a range from −48 dB to 0 dB. ❸...
-
Page 17: Right Side
Right side ❶ microSD card slot Insert a microSD card here. ❷ USB power port (Type-C) Power can be supplied to the L6 by connecting a specified AC adapter (AD-17) or a 5V portable battery. - Page 18 Bottom ❶ Openings for connecting a Eurorack adapter (ERL-6) The L6 can be installed in a Eurorack case by using an ERL-6 Eurorack adapter (sold separately). ❷ Battery cover (→ Installing Open this when installing or removing AA batteries. batteries)
-
Page 19: Connection Example
Connection example ❶ Mics for lead and backing vocals and drums, for example (→ Connecting mics) ❷ Synthesizers and other instruments (→ Connecting synthesizers and effects) ❸ MIDI devices, including keyboards and controllers (→ Connecting MIDI devices) ❹ Powered monitors and PA systems, for example (→ Connecting headphones, powered monitors and mixers) ❺... - Page 20 ❻ Computer, smartphone or tablet (→ Connecting computers, smartphones and tablets) ❼ AC adapter (→ Connecting an AC adapter) ❽ Headphones (→ Connecting headphones, powered monitors and mixers)
-
Page 21: Signal Flow
Signal flow ❶ Recording files (red) Channel inputs 1 – 6 and the master outputs are recorded on the microSD card. - Page 22 SOUND PAD L/R (purple) Sound pad signals are output. ⓮ Levels The levels of sound pads 1 – 4 can be adjusted. These can only be set using the ZOOM L6 Editor (→ Setting sound pad play modes and computer app. levels) ⓯...
- Page 23 ⓰ Internal effects Effects that can be selected from 5 types. ⓱ Effect level The internal effect level can be adjusted. ⓲ Master level The master level can be adjusted. ⓳ Compressor This can increase the sound pressure of the mixed audio while preventing clipping. ⓴...
-
Page 24: Preparing For Use
Preparing for use Supplying power The L6 can be powered by a connected power supply (AC adapter, USB bus power or portable battery) or batteries. Power sources will be used in the following order of priority: USB port on right side, USB port on top, batteries. - Page 25 NOTE • Use only one type of battery (alkaline, NiMH or lithium) at a time. • Set the type of battery used correctly so that the amount of remaining battery charge can be shown (→ Setting the type of batteries accurately. used) •...
-
Page 26: Connecting An Ac Adapter
Connecting an AC adapter Connect the cable of the specified AC adapter (AD-17) to the USB (Type-C) port on the right side of the unit, and connect the AC adapter to an outlet. Other power sources The L6 can be operated using USB bus power by connecting a computer to the USB (Type-C) port on the top of the unit. -
Page 27: Making Connections
Making connections Connecting mics Connect dynamic and condenser mics with XLR plugs to the INPUT 1 and 2 jacks. Phantom power (+48 V) can be supplied to condenser mics. To supply phantom power, press the (phantom power) button so that it lights. NOTE •... - Page 28 Connecting synthesizers and effects Synthesizers, effects and other line-level devices can be connected to INPUT 1 – 6. 1 – 2 are mono inputs and 3 – 6 are stereo inputs. ■ Connecting to INPUT 1 – 2 • Connect devices to each input with TRS plugs. •...
- Page 29 NOTE • Direct input of passive guitars and basses is not supported. Connect these instruments through a mixer or effects device. • If the (SIGNAL) indicator lights red, lower the level of the device connected to that channel or make other adjustments so that the (SIGNAL) indicator stops lighting red.
- Page 30 Connecting headphones, powered monitors and mixers Stereo audio that is a mix of every channel can be output to powered monitors or a PA system connected to the MASTER output jacks. Headphones can also be connected to the MONITOR output jack.
- Page 31 • When using a smartphone or tablet, connect an AC adapter to supply power. adapter) By connecting the L6 to a computer, smartphone or tablet, the following uses are possible. • Install the ZOOM L6 Editor on a computer and use it to make sound pad settings and other detailed (→ Using the settings.
-
Page 32: Inserting Microsd Cards
• The following recording media formats are supported. - microSDHC memory cards - microSDXC memory cards See the ZOOM website (zoomcorp.com/help/l6) for information about microSD cards that have been confirmed to work with this unit. - Page 33 Use examples ■ Using as a synth mixer Used to mix multiple synthesizers, it can be manipulated in live performances and recording. ■ Live streaming of podcasts (→ Using as an audio Using mics, sound can be streamed in real time. interface) While streaming audio in real time, the L6 can simultaneously record.
- Page 34 ■ Using in the field Powered by regular batteries or a portable battery, the L6 can be used to capture audio in the field. The captured audio can be recorded on a microSD card and transferred to a computer for editing and distribution.
-
Page 35: Turning The Power On/Off
Turning the power on/off Turning on the power Press the (POWER) button until the (POWER) indicator lights. This turns on the L6 power. NOTE The power will automatically turn off if the L6 is unused for 10 hours. To keep the power on at all times, set (→ Turning the power off... -
Page 36: Using The App
Using the app Install the ZOOM L6 Editor on a computer and use it to make initial settings, sound pad settings and other detailed settings. Use a USB cable (Type-C) to connect the USB port on the top to the computer. - Page 37 If a DAW or another application that uses MIDI ports is launched before ZOOM L6 Editor, the MIDI ports needed by ZOOM L6 Editor could be used, preventing proper connection. If this happens, launch ZOOM L6 Editor before the other app, or set that app not to use the MIDIIN3 and (→ USB MIDI port MIDIOUT3 (ZOOM L6) ports.
-
Page 38: App Screen Overview
❸ Date & Time (→ Setting the date and time) This shows the date and time set for the L6. (When ZOOM L6 Editor is launched, the date and time for the L6 is acquired from the computer and set automatically.) ❹... - Page 39 ❿ Selection of signals sent to AUX SEND 1/2 jacks (→ Selecting the signal send positions for AUX SEND 1 and 2) The signal sent from each channel to the AUX SEND 1/2 jacks can be set to before or after level adjustment.
-
Page 40: Setting Date And Time, Battery Type And Automatic Power Off (Making Initial L6 Settings Before Use)
Connect the L6 with a computer using a USB cable (Type-C), and launch ZOOM L6 Editor. app) When the L6 is connected to ZOOM L6 Editor, the date and time shown in the app will be acquired from the computer and set on the L6. - Page 41 Setting Explanation Alkaline Alkaline batteries Ni-MH Nickel-metal hydride batteries Lithium Lithium batteries For “Auto Power Off”, select an automatic power off setting. Setting Explanation 10 Hours The power will automatically turn off if it is unused for 10 hours. Never The power will not turn off...
- Page 42 Setting date and time, battery type and auto power off without using the app Initial L6 settings can be made without using the app by putting the L6 in setting mode. The settings can be confirmed using sound output from the L6. Connect powered monitors or headphones (→ Connecting headphones, powered monitors and to the L6.
- Page 43 Use the channel 1 – 5 (encoders) to set the date and time. The setting values will be output as audio guidance. ❶ Year This can be set from 0 to 99. (2000 – 2099 CE) ❷ Month This can be set from 1 to 12. (January – December) ❸...
- Page 44 Press the (FREQ) button. (FREQ) button and channel 1 (encoder) indicator will light and battery type setting mode will be enabled. (“Battery type” will be output as audio guidance.) Use the channel 1 (encoder) to set the battery type. The setting values will be output as audio guidance. •...
- Page 45 This returns to setting mode, and the (HIGH), (FREQ) and (MID) buttons will blink. Next, set the Auto Power Off function. Press the (MID) button. (MID) button and channel 1 (encoder) indicator will light and Auto Power Off setting mode will be enabled. (“Auto power off” will be output as audio guidance.) Use the channel 1 (encoder) to select the Auto Power Off...
- Page 46 Press the blinking (record) button. The Auto Power Off setting is confirmed, and the (record) button becomes unlit. Press the (POWER) button until the (POWER) indicator becomes unlit. This exits setting mode and turns off the L6 power.
-
Page 47: Mixing
Mixing Adjusting channel levels Press the (LEVEL) button, lighting it, and then use the (encoders) to adjust the levels of the desired channels. Adjusted values can be confirmed with the indicators. -
Page 48: Adjusting The Overall And Monitoring Levels
Adjusting the overall and monitoring levels Sound mixed on the L6 can be output to powered monitors or a PA system connected to the MASTER output jacks. It can also be monitored using headphones connected to the MONITOR output jack. Adjusting the level of the MASTER output jacks •... -
Page 49: Muting Channels
• Adjusting the level with the (MASTER) knob will also change the MONITOR output level. The level adjusted by the (MONITOR) knob does not affect the MASTER output level. Muting channels Press the (mute) button of the channel to be silenced to light it. This mutes sound from the selected channel. -
Page 50: Adjusting Channel Tone (Eq)
When set to the center, the middle indicator lights. Adjusting channel tone (EQ) Frequency bands can be boosted/cut to adjust the tones of each channel. Press the button for the desired parameter ( (HIGH), (FREQ), (MID) or (LOW)) to light it, and then use the encoder for the desired channel to boost/cut it. - Page 51 • (LOW) button: Boost/cut low frequencies.
-
Page 52: Using Effects
Using effects The internal effects of the L6 can be used on every channel. In addition, two external effects can be connected and applied to sounds. Using internal effects The internal effect level can be adjusted. Press the (SEL) button repeatedly to select an internal effect. The indicator lights for the selected internal effect. - Page 53 Press the (EFX) button, lighting it, and then use the (encoders) to adjust the amount sent to the effect from the desired channels. How much the effect is applied can be adjusted by the send amount. Adjusted values can be confirmed with the indicators. HINT While pressing the (EFX) button, press a...
- Page 54 ■ Adjusting internal effect parameters Use ZOOM L6 Editor to adjust internal effect parameters. Connect the L6 with a computer using a USB cable (Type-C), and launch ZOOM L6 Editor on the (→ Using the computer. app) Click “Edit” for “Effect Parameter”.
- Page 55 • TONE adjusts the tone. ❹ Delay (digital delay) • TIME sets the delay time. • FEEDBACK adjusts the amount of feedback. ❺ Echo (tape echo) • TIME sets the delay time. • REPEAT adjusts the number of repetitions. ❻ Click this to return to the previous screen.
-
Page 56: Using External Effects
Using external effects Up to two external effects can be connected and applied to each channel. ■ Connecting external effects : audio signal flow ❶ Connect the L6 AUX SEND 1 or 2 jack to the input jack of an external effect. Send channel signals from the L6 to the external effect. - Page 57 ■ Using external effects (→ Adjusting channel Adjust the levels of channels to which external effects are connected. levels) (→ Adjusting panning for each (→ Adjusting channel As necessary, adjust the panning channel) and EQ tone (EQ)). Press the (AUX1) or (AUX2) button, lighting it, and then use the (encoders) to adjust the amounts sent to the external effect from the channels to be affected.
- Page 58 HINT • While pressing the (AUX1) or (AUX2) button, press a (mute) button to light that and mute the send to the AUX SEND jack for that button. When the send is muted, the (mute) button will light while the (AUX1) or (AUX2) button is pressed.
- Page 59 The signal sent from each channel to the AUX SEND 1/2 jacks can be set to either before or after level adjustment. Connect the L6 with a computer using a USB cable (Type-C), and launch ZOOM L6 Editor on the (→ Using the computer.
- Page 60 Setting Explanation Post Fader Signals are sent to the AUX SEND 1/2 jacks after level adjustment. The send amounts will be increased or decreased along with level adjustments.
-
Page 61: Saving Settings (Scenes)
Saving settings (scenes) Up to 3 sets of current mixer settings can be saved as scenes and these saved settings can be recalled at any time. Saving scenes Press and hold the button for the desired scene ( (A), (B) or (C) button) until it lights. -
Page 62: Recalling Scenes
Recalling scenes Press the button for the scene to be recalled ( (B) or (C)). That button will light and its saved scene will be recalled. Buttons that are unlit do not have scenes saved to them. NOTE • When recalling scenes, be careful not to press a button so long that it starts to blink. Pressing a button too long will cause the scene to be overwritten with the current mixer settings. -
Page 63: Using Sound Pads
Using sound pads Audio files can be assigned to the SOUND PAD buttons. Press one to play the assigned file. This is convenient for playing interviews that have been recorded in advance, opening and closing music and jingles. Level and play mode settings can be made for each pad. MIDI devices can also be used to play the sound pads. - Page 64 The selected audio files will be assigned to the (1) to (4) buttons and those buttons (1) – (4)) will light. HINT If audio files are not assigned using ZOOM L6 Editor, the first file by name alphabetically in each folder will be assigned automatically.
- Page 65 Using the L6 to record audio files and assign them to sound pads Stereo files mixed and recorded on the L6 can be assigned to sound pads. Prepare to record. Connect mics, instruments and audio devices, for example, to the L6, and input and mix their sounds (→ Making to check the sound to be assigned to a sound pad.
-
Page 66: Setting Sound Pad Play Modes And Levels
Setting sound pad play modes and levels For every sound pad, the playback method used when it is pressed and its level can be changed. Connect the L6 with a computer using a USB cable (Type-C), and launch ZOOM L6 Editor on the (→ Using the computer. - Page 67 Use the “Level” pull-down menus to click and select levels. Levels can be set for each sound pad from −∞ – +10 dB.
-
Page 68: Playing Sound Pads
Playing sound pads Press a lit SOUND PAD ( (1), (2), (3) or (4)). This plays the audio file assigned to that SOUND PAD. During SOUND PAD playback, that SOUND PAD button will blink. (→ Setting sound pad play modes and The playback mode can also be changed. -
Page 69: Using Computers, Smartphones, Tablets And Midi Devices To Play Sound Pads
Computers, smartphones, tablets and MIDI devices, including MIDI keyboards, can be used to play sound pads. (→ Using the Connect the L6 with a computer using a USB cable (Type-C), and launch ZOOM L6 Editor. app) Click the “MIDI Note” pull-down menus to set MIDI note numbers. -
Page 70: Recording And Playing Audio
Recording and playing audio By installing a microSD card in the L6, audio from every channel as well as a stereo mix of all channels can be recorded. The most recently recorded file can also be played back. NOTE • Recorded files are saved in the following format. - Sample rate: 48 kHz - Bit depth: 32-bit float - Mono files for channels 1/2, stereo or two mono files for channels 3/4, stereo files for channels 5/6... - Page 71 To stop, press the (record) or (play/stop) button. Recording will stop and the (record) button will become unlit. NOTE If the file size exceeds 2 GB during recording, a new file will be created automatically and recording will continue without pause. No gap in sound will occur between the two files when this happens. HINT Files are automatically saved at regular intervals during recording.
-
Page 72: Selecting The Type Of Files Recorded
Selecting the type of files recorded The files saved when recording can be selected. Connect the L6 with a computer using a USB cable (Type-C), and launch ZOOM L6 Editor on the (→ Using the computer. app) Click a recording file setting for “Recorder Mode”. -
Page 73: Playing Recordings
Playing recordings Press the (play/stop) button. (play/stop) button will light green, and playback of the most recently recorded file will start. Use the (MONITOR) knob to adjust the headphone volume. Use the (MASTER) knob to adjust the volume output from the MASTER output jacks. Press the (play/stop) button. -
Page 74: Managing Files
Managing files Files created by the L6 are saved on the microSD card. Recording files on the microSD card can be checked and deleted. L6 folder and file structure The following types of files are created when recording with a microSD card that was formatted by the L6. ❶... - Page 75 The recording files for each channel and stereo files for mixes of the channels are saved as follows. • Channels 1/2: Mono files are saved for each channel. • Channels 3/4: Stereo files are saved for each channel. When a (MONO) button is lit, 2 mono files will be created instead of a stereo file.
-
Page 76: Naming Of Recording Files And Folders
Naming of recording files and folders Numerical dates and times of recording are used for the names of recording file folders. Folder name example Explanation ❶ Date The date of recording is used as a number. ❷ Time The hour, minute and second are used as numbers. File names are given in the following format. -
Page 77: Using As An Audio Interface
Using as an audio interface Sounds input to the L6 can be sent to a computer, smartphone or tablet and playback signals from that device can be output from the L6. • No driver is necessary for use with Mac computers, smartphones and tablets. •... -
Page 78: Using With Mac Computers
The format used by the L6 for data transfer can be selected on the Mac. From the “Utilities” subfolder of the “Applications” folder on the Mac, open “Audio MIDI Setup”. In Audio Devices, select “ZOOM L6” and set the Input and Output formats to 32-bit Float. NOTE For the bit depth, 32-bit Float should normally be used as is, but try 24-bit if an application does not operate properly with this setting. -
Page 79: Using With Windows Computers
NOTE The latest ZOOM L6 Driver can be downloaded from the above website. Launch the installer and follow the instructions to install “ZOOM L6 Driver”. NOTE • Do not connect the L6 to the computer during installation. - Page 80 Making driver control panel settings Click the “ZOOM L6 Control Panel” icon in the notification area of the taskbar to launch the control panel. Make control panel settings. ❶ Open information dialog The version and other information can be checked.
-
Page 81: Transferring Files To Computers
By connecting the L6 to a computer, files on the microSD card can be checked and moved. Connecting with a computer (→ Using the Connect the L6 with a computer using a USB cable (Type-C), and launch ZOOM L6 Editor. app) Click “File Transfer Mode”. -
Page 82: Disconnecting From A Computer
Disconnecting from a computer Disconnect on the computer. • Windows: Select the L6 from “Safely Remove Hardware”. • macOS: Drag the L6 icon to the Trash and drop it. Click “Exit File Transfer Mode”. The ZOOM L6 Editor will return to normal. -
Page 83: Using Midi Devices
Using MIDI devices Connecting MIDI devices Computers and MIDI devices can be connected to the L6. ❶ MIDI devices Use 3.5mm TRS cables to connect MIDI devices, including controllers and keyboards. To connect with MIDI devices that have 5-pin DIN connectors, use 5-pin DIN-TRS MIDI (Type-A) conversion cables. - Page 84 ZOOM L6 Editor computer app. Do not use it. NOTE If a DAW or another application that uses MIDI ports is launched before ZOOM L6 Editor, the MIDI ports needed by ZOOM L6 Editor could be used, preventing proper connection. Launch ZOOM L6 Editor before...
-
Page 85: Making Midi Settings
To control the L6 with a MIDI controller, MIDI keyboard or other MIDI device connected to the MIDI IN/OUT jacks, turn on this setting. (→ Using the Connect the L6 with a computer using a USB cable (Type-C), and launch ZOOM L6 Editor. app) Click for “Mixer Control via MIDI”. - Page 86 MIDI signals output from the L6 MIDI OUT can be set to either the MIDI signals generated by the L6 or MIDI signals input through the MIDI IN. (→ Using the Connect the L6 with a computer using a USB cable (Type-C), and launch ZOOM L6 Editor. app) Click the MIDI output setting for “MIDI Out Mode”.
- Page 87 The MIDI channel that the L6 uses to send and receive data can be set. (→ Using the Connect the L6 with a computer using a USB cable (Type-C), and launch ZOOM L6 Editor. app) Click a MIDI channel in the “MIDI Channel” pull-down menu to select it.
- Page 88 The L6 can be controlled with operations using the corresponding MIDI control numbers on MIDI devices, including MIDI controllers and keyboards, and in DAWs and other software. (→ Using the Connect the L6 with a computer using a USB cable (Type-C), and launch ZOOM L6 Editor. app) Click “Edit” for “MIDI CC# Mapping”.
- Page 89 ❷ MIDI control numbers Use the pull-down menus to click MIDI control numbers and select them. Select “Not Mapped” to not assign a MIDI control number to that parameter. ❸ Scrollbar Use this to scroll the parameters up and down. ❹...
-
Page 90: Managing Microsd Cards
The capacity and open space of the microSD card loaded in the L6 along with the available recording time can be checked. (→ Using the Connect the L6 with a computer using a USB cable (Type-C), and launch ZOOM L6 Editor. app) Check the state of the microSD card on the ZOOM L6 Editor screen. -
Page 91: Formatting Microsd Cards
Formatting microSD cards To maximize the performance of a microSD card, format it for use with the L6. (→ Inserting microSD With the power off, insert the microSD card. cards) While pressing the (record) button, press the (power) button to turn on the L6 power. (play/stop) button will blink. -
Page 92: Making Various Settings
Connect the L6 with a computer using a USB cable (Type-C), and launch ZOOM L6 Editor. app) When the L6 is connected to ZOOM L6 Editor, the date and time shown in the app will be acquired from the computer and set on the L6. - Page 93 While pressing the (HIGH) and (FREQ) buttons, press the (POWER) button to turn on the L6 power. The L6 will start in setting mode, the (POWER) indicator will light, and the (HIGH), (FREQ) and (MID) buttons will blink. Press the (HIGH) button.
- Page 94 NOTE Press the (play/stop) button to output the current setting as audio. After setting all items, press the blinking (record) button. The date and time are confirmed, and the (record) button becomes unlit. This returns to setting mode, and the (HIGH), (FREQ) and (MID) buttons will blink.
-
Page 95: Setting The Type Of Batteries Used
Select the type of battery used by the L6 correctly so that the amount of remaining battery charge can be shown accurately. (→ Using the Connect the L6 with a computer using a USB cable (Type-C), and launch ZOOM L6 Editor. app) For “Battery Type”, click the type of batteries to select it. - Page 96 Setting the battery type without using the app The settings can be confirmed using sound output from the L6. Connect powered monitors or headphones (→ Connecting headphones, powered monitors and to the L6. mixers) While pressing the (HIGH) and (FREQ) buttons, press the (POWER) button to turn on the L6 power.
- Page 97 This exits setting mode and turns off the L6 power.
-
Page 98: Turning The Power Off Automatically (Auto Power Off)
To keep the power on at all times, set Auto Power Off to Never. (→ Using the Connect the L6 with a computer using a USB cable (Type-C), and launch ZOOM L6 Editor. app) For “Auto Power Off”, select an automatic power off setting. - Page 99 Setting auto power off without using the app The settings can be confirmed using sound output from the L6. Connect powered monitors or headphones (→ Connecting headphones, powered monitors and to the L6. mixers) While pressing the (HIGH) and (FREQ) buttons, press the (POWER) button to turn on the L6 power.
-
Page 100: Restoring Factory Default Settings
Restoring factory default settings The L6 settings can be reset to their factory defaults. (→ Using the Connect the L6 with a computer using a USB cable (Type-C), and launch ZOOM L6 Editor. app) Click “Reset”. The L6 will be restored to its factory default state. - Page 101 Restoring factory default settings without using the app. While pressing the (A) button, press the (power) button to turn on the L6 power. (POWER) indicator will light and the (A) button will blink. Press the (A) button. The L6 will be restored to its factory default state. NOTE Initializing settings will overwrite all settings with their factory defaults.
-
Page 102: Managing The Firmware
Checking the firmware version The firmware version used by the L6 can be checked. (→ Using the Connect the L6 with a computer using a USB cable (Type-C), and launch ZOOM L6 Editor. app) Check the firmware version on the ZOOM L6 Editor screen. -
Page 103: Appendix
Recording is not possible • Confirm that the microSD card has open space. The available recording time can be checked on the (→ Checking the microSD card ZOOM L6 Editor screen. state) (→ Inserting microSD • Confirm that a microSD card is loaded properly in the card slot. -
Page 104: Other Trouble
L6 as the “Audio” or “Input/output” device in an application that supports 32-bit float format. • A driver is necessary to use 32-bit float format with Windows. The driver can be downloaded from the ZOOM website (zoomcorp.com/help/l6). Battery operation time is short Making the following settings could increase the battery operation time. -
Page 105: Block Diagram
Block diagram... -
Page 106: Midi Implementation Chart
MIDI implementation chart Function Transmitted Recognized Remarks Basic channel Default 1 – 16 1 – 16 Changed 1 – 16 1 – 16 Mode Default Mode 3 Mode 3 Message × × Altered ************** ************** Note number 0 – 127 0 –... -
Page 107: Specifications
Specifications Input and Inputs MIC/LINE (mono) output LINE (stereo) channels Outputs AUX SEND (mono) MASTER (stereo) MONITOR (stereo) Inputs MIC/LINE Connectors 2 XLR/TRS combo jacks (XLR: 2 HOT, TRS: TIP HOT) Input gain Adjustment unnecessary (dual A/D converter circuits used) Input impedance XLR: 3.8 kΩ... - Page 108 -120 dBu or less (IHF-A) at 150Ω input input noise Power 4 AA batteries (alkaline, lithium, or rechargeable NiMH) AC adapter (ZOOM AD-17): DC 5V/1A • USB bus power is supported. Estimated continuous recording time using 12-track recording, Alkaline batteries: about 3 hours batteries phantom power off,...
- Page 109 Dimensions 223 mm (W) × 114 mm (D) × 46.5 mm Weight (main unit only) 526 g Weight (including batteries) 618 g Note: 0 dBu = 0.775 Vrms...
- Page 110 ZOOM CORPORATION 4-4-3 Kanda-surugadai, Chiyoda-ku, Tokyo 101-0062 Japan zoomcorp.com Z2I-5357-01...
Need help?
Do you have a question about the LiveTrak L6 and is the answer not in the manual?
Questions and answers