Zoom LiveTrak L-20 Control Operation Manual
Hide thumbs
Also See for LiveTrak L-20 Control:
- Quick manual (17 pages) ,
- Operation manual (102 pages)
Table of Contents

Related Manuals for Zoom LiveTrak L-20 Control


Summary of Contents for Zoom LiveTrak L-20 Control
- Page 1 L-20 Control Version 2.0 Operation Manual This document cannot be displayed properly on black-and-white displays. © 2019 ZOOM CORPORATION Copying or reprinting this manual in part or in whole without permission is prohibited.
-
Page 2: Table Of Contents
Contents Introduction ............3 Copyrights . -
Page 3: Introduction
The Bluetooth word mark and logo are registered trademarks of Bluetooth SIG, Inc. and these marks are used under license by Zoom Corporation. Other trademarks and trade names are the property of their respective companies. All trademarks and registered trademarks in this document are for identifica- tion purposes only and are not intended to infringe on the copyrights of their respective owners. -
Page 4: Pairing (Connecting) With The
Pairing (connecting) with the NOTE · A separate ZOOM BTA-1 Bluetooth adapter must be installed in the remotely control it from an iPad. With a BTA-1, transmission up to 10 m is possible when used indoors without obstacles. For details, see the operation manual. -
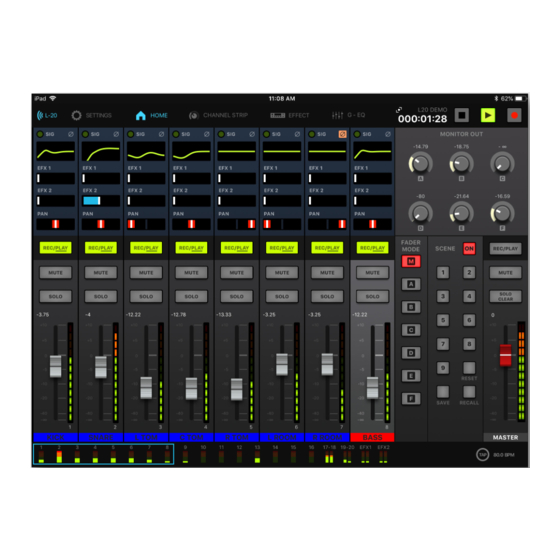
Page 5: Operation Screen Overview
Operation screen overview Main Areas Toolbar Transport Monitor Input Channels Master Meter Bridge Fader Mode Scene Navigation between views Tap the buttons in the toolbar to access other views. Setting Window Record Panel Effects Channel Strip Graphic EQ Device List... -
Page 6: Input Channels
Input Channels Phase on Effect Indicators Names Input Signal Effect EQ Displays Parameter 1 EFX1, 2 Send faders Effect Parameter 2 Pan faders REC/PLAY Buttons MUTE Buttons SOLO Buttons Fader Levels Channel Effect Return Faders Faders Level Meters Channel Names Channel Strip The channel strip displays the settings for the selected channel. -
Page 7: Effects
Effects The Effects page lets you see and change which effects are assigned and ad- just their parameters. Effect Name and Description (Tap to select a different effect) Parameter 2 Knob Parameter 1 Knob Graphic EQ The 15-band Graphic EQ lets you adjust the tone of the Master Out. The only way to access the Graphic EQ is using the L-20 Control application. -
Page 8: Master Section
Master Section STOP Button Project Name PLAY Button CHANGE PANEL Button RECORD Button Tap to view Record Panel Project Counter MONITOR OUT Knobs FADER MODE Buttons Create separate mixes for Monitor A-F outputs MASTER REC/PLAY Button MUTE Button SCENE ON/OFF Button SOLO CLEAR Button Tap to unsolo any solo’d channels... -
Page 9: Controlling The Mix
Controlling the Mix Mixing Input Channels on the Toolbar. Adjust parameter settings on the Home Screen. ■ Adjusting pan faders Drag a pan fader left and right to adjust its value. NOTE · Double-tap a fader to reset it to the default value. ■... -
Page 10: Making Channel Strip Adjustments
Making Channel Strip Adjustments Tap a channel to select it. on the Toolbar. The Channel Strip is displayed above the channels. ■ Adjusting Channel Strip knobs Slide a control knob left and right (or up and down) to adjust its value. The parameter popup appears while adjustments are made. - Page 11 ■ Editing the Channel Name Tap the Channel Name and edit it using the on-screen keyboard. Tap done and the edited name will appear in the channel. NOTE · The Channel Name can have up to 8 characters. · The following characters can be used in the Channel Name: (space) ! # $ % &...
-
Page 12: Adding An Effect To A Channel
Adding an Effect to a Channel Tap a channel to select it. Adjust the EFX1, 2 Send Level. Adjust the EFX1, 2 Return Level Fader. Tap the button. Editing Effects Tap the button in the toolbar. Tap the current effect name The effect select screen appears. -
Page 13: Graphic Eq
Graphic EQ The Graphic EQ lets you adjust the tone of the Master Out. The G-EQ is only controllable from the L-20 Control application. Graphic EQ set- tings are stored on the Tap the button in the toolbar. Turn the G-EQ on by tapping Slide the faders up to increase gains or down to decrease gains at desired frequencies. -
Page 14: Recording Tracks
Recording Tracks Record Setup Setting up to record is done primarily on the mixer. This includes: ■ Recording resolution ■ Making physical connections ■ Adjusting the input gain, compression level ■ Metronome settings Once setup is complete, with the L-20 Control application, you can: ■... -
Page 15: Playing Tracks
Playing Tracks → to open the Record Panel ( “Master Sec- tion” on page 8). repeatedly on the channels you want to playback until they are playback enabled In the Record panel, tap... -
Page 16: Using Scenes
Using Scenes Saving Scenes to enable it. Buttons will light if they have saved scenes Adjusting input levels and blink if they do not. again if you do not want to save a scene. Tap one of the buttons labeled where you want to save the scene. -
Page 17: Adjusting The Monitor Out A - F Mixes
Adjusting the Monitor Out A - F Mixes button to select the output to mix. The selected output button lights and operation of all the channel faders is enabled. Use the channel faders to adjust the volumes. Copying a Mix While tapping and holding for the output you want to copy, press a blinking copy destination (... -
Page 18: Using Multiple Ipads To Control An (New Function In Version 2.0)
Using multiple iPads to control an (new function in Version 2.0) Using L-20 Control (Version 2.0 or later), multiple iPads can be connected to an and used to control it. One iPad acts as the hub device and relays transmissions between the other iPads (remote devices) and the . - Page 19 Launch L-20 Control on a remote device. Hub devices that can be connected appear on the remote device. If this does not appear, tap the key to show it. On the remote device, tap the device name/ID under HUB DEVICES to connect them.
- Page 20 ZOOM CORPORATION 4-4-3 Kanda-surugadai, Chiyoda-ku, Tokyo 101-0062 Japan www.zoom.co.jp Z2I-3418-02...
Need help?
Do you have a question about the LiveTrak L-20 Control and is the answer not in the manual?
Questions and answers