Table of Contents
Advertisement
Quick Links
Advertisement
Table of Contents

Related Manuals for OmniPod ENT450


Summary of Contents for OmniPod ENT450
- Page 1 INSULIN MANAGEMENT SYSTEM Podder’s handbook ™ *Up to 72 hours of insulin delivery...
- Page 2 From Ireland: +44-800-011-6132 24 hours/7 days Website: www.myomnipod.com Address: Insulet Corporation, 600 Technology Park Drive, Ste 200 Billerica, MA, 01821, USA PDM Model: ENT450 Serial Number: __________________________________________________ Omnipod® Insulin Management System Start Date: _____________________ Healthcare Provider Nurse/Educator Name Name Address Address...
- Page 3 © 2012-2017 Insulet Corporation. Omnipod and the Omnipod logo are trademarks or registered trademarks of Insulet Corporation in the United States of America and other various jurisdictions. All rights reserved. Patent information at www.insulet.com/patents. FreeStyle and related brand marks are trademarks of Abbott Diabetes Care Inc. in various jurisdictions and used with permission.
-
Page 4: Table Of Contents
1 Your Omnipod® Insulin Management System . . . . . . . . . . . . . . . . . - Page 5 Contents Basal and BG settings . . . . . . . . . . . . . . . . . . . . . . . . . . . . . . . . . . . . . . . . . . . . . . . . . . . . . . . . 1 5 Bolus Calculator settings .
- Page 6 Contents 6 Modifying Basal Insulin Delivery . . . . . . . . . . . . . . . . . . . . . . . . . . . . . . . . . . . . . . 55 Using Temporary Basal Rates .
- Page 7 Contents Program reminders . . . . . . . . . . . . . . . . . . . . . . . . . . . . . . . . . . . . . . . . . . . . . . . . . . . . . . . . . . 8 0 Confidence reminders .
- Page 8 Contents Pods and the environment . . . . . . . . . . . . . . . . . . . . . . . . . . . . . . . . . . . . . . . . . . . . . . . . 109 PDM Care .
- Page 9 Omnipod® System Notice Concerning Interference . . . . . . . . . . . . . . . . . .
-
Page 10: Introduction
PDM you have, turn it over. On the back of the PDM, look for "ENT450." If you see it, this is the correct User Guide. If you do not see it, please call Customer Care. -
Page 11: Indications And Contraindications
Caution: This device is for prescription use only. Indication The Omnipod® Insulin Management System is intended for subcutaneous (below the skin) delivery of insulin at set and variable rates for the management of diabetes mellitus in persons requiring insulin and for the quantitative measurement of glucose in fresh capillary whole blood (in vitro). -
Page 12: General Warnings And Cautions
Pod: NovoRapid®, Humalog®, or Apidra®. NovoRapid®, Humalog, and Apidra are compatible with the Omnipod® System for use up to 72 hours (3 days). Before using a different insulin with the Omnipod® System, check the insulin drug label to make sure it can be used with a pump. -
Page 13: Safe Use
Pod and put it and the PDM outside the treatment area. Check with your healthcare provider for Pod removal guidelines. The Omnipod® System should NOT be used at low atmospheric pressure (below 696 hPA). You could encounter such low atmospheric pressures at high elevations, such as when mountain climbing or living at elevations above 3,000 meters (10,000 feet). -
Page 14: Safety Features
Omnipod® System, especially during the first few weeks and months. When you have questions about diabetes management after starting on the Omnipod® System, do not hesitate to talk with your healthcare provider. For technical questions about your Omnipod® System setup or operation, or to order Omnipod®... - Page 15 Note: Activate your PDM periodically to confirm that there are no notifications or alarms that require a response. Warning: Do NOT attempt to use the Omnipod® System before you receive training from your Omnipod® System Trainer or healthcare provider. Inadequate training could put your health and safety at risk.
-
Page 16: Your Omnipod® Insulin Management System
The Getting Started section of this book explains the basic operation and setup of the Omnipod® System. The User Guide section gives step-by-step instructions for using the System. The Reference section explains the System in detail. Terms and conventions Bold text Buttons that you press, soft keys, menus, and screens are in bold. -
Page 17: The Pod And Pdm
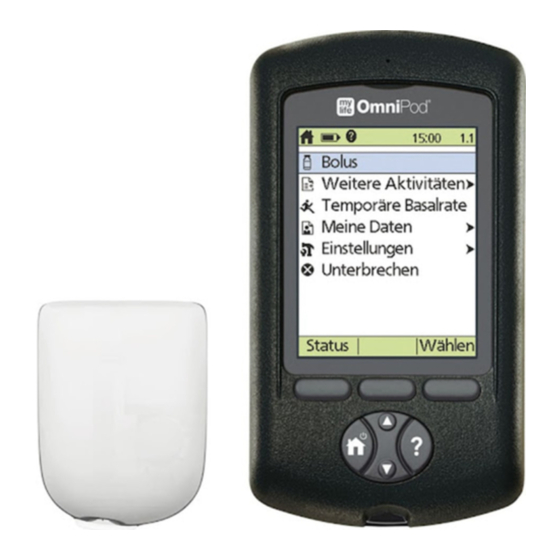
1 Your Omnipod® Insulin Management System The Pod and PDM The Omnipod® System is made up of two parts: The Pod, which delivers insulin to your body, and the Personal Diabetes Manager (PDM), which allows you to control the Pod. - Page 18 Your Omnipod® Insulin Management System 1 The PDM: The PDM is a handheld device that: • Wirelessly programs the Pod with your personalized insulin-delivery instructions • Wirelessly monitors the Pod's operation • Includes a built-in blood glucose meter USB port...
-
Page 19: Screen Navigation
1 Your Omnipod® Insulin Management System Screen Navigation The PDM communicates with you by displaying images on its screen. You communicate with the PDM by pressing buttons and soft keys. The Home/Power button Press and hold the Home/Power button to turn the PDM on or off. -
Page 20: The Info Button
Your Omnipod® Insulin Management System 1 The Info button Some screens have a "more info" icon in the header bar (see page 7) or displayed to the right of an item in a list. When the "more info" icon is present, press the Info button to display a screen with additional details. -
Page 21: Data Entry
1 Your Omnipod® Insulin Management System Data Entry This section explains how to enter numbers or text into the PDM. Refer back to this section as needed while you are learning to use your PDM. Entering numbers Use the Up/Down button to increase or decrease a number. -
Page 22: The Header Bar
Your Omnipod® Insulin Management System 1 The Header Bar A screen's header bar gives useful information that is not found anywhere else. The information on the header bar varies according to each screen's purpose. PDM battery level indicator The batteries in your PDM should last about three weeks. The header bar on the... -
Page 23: The Pdm's Top-Level Screens
1 Your Omnipod® Insulin Management System The PDM's Top-level Screens This section introduces you to the PDM's top-level screens: The ID screen identifies the PDM as being yours. • • The Home screen and the More actions screen are the main menus. They provide the entry point to the PDM's functions. -
Page 24: Home Screen And More Actions Screen
Your Omnipod® Insulin Management System 1 Home screen and More actions screen The menu items on the Home screen and its More actions submenu give you access to the Omnipod® System's features. The Home screen can be accessed from most screens by pressing the Home/ Power button. -
Page 25: Status Screen
1 Your Omnipod® Insulin Management System Status screen The Status screen is an important screen. Navigating to the Status screen causes the PDM to ask the Pod about its (the Pod's) current state. For details, see "Status checks: How the PDM checks Pod function" on page 134. -
Page 26: Iob Screen
Your Omnipod® Insulin Management System 1 IOB screen For details about your insulin on board (IOB), navigate to the Status screen and press the Info button. The IOB screen shows you how much of your total IOB is from a meal IOB and how much is from a correction IOB. - Page 27 This page intentionally left blank.
-
Page 28: Initial Pdm Setup
CHAPTER 2 Initial PDM Setup Preparing for Your Training If you are a first-time Omnipod® System user, you need to meet with your Omnipod® System Trainer to set up your Personal Device Manager (PDM) and first Pod. To get a head start on learning about the Omnipod® System, review this User Guide prior to meeting with your Omnipod®... -
Page 29: Insert The Batteries
2 Initial PDM Setup Avoid taking a long break during the setup process. If the PDM is idle for 60 minutes during the setup process, you must begin the setup process from the beginning. Tip: Use the pages at the end of this User Guide to write down all of your settings. This list will be helpful if you ever need to reset or replace your PDM. -
Page 30: Basal And Bg Settings
4. Use the Up/Down button to choose your preferred date format. Press Next. Basal and BG settings Maximum Basal Rate The Omnipod® System cannot deliver insulin at a basal rate that exceeds your Maximum Basal Rate. You can adjust your Maximum Basal Rate later, if your needs change. - Page 31 2 Initial PDM Setup 2. To set different values for different times of day, you must sub-divide the day by defining new time segments. To add a time segment: a. Choose [add new] and press New. Note: You can edit an existing segment by using the Up/Down button to select a segment you wish to change and pressing Edit.
-
Page 32: Bolus Calculator Settings
Initial PDM Setup 2 Upper and lower limits for BG Goal Range To define the upper and lower limits of your BG Goal Range: 1. Use the Up/Down button to select the lower limit. Press Next. 2. Use the Up/Down button to select the upper limit. Press Next. 3. - Page 33 2 Initial PDM Setup 4. When the desired number of time segments exist, press Done. 5. Review the graph of your Target BG and Correct Above profile. Press List for a listing. Press Graph to see the graph again. 6. Press Save to store the profile. Minimum BG for Calcs If your blood glucose level is below the Minimum BG for Calcs that you specify, the Bolus Calculator is disabled (see "The Bolus Calculator"...
-
Page 34: Adding Time Segments
Initial PDM Setup 2 Adding time segments 1. Choose [add new] and press New. Note: You can edit an existing segment by using the Up/Down button to select a segment you wish to change and pressing Edit. 2. Enter a start time for the segment, then press Next. 3. -
Page 35: Other Bolus Settings
2 Initial PDM Setup Reverse correction There may be times when you are about to eat and your blood glucose level is below your Target BG level. If Reverse Correction is on, the Bolus Calculator decreases a suggested meal bolus to help counteract your low blood glucose reading. -
Page 36: Pod Settings
Initial PDM Setup 2 Extended bolus setting Extending a bolus means that a meal bolus can be delivered over a prolonged period of time. For an explanation of extended boluses, see page 143. 1. Select a configuration for your extended bolus: To specify the amount of the immediate portion of the bolus as a percent of the total bolus. - Page 37 This page intentionally left blank.
-
Page 38: Changing Your Pod
Preliminary steps 1. Gather the necessary supplies: • A vial of rapid-acting U-100 insulin approved for use in the Omnipod® System • An unopened Pod • Alcohol prep swabs... -
Page 39: Prepare The Pdm And Deactivate The Old Pod
3 Changing Your Pod 2. Wash your hands before starting and keep them clean throughout the Pod change process. 3. Check the insulin for signs of deterioration. 4. Check the Pod's packaging for damage, then open it and inspect the Pod for signs of damage. - Page 40 Changing Your Pod 3 3. If a Pod is active, press Confirm to deactivate your Pod. If a temp basal or extended bolus is running, it is canceled when you press Confirm. Warning: Do NOT apply a new Pod until you have deactivated and removed the old Pod.
-
Page 41: Fill The Syringe With Insulin
3 Changing Your Pod 6. The screen asks if you'd like to activate a Pod now. Press Yes. Then put your PDM down without pressing any more buttons yet. If you see a communication error message when you attempt to deactivate your Pod, see "Failure when deactivating a Pod"... -
Page 42: Fill And Activate A Pod
Pod. Do not insert the fill syringe more than once into the fill port. Only use the fill syringe and needle that came with your Pod. The fill syringe is intended for single use only and should only be used with the Omnipod® System. To fill the Pod with insulin: 1. - Page 43 8. Press Next. A screen appears telling you that the Pod is priming. 9. The Omnipod® System performs a series of safety checks and automatically primes the Pod. Listen for the beeps that indicate that the Pod is successfully activated.
-
Page 44: Select The Pod Site
Changing Your Pod 3 Select the Pod Site Discuss suitable Pod placement sites with your healthcare provider using the following guidelines: • Ideal sites have a layer of fatty tissue. • Ideal sites offer easy access and viewing. • The site should be at least 2.5 cm (1 inch) away from the previous site... -
Page 45: Apply The Pod
3 Changing Your Pod Apply the Pod The next step is to apply the Pod to your body: 1. Remove the Pod's plastic needle cap on the underside of the Pod by placing your thumb on the bottom (flat edge) of the Pod’ s plastic cap and pulling the cap upwards. - Page 46 Changing Your Pod 3 5. Orient the Pod so it is: • Horizontal or diagonal on your abdomen, hip, or buttocks. • Up and down or at a slight angle on your upper arm or thigh. Suggested Pod orientation Up, down, or slight angle Horizontal or diagonal Up, down, or slight angle 6.
-
Page 47: Check The Infusion Site
3 Changing Your Pod Warning: If you are applying a Pod in a place that does not have a lot of fatty tissue, squeeze the skin around the Pod throughout the next step. Occlusions may result if you do not use this technique for lean areas. -
Page 48: Avoid Infusion Site Infections
Changing Your Pod 3 Warning: Check the infusion site after insertion to ensure that the cannula was properly inserted. If the cannula is not properly inserted, hyperglycemia may result. 4. If there is a problem with the cannula, press No and follow the on-screen instructions for deactivating your Pod. -
Page 49: More Information About Pod Use
3 Changing Your Pod Warnings: Check often to make sure the Pod and soft cannula are securely attached and in place. A loose or dislodged cannula may interrupt insulin delivery. Verify that there is no wetness or scent of insulin, which may indicate that the cannula has dislodged. -
Page 50: Checking Your Blood Glucose
Only use FreeStyle and FreeStyle Lite test strips and FreeStyle control solution with the Omnipod® System. Using other brands of test strips and control solutions with the System can produce inaccurate results. - Page 51 4 Checking Your Blood Glucose Warnings: Test results below 3.9 mmol/L mean low blood glucose (hypoglycemia). Test results greater than 13.9 mmol/L mean high blood glucose (hyperglycemia). If you get results below 3.9 mmol/L or above 13.9 mmol/L, but do not have symptoms of hypoglycemia or hyperglycemia (see "Living with Diabetes"...
-
Page 52: Using The Built-In Bg Meter
Please read all instructions provided on the test strip package insert before using the Omnipod® System and FreeStyle accessories. Insert a test strip into the PDM 1. Turn on your PDM by pressing the Home/ Power button. - Page 53 Failure to do so will result in an inaccurate reading. It is important to always enter a code whether using FreeStyle or Freestyle Lite with the Omnipod® System, even if some FreeStyle Lite products indicate that no coding is required. No coding only applies when these strips are used with certain Abbott meters, and does not apply to the Omnipod®...
-
Page 54: Test Your Blood Glucose Or Control Solution
Thoroughly dry your hands and the test site. Measurements obtained from alternate site testing should not be used to calculate insulin doses with the Omnipod® System. To test your blood glucose or to perform a control solution test: 1. - Page 55 4 Checking Your Blood Glucose 4. Position the PDM so the test strip's sample area meets the blood or control solution at a slight angle. Note: If you do not apply a drop of blood or control solution within two minutes of inserting the test strip, the PDM powers off.
-
Page 56: Control Solution Results
Checking Your Blood Glucose 4 Note: If you receive a "Meter Error" message when checking your BG, see "Errors in the Built-in BG Meter" on page 106. 8. Remove and dispose of the test strip (see the test strip instructions for use for disposal information). -
Page 57: Blood Glucose Results
4 Checking Your Blood Glucose Blood glucose results When the PDM displays your blood glucose result, it adds an on-screen message if the result is especially high or low (see "How the PDM reports blood glucose results" on page 44). To bolus or not to bolus? 1. - Page 58 Checking Your Blood Glucose 4 Low and high blood glucose readings Warnings: Blood glucose readings that are especially low or high can indicate potentially serious condition requiring immediate medical attention. If left untreated, this situation can quickly lead to diabetic ketoacidosis (DKA), shock, coma, or death.
-
Page 59: Using Bg Meter
4 Checking Your Blood Glucose How the PDM reports blood glucose results When the PDM displays your blood glucose reading, it adds a warning message for high and low results. Blood glucose result Screen display Screen warning message Above 27.8 mmol/L HIGH Check for ketones! 13.9-27.8 mmol/L... -
Page 60: Tagging The Blood Glucose Results
Checking Your Blood Glucose 4 3. Use the Up/Down button to enter your measured blood glucose value. 4. Press Tag to add an informational note to your blood glucose reading (see "Tagging the Blood Glucose Results" on page 45). 5. Press Save to save the reading in the BG history records. See "How the PDM reports blood glucose results"... - Page 61 This page intentionally left blank.
-
Page 62: Delivering A Bolus Of Insulin
You can deliver a bolus of insulin when you need to lower a high blood glucose level and when you are about to eat. The Omnipod® Insulin Management System allows you to: • Have the System's Bolus Calculator suggest a correction or meal bolus (see "Bolusing with the Bolus Calculator"... -
Page 63: Deliver The Bolus
5 Delivering a Bolus of Insulin 3. Enter your blood glucose reading: • To enter a reading from a separate BG meter, use the Up/Down button to enter the blood glucose value, then press Yes. • If you recorded a blood glucose value within the past 10 minutes, the screen automatically displays it. - Page 64 Delivering a Bolus of Insulin 5 Warning: If the suggested bolus exceeds your Maximum Bolus, "Exceeds max bolus" appears below the bolus. If you select Enter or Extend, a screen warns you that the suggested bolus exceeds your Maximum Bolus. Press Confirm to allow a one-time override of the limit or Cancel to disallow it.
-
Page 65: Manually-Calculated Bolus
5 Delivering a Bolus of Insulin If you want to cancel or replace a bolus, see "Altering an Ongoing Bolus" on page To add an informational tag to the BG value used for this bolus, see "Tagging the Blood Glucose Results" on page 45. Manually-calculated Bolus If the Bolus Calculator is disabled or turned off, you must calculate a bolus amount yourself. -
Page 66: Altering An Ongoing Bolus
Delivering a Bolus of Insulin 5 Note: Your "extended bolus" setting determines whether the screen displays percent (%) or units (U). If the extended bolus option is off, the "Extend" soft key label does not appear on the screen. 7. If the BG reminder option is turned on and you want a reminder to check your blood glucose, press Yes. -
Page 67: Cancel An Immediate Bolus
5 Delivering a Bolus of Insulin Cancel an immediate bolus To cancel an active bolus while it is being delivered: 1. If necessary, turn on your device and confirm your 2. If bolus delivery has not finished yet, press Cancel on the "Delivering bolus"... -
Page 68: Replace An Extended Bolus
Delivering a Bolus of Insulin 5 Replace an extended bolus To replace an extended bolus with a new extended bolus: 1. Follow the instructions in "Bolusing with the Bolus Calculator" on page 47 or "Manually-calculated Bolus" on page 50 to specify the amount of the new bolus. - Page 69 This page intentionally left blank.
-
Page 70: Modifying Basal Insulin Delivery
CHAPTER 6 Modifying Basal Insulin Delivery This chapter describes how to modify your basal insulin delivery using temporary basal rates or switching to a different Basal Program. Using Temporary Basal Rates Use a temporary basal rate, or “temp basal, ” to handle a temporary change in your routine. - Page 71 6 Modifying Basal Insulin Delivery 4. If temp basals are configured as a flat rate (U/h), skip to step 6. If temp basals are configured as a percent change (%), select Increase or Decrease depending on whether you want more or less insulin delivery in the near future.
-
Page 72: Activate A Temp Basal Preset
Modifying Basal Insulin Delivery 6 Activate a temp basal preset A temp basal preset stores the details of a temp basal that you use frequently. Temp basal presets can be activated rapidly. To create or modify a temp basal preset, see "Temp basal presets"... -
Page 73: Cancel A Temp Basal
6 Modifying Basal Insulin Delivery Cancel a temp basal A temp basal stops automatically at the end of its time period. To cancel a running temp basal: 1. From the Home screen, select Suspend/cancel. 2. Highlight Cancel temp basal and press Select. 3. -
Page 74: Suspending And Resuming Basal Insulin Delivery
Sometimes you may need to stop insulin delivery briefly. For example, you must suspend insulin delivery prior to editing an active Basal Program or resetting the time or date. The Omnipod® System lets you suspend all insulin delivery for up to two hours. - Page 75 6 Modifying Basal Insulin Delivery Resume insulin delivery before the suspension period ends 1. From the Home screen, choose Resume. 2. Press Confirm to restart the Basal Program scheduled for the current time. Resume insulin delivery after the suspension period ends 1.
-
Page 76: Adjusting Settings
The screens shown here are the two main menu screens that give you access to your Omnipod® System settings: the Settings menu and the System setup menu. Home > Settings Home > Settings> System setup General PDM Settings General PDM settings include your identification and general device settings. -
Page 77: Username And Screen Color
7 Adjusting Settings Username and screen color The ID screen settings are used to identify your PDM. Identifying the PDM as yours prior to using it helps ensure that you use the PDM that is tuned to control your Pod and that is programmed with your personal settings. To change your ID screen settings: 1. -
Page 78: Lock Or Unlock The Pdm Buttons
Warning: If the PDM fails to beep, call Customer Care immediately. If an activated Pod fails to beep, change the Pod immediately. Continuing to use the Omnipod® System in these situations may put your health and safety at risk. Lock or unlock the PDM buttons You can lock the PDM to prevent accidentally changing Basal Programs or giving boluses. -
Page 79: Factory Defaults Settings
7 Adjusting Settings Factory defaults settings Reset PDM is a rarely-used function that returns all of the PDM's settings to the default factory settings. Caution: Resetting the PDM deletes your Basal Programs, temp basal presets, bolus presets, carb presets, and all Bolus Calculator settings. Before using this feature, be sure you have a written record of the information you need to reprogram your PDM. -
Page 80: Basal Programs
Adjusting Settings 7 To change your Maximum Basal Rate: 1. Home > Settings > System setup > Bolus/basal/calcs > Max basal 2. Use the Up/Down button to specify your the Maximum Basal Rate, then press Enter. Note: You cannot set a Maximum Basal Rate that is lower than the highest basal rate of an existing Basal Program, temp basal preset, or currently running temp basal. - Page 81 7 Adjusting Settings 4. The next steps are the same as those you performed when you set up your first Basal Program. Follow the on- screen instructions or see "Define a Basal Program" on page 15 for step-by- step instructions. After you confirm your new Basal Program, the PDM stores it for your future use.
- Page 82 Adjusting Settings 7 5. To delete a segment: a. Select an adjacent segment and press Edit. b. Change the start time or end time so the adjacent segment covers the segment you are deleting. c. Optionally, change the value for the resulting longer segment. d.
-
Page 83: Temp Basal Configuration
7 Adjusting Settings Temp basal configuration To turn off the temp basal feature or change your temp basal configuration: 1. Home > Settings > System setup > Bolus/basal/calcs > Temp basal 2. Select a configuration for your temp basal: Specify temp basals as a percentage of the currently active Basal Program. - Page 84 Adjusting Settings 7 Edit or rename a temp basal preset Note: You cannot edit a temp basal preset that is actively running. 1. Home > Settings > Presets > Temp basal presets 2. Highlight the temp basal preset you would like to change, scrolling down as needed if there is a long list.
-
Page 85: Bolus Calculator Settings
7 Adjusting Settings Bolus Calculator Settings Warning: The Bolus Calculator displays a suggested bolus dose based on the personalized settings you have programmed into the PDM. Check with your healthcare provider before adjusting your Bolus Calculator settings. The following sections describe how to edit individual Bolus Calculator settings. -
Page 86: Minimum Bg For Calcs
Adjusting Settings 7 You can set different Target BG and Correct Above values for different times of day. To edit or add Target BG or Correct Above segments: 1. Home > Settings > System setup > Bolus/basal/calcs > Ratios/factors/targets > Target BG 2. -
Page 87: Correction Factor
7 Adjusting Settings Correction Factor The Bolus Calculator uses your Correction Factor to calculate a correction bolus when your blood glucose value is above your Correct Above setting (see "The Bolus Calculator" on page 144). Your Correction Factor can range from 0.1 to 22.2 mmol/L. -
Page 88: Carb Presets
Adjusting Settings 7 Carb presets Carbs presets are used to store the carbohydrate content of snacks or meals that you eat often. You can quickly select a carb preset when the Bolus Calculator asks how many carbs you are about to eat. You can create up to 36 carb presets. Create a new carb preset To save a frequently eaten food as a carb preset: 1. - Page 89 7 Adjusting Settings Edit or rename a carb preset 1. Home > Settings > Presets > Carb presets 2. Choose the category containing the preset you want to edit, then press Select. 3. Highlight the carb preset that you want to edit, then press Edit. 4.
-
Page 90: Bolus Delivery Settings
Adjusting Settings 7 Bolus Delivery Settings Extended bolus configuration An extended bolus is delivered over a prolonged period of time. Only the meal portion of a bolus can be extended. A correction bolus cannot be extended. To turn off the extended bolus feature or to change your extended bolus configuration: 1. -
Page 91: Bolus Presets
7 Adjusting Settings Bolus presets Bolus presets allow you to store commonly used bolus amounts for quick retrieval in the future. Bolus presets are only used if the Bolus Calculator is off. A bolus preset only stores the total number of units of insulin in a bolus. You will specify whether the bolus should be extended or not when you activate it. -
Page 92: Reminder And Notification Settings
Adjusting Settings 7 Reminder and Notification Settings Reminders and notifications are used to bring items related to system function to your attention (see "Notifications" on page 99 and "Informational Beeps" on page 101). BG reminders If BG reminders are on, a screen is inserted into the bolus flow that asks if you would like to set a reminder to check your blood glucose. -
Page 93: Low Reservoir Level
7 Adjusting Settings Low reservoir level The Pod and PDM sound an advisory alarm when the insulin level in your Pod reaches the low reservoir setting. This setting can range from 10 to 50 units. 1. Home > Settings > System setup > Alerts/reminders > Low reservoir 2. - Page 94 Adjusting Settings 7 Add a new bolus reminder 1. Home > Settings > System setup > Alerts/reminders > Bolus reminders 2. Highlight On and press Select. 3. Highlight [add new] and press New. 4. Use the Up/Down button to enter the start time for the interval, and press Next.
-
Page 95: Program Reminders
7 Adjusting Settings Program reminders If program reminders are on, the Pod beeps every 60 minutes while a temp basal or extended bolus is in progress. See page 101 for more information about program reminders. 1. Home > Settings > System setup > Alerts/reminders >Program reminders 2. - Page 96 Adjusting Settings 7 Add a new custom reminder 1. Home > Settings > System setup > Alerts/reminders > Custom reminders 2. Highlight [add new] and press New. 3. If desired, enter a unique name for the custom reminder (see "Entering text" on page 6).
-
Page 97: Bg Readings Settings
7 Adjusting Settings BG Readings Settings Upper limit and lower limit of the BG Goal Range The upper and lower limit of your BG Goal Range are used in the history graphs and statistics to determine which blood glucose readings are within goal and which are above or below your goal. -
Page 98: Built-In Bg Meter Sound
Adjusting Settings 7 Built-in BG meter sound You can control whether the built-in BG meter beeps when the test strip is full of blood or control solution. 1. Home > Settings > System setup > BG meter 2. Highlight BG sound, and press Select. 3. - Page 99 This page intentionally left blank.
-
Page 100: Browsing Your Records
CHAPTER 8 Browsing Your Records The PDM history records contain information about your blood glucose readings, insulin delivery, carbohydrate entries, and alarms history. The history records can store over 90 days of information. Once the memory is full, new records begin to replace the oldest records. -
Page 101: Selecting List Items Or Dates
8 Browsing Your Records Selecting list items or dates The middle soft key of many of the history screens toggles between Event and Day. Selecting Event or Day determines what happens when you press the Up/ Down button as explained in the following sections. Selecting Event Selecting the Event option switches the highlighting from the date into the list of items. -
Page 102: Meaning Of Icons Used On Record Screens
Browsing Your Records 8 Selecting Day Selecting the Day option switches the highlighting from the list to the date, which is located in the upper right-hand corner of the screen. When the date is highlighted, pressing the Up/Down button changes the date to the preceding or next date. This allows you to access all of the daily records that are stored in your history. -
Page 103: Insulin Delivery Records
8 Browsing Your Records Insulin Delivery Records You can view basal and bolus insulin delivery records as a (1) combined summary or (2) day-by-day list of individual events. Combined basal and bolus summary 1. To see a summary of your daily basal and bolus insulin delivery, navigate to: Home >... -
Page 104: Basal History
Browsing Your Records 8 3. To see additional details about a list item that has a icon next to it, use the Up/Down button in Event mode to highlight the list item, and then press the Info button. Note: Boluses delivered with a syringe are not included in these records. Both the bolus and the basal history screens include information about suspending or resuming insulin, and Pod changes. -
Page 105: Bg History Records
8 Browsing Your Records BG History Records The PDM stores blood glucose (BG) records for the past 90 days. You can view individual readings, single-day summaries, and multi-day summaries. Note: LOW and HIGH BG readings are included in the number of BG readings but not in calculations or averages. -
Page 106: View Bg Records For Multiple Days
Browsing Your Records 8 5. To see a graph of all of the BG readings for the selected day, press Graph. (Alternatively, from the Status screen, navigate to: Home > My records > BG history > Graph). The two horizontal dashed line on the graph show the upper and lower limits of your BG Goal Range. -
Page 107: Alarm History Records
8 Browsing Your Records 3. Press Graph to see a graph of the multi-day period. Graphs are not available for 60-day and 90-day periods. 4. Press Stats to see the text summary of the multi-day period. 5. Press Back to return to viewing single-day data. Alarm History Records The PDM lists the entire alarm history on a single screen. -
Page 108: Combined Listing Of All History Data
Browsing Your Records 8 Combined Listing of All History Data The PDM can display all of your history records on a single screen: 1. To see a combined record of all of your history records for a day, navigate to: Home >... - Page 109 This page intentionally left blank.
-
Page 110: Alarms, Notifications, And Other Messages
If you need to return the PDM for replacement, contact your healthcare provider for instructions about using injections. The Omnipod® System generates the following types of alarms and messages: Hazard alarms are high priority alarms that indicate a serious problem has •... -
Page 111: Hazard Alarms
9 Alarms, Notifications, and Other Messages Hazard Alarms Hazard alarms make you aware of serious situations. For hazard alarms that originate in the Pod, the Pod sounds a continuous tone broken up periodically by a series of beeps and the PDM sounds a continuous tone. For hazard alarms that originate in the PDM, the PDM sounds a continuous tone and the Pod remains silent. - Page 112 Alarms, Notifications, and Other Messages 9 PDM message What to do Description Press OK. The PDM detects an PDM Error. unexpected error. Remove Pod. Remove Pod now. Call Customer Care PDM sounds alarm. Call customer support immediately. Check blood glucose. Press OK.
-
Page 113: Advisory Alarms
9 Alarms, Notifications, and Other Messages Advisory Alarms Advisory alarms inform you of a situation that needs your attention in the near future. Warnings: Three advisory alarms (Pod expiration advisory, low reservoir, and Auto- off) escalate and result in a stoppage of insulin delivery if ignored. Be sure to respond to all advisory alarms when they occur. -
Page 114: Notifications
Alarms, Notifications, and Other Messages 9 PDM message Beeps Description What to do Press OK to 2 sets of 4 beeps Time period for End of insulin every minute insulin suspension restart the suspend. for 3 minutes. has passed. If you scheduled Basal Press OK to Repeats every... - Page 115 9 Alarms, Notifications, and Other Messages PDM message Beeps Description What to do You need to activate a Press OK. Reminder: 2 sets of 4 new Pod to begin basal beeps, repeat Activate a new No active Pod. insulin delivery. every 15 min.
-
Page 116: Informational Beeps
Alarms, Notifications, and Other Messages 9 Informational Beeps Informational beeps let you know that normal events are occurring as expected. The PDM does not show an explanatory message. Event Beep from Beep Comment Pod PDM pattern ✓ Start of Temp basal, bolus Two beeps To turn these or extended bolus... -
Page 117: Pod Communication Failures
9 Alarms, Notifications, and Other Messages Event Beep from Beep Comment Pod PDM pattern ✓ Test strip filled Single beep To turn these beeps on or off, see "Built- ✓ BG reading done Two beeps in BG meter sound" on page 83. ✓... -
Page 118: Failure When Activating Or Sending A Command To A Pod
Alarms, Notifications, and Other Messages 9 Failure when activating or sending a command to a Pod PDM message What to do Communication error. During activation, place the PDM so it touches the Pod. After activation, hold the PDM within 5 ft (1.5 m) of the Pod. -
Page 119: Failure When Canceling A Bolus
9 Alarms, Notifications, and Other Messages Failure when canceling a bolus PDM message What to do Communication error. When an attempt to cancel a bolus is not immediately successful, the PDM displays this screen. Move your PDM closer to your Pod. Move PDM close to Pod. -
Page 120: Failure When Deactivating A Pod
Alarms, Notifications, and Other Messages 9 Failure when deactivating a Pod PDM message What to do An attempt to deactivate the Pod fails. Communication error. Remove your Pod. Remove pod. Press Retry to try deactivating the Pod again, or To retry deactivation, press press Discard to break the link between the PDM "Retry."... -
Page 121: Errors In The Built-In Bg Meter
9 Alarms, Notifications, and Other Messages Errors in the Built-in BG Meter If there is a problem in the blood glucose meter, test strip, sample, or results, the PDM gives three beeps and displays a meter error number. Use the meter error number to look up corrective actions in the following table. - Page 122 Alarms, Notifications, and Other Messages 9 PDM message Possible causes What to do 3 possibilities: Be sure you see the blinking blood drop screen before you apply blood or Incorrect test control solution. procedure; for example, putting Conduct a control solution test using Meter Error 3 blood on the a new test strip.
-
Page 123: Silencing An Alarm
9 Alarms, Notifications, and Other Messages Silencing an Alarm Pod alarm: If you respond to a Pod alarm but the PDM cannot shut off the alarm, the Pod alarm continues. To permanently silence a Pod alarm: 1. Remove the Pod from your body. 2. -
Page 124: Taking Care Of Your Pdm And Pod
CHAPTER 10 Taking Care of Your PDM and Pod The Omnipod® Insulin Management System has no user-serviceable parts. If you require assistance operating or maintaining the Omnipod® System, call Customer Care. Warnings: Store all Omnipod® System products and supplies, including unopened Pods, in a cool, dry place. -
Page 125: Pdm Care
10 Taking Care of Your PDM and Pod Warning: Do NOT expose a Pod to direct sunlight for long periods of time. Remove your Pod prior to using hot tubs, whirlpools, or saunas. These conditions could expose the Pod to extreme temperatures and may also affect the insulin inside the Pod. -
Page 126: Pdm And The Environment
PDM and the environment Avoid extreme temperatures Extreme operating temperatures can affect the PDM's battery and interfere with Omnipod® System operation. Avoid using the PDM in temperatures below 4.4°C (40°F) or above 40°C (104°F). Water and your PDM The PDM is not waterproof. Do not place it in water or leave it near water where it can accidentally fall in. -
Page 127: Replacing The Pdm's Batteries
10 Taking Care of Your PDM and Pod USB cable When you use a USB cable to upload your records to another device, disconnect the USB cable as soon as you are finished. Warning: Only connect a USB cable to your PDM when downloading data to a computer. -
Page 128: Pdm Cleaning And Disinfecting
Taking Care of Your PDM and Pod 10 Warning: The PDM remembers the date and time for up to two hours after the batteries run out or are removed. After that, the date and time may need to be reset. If there is an active Pod, it will have to be replaced. To replace the batteries: 1. - Page 129 10 Taking Care of Your PDM and Pod Note: After cleaning or disinfecting your PDM, perform a control solution test to ensure that the Omnipod® System functions properly (see "Test your blood glucose or control solution" on page 39). Note: Wash your hands thoroughly with soap and water after handling the BG Meter, lancing device, or test strips.
-
Page 130: If You Drop The Pdm
Taking Care of Your PDM and Pod 10 In addition, the testing supports an additional two cleanings per week over the 4 year life of the device: Recommended Procedure # Wipes Tested Cleaning 2 cleanings x 52 weeks x 4 years 416 wipes Cycle 1 cycle/week x 52 weeks x 4 years... - Page 131 10 Taking Care of Your PDM and Pod If you are unable to use your PDM's built-in BG Meter, use a backup BG Meter to check your blood glucose. Warning: If your PDM is damaged or not working as it should, please call Customer Care for assistance.
-
Page 132: Living With Diabetes
Omnipod® System, as well as the responsibilities that come with insulin pump therapy. Remember: safe use begins and ends with you. If you have questions or doubts about being able to safely use the Omnipod® System at any time, consult your healthcare provider immediately. -
Page 133: Check Your Blood Glucose Frequently
Extra new PDM batteries (at least two AAA alkaline; do not use rechargeable batteries) • A vial of rapid-acting U-100 insulin (see the Introduction for insulins approved for use in the Omnipod® System) • Syringes or pens for injecting insulin •... -
Page 134: Traveling And Vacations
Warning: When you travel outside the country or for long periods of time, be sure to take extra Pod supplies. Prior to departure, call Customer Care to inquire about additional Omnipod® System supplies for your trip. -
Page 135: Airport Issues
All diabetes supplies are in your carry-on luggage. • Carry a signed letter from your healthcare provider explaining that you need to carry insulin supplies and Omnipod® System equipment. • Bring prescriptions for all medications and supplies with their original prescription labels. -
Page 136: Keep Supplies Accessible
Avoid Lows, Highs, and DKA You can avoid most risks related to using the Omnipod® System by practicing proper techniques and by acting promptly at the first sign of hypoglycemia, hyperglycemia, or diabetic ketoacidosis. The easiest and most reliable way to avoid these conditions is to check your blood glucose often. - Page 137 11 Living with Diabetes Symptoms of hypoglycemia (low blood glucose) Never ignore the following symptoms, as they could be a sign of hypoglycemia: • Shakiness • Fatigue • Unexplained sweating • Cold, clammy skin • Weakness • Blurred vision or a headache •...
- Page 138 Living with Diabetes 11 To avoid hypoglycemia (low blood glucose) • Work with your healthcare provider to establish individualized BG Targets and guidelines. • Keep a fast-acting carbohydrate with you at all times to respond quickly to low blood glucose. Examples of fast-acting carbs are glucose tablets, hard candies or juice.
- Page 139 11 Living with Diabetes To treat hypoglycemia (low blood glucose) Any time your blood glucose is low, treat it immediately according to your healthcare provider’ s instructions. Check your blood glucose every 15 minutes while you are treating, to make sure you don’t overtreat the condition and cause blood glucose levels to rise too high.
- Page 140 Living with Diabetes 11 Possible causes of Suggested action hypoglycemia Adjust insulin delivery as instructed by your healthcare provider. Check blood glucose before, during and after activity and treat as necessary. Prolonged or intense exercise Note: Effects of exercise can last several hours— even a full day—after activity ends.
-
Page 141: Hyperglycemia (High Blood Glucose)
11 Living with Diabetes Hyperglycemia (high blood glucose) Pods use rapid-acting insulin, so you have no long-acting insulin in your body. If an occlusion (interruption of insulin delivery from the Pod) occurs, your blood glucose can rise rapidly. Warnings: An occlusion may result from a blockage, Pod malfunction, or from using old or inactive insulin (see "Occlusion detection"... - Page 142 Living with Diabetes 11 To treat hyperglycemia (high blood glucose) Always check your blood glucose levels frequently while treating hyperglycemia. You don’t want to over-treat the condition and cause your blood glucose level to drop too far. 1. Check your blood glucose level. The result will help you to find out how much insulin is needed to return your blood glucose to your blood glucose goal.
- Page 143 11 Living with Diabetes Possible causes of Suggested action hyperglycemia Deactivate and remove the used Pod. Infected infusion Apply a new Pod in a different location and consult site your healthcare provider. Deactivate and remove the used Pod. Apply a new Pod in a different location. Dislodged cannula Note: Avoid sites near a waistband, belt, or other areas where friction may dislodge the cannula.
-
Page 144: Diabetic Ketoacidosis (Dka)
Living with Diabetes 11 Possible causes of Suggested action hyperglycemia Weight loss or gain Menstrual cycle Consult your healthcare provider for guidance. Pregnancy Diabetic ketoacidosis (DKA) Pods use rapid-acting insulin, so you have no long-acting insulin in your body. If insulin delivery from the Pod is interrupted (an occlusion), your blood glucose can rise rapidly and lead to diabetic ketoacidosis (DKA). -
Page 145: Handling Special Situations
11 Living with Diabetes To treat DKA • Once you have begun treatment for high blood glucose, check for ketones. Check for ketones any time your blood glucose is 13.9 mmol/L or above. • If ketones are negative or trace, continue treating for high blood glucose. •... -
Page 146: Exercising, Playing Sports, Or Working Hard
Living with Diabetes 11 Exercising, playing sports, or working hard Check your blood glucose levels before, during and after exercising, playing sports, or doing unusually hard physical labor. The Pod’ s adhesive keeps it securely in place for up to 3 days. However, if necessary, several products are available to enhance adhesion. - Page 147 This page intentionally left blank.
-
Page 148: Understanding Pdm And Pod Function
CHAPTER 12 Understanding PDM and Pod Function PDM and Pod Interactions This section describes how the PDM controls the Pod, and what the Pod can do without input from the PDM. Pod actions controlled by the PDM The Pod requires input from the PDM in order to: •... - Page 149 12 Understanding PDM and Pod Function Status checks: How the PDM checks Pod function The PDM periodically checks to see if the Pod is functioning properly. These "status checks" are done: When you turn on the PDM and press Confirm on the ID screen. •...
- Page 150 The PDM and Pod are separated by more than 1.5 meters (5 feet). • The PDM's batteries are dead. • There is too much outside interference (see "Omnipod® System Notice Concerning Interference" on page 163). For instructions on handling communication problems, see "Pod Communication Failures" on page 102.
-
Page 151: What The Pod Can Do Between Pdm Instructions
12 Understanding PDM and Pod Function Pod deactivation "Deactivation" uncouples a PDM and Pod from each other. Deactivation has the following outcomes: • It stops the current Pod's insulin delivery. • It permanently silences any alarms from that Pod. • It frees the PDM to activate a new Pod. -
Page 152: Pdm's Self-Checks
Understanding PDM and Pod Function 12 PDM's self-checks The PDM checks itself for errors whenever it is being operated. Also, once a day, the PDM wakes up and performs a series of self-diagnostic tests. If the self- diagnostic tests detect an error, the PDM sounds a hazard alarm and displays an explanatory message (see "Hazard Alarms"... -
Page 153: Basal Insulin Delivery
"basal" insulin. In people without diabetes, the pancreas continuously delivers this basal insulin. For people using the Omnipod® Insulin Management System, the Pod mimics a healthy pancreas by delivering basal insulin at the rate that you program into the PDM. -
Page 154: Temporary Basal Rates
Temporary basal rates The ability to set temporary basal rates, or "temp basals," is an important feature of the Omnipod® Insulin Management System. A temp basal lets you override the currently running Basal Program by setting a different basal rate for a predetermined period of time. - Page 155 12 Understanding PDM and Pod Function Temp basal settings: Units per hour (U/hr) or percent (%) Temp basals can be set using percent (%) or units per hour (U/hr). Setting temp basals to units per hour (U/hr) means that the Pod delivers insulin at a flat rate for the duration of the temp basal.
- Page 156 Understanding PDM and Pod Function 12 The calculations for the 50% increase temp basal in the preceding figure are: Time segment Basal rate of 50% increase Resulting temp boundaries* Basal Program (U/hr) basal rate: (U/hr) (U/hr) Midnight–7:00 am 0.20 7:00 am–10:00 am 0.20 0.20 x 50%=0.10 0.20 + 0.10 = 0.30...
-
Page 157: Methods To Temporarily Stop Insulin Delivery
12 Understanding PDM and Pod Function To handle predictable, short-term changes, you can define temp basal presets (see "Temp basal presets" on page 68). Once stored, a temp basal preset can be activated quickly at a later time (see "Activate a temp basal preset" on page 57). Methods to temporarily stop insulin delivery There may be times when you want to stop all insulin delivery, or at least all basal insulin delivery, for a period of time. -
Page 158: Immediate And Extended Boluses
Understanding PDM and Pod Function 12 Immediate and Extended Boluses A bolus is an extra dose of insulin that is delivered in addition to the continuous basal rate of insulin delivery. Boluses are used to bring down high blood glucose levels and to handle the carbohydrates (carbs) in a meal. -
Page 159: The Bolus Calculator
12 Understanding PDM and Pod Function The Bolus Calculator The PDM's Bolus Calculator can do a lot of the work of calculating a bolus for you. The Bolus Calculator uses your personal settings and also takes into account any insulin that remains from recent boluses (referred to as insulin on board or IOB). Bolus Calculator boluses When calculating a bolus, the Bolus Calculator considers a bolus to be made up of the following two components:... -
Page 160: When The Bolus Calculator Does Not Work
Understanding PDM and Pod Function 12 When the Bolus Calculator does not work The Bolus Calculator does not work when it is "disabled" or when it is "turned off." You control whether the Bolus Calculator is turned on or off, but the PDM controls when it is disabled. - Page 161 12 Understanding PDM and Pod Function Target BG When calculating a correction bolus, the Bolus Calculator aims to bring your blood glucose down to the Target BG. Correct Above threshold The Bolus Calculator only suggests a correction bolus if your blood glucose reading is above your Correct Above setting.
- Page 162 Understanding PDM and Pod Function 12 Boundaries of the Bolus Calculator suggestions The following figure shows the boundaries between the types of calculations performed by the Bolus Calculator. For example, the Bolus Calculator suggests a meal bolus, but not a correction bolus, if your blood glucose reading is between your Target BG and your Correct Above settings.
-
Page 163: Bolus Calculator Equations
12 Understanding PDM and Pod Function Bolus Calculator equations The Bolus Calculator first calculates a preliminary correction and meal bolus. It then adjusts these preliminary values for IOB, if applicable. The final suggested bolus is equal to the sum of the resulting correction bolus and meal bolus. Preliminary bolus calculations Preliminary correction bolus = Current BG - Target BG Correction Factor... - Page 164 Understanding PDM and Pod Function 12 Insulin on board (IOB) calculations Duration of insulin action – time since previous bolus x previous bolus Duration of insulin action IOB from a previous correction bolus is called a “correction IOB. ” IOB from a previous meal bolus is called a “meal IOB. ” Correction IOB example Duration of insulin action: 3 hours Time since previous correction bolus: 1 hour...
-
Page 165: Bolus Calculator Examples
12 Understanding PDM and Pod Function Bolus Calculator examples Example 1: Eating, BG above target, no IOB Target BG (target): 5.6 mmol/L Current BG (current): 8.4 mmol/L IC Ratio: 1:15 Correction Factor (CF): Carb intake: 45 grams carbohydrate (carbs) Meal IOB: Correction IOB: Correction bolus 8.4 mmol/L[current... - Page 166 Understanding PDM and Pod Function 12 Example 2: Not eating, BG above target, 1 U meal IOB,1 U correction IOB Target BG (target): 5.6 mmol/L Current BG (current): 8.4 mmol/L IC Ratio: 1:15 Correction Factor (CF): Carb intake: 0 grams carbohydrate (carbs) Meal IOB: Correction IOB: Preliminary correction bolus...
- Page 167 12 Understanding PDM and Pod Function Example 3: Eating, BG at target, 1 U meal IOB Target BG (target): 5.6 mmol/L Current BG (current): 5.6 mmol/L IC Ratio: 1:15 Correction Factor (CF): Carb intake: 45 grams carbohydrate (carbs) Meal IOB: Correction IOB: Preliminary correction bolus 5.6 mmol/L[current] –...
- Page 168 Understanding PDM and Pod Function 12 Example 4: Eating, BG above target, 1 U correction IOB Target BG (target): 5.6 mmol/L Current BG (current): 8.4 mmol/L IC Ratio: 1:15 Correction Factor (CF): Carb intake: 60 grams carbohydrate (carbs) Meal IOB: Correction IOB: Preliminary correction bolus 8.4 mmol/L...
-
Page 169: Bolus Calculator Rules
12 Understanding PDM and Pod Function Bolus Calculator rules The Bolus Calculator applies the following rules to the suggested bolus doses: Suggested bolus doses are rounded down to the nearest 0.05U. • If the total of the suggested bolus calculation (correction bolus plus meal bolus) is less than zero, the suggested bolus dose is 0.00U. -
Page 170: Appendix
Appendix Summary of Settings and Options The options for the various Omnipod® Insulin Management System settings are: Time 12-hour or 24-hour clock Date MM/DD/YY DD/MM/YY MM.DD.YY DD.MM.YY YY-MM-DD Maximum Basal Rate 0.05-30 U/hr. Default is 3.00 U/hr Basal rate U/hr. Range: 0.05 U/hr to Maximum Basal Rate in 0.05 U/hr increments. -
Page 171: Pod Specifications
Appendix Insulin-to-carb (IC) 8 time segments; 1 to 150 g carb/U in 1g carb/U ratio increments Correction (sensitivity) 8 time segments; 0.1 to 22.2 mmol/L in 0.1 mmol/L factor increments Reverse correction On or Off. Default is On. Duration of insulin 2 to 6 hours in 30-minute increments action Bolus increment... - Page 172 Appendix Storage relative humidity range: 20 to 85%, non-condensing Operating atmospheric pressure: 696 hPA to 1060 hPA Storage atmospheric pressure: 696 hPA to 1060 hPA Non-pyrogenic: Fluid pathway only Type BF applied part: Protection from electrical shock Maximum infusion pressure: 10 psi Maximum volume infused under single fault conditions: 0.0 U Flow Capability: Basal: Programmable by the user in 0.05U increments up to 30.0 U per hour...
-
Page 173: Pdm Specifications
Appendix PDM Specifications Size: 6.21 cm wide x 11.25 cm long x 2.5 cm high (2.4” x 4.4” x 0.98” ) Weight: 125 grams (4.41 oz) Screen: 3.6 cm wide x 4.8 cm long (1.4” x 1.9” ); 6.1 cm diagonal (2.4”) LCD Battery: Powered by 2 AAA batteries Battery life: Approximately 3 weeks Operating temperature range: 4.4°C to 40°C (40°F to 104°F) -
Page 174: Protection From Over-Infusion Or Under-Infusion
Occlusion detection An occlusion is a blockage or interruption in insulin delivery. If the Omnipod® System detects an occlusion, it sounds a hazard alarm and prompts you to deactivate and change your Pod. -
Page 175: System Accuracy According To International Standard
Appendix System Accuracy according to International Standard ISO 15197:2013 Capillary blood glucose results were compared with those obtained using the YSI Glucose Analyser. System accuracy for finger samples with YSI glucose results lower than 5.55 mmol/L and 27.8 mmol/L. Within Within Within ±... -
Page 176: Pdm Icons
Appendix PDM Icons This section defines the images found on the PDM screens. Icon Meaning Icon Meaning Home/Power More actions Bolus Communication Pod change Up/Down Diagnostics/ Up/Down (on color) settings Temp basal Status Suspend/cancel Text entry right Basal Program Submenu Hazard alarm (Alternating/ Home screen... -
Page 177: Omnipod® System Label Symbols
BG tag record Built-in BG meter “Unconfirmed” history temperature out- record of-range Omnipod® System Label Symbols The following symbols appear on the Omnipod® System or its packaging: Symbol Meaning Symbol Meaning Single Use MR Unsafe Caution: Consult Non-pyrogenic fluid... -
Page 178: Medical Device Directive
There are no guarantees that interference will not occur in a particular installation. If the Omnipod® System does cause harmful interference to radio and television reception, the interference may be corrected by one of the following measures: •... - Page 179 (increased emission and decreased immunity). Care should be taken if the Omnipod® System is used adjacent to other electrical equipment; if adjacent use is inevitable, such as in work environments, the Omnipod® System should be observed to verify normal operation in this setting.
- Page 180 Appendix Warning: Portable RF communications equipment (including peripherals such as antenna cables and external antennas) should be used no closer than 30 cm (12 inches) to any part of the System. Otherwise, degradation of the performance of this equipment could result. Electromagnetic Emissions This equipment is intended for use in the electromagnetic environment specified below.
- Page 181 Appendix Electromagnetic Immunity The System is intended for use in the electromagnetic environment specified below. You should observe these requirements in the use of the System. Compliance Immunity IEC 60601-1-2 level (of this against test level device) Electromagnetic environment ElectroStatic contact If floors are covered with synthetic material, Discharge, ESD...
- Page 182 Appendix Electromagnetic Immunity Field strengths from fixed transmitters, such as base stations for radio (cellular/ cordless) telephones and land mobile radios, amateur radio, AM and FM radio broadcast, and TV broadcast, cannot be predicted theoretically with accuracy. To assess the electromagnetic environment due to fixed RF transmitters, an electromagnetic site survey should be considered.
-
Page 183: Warranty For The Pdm And Pods
Warranty Coverage for the Omnipod® System Pods Subject to the terms and conditions below, Insulet warrants to you, the original recipient of the Omnipod® System, that if Insulet determines that an Omnipod® System Pod (“Pod”) you have received has a defect in material or workmanship... - Page 184 This Warranty will apply only if the PDM or the Pod at issue has been used in accordance with the Omnipod® System User Guide and/or other written instructions provided by Insulet. This Warranty does not apply if the PDM or the Pods have been: •...
- Page 185 Your statutory rights are not affected by this Warranty. Insulet does not warrant the suitability of the PDM or the Pods or the Omnipod® System for any specific person as health care and treatment are complex subjects requiring the services of qualified health care providers.
- Page 186 PDM, a Pod, or an Omnipod® System. No employee, agent or other representative of Insulet or any other party is authorized to make any product warranty or agreement applicable to a PDM, a Pod, or an Omnipod® System in addition to those made in the foregoing.
- Page 187 This page intentionally left blank.
-
Page 188: Glossary
Glossary A1c (see Hemoglobin A1c) Activation: The process of linking the PDM to a Pod so that the Pod only responds to commands from that specific PDM. Advisory alarm: A series of beeps and message on the screen advising about an action that you may want to take to prevent a serious problem. - Page 189 This duration can vary greatly depending on the type of insulin you take. Extended bolus: A feature of the Omnipod® System that allows a meal bolus dose to be delivered over an extended period of time.
- Page 190 Glossary is a type of carbohydrate, but it does not raise blood glucose levels as other carbohydrates do. Glucose: A simple sugar (also known as dextrose) used by the body for energy. Without insulin, many cells in the body cannot use glucose for energy. Hazard alarm: A continuous sound and a screen message from the PDM or Pod indicating that an error has occurred or that insulin delivery has stopped.
- Page 191 Glossary Manually-calculated bolus: A bolus amount of insulin chosen by you (not calculated by the Bolus Calculator). Maximum Basal Rate: Upper limit for basal rates in a Basal Program or temp basal. Maximum Bolus: The largest bolus that you can request from the PDM. The Bolus Calculator warns you if it calculates a bolus that is over this amount.
-
Page 192: Index
Index basal records 88, 89 basal segment 19, 138, 173 accuracy, flow 157 batteries activate insert 14 Basal Program 58 level indicator 7 communication range 27, 133 low 100, 112 Pod 27, 133, 173 preserve 63 temp basal 55 replace 112 active insulin. - Page 193 Index increment 75 cleaning manually-calculated 50, 176 PDM 114 records 88 Pod 110 reminders 78, 100 clock, AM/PM or 24-hour 15, 61 with the Bolus Calculator 47–50 code number, test strip vial 38 Bolus Calculator 144–154, 173 communication bolusing with 47 failure 102 disabled 50, 145 range 27, 133–136...
- Page 194 Index distance between Pod and PDM 27, 133–136 hazard alarms 96 DKA 23, 129, 174 header bar 7 dropped PDM 115 hemoglobin A1c (HbA1c) 175 duration of insulin action 72, 146, high BG reading 43 149–150, 174 history. See records Home/Power button 4 Home screen 9 eating.
- Page 195 Index insulin action. See duration of model number i, ix insulin action modify an ongoing bolus 51 insulin on board (IOB) 146, 149–152, More Actions menu 9 More Info indicator 7 insulin-to-carb ratio. See IC Ratio MRIs 131 interaction, PDM and Pod 133–137 IV Prep wipes 113 navigating records screens 86 navigation shorthand 5...
- Page 196 Index basal 89 activation 27, 133 basal, bolus summary 88 Auto-off 78, 137 blood glucose 90 care 109 bolus 88 change 23 carbohydrate 92 check status 134 combined list 93 cleaning 110 icons 87 deactivation 24, 136 insulin delivery 88 discard 136 lost record 87 expiration 77, 98, 99...
- Page 197 Index scent of insulin 34 screen lock or unlock 63 schedule insulin. See Basal Program screen time-out 63 screen summary 155 bright mode 5 Target BG 70 color 62 temp basal configuration 68 Home 9 Temp basal preset 68 ID 8 time 61 IOB 11 username 62...
- Page 198 Index DKA 129 username 8, 62 hyperglycemia 126 hypoglycemia 122 syringe, fill 26 vacation 119 air bubbles 27 vibration or sound 62, 100 tags, blood glucose 45, 82, 90 water 110, 111 tags, control solution 41 website i Target BG 70, 146–154 temp basal 176 about 139–142 X-rays 120, 131...
- Page 199 My PDM Settings Use these pages to keep track of your important PDM settings. Remember to update your information if you change or add settings. Basal Program 1 Basal Program 2 Basal rate Basal rate Name_______________ Name_____________ U/hr U/hr midnight midnight U/hr U/hr...
- Page 200 My PDM Settings Insulin-to-Carbohydrate Correction Factor Ratio (IC Ratio) 1 unit of insulin 1 unit of Correction Factor for IC Ratio for each time decreases BG each time segment insulin covers segment midnight to midnight to g carb mmol/L g carb mmol/L g carb mmol/L...
- Page 201 My Notes...
- Page 202 Support/Supplies: 0800 011 6132 | Omnipod-GB@insulet.com www.myomnipod.com Welcome, Podder ! ™ © 2012-2017 Insulet Corporation. Omnipod and the Omnipod logo are trademarks or registered trademarks of Insulet Corporation in the United States of America and other various jurisdictions. All rights reserved. Patent information at www.insulet.com/patents.
Need help?
Do you have a question about the ENT450 and is the answer not in the manual?
Questions and answers