OmniPod 5 - Insulin Delivery System Manual
- Technical user manual (366 pages) ,
- User manual (88 pages) ,
- Quick start manual (68 pages)
Advertisement
- 1 BASICS
- 2 RESPONSE
- 3 TROUBLESHOOTING
- 4 Important User Information
- 5 Documents / Resources
BASICS
This guide will help you feel comfortable taking care of someone with diabetes using the Omnipod 5 Automated Insulin Delivery System. Let's start with the basics!
What is type 1 diabetes?
Type 1 diabetes is a chronic disease where the pancreas produces little to no insulin. People with diabetes need to replace the insulin their pancreas cannot make, either through insulin injections or an insulin pump (standard or automated).
How do insulin pumps work?
Insulin pumps deliver insulin in two different ways, with basal and bolus doses. Basal insulin covers background insulin needed to keep glucose levels in range between meals and overnight. Bolus insulin is an additional dose of insulin needed for food (meal bolus) and/or to lower high glucose levels (correction bolus).
Insulin delivery in standard insulin pump therapy

 Insulin delivery from an insulin pump, or Pod.
Insulin delivery in Automated Insulin Delivery (AID) Systems
In AID systems like Omnipod 5, insulin delivery is adjusted automatically based on sensor glucose values. With Omnipod 5, the system automatically increases, decreases or pauses insulin delivery every 5 minutes based on where glucose is now, and where it is predicted to be in 60 minutes
How Omnipod 5 works

 NOTE!
NOTE!
The Omnipod 5 System will always pause insulin delivery when glucose is below 3.3 mmol/L (60 mg/dL).
* Bolus for meals and corrections are still needed
- Study in 240 people with T1D aged 6 -70 years involving 2 weeks standard diabetes therapy followed by 3 months Omnipod 5 use in Automated Mode. Average time in Target Glucose range (from CGM) for standard therapy vs Omnipod 5 in adults/adolescents = 64.7% vs. 73.9% and children = 52.5% vs. 68.0%. Brown et al. Diabetes Care (2021).
- Study in 80 people with T1D aged 2 –5.9 yrs involving 2 weeks standard diabetes therapy followed by 3 months Omnipod 5 use in Automated Mode. Average time in Target Glucose range (from CGM) for standard therapy vs Omnipod 5 = 57.2% vs. 68.1%. SherrJL, et al. Diabetes Care (2022).
What is the Omnipod 5 Automated Insulin Delivery System?
The Omnipod 5 System automatically adjusts insulin delivery every 5 minutes to manage glucose levels. The system will increase, decrease or pause insulin based on the sensor glucose value and trend.
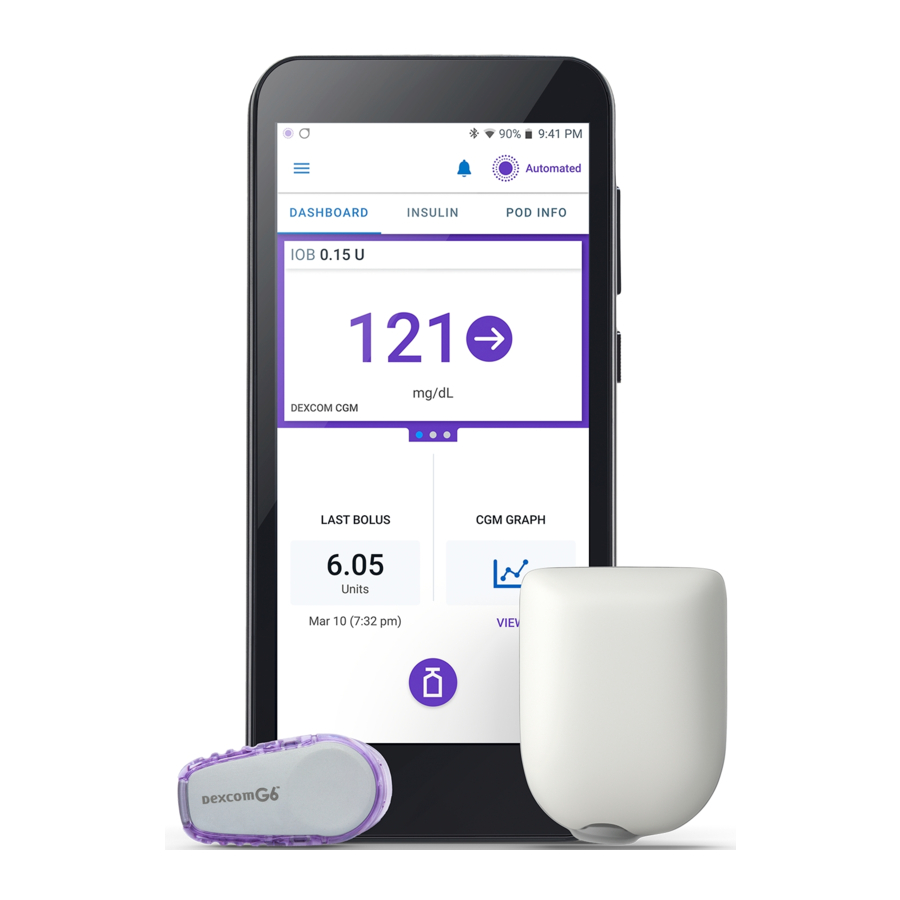
The Omnipod 5 Controller
Control the Pod's operations from the Insulet-provided Controller. Always keep the Controller close to hear any alerts and alarms.
The Omnipod 5 Pod
Tubeless, wearable and waterproof † , the Pod with SmartAdjust™ technology automatically adjusts and delivers insulin for up to 3 days, or 72 hours.
Glucose sensor
Sends glucose values to the Pod. A separate prescription is required for the sensor. Please refer to sensor manufacturer for all instructions for use.

† The Pod has a waterproof IP28 rating for up to 7.6 metres (25 feet) for up to 60 minutes. The Omnipod ® 5 Controller is not waterproof. The Dexcom G6 sensor and transmitter are water-resistant and may be submerged under 2.4 metres (8 feet) of water for up to 24 hours without failure when properly installed. FreeStyle Libre 2 Plus sensor is water-resistant in up to 1 metre (3 feet) of water and should not be immersed longer than 30 minutes.
‡ Shah VN, et al. Diabetes Technol and Ther. 2018;20(6).
§ Fingerpricks required for diabetes treatment decisions if symptoms or expectations do not match readings.
Omnipod 5 screens are for educational purposes and may vary on compatible smartphone chosen. Consult your healthcare professional before using these features and for personalised recommendations.
Omnipod 5 Home screen

How to deliver a bolus
With the Omnipod 5 System, it is still important and necessary to bolus (deliver an insulin dose) for both meals and high glucose levels. It is ideal to start a meal bolus at least 15-20 minutes before eating to prevent hyperglycemia.1
To start a bolus, tap the Bolus button

Tap on the Carbs field to enter the amount of carbohydrates to be eaten Tap USE SENSOR to use sensor glucose value and trend for a correction bolus*

Tap CONFIRM

TIP!
If snacking or having a second helping, do not re-enter the glucose value. Enter only the carbohydrates to keep from adding too much insulin at once. If glucose is still high a few hours after the snack or second helping, you can give a correction bolus then.
* Tap Glucose field to manually enter your blood glucose level
- Berget C, Sherr JL, DeSalvo DJ, Kingman R, Stone S, Brown SA, Nguyen A, Barrett L, Ly T, Forlenza GP. Clinical Implementation of the Omnipod 5 Automated Insulin Delivery System: Key Considerations for Training and Onboarding People with Diabetes. Clin Diabetes. 2022;40(2):168-184.
Omnipod 5 screens are for educational purposes only. Consult your healthcare professional before using these features and for personalised recommendations.
Review the entries to ensure they are correct, then tap START

Confirm the screen says Delivering Bolus and shows a green progress bar before leaving the Omnipod 5 Controller

TIP!
The SmartBolus Calculator suggests insulin amounts based on glucose value, trend and active insulin. Tap CALCULATIONS to see additional information.
Omnipod 5 screens are for educational purposes only. Consult your healthcare professional before using these features and for personalised recommendations.
RESPONSE
Managing glucose levels
Managing and responding to glucose levels can be challenging. The Omnipod 5 System automates insulin delivery, helping to protect against highs and lows.1,2 Thirsty You may still need to respond to high glucose, and should always treat low Thirsty glucose. Always follow the treatment plan provided by the primary caregiver and/or healthcare provider.
Low glucose (hypoglycemia)
Low glucose is when the amount of glucose drops below 3.9 mmol/L (70mg/dL). If the person with diabetes suspects a low glucose, check glucose to confirm. If symptoms do not match sensor readings, test glucose levels with blood glucose meter (BG meter).
Symptoms of hypoglycemia include:

Potential causes of a low glucose:
Food
- Did they eat as many carbohydrates as planned?
- Did they delay eating after taking their insulin?
Activity
- Were they more active than usual?
Medication
- Did they take more insulin or medication than usual?
- Study in 240 people with T1D aged 6 -70 years involving 2 weeks standard diabetes therapy followed by 3 months Omnipod 5 use in Automated Mode. Average time in Target Glucose range (from CGM) for standard therapy vs Omnipod 5 in adults/adolescents = 64.7% vs. 73.9% and children = 52.5% vs. 68.0%. Brown Blurry Vision Blurry Vision et al. Diabetes Care (2021). Weak Confused
- Study in 80 people with T1D aged 2 –5.9 yrs involving 2 weeks standard diabetes therapy followed by 3 months Omnipod 5 use in Automated Mode. Average Weight Loss time in Target Glucose range (from CGM) for standard therapy vs Omnipod 5 = 57.2% vs. 68.1%. SherrJL, et al. Diabetes Care (2022).
- Boughton CK, Hartnell S, Allen JM, Fuchs J, Hovorka R. Training and Support for Hybrid Closed-Loop Therapy. J Diabetes Sci Technol. 2022 Jan; 16(1):218-223.
High glucose (hyperglycemia)
High glucose is when there is too much glucose in their blood, usually over 13.9 mmol/L (250 mg/dL). It is important to check glucose before treating for hyperglycemia.
Symptoms of hyperglycemia include:

- Check glucose.
- If glucose is higher than 13.9 mmol/L (250 mg/dL) follow their healthcare provider's instructions for checking for ketones. If ketones are present, follow 'sick day' instructions provided by their healthcare provider.
- If ketones are not present, take a correction bolus from the Pod as prescribed.
- Continue to monitor glucose and treat as instructed by their healthcare provider.
Potential causes of a high glucose:
Food
- Did they increase their portion size of carbohydrates without accounting for it?
- Did they correctly calculate how much insulin to take?
Activity
- Were they less active than usual?
Wellness
- Are they feeling stressed or scared?
- Do they have a cold, flu or other illness?
- Are they taking any new medications?
- Have they ran out of insulin in their Pod?
- Has their insulin expired?
Pod
- Is the Pod inserted properly? The small tube under the skin can dislodge or bend.
- When in doubt change the Pod.
How to change a Pod
The Pod should be changed every 72 hours or when it has run out of insulin. There also may be rare instances when a Pod change is necessary for the system to keep working.
To deactivate and change Pod, tap POD INFO

Tap VIEW POD DETAILS

Tap CHANGE POD, and then tap DEACTIVATE POD. If the Pod has already been deactivated, tap SET UP NEW POD on the home screen

Removing an old Pod
- Gently lift the edges of the adhesive tape from the user's skin and remove the entire Pod. Remove the Pod slowly to help avoid possible skin irritation.
- Use soap and water to remove any adhesive that remains on the skin, or, if necessary, use an adhesive remover.
- Check the infusion site for signs of infection.
- Dispose of the used Pod according to local waste disposal regulations.
![]()
Do not apply a new Pod until you have deactivated and removed the old Pod. A Pod that has not been deactivated properly can continue to deliver insulin as programmed, putting the user at risk of over infusion and possible hypoglycemia.

Omnipod 5 screens are for educational purposes only. Consult your healthcare professional before using these features and for personalised recommendations.
Filling a new Pod
- Take the fill needle and twist clockwise onto syringe. Remove protective cap on needle.
- Pull back on plunger to draw air into syringe equal to the amount of insulin.
- Empty air into vial of insulin.
- Turn vial and syringe upside down and withdraw insulin.
- Tap or flick syringe to remove any bubbles. Leaving the Pod in its tray, insert the syringe straight down into the fill port and empty out all of the insulin. Be sure the Pod beeps twice. Put the Controller right next to the Pod and press NEXT.
![]()


TIP!
You must fill the Pod with at least 85 units of insulin, but no more than 200 units.
Fill the Pod with _____ units
Pod placement
Carefully follow the on-screen instructions. See right for proper Pod locations

Check the Pod after insertion to ensure that the cannula was properly inserted by looking to see if the pink window is visible

TIP!
For optimal connectivity, the Pod should be placed in direct line of sight of the sensor. Always put the Pod in a new location.
Pod positioning
Arm & Leg:
Position the Pod vertically or at a slight angle.

Back, Abdomen & Buttocks:
Position the Pod horizontally or at a slight angle.

Pod shown without the necessary adhesive.
Pod & Sensor Placement Examples

*Pod placement examples based on Sensor placed on back of arm.
Consult the Sensor System Instructions for Use for more information on approved Sensor placement locations.
Helpful Hint: When getting started, please consider that for optimal connectivity, the Pod should be placed within the line of sight of the sensor. Line of sight means that the Pod and sensor are worn on the same side of the body such that the two devices can 'see' one other without your body blocking their communication.
Managing activity and exercise

What is the Activity feature?
While in Automated Mode, there may be times when the person living with diabetes would like less insulin automatically delivered. When the Activity feature is started, the SmartAdjust™ technology reduces insulin delivery and automatically sets the target glucose to 8.3 mmol/L (150 mg/dL) for the time you choose.
When can the Activity feature be used?
During activities like sports, swimming, yard work, a walk in the park, or any other time when the glucose level tends to decrease.
How do I start the Activity feature?
- Tap the menu button
- Tap ACTIVITY
- Enter the desired duration, then tap CONFIRM
- Tap START
The Pod has a waterproof IP28 rating for up to 7.6 metres (25 feet) for up to 60 minutes. The Omnipod ® 5 Controller is not waterproof. The Dexcom G6 sensor and transmitter are water-resistant and may be submerged under 2.4 metres (8 feet) of water for up to 24 hours without failure when properly installed. FreeStyle Libre 2 Plus sensor is water-resistant for up to 1 metre (3 feet) of water and should not be immersed longer than 30 minutes Omnipod ® 5 screens are for educational purposes only. Consult your healthcare professional before using these features and for personalised recommendations.
TROUBLESHOOTING
Notifications, alerts and alarms
Follow the instructions on the screens to acknowledge the alarms and take action.
 Hazard Alarms
High priority alarms that indicate a serious problem has occurred and a Pod change may be needed

Respond to Hazard Alarms as soon as possible. Pod Hazard Alarms indicate that insulin delivery has stopped. Failure to respond to a Hazard Alarm can result in hyperglycaemia.
 Advisory Alarms
Lower priority alarms that indicate a situation exists that needs attention
 Notifications
Reminder of an action that should be performed
Viewing history
To view the history summary and detail information go to the History Detail screen by tapping the Menu button ( ) and then tapping History Detail.

System states
There are times when the Pod, sensor, and/or Omnipod 5 Controller have issues communicating, but there are simple steps that can fix these issues.
Automated Mode: Limited

Automated Mode: Limited occurs when the Pod and sensor lose connection while in Automated Mode. When this occurs, the system can no longer fully adjust automated insulin delivery but will continue to deliver basal insulin until sensor glucose values return.
What should you do?
- First, make sure the Pod and sensor are in a direct line of sight.
- If the Omnipod 5 Controller/Dexcom App is still receiving values, then it could be an issue with the Pod communicating with the sensor. If not, then the issue may be with the sensor.
No Pod communication

There may be times when the Pod and Omnipod 5 Controller are unable to communicate. If you see a "No Pod Communication" message, don't worry. The Pod is still delivering insulin according to its last instructions, and will update the Pod status when communication is restored.
What should you do?
- First bring the Omnipod 5 Controller and active Pod closer – within 5 feet of each other to try to restore communication.
- If the communication issue remains, the Omnipod 5 Controller will offer you options to resolve the communication issue. Leave any options to DISCARD or DEACTIVATE POD as last choice after trying the other options.
Supplies to have on hand:
Always keep an emergency kit with you to quickly respond to any diabetes emergency or in the case that the Omnipod 5 System stops working. Always carry supplies to perform a Pod change should you need to replace your Pod at any time.
- Several new Pods
- A vial of insulin and syringes
- Glucose tabs or other fast-acting carbohydrates
- Sensor supplies
- Blood glucose meter and strips
- Ketone meter and strips or ketone urine strips
- Lancets
- Alcohol swabs
- Glucagon kit
- Omnipod 5 Caregiver Guide
Important User Information
The Omnipod 5 Automated Insulin Delivery System is a single hormone insulin delivery system intended to deliver U-100 insulin subcutaneously for the management of type 1 diabetes in persons aged 2 and older requiring insulin.
The Omnipod 5 System is intended to operate as an automated insulin delivery system when used with compatible Continuous Glucose Monitors (CGM). When in automated mode, the Omnipod 5 system is designed to assist people with type 1 diabetes in achieving glycaemic targets set by their healthcare providers. It is intended to modulate (increase, decrease or pause) insulin delivery to operate within predefined threshold values using current and predicted CGM values to maintain blood glucose at variable target glucose levels, thereby reducing glucose variability. This reduction in variability is intended to lead to a reduction in the frequency, severity, and duration of both hyperglycaemia and hypoglycaemia.
The Omnipod 5 System can also operate in a manual mode that delivers insulin at set or manually adjusted rates.
The Omnipod 5 System is intended for single patient use. The Omnipod 5 System is indicated for use with NovoLog ® /NovoRapid ®, Humalog ®, Trurapi ® /Insulin aspart Sanofi Kirsty ®, and Admelog/Insulin lispro Sanofi U-100 insulin.
SmartAdjust TM technology should NOT be used by anyone under the age of 2 years old. SmartAdjust TM technology should also NOT be used in people who require less than 5 units of insulin per day as the safety of the technology has not been evaluated in this population.
The Omnipod 5 System is NOT recommended for people who are unable to monitor glucose as recommended by their healthcare provider, are unable to maintain contact with their healthcare provider, are unable to use the Omnipod 5 System according to instructions, are taking hydroxyurea as it could lead to falsely elevated sensor values and result in over-delivery of insulin that can lead to severe hypoglycaemia, and do NOT have adequate hearing and/or vision to allow recognition of all functions of the Omnipod 5 System, including alerts, alarms, and reminders. Device components including the Pod, transmitter, and sensor must be removed before Magnetic Resonance Imaging (MRI), Computed Tomography (CT) scan, or diathermy treatment. In addition, the Controller and smartphone should be placed outside of the procedure room. Exposure to MRI, CT, or diathermy treatment can damage the components. Visit www.omnipod.com/safety for additional important safety information.
DO NOT start to use the Omnipod 5 System or change settings without adequate training and guidance from a healthcare provider. Initiating and adjusting settings incorrectly can result in over-delivery or under-delivery of insulin, which could lead to hypoglycaemia or hyperglycaemia.
Customer Care: 0800 011 6132* | +44 20 3887 1709
Insulet Netherlands BV Stadsplateau 7, 3521 AZ Utrecht, Netherlands
omnipod.com
*Your call may be recorded for quality monitoring and training purposes. Calls to 0800 numbers are free from local landlines but other networks may charge for these calls
Documents / Resources
References
![www.omnipod.com]() Important Safety Information | Insulin Pump Therapy | Omnipod
Important Safety Information | Insulin Pump Therapy | Omnipod![omnipod.com]() Omnipod | Insulin Pump Therapy, Simplified
Omnipod | Insulin Pump Therapy, Simplified
Download manual
Here you can download full pdf version of manual, it may contain additional safety instructions, warranty information, FCC rules, etc.
Advertisement


Need help?
Do you have a question about the 5 and is the answer not in the manual?
Questions and answers