Table of Contents
Advertisement
Quick Links
Omnipod
5 Automated Insulin Delivery System Technical User Guide
®
Contacts and Important Information
Customer Care - 24 hours/7 days
Website: omnipod.com
Address: Insulet Corporation, 100 Nagog Park, Acton MA 01720
Controller Model: PDM-M001-G-XX
Serial Number:
Controller FCC ID: 2ADINN5004L
Controller FCC ID: 2ADINN5004LR1
Pod FCC ID: RBV-029
Pod FCC ID: RBV-029C
Omnipod® 5 Automated Insulin Delivery System
Start Date:
Healthcare Provider
Name
Street Address
City
Phone
Email
Health Insurance
Name
Street Address
City
Phone
Policy Number
Omnipod® Trainer
Name
Street Address
City
County Post Code
Phone
Email
Pharmacy
Name
Street Address
County Post Code
City
Phone
Email
County Post Code
County Post Code
i
Advertisement
Chapters
Table of Contents

Subscribe to Our Youtube Channel
Related Manuals for OmniPod 5


Summary of Contents for OmniPod 5
- Page 1 Omnipod 5 Automated Insulin Delivery System Technical User Guide ® Contacts and Important Information Customer Care - 24 hours/7 days Website: omnipod.com Address: Insulet Corporation, 100 Nagog Park, Acton MA 01720 Controller Model: PDM-M001-G-XX Serial Number: Controller FCC ID: 2ADINN5004L...
- Page 2 © 2022 Insulet Corporation. Insulet, Omnipod and the Omnipod logo are trademarks or registered trademarks of Insulet Corporation in the United States and other various jurisdictions. All rights reserved. The Bluetooth® word mark and logos are registered trademarks owned by Bluetooth SIG, Inc.
-
Page 3: Table Of Contents
Chapter 1: Introduction . . . . . . . . . . . . . . . . . . . . . . . . . . . . . . . . . . . . . . . . . . . . . . . . . . 3 1.1. Welcome to Your Omnipod® 5 System ....... .4 1.2. - Page 4 5.8. More Information about Pod Use ........
- Page 5 15.5. Handling Special Situations ........
- Page 6 Contents 17.5. Adjustments to Your Calculation ........219 17.6.
- Page 7 26.1. Omnipod 5 Pump FAQs ........
- Page 8 This page intentionally left blank. viii...
-
Page 9: Section 1: Before You Begin
BEFORE YOU BEGIN 1 Introduction... - Page 10 This page intentionally left blank.
-
Page 11: Chapter 1: Introduction
Contents 1.1. Welcome to Your Omnipod® 5 System ....... 4 The Omnipod 5 System Features . -
Page 12: Welcome To Your Omnipod® 5 System
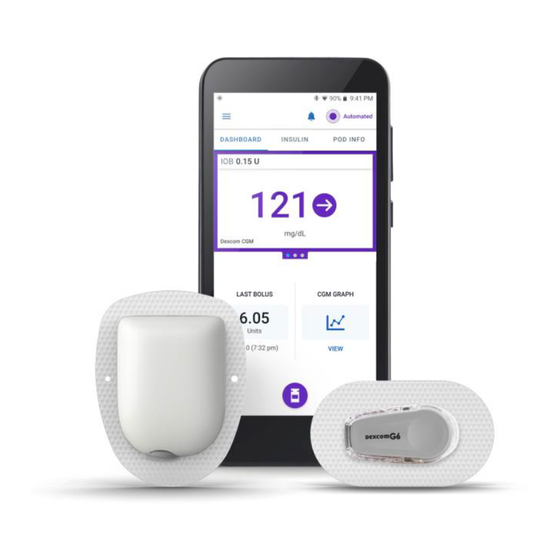
The Pod is waterproof for depths of up to 7.6 metres (25 feet) for up to 60 minutes (IP28). Omnipod® 5 App: The Omnipod 5 App allows you to select a basal profile, •... - Page 13 In Automated Mode, the system records automated insulin delivery and corresponding sensor glucose values every 5 minutes. The Home screen features a Sensor Graph that allows for reference of your sensor glucose values and displays some information about insulin delivery.
-
Page 14: About This User Guide
U-100 insulin subcutaneously for the management of type 1 diabetes in persons aged 2 and older requiring insulin. The Omnipod 5 System is intended to operate as an automated insulin delivery system when used with compatible Continuous Glucose Monitors (CGM). -
Page 15: Compatible Insulins
Introduction 1 The Omnipod 5 System can also operate in a Manual Mode that delivers insulin at set or manually adjusted rates. The Omnipod 5 System is intended for single-patient use. The Omnipod 5 System is indicated for use with NovoLog®/NovoRapid®, Humalog® and Admelog® U-100 insulin. - Page 16 ONLY use rapid-acting U-100 NovoLog®/ NovoRapid® (insulin aspart), Humalog® (insulin lispro) and Admelog® (insulin lispro) insulin in the Omnipod 5 System as they have been tested and found to be safe for use with this system. NovoLog/NovoRapid, Humalog and Admelog are compatible with the Omnipod 5 System for use up to 72 hours (3 days).
- Page 17 Introduction 1 over-delivery or under-delivery of insulin, which can lead to hypoglycaemia or hyperglycaemia. Settings that impact bolus calculations mainly include: Max Bolus, Minimum Glucose for Calculations, Correct Above, Correction Factor(s), Insulin to Carb (IC) ratio(s), Duration of Insulin Action and Target Glucose. Warning: ALWAYS follow your healthcare provider's guidance on appropriate glucose monitoring to avoid hyperglycaemia and hypoglycaemia.
- Page 18 ALWAYS make sure you are using the Sensor as per the manufacturer's instructions. Do not extend the Sensor wear beyond the recommended duration and do not start a Sensor past its Use-By date. The Omnipod 5 System relies on accurate, current sensor glucose values to determine your insulin needs. Incorrect use of the Sensor could result in over-delivery or under-delivery of insulin, which could lead to hypoglycaemia or hyperglycaemia.
-
Page 19: General Precautions
Exposure to oxygen-rich environments could result in combustion of the Pod or Omnipod 5 Controller, which can cause severe burns to the body. Warning: DO NOT use the Omnipod 5 System in high atmospheric pressure environments (above 1060 hPA), which can be found in a hyperbaric chamber. -
Page 20: Potential Risks
Introduction Caution: DO NOT navigate away from the Omnipod 5 App while you are in the process of making changes to your insulin delivery settings. If you leave the App before you are able to save the setting change and before the App is able to put the setting change into effect, the system will continue to use your last saved settings. -
Page 21: Important User Information
The Omnipod 5 System is designed to work with the Dexcom G6 CGM. To use the Dexcom G6 with the Omnipod 5 System, you will need to obtain the Dexcom G6 Sensor, Transmitter and Instructions for Use, and download the Dexcom G6 app on your personal smartphone. -
Page 22: Emergency Kit
Warning: ALWAYS keep an emergency kit with you to quickly respond to any diabetes emergency or in the case that your Omnipod 5 System stops working. Always carry supplies to perform a Pod change should you need to replace your Pod at any time. -
Page 23: Section 2: Omnipod 5 Pump Features
Omnipod 5 Pump Important Safety Information 2 System Terminology and Navigation 3 Omnipod 5 System Overview 4 Setting Up Your Omnipod 5 Application 5 Activating and Changing Your Pod 6 Basal Programmes 7 Temporary Basal Rates and Presets 8 Blood Glucose Readings 9 Pausing and Starting Insulin Delivery... - Page 24 This page intentionally left blank.
-
Page 25: Omnipod 5 Pump Important Safety Information
Humalog® (insulin lispro) and administering insulin before you start Admelog® (insulin lispro) insulin in the Automated Mode. Omnipod 5 System as they have been Omnipod 5 System tested and found to be safe for use with this system. NovoLog/NovoRapid,... - Page 26 NEVER use a Pod if, should be changed immediately. If the while you are filling the Pod, you feel significant resistance while pressing the Omnipod 5 App fails to beep during a diagnostic test, contact Customer Care plunger down on the fill syringe.
- Page 27 Warning: ALWAYS identify the at elevations above 3,000 metres Omnipod 5 App as yours before using (10,000 feet). Change in atmospheric it. Using someone else's Omnipod 5 pressure can also occur during App can result in incorrect insulin take-off with air travel.
- Page 28 • You have not installed a required Warning: update to the Omnipod 5 App NEVER drive yourself to the emergency department if you • An update for the Omnipod 5 need emergency medical care. Ask a...
- Page 29 If left untreated, these Caution: DO NOT use any situations can quickly lead to diabetic component of the Omnipod 5 System ketoacidosis (DKA), shock, coma or (Controller, Pod) if you suspect death. damage after an unexpected event...
- Page 30 ALWAYS be aware of for single-use only and should only possible changes to your time zone be used with the Omnipod 5 System. when travelling. If you do not update Failure to follow the instructions above your time zone, your insulin therapy may result in damage to your Pod.
- Page 31 >30°C (86°F) during storage and and the Pod does not detach from your >40°C (104°F) during use. Extreme skin. cold is defined as >0°C (32°F) during storage and >5°C (41°F) during use. Controller Caution: Use ONLY the USB charging Caution:...
- Page 32 Pod before other setting that prevents you from losing communication. For example, hearing alarms and notifications from your Omnipod 5 App. If you do not automated insulin delivery from the Pod will continue in Automated Mode. hear alarms and notifications from...
-
Page 33: Chapter 2: System Terminology And Navigation
CHAPTER 2 System Terminology and Navigation Contents 2.1. Terminology ............26 2.2. -
Page 34: Terminology
Advisory Alarm An alarm that alerts you to some aspect of the Omnipod 5 System that will need your attention in the near future, such as a low amount of insulin remaining in your Pod. Automated Mode... - Page 35 Omnipod 5 System. Deactivate Preferred method for shutting down the Pod. Deactivation turns off insulin delivery in the Pod and allows the Omnipod 5 App to activate a new Pod. Device In Omnipod 5, “device” refers to the Omnipod 5 Controller used to control the Omnipod 5 App.
- Page 36 Basal Programme. Microbolus A small amount of insulin calculated by SmartAdjust technology, delivered automatically by the Pod every 5 minutes during Automated Mode. Omnipod 5 Application Software on the Controller that is the primary (App) user interface of the Omnipod 5 System.
-
Page 37: Using The Touchscreen And Entering Information
2.2. Using the Touchscreen and Entering Information This section explains how to use the touchscreen, how to enter numbers or text into the Omnipod 5 App, and how this User Guide describes moving between Omnipod 5 App screens. Touchscreen Basics The Omnipod 5 App displays messages and options for you on its touchscreen. -
Page 38: Screen Time-Out And Brightness
System Terminology and Navigation Screen time-out and brightness The screen on the Controller turns black, called “timing-out”, after a period of inactivity. To control the screen time-out and brightness settings, see “Screen Display” on page 117. The screen dims 6-10 seconds before it times out. If the screen dims, tap the screen to prevent it from timing out. -
Page 39: Using A Scroll Wheel
System Terminology and Navigation Using a scroll wheel Tapping an editable field can bring up a scroll wheel. Place your finger on the scroll wheel. Swipe up or down to select your desired value. The faster you move your finger, the faster the wheel will scroll. When your desired selection is shown, select the value by tapping the radio button next to the value and tapping DONE. -
Page 40: Navigation Buttons And Navigation Shorthand
System Terminology and Navigation Navigation Buttons and Navigation Shorthand Options button The Options button ( ) appears on the side of certain lists. Tapping the Options button brings up a list of options relevant to the item on that row. User Guide navigation shorthand The User Guide uses the “>”... -
Page 41: Chapter 3: Omnipod 5 System Overview
Contents 3.1. Omnipod 5 App and Dexcom Communication .....34 3.2. Omnipod 5 App ........... .35 The Omnipod 5 Controller . -
Page 42: Omnipod 5 App And Dexcom Communication
• Your Dexcom G6 Transmitter sends sensor glucose values to the Pod and to the Dexcom G6 app. The Omnipod 5 App does not communicate directly with the Dexcom G6 app. For Dexcom-specific information, refer to your Dexcom G6 CGM System Instructions for Use. -
Page 43: Omnipod 5 App
Omnipod 5 System Overview 3.2. Omnipod 5 App You use the Omnipod 5 App to control and monitor the Pod's operations using Bluetooth® wireless technology. Caution: AVOID leaving your Controller in a place that would prevent you from hearing alarms and notifications from your Omnipod 5 App. Delivery of insulin in Manual Mode or Automated Mode continues as programmed if you move away from your Controller. -
Page 44: Lock Screen And Security
3.3. Lock Screen and Security Warning: ALWAYS identify the Omnipod 5 app as yours before using it. Using someone else's Omnipod 5 App can result in incorrect insulin delivery for both of you. Warning: ALWAYS keep your Controller safe and within your control to ensure that others cannot make changes to your insulin therapy. -
Page 45: Forgotten Your Pin
“Power Off”, tap outside the message to cancel the message. If you accidentally power off your Controller, you can miss important notifications and alarms from the Omnipod 5 App. If you do not hear alarms and notifications from your Controller, you might not make the changes you need to make to your insulin therapy in a timely manner. -
Page 46: Status Bar
Omnipod 5 System Overview 3.4. Status Bar At the top of the screen is a status bar that shows icons for both the Omnipod 5 App and your Controller. The following icons will display when applicable: • Omnipod 5 Status icon •... -
Page 47: Home Screen
Omnipod 5 System Overview 3.5. Home Screen This section introduces you to what you may see on the Omnipod 5 App Home screen. Different information will display depending on which system mode is activated. Alarms and Notifications Status bar Menu button... -
Page 48: Dashboard Tab
DASHBOARD Tab The DASHBOARD tab displays the following information. Note: The DASHBOARD tab shows different content if a Transmitter is paired to the Omnipod 5 App. Without paired Transmitter • INSULIN ON BOARD (IOB): value displays when IOB is available. -
Page 49: With A Paired Transmitter
INSULIN ON BOARD (IOB) • Sensor glucose value (with a trend arrow): when a sensor glucose value is available. See “19.5. Sensor Glucose Trend Arrows” on page 252. • Sensor glucose value (without an arrow): when the Sensor supplies a sensor glucose value but is unable to report the sensor glucose trend. -
Page 50: Insulin Tab
Omnipod 5 System Overview INSULIN Tab The INSULIN tab label changes to ACTIVITY when the Activity feature is enabled in Automated Mode or to TEMP ON when a temp basal is running in Manual Mode. Manual Mode By default, in Manual Mode, the INSULIN tab shows the name and graph of the user- defined Basal Programme. -
Page 51: Temp Basal
Omnipod 5 System Overview Temp basal When a temp basal is running, the INSULIN tab label changes to TEMP ON and is highlighted in light blue. It displays the temp basal graph and allows you to cancel the temp basal. See “7.1. About Temporary Basal Rates”... -
Page 52: Pod Info Tab
Pod. To restore communication, try bringing the Controller within 1.5 metres (5 feet) of the Pod. See “26.5. Pod Communication Issues – “Try Again”” on page 323. -
Page 53: Pod Info Banners
Pod, a red LOW POD INSULIN banner appears on the POD INFO tab. If the Pod will expire soon and there are less than 5 units of insulin in the Pod, the red LOW POD INSULIN banner is displayed on the POD INFO tab. -
Page 54: Bolus Information And Button
Estimated and unconfirmed bolus amounts The Omnipod 5 App estimates bolus amounts during an ongoing bolus and when the Pod is out of range. A grey icon ( ) marks estimated bolus amounts. -
Page 55: Home Screen Main Menu
Omnipod 5 System Overview 3.6. Home Screen Main Menu The Main Menu on the Home screen lets you access most of the Omnipod 5 App's functions. To access the Main Menu: • Tap the Menu button ( ) in the upper left corner of the Home screen. -
Page 56: Notifications And Messages
Alarms require your immediate attention (see page 150). If you ignore an alarm, you could develop hypoglycaemia or hyperglycaemia. When an alarm occurs, the Pod will beep and the Omnipod 5 App will beep or vibrate if sound/vibrate is on. Hazard alarms ( ) alert you to a problem with your insulin delivery, Pod or Omnipod 5 App that requires immediate attention to resolve. -
Page 57: Manual And Automated Mode Overview
Action item notifications are related to changes you may have made to your Omnipod 5 App that could affect safe use of the system. For example, a Turn on Bluetooth action item means Bluetooth wireless technology has been shut off and your App is no longer communicating with your Pod. - Page 58 Omnipod 5 System Overview Manual Mode Automated Mode Bolus Insulin Insulin is delivered using the Insulin is delivered using the Delivery SmartBolus Calculator or SmartBolus Calculator or entered manually. entered manually. Connected Not required. If connected, Required. Sensor glucose Sensor...
- Page 59 Omnipod 5 System Overview Manual Mode Automated Mode Manage Sensor View and modify View Transmitter serial Transmitter serial number number (SN) (SN) Pause and Start Manually pause insulin for System automatically pauses Insulin a specified duration of up automated insulin delivery to 2 hours.
- Page 60 Omnipod 5 System Overview Identifying System modes The mode indicator shows the Omnipod 5 System's current operating mode. Graphic Description Displays when there is no Pod communication or no active Pod. Displays when the Omnipod 5 System is in Automated Mode and the Pod is providing automated insulin delivery.
-
Page 61: Chapter 4: Setting Up Your Omnipod 5 Application
4.5. Bolus Settings ........ -
Page 62: Setting Up Your Account
2. Follow the on-screen instructions to set up your account. 4.2. Preparing for Your Training If you are a first-time Omnipod user, you may need to meet with your Omnipod 5 Trainer to set up your Omnipod 5 App, your first Pod and your Dexcom G6 Sensor. -
Page 63: General Settings On The Insulet-Provided Controller
Pod) • Alcohol prep swabs • Instructions from your healthcare provider with Omnipod 5 App settings tailored to your needs. These settings include Basal Programme, Insulin to Carb Ratio, Correction Factor, Target Glucose and Duration of Insulin Action. -
Page 64: Turning On And Signing In To Your Controller
3. The Controller runs through a series of checks. If prompted, allow permissions and connect to Wi-Fi. See page 166 for more details. Note: The SIM Card on your Omnipod 5 Controller enables data to be sent and received via a mobile network when your Controller is not connected to a Wi-Fi network. -
Page 65: Setting Up Training
Omnipod 5 System. Training is critical for the safe and effective use of the Omnipod 5 System. Tap the check box if you understand and acknowledge the importance of completing training. -
Page 66: Setting Up Your Controller
Setting Up Your Controller Warning: ALWAYS identify the Omnipod 5 App as yours before using it. Using someone else's Omnipod 5 App can result in incorrect insulin delivery for both of you. Personalise your Controller Follow the steps below to personalise your Controller. -
Page 67: Enabling Notifications And Sound On Your Controller
¾ Tap I UNDERSTAND . 2. Read the message explaining the importance of enabling sound on your Omnipod 5 App. If you do not have sound enabled, you may miss important messages. ¾ Tap I UNDERSTAND . If you do silence your device, the... -
Page 68: Basal Settings
Setting Up Your Omnipod 5 Application 4.4. Basal Settings Warning: DO NOT start to use your system or change your settings without adequate training and guidance from your healthcare provider. Initiating and adjusting settings incorrectly can result in over-delivery or under-delivery of insulin, which could lead to hypoglycaemia or hyperglycaemia. -
Page 69: Create A Basal Programme
Setting Up Your Omnipod 5 Application Create a Basal Programme The next step is to create a Basal Programme. For a description of basal rates, basal segments and Basal Programmes, see “Basal Programmes” on page 89. ¾ Tap NEXT on the Create Basal Programme description screen to continue. -
Page 70: Review The Basal Programme
4. When the Basal Programme is correct, tap SAVE . 5. To add a new segment: a. Tap the row containing the start time of the new segment. b. Tap the End Time field and enter the start time of the new segment as the end time of this segment. -
Page 71: Temporary Basal Configuration
7. When the Basal Programme is correct, tap SAVE. Note: If the basal rate for a segment is 0 U/hr, the Omnipod 5 App displays a message calling this to your attention. Tap OK if the 0 U/hr rate is correct. -
Page 72: Bolus Settings
3. Tap the Correct Above field and specify the Correct Above value for that segment. 4. Review and tap NEXT. 5. Repeat the above steps as needed until you have specified values for the segment that ends at midnight. 6. Review the segments for the full 24-hour profile. -
Page 73: Insulin To Carb (Ic) Ratio
IC Ratio value for the segment. 3. Tap DONE to close the number pad. 4. Review and tap NEXT. 5. Repeat the above steps as needed until you have specified values for the segment that ends at midnight. -
Page 74: Correction Factor
Setting Up Your Omnipod 5 Application 6. Review your 24-hour IC Ratio segments. 7. To change any of the entries: a. Tap the row containing the entry to be changed and enter the corrected value. b. Review and correct any remaining segments as needed. -
Page 75: Duration Of Insulin Action
4. Repeat the above steps as needed until you have specified values for the segment that ends at midnight. 5. Review the segments for the full 24-hour profile. 6. To change any of the entries: a. Tap the row containing the entry to be changed and enter the corrected value. -
Page 76: Your App Set-Up Is Complete
4.6. Your App Set-up is Complete Congratulations! Omnipod 5 App set-up is complete. When you are ready to activate your first Pod, go to “5.1. Beginning the Pod Activation Process” on page 72. After successfully activating the Pod, you will be prompted to connect your Sensor to the Omnipod 5 System. -
Page 77: Saving Your Settings For Reference
Pod with supplies to use when restarting the app. Before you begin using your Omnipod 5 App, write down or take photos of all your settings and keep them in a secure location that you can reference in the future. - Page 78 This page intentionally left blank.
-
Page 79: Chapter 5: Activating And Changing Your Pod
5.8. More Information about Pod Use ........86... -
Page 80: Beginning The Pod Activation Process
Pod may not work properly and increase your risk of infection. Caution: DO NOT use any component of the Omnipod 5 System (Controller, Pod) if you suspect damage after an unexpected event such as dropping or hitting on a hard surface. Using damaged components may put your health at risk as the system may not be working properly. - Page 81 4. Check the Pod's packaging for damage. If undamaged, open it and inspect the Pod for signs of damage. 5. If the insulin or Pod is below 10°C (50°F), allow it to warm up to room temperature before proceeding. Confirm that you are using an Omnipod 5 Pod prior to beginning Pod activation.
-
Page 82: Setting Up A New Pod
The Pod can deliver up to 200 units of U-100 insulin. 5. Draw air into the fill syringe up to the amount of insulin you want. 6. Insert the needle into the insulin vial and inject the air. Injecting air makes it... -
Page 83: Filling, Activating, Applying And Starting The Pod
Use only the fill syringe and needle that came with your Pod. The fill syringe is intended for single use only and should only be used with the Omnipod 5 System. Failure to follow the instructions above may result in damage to your Pod. -
Page 84: Fill The Pod With Insulin
Note: After filling the Pod, continue to the next step immediately. If two hours pass before activating the filled Pod, the Pod becomes unusable. 5. Remove the needle from the insulin fill port. The port is self-sealing; insulin will not leak after the needle is removed. - Page 85 Note: After activating a Pod, the Omnipod 5 App should always be able to communicate with a Pod that is up to 1.5 metres (5 feet) away. Depending on the location, the Omnipod 5 App may be able to communicate with a Pod that is as much as 15 metres (50 feet) away.
-
Page 86: Prepare The Pod Site
• Ideal sites offer easy access and viewing. • The site should be at least 2.5 cm (1 inch) away from the previous site to avoid skin irritation. • The site should be at least 5 cm (2 inches) away from your navel. -
Page 87: Pod Site Examples
Activating and Changing Your Pod Pod site examples Pod site map (optional) The Pod site map is an optional feature that helps you track your current and recent Pod site locations. This option only appears if the Pod Sites setting is turned on (see “10.2. -
Page 88: Prepare The Infusion Site
Pod. Tap again to deselect the detail. Note: To delete a site detail, tap the next to the detail. 5. Tap DONE when finished to return to the Change Pod screen. Prepare the infusion site To reduce the risk of infection at the infusion site: 1. -
Page 89: Remove The Pod's Tab
Activating and Changing Your Pod 5. Let the infusion site air-dry thoroughly. Do not blow on the site to dry it. Remove the Pod's Tab Warning: DO NOT apply a Pod if you see the cannula is extended beyond the adhesive backing after the tab on the Pod is removed. This cannula cannot be inserted, resulting in under-delivery of insulin, which could lead to hyperglycaemia. -
Page 90: Begin Insulin Delivery
Activating and Changing Your Pod 2. Orient the Pod so it is: • Horizontal or diagonal Up, down or slight angle on your abdomen, hip, lower back or buttocks. Horizontal or diagonal • Up and down, or at a slight angle on your upper arm or thigh. -
Page 91: Checking Your Infusion Site
Confirm Pod is securely attached 1. Confirm that the Pod is securely attached to your body, then tap YES. 2. If you are squeezing your skin, stop squeezing when the Omnipod 5 App asks if the cannula is properly inserted. -
Page 92: Switching To Automated Mode
An active Pod and Transmitter serial number (SN) are required to switch to Automated Mode. If you have a Transmitter SN entered in the Omnipod 5 App, you will be prompted to switch to Automated Mode after activating your Pod. -
Page 93: Deactivating An Active Pod
Manual Mode; however, you will be prompted to enter Automated Mode if you have a Transmitter serial number (SN) entered into the Omnipod 5 App. 3. Remove the deactivated Pod from your body: a. Gently lift the edges of the adhesive tape from your skin and remove the entire Pod. -
Page 94: More Information About Pod Use
Infections” on page 86). d. Dispose of the used Pod according to local waste disposal regulations. 4. To activate a new Pod, tap SET UP NEW POD . 5.8. More Information about Pod Use Avoiding Infusion-Site Infections Caution: ALWAYS rotate insulin infusion sites to help prevent infusion-site complications like scar tissue and infection. -
Page 95: Additional Information
Again”” on page 323. • If the Home: POD INFO tab says “No Pod Communication”: • To find the last time the Omnipod 5 App successfully communicated with the Pod, navigate to: Menu button ( ) > Pod. • If you are unable to restore communication with the Pod and want to change to a new Pod, navigate to: Menu button ( ) >... - Page 96 This page intentionally left blank.
-
Page 97: Chapter 6: Basal Programmes
6.5. Deleting a Basal Programme ........ -
Page 98: About Basal Programmes
While in Manual Mode, Basal Programmes are used to deliver a steady amount of insulin throughout the day. This is known as your basal insulin. Different days can have different routines. The Omnipod 5 System lets you create different Basal Programmes for your different routines. For example, you may use one Basal Programme on weekdays and a different one on weekends. -
Page 99: Creating New Basal Programmes
Note: If you already have 12 Basal Programmes, CREATE NEW does not appear. If necessary, you can delete an existing Basal Programme, See “6.5. Deleting a Basal Programme” on page 92. 3. See “Create a Basal Programme” on page 61 to continue creating your new Basal Programme. -
Page 100: Deleting A Basal Programme
• If you edited a saved Basal Programme and want to start it, tap START. 8. If you do not want to start the newly edited Basal Programme, tap NOT NOW. 6.5. Deleting a Basal Programme You can only delete a Basal Programme that is not in progress. To delete a Basal Programme: 1. -
Page 101: Basal Insulin Delivery
“basal” insulin. In people without diabetes, the pancreas continuously delivers this basal insulin. For people using the Omnipod 5 System, the Pod can mimic a pancreas of a person without diabetes by delivering basal insulin continuously as your wear the Pod. - Page 102 Basal Programmes In order to create the Basal Programme shown in the example above, the following basal segments are programmed into the Omnipod 5 App: Segment Basal rate 1: Midnight–10:00 am 0.20 U/hr Between midnight and 10:00 am, the Pod delivers 0.20 units of insulin per hour.
-
Page 103: Chapter 7: Temporary Basal Rates And Presets
7.5. Editing a Temp Basal Preset ........ -
Page 104: About Temporary Basal Rates
U/hr, see page 123. Tip: By default, the Omnipod 5 App or Pod sounds a tone at the beginning and end of a temp basal, and every 60 minutes while a temp basal is running. To turn these ON or OFF, see “13.3. -
Page 105: Starting A Temp Basal
Temporary Basal Rates and Presets 7.2. Starting a Temp Basal Note: You cannot start or cancel a temp basal during an immediate bolus, but you can start or cancel a temp basal while an extended bolus is in progress. To start a temp basal: 1. - Page 106 • If you set a decrease, the Basal Programme in progress is shown as a horizontal dotted line. 5. Tap CONFIRM to continue. 6. Review the temp basal details. If corrections are needed, tap on the row to change. Then enter your corrections and confirm them.
-
Page 107: Cancelling A Temp Basal Or Temp Basal Preset
1. Navigate to the Home screen's TEMP ON tab. 2. Tap CANCEL. 3. Tap YES to confirm cancellation. The Omnipod 5 App cancels the temp basal and starts the last scheduled Basal Programme. 7.4. Creating a New Temp Basal Preset To create a new temp basal preset: 1. -
Page 108: Editing A Temp Basal Preset
11. If you would like to start this temp basal now, tap START. Otherwise, tap NOT NOW. 7.5. Editing a Temp Basal Preset Note: You cannot edit a temp basal preset that is in progress. To edit a temp basal preset: 1. -
Page 109: Deleting A Temp Basal Preset
Temporary Basal Rates and Presets 7.6. Deleting a Temp Basal Preset Note: You cannot delete a temp basal preset that is in progress. To delete a temp basal preset: 1. Navigate to the Temp Basal Presets screen: Menu button ( ) >... -
Page 110: Temp Basal Settings: Units Per Hour (U/Hr) Or Percentage (%)
Temporary Basal Rates and Presets Temp basal settings: Units per hour (U/hr) or percentage (%) Temp basals can be set using a percentage (%) or units per hour (U/hr). Setting temp basals to units per hour (U/hr) means that the Pod delivers insulin at a flat rate for the duration of the temp basal. -
Page 111: Temp Basal Limitations
Temp basals that turn off basal insulin delivery: When using a percentage (%), if you set a decrease that results in a flow of less than 0.05 U/hr for a segment, the Omnipod 5 App informs you that you will receive 0 U/hr of insulin for one or more segments. -
Page 112: Temp Basal Presets
Temporary Basal Rates and Presets Tip: Using a temp basal to turn off basal insulin delivery is useful if you want your Basal Programme to automatically start when the temp basal ends. Temp basal presets Some temporary changes in your daily routine are easy to predict, and you may know from experience how they affect your insulin needs. -
Page 113: Chapter 8: Blood Glucose Readings
Chapter 8: Blood Glucose Readings CHAPTER 8 Blood Glucose Readings Contents 8.1. About Blood Glucose Readings ........106 8.2. -
Page 114: About Blood Glucose Readings
Transmitter to an active Pod. Once connected, sensor glucose values are displayed and can be used in the Omnipod 5 App in both Manual and Automated Mode. There may be times when you need to check your blood glucose using a separate BG meter. -
Page 115: Entering Your Blood Glucose Reading
SmartBolus Calculator, SAVE does not appear. • Tap CANCEL, then YES, to exit the screen without saving the blood glucose reading. The Omnipod 5 App records the current time as the time of the blood glucose reading. -
Page 116: High And Low Blood Glucose Readings
Omnipod 5 App records “HIGH” in the history. This indicates severe hyperglycaemia (high glucose). If the blood glucose reading is LOW or below 1.1 mmol/L, the Omnipod 5 App records “LOW” in the history. This indicates severe hypoglycaemia (low glucose). -
Page 117: How Blood Glucose Readings Are Displayed
<blood glucose reading> 0–1 mmol/L or LOW How Blood Glucose Readings are Displayed The Omnipod 5 App displays the blood glucose reading with a colour. The text colour is: • Yellow if your blood glucose is above your Glucose Goal Range. - Page 118 This page intentionally left blank.
-
Page 119: Chapter 9: Pausing And Starting Insulin Delivery
CHAPTER 9 Pausing and Starting Insulin Delivery Contents 9.1. Pausing Insulin Delivery ......... 112 Pause insulin delivery . -
Page 120: Pausing Insulin Delivery
Sometimes you may need to pause insulin delivery briefly. For example, you must pause insulin delivery prior to editing a Basal Programme in progress or changing the time zone. The Omnipod 5 System lets you pause all insulin delivery for up to two hours. -
Page 121: Methods To Temporarily Pause Insulin Delivery In Manual Mode
Pausing and Starting Insulin Delivery 9.2. Methods to Temporarily Pause Insulin Delivery in Manual Mode There may be times when you want to pause all insulin delivery, or at least all basal insulin delivery, for a period of time. If you do not want to deactivate your current Pod, you can request a temporary halt of insulin delivery as follows: •... -
Page 122: Starting Insulin Delivery
) > Start Insulin 2. Tap START INSULIN to confirm restarting the Basal Programme scheduled for the current time. The Omnipod 5 App beeps to confirm that insulin delivery has started. Start insulin delivery after the pause period ends ¾ Tap START INSULIN to start insulin delivery. -
Page 123: Chapter 10: Changing Settings
Chapter 10: Changing Settings CHAPTER 10 Changing Settings Contents 10.1. General Settings ..........116 Network Connectivity . -
Page 124: General Settings
Flight Mode is a device setting that turns off mobile phone and Wi-Fi network connectivity. Flight Mode can be turned ON or OFF. Note: Though the Omnipod 5 System does not require constant network connectivity, frequent connectivity (either mobile phone or Wi-Fi) is needed for optimal use of the system, such as if you typically share your glucose data with a care partner. -
Page 125: Screen Display
Changing Settings 10 Screen Display Use the screen display settings to control the screen time-out and brightness. Screen time-out The Controller screen turns black if you have not used it for the specified amount of time, in order to preserve battery power. To change the amount of time: 1. -
Page 126: Pin
App time Device time zone Your device time zone is the time displayed outside of the Omnipod 5 App on the status bar and the lock screen. Your device time will update automatically when you travel to a new time zone or for Daylight Saving Time when you have the Automatic Time Zone setting ON. -
Page 127: Insulin Delivery Time Zone
For example, when you travel outside of the country, your Omnipod 5 App will ask you if you would like to update your insulin delivery time zone to your new local time. -
Page 128: Reminder Settings
Pod with supplies to use when restarting the app. If you need to reset the Omnipod 5 App on your Controller, which will clear all your settings and history, follow these three steps. -
Page 129: Pod Expiry
3. Tap SAVE. Low Pod Insulin An advisory alarm from the Pod and Omnipod 5 App sounds when the insulin level in your Pod drops below the low Pod insulin setting. This setting can range from 10 to 50 units. -
Page 130: Confidence Reminders
This setting can range from 1 to 24 hours. Example: If you choose 10 hours, you must wake up your Omnipod 5 App and unlock it at least once every 10 hours, day and night, to prevent the Pod Shutdown alarm. -
Page 131: Basal And Temp Basal Settings
Changing Settings 10 10.3. Basal and Temp Basal Settings The following sections describe how to change settings that control basal insulin delivery. Note: These settings only apply when using Manual Mode. Maximum Basal Rate The Maximum Basal Rate defines an upper limit for any basal rate used in your Basal Programmes and temp basals during Manual Mode only. - Page 132 This page intentionally left blank.
-
Page 133: Chapter 11: Browsing Your History And Records
History Summary Section . . . . . . . . . . . . . . . . . . . . . . . . . . . . . . . . . . . . . . . . . . . . . . 1 30 11.5. Calculations for History Summaries ......132 Glucose Summaries . -
Page 134: About Your Recent History And Past Records
11 Browsing Your History and Records 11.1. About Your Recent History and Past Records The Omnipod 5 App can store 90 days of history records. Once the memory is full, new records begin to replace the oldest records. You can browse but not edit the information in your records. -
Page 135: Sensor Graph States
The top section of the Sensor Graph changes colour based on your current system mode. When the Omnipod 5 System is in Manual Mode, the graph heading is light grey. The graph shows your most recent sensor glucose values over the last 3 hours. - Page 136 • The bolus button at the time you started a bolus 6. Vertical axis: Displays sensor glucose values in mmol/L 7. Time scale: Displays hour and half-hour markings. When the Omnipod 5 System is in Automated Mode, the graph heading is purple.
-
Page 137: History Information Overview
Browsing Your History and Records 11 When the Omnipod 5 System is in Automated Mode: Limited state, the graph heading is dark grey. 11.4. History Information Overview You can access the history summary and detail information, and a list of automated events from the History Detail screen. -
Page 138: History Summary Section
11 Browsing Your History and Records Note: Tap the “<” next to the date arrow to view an earlier day. History Summary Section The upper section of the History screens summarises the records for the day. Summary item Description Row 1 - Sensor Average Sensor Average of sensor glucose values for the day. - Page 139 When insulin delivery is unconfirmed After delivering a bolus or basal dose of insulin, the Pod sends a confirmation to the Omnipod 5 App once completed. If a bolus, basal or total insulin delivery has not been confirmed, the following icons will display:...
-
Page 140: Calculations For History Summaries
11 Browsing Your History and Records 11.5. Calculations for History Summaries This section lists the calculations for the summary data shown on the History screens. Glucose Summaries The calculations used for the glucose summaries include sensor glucose values (including HIGH and LOW values) and exclude manually-entered readings. -
Page 141: History Details Section
Browsing Your History and Records 11 When your Omnipod 5 System has not received updates from the Pod about confirmed insulin delivery, the insulin delivery calculations are estimates based on the scheduled insulin delivery. Summary item Calculation Row 2 Total Insulin... -
Page 142: Glucose Details
The Dexcom G6 icon is: Glucose Goal Range The goal of using the Omnipod 5 System is to keep your glucose within your Glucose Goal Range. You define this range by setting the upper and lower limits. The Sensor Graph and the Enter BG screen use the Glucose Goal Range to determine which glucose readings are within your goal and which are above or below your goal. -
Page 143: Immediate And Extended Boluses
Browsing Your History and Records 11 Immediate and extended boluses The bolus amount listed next to the Bolus button is the total of an immediate bolus plus any extended portion of the bolus. If you cancel an immediate or extended bolus, the amount listed is the confirmed amount delivered before cancellation. -
Page 144: When The Pod Has Not Confirmed A Bolus Delivery
Omnipod 5 App that the bolus was delivered. Before the Omnipod 5 App receives confirmation from the Pod that the bolus has been delivered, the Omnipod 5 App estimates the amount delivered. During this time, the History screens use a grey exclamation mark icon to indicate that the bolus is estimated. -
Page 145: Basal Programmes
Browsing Your History and Records 11 Basal Programmes A Basal Programme icon and banner indicate the start of a Basal Programme and the restart of a Basal Programme at the end of a temp basal or insulin pause period. Temp basals In Manual Mode, a temp basal icon and banner indicate the start, end or cancellation of a temp basal. -
Page 146: Automated Events (Auto Events)
Automated Events (Auto Events) Tap AUTO EVENTS on the history screen to display the amount of insulin delivered at each 5-minute period while in Automated Mode. A system mode icon and banner show the time the system switched to Automated... -
Page 147: Chapter 12: Managing Software Updates
Omnipod 5 App Update . . . . . . . . . . . . . . . . . . -
Page 148: Insulet-Provided Controller
When an update is available, you will receive a notification prompting you to carry out an update. Note: You will not be able to navigate in the Omnipod 5 App during an Omnipod 5 update; however, your insulin therapy will not be impacted. - Page 149 Omnipod 5 App as soon as the update is available. If you choose to postpone an optional update to a later time, you can manually update the Omnipod 5 App at any time.
- Page 150 12 Managing Software Updates 5. Tap Update Now . Once the update is complete, a confirmation screen displays to inform you that the update was completed successfully.
-
Page 151: Chapter 13: Alarms, Action And Reminder Notifications
13.5. Responding to Alarms ........ - Page 152 Update Omnipod 5 - App No Longer Supported . . . . . . . . . . . . . . . .
-
Page 153: Types Of Alarms And Notifications
Pod and Omnipod 5 App hazard alarm occur simultaneously, the hazard alarm that most recently occurred will be displayed first on the Omnipod 5 App. Any Pod hazard alarms will be sounded on the Pod. • Advisory alarms are low-priority alarms that indicate that a situation exists that needs your attention. -
Page 154: Alarms And Notifications Screen
13 Alarms, Action and Reminder Notifications For how to view the alarms and notifications history, see page 146. For Dexcom G6 alarm information, see the Dexcom G6 CGM System Instructions for Use. 13.2. Alarms and Notifications Screen To review past alarms and notifications: 1. -
Page 155: Sounds And Vibrations
Alarms, Action and Reminder Notifications 13 13.3. Sounds and Vibrations The Omnipod 5 System uses sounds and vibrations to attract your attention to an alarm or notification. Caution: AVOID setting your Controller to Silent, Vibrate or any other setting that prevents you from hearing alarms and notifications from your Omnipod 5 App. -
Page 156: Informational Sounds And Vibrations
The Pod and the Omnipod 5 App can provide informational sounds (tones, beeps) or vibrations to let you know that normal activity between the Pod and the Omnipod 5 App is occurring as expected. See the tables below for descriptions of informational sounds you will encounter during use. -
Page 157: Basal Programme Changes
Pod activation/Pod deactivation Cause Omnipod 5 App Tones or vibrations Tone/vibration when Beeps twice when it occur at various the Pod and Omnipod 5 has been filled with times during the Pod App are successfully the minimum amount activation process to paired. -
Page 158: Responding To Alarms
2. After unlocking your Omnipod 5 App, follow the on-screen instructions or see the individual alarm details starting on page 151. Note: You can use your Omnipod 5 System even if you do not address an advisory alarm immediately. However, you must acknowledge a hazard alarm before you can use your Omnipod 5 System. -
Page 159: Diagnostics
Pod, the Pod beeps several times and sounds the alarm tone for several seconds. 5. If the Pod did not beep, tap NO. Then either tap CHECK AGAIN to retry testing the alarms, or tap DONE and change your Pod. -
Page 160: Hazard Alarm List
(occlusion). Not taking action promptly could result in under-delivery of insulin, which can lead to hyperglycaemia or diabetic ketoacidosis (DKA). Screen Alert Description Omnipod 5 App: Why it occurs: A blockage (occlusion) was detected from a blocked cannula, a Pod malfunction or from using old or inactive insulin, which has stopped insulin delivery. -
Page 161: Omnipod 5 App Error
Screen Alert Description Omnipod 5 App: Why it occurs: An unexpected error is detected in the Omnipod 5 App. Note: If your Omnipod App stops and restarts on its own, you may notice the app flashing white before this screen appears. -
Page 162: Omnipod 5 Memory Corruption
13 Alarms, Action and Reminder Notifications Omnipod 5 Memory Corruption Screen Alert Description Omnipod 5 App: Why it occurs: An unexpected error is detected in the Omnipod 5 App. Pod sound: None Controller sound and vibration: • 30-second tone • 30-second vibration •... -
Page 163: Pod Error
Pod changes could result in under-delivery of insulin, which can lead to hyperglycaemia. If another Pod is not available, use a different insulin delivery method. Screen Alert Description Omnipod 5 App: Why it occurs: The Pod detects an unexpected error and insulin delivery has stopped. Pod sound: Continuous tone Controller sound and vibration: •... -
Page 164: Pod Expired
If another Pod is not available, use a different insulin delivery method. Screen Alert Description Omnipod 5 App: Why it occurs: The Pod has reached the end of its operating life and insulin delivery has stopped. Pod sound: Continuous tone Controller sound and vibration: •... -
Page 165: Pod Out Of Insulin
If another Pod is not available, use a different insulin delivery method. Screen Alert Description Omnipod 5 App: Why it occurs: The Pod’ s insulin reservoir is empty and insulin delivery has stopped. Pod sound: Continuous tone Controller sound and vibration: •... -
Page 166: Pod Shutdown
If another Pod is not available, use a different insulin delivery method. Screen Alert Description Omnipod 5 App: Why it occurs: The Pod has stopped delivering insulin because you have set a Pod Shutdown time and you did not respond to the Pod Shutdown advisory alarm. -
Page 167: System Error
Alarms, Action and Reminder Notifications 13 System Error Screen Alert Description Omnipod 5 App: Why it occurs: An unexpected error is detected in the Pod or the Omnipod 5 App. Pod sound: None Controller sound and vibration: • 30-second tone •... -
Page 168: Advisory Alarm List
Advisory alarms inform you of a situation that needs your attention in the near future. Low Pod Insulin Screen Alert Description Omnipod 5 App: Why it occurs: The amount of insulin in the Pod is below the value specified in your settings. Pod sound: •... -
Page 169: Pod Expired
8-beep tone • Tone issued once every 60 minutes starting after 72 hours of Pod life • After 79 hours of Pod life, tone is issued once every 5 minutes Controller sound and vibration: • 3-second tone • 3-second vibration •... -
Page 170: Pod Shutdown
13 Alarms, Action and Reminder Notifications Pod Shutdown Screen Alert Description Omnipod 5 App: Why it occurs: You have reached the Pod Shutdown time you set. The Pod will stop delivering soon if you do not respond to this alarm. -
Page 171: Start Insulin
If you do not start insulin delivery, you could develop hyperglycaemia. Screen Alert Description Omnipod 5 App: Why it occurs: The time period that you specified to pause insulin has passed. If you do not start insulin delivery, you could develop hyperglycaemia. -
Page 172: Urgent Low Glucose
Screen Alert Description Omnipod 5 App: Why it occurs: Your glucose is at or below 3.1 mmol/L, according to what your Sensor sent to the Omnipod 5 App. Pod sound: • 4-beep tone • Repeats every 5 minutes that sensor... -
Page 173: Action Item Notification List
You have not installed a required update to the Omnipod 5 App • An update for the Omnipod 5 App is not yet available to fix a known issue Use a different insulin delivery method. Failure to deactivate your Pod and use another form of insulin delivery could result in over-delivery or under-delivery of insulin. -
Page 174: Connect To A Wireless Network
Tip: If Wi-Fi is not available, move to an area with a better mobile phone signal. Note: The SIM Card on your Omnipod 5 Controller enables data to be sent and received via the AT&T wireless network when your Controller is not connected to a Wi-Fi network. -
Page 175: Daylight Saving Time Change
Screen Alert Description Omnipod 5 App: Why it occurs: The Omnipod 5 App has detected that Daylight Saving Time has started or ended. Pod sound: None Controller sound and vibration: •... -
Page 176: Omnipod 5 Error
13 Alarms, Action and Reminder Notifications Omnipod 5 Error Screen Alert Description Omnipod 5 App: Why it occurs: Your Omnipod 5 App has encountered a problem. Pod sound: None Controller sound and vibration: • 3-second tone • 3-second vibration •... -
Page 177: Update Omnipod 5 - App No Longer Supported
Alarms, Action and Reminder Notifications 13 Update Omnipod 5 - App No Longer Supported Description Why it occurs: The Omnipod 5 App version you are currently using is obsolete and no longer supported. Pod sound: None Controller sound and vibration: •... -
Page 178: Update Omnipod 5 - Software Update
13 Alarms, Action and Reminder Notifications Update Omnipod 5 - Software Update Description Why it occurs: An Omnipod 5 App software update is available. Pod sound: None Controller sound and vibration: • 3-second tone • 3-second vibration • No repetition What to do: 1. -
Page 179: Update
Alarms, Action and Reminder Notifications 13 Update OS Screen Alert Description Omnipod 5 App: Why it occurs: An operating system update is available for your Controller. Pod sound: None Controller sound and vibration: • 3-second tone • 3-second vibration •... -
Page 180: Update Time Zone
Screen Alert Description Omnipod 5 App: Why it occurs: Your Controller time zone does not match the Omnipod 5 App insulin delivery time zone. Pod sound: None Controller sound and vibration: • 3-second tone •... -
Page 181: Silencing Unresolved Alarms
Alarms, Action and Reminder Notifications 13 13.9. Silencing Unresolved Alarms You can silence the Pod or Omnipod 5 App alarms by acknowledging the alarm screen displayed on your Omnipod 5 App. If the alarm continues, follow the directions in this section. -
Page 182: Responding To Reminder Notifications
Finding out about reminder notifications To alert you to a notification, the Pod sounds a 3-beep tone, and the Omnipod 5 App either sounds a tone or vibrates (see “13.3. Sounds and Vibrations” on page 147). When you hear a sound or feel a vibration, check your Omnipod 5 App for a message. -
Page 183: Reminder Notifications List
) in the upper left of the screen to mark the notifications as acknowledged. Note: Putting the Omnipod 5 Controller to sleep by pressing the Power button does not mark the notifications as acknowledged. You must tap the back arrow ( ) to acknowledge the notification. - Page 184 What to do Acknowledge the message (see “Acknowledging reminder notifications” on page 174). Change your Pod. Note: To change the timing of this notification, see “Pod Expiry” on page 121. Both the Pod and the Omnipod 5 App sound the notification.
-
Page 185: Chapter 14: Taking Care Of Your Controller And Pod
CHAPTER 14 Taking Care of Your Controller and Pod Contents 14.1. Pod and Insulin Storage and Care ....... 178 Pod and Insulin Storage . -
Page 186: Pod And Insulin Storage And Care
DO NOT expose any Omnipod 5 System products or supplies to extreme temperatures as this results in them not functioning properly. Store all Omnipod 5 System products and supplies, including unopened Pods, in a cool, dry place. The Omnipod 5 Automated Insulin Delivery System has no user-serviceable parts. -
Page 187: Controller Storage And Care
Controller screen lock security key with anyone. Caution: DO NOT use any component of the Omnipod 5 System (Controller, Pod) if you suspect damage after an unexpected event such as dropping or hitting on a hard surface. Using damaged components may put your health at risk as the system may not be working properly. -
Page 188: Long-Term Storage Of Your Controller
Your Controller and the Environment Avoid extreme temperatures Extreme operating temperatures can affect the Controller battery and interfere with Omnipod 5 System operation. Avoid using the Controller in temperatures below 5°C (41°F) or above 40°C (104°F). Caution: DO NOT expose your Controller to extreme temperatures while in storage or during use. -
Page 189: Usb Cable
Taking Care of Your Controller and Pod 14 USB cable Caution: Use ONLY the USB charging cable that you received in the box with your Controller. AVOID using alternative charging cables or other accessories, as they may damage the Controller or affect the way it charges in the future. -
Page 190: Controller Battery Care
14 Taking Care of Your Controller and Pod 2. If the Controller has turned off, press and hold the Power button to see whether the Controller turns on and the Lock screen appears. Caution: Do not use the Controller if it appears damaged or is not working as it should. -
Page 191: Charging The Controller Battery
Under normal use, the battery should hold its charge for more than one day. An Omnipod 5 App message alerts you when the battery charge is low. The battery icon in the status bar tracks the remaining charge in the battery (see “3.4. - Page 192 14 Taking Care of Your Controller and Pod Note: If the Controller battery is critically low and the Controller has turned OFF, your Pod continues to deliver Automated Mode insulin or Manual Mode basal insulin according to the Basal Programme in progress or temp basal. If you do not charge your Controller battery, this insulin delivery continues until the Pod expires.
-
Page 193: Chapter 15: Living With Diabetes
15.5. Handling Special Situations ........ -
Page 194: Infusion-Site Checks
15 Living with Diabetes 15.1. Infusion-Site Checks Caution: ALWAYS check for signs of infection often. If an infusion site shows signs of infection: • Immediately remove the Pod and apply a new Pod at a different infusion site. • Contact your healthcare provider. Treat the infection according to instructions from your healthcare provider. -
Page 195: Being Aware Of Your Glucose
Living with Diabetes 15 15.2. Being Aware of Your Glucose Warning: ALWAYS be aware of your current sensor glucose value, trust how your body feels and do not ignore symptoms of high and low glucose. Even though insulin delivery adjusts automatically in Automated Mode with the goal of bringing your glucose level to your defined Target Glucose, severe hypoglycaemia or hyperglycaemia may still occur. -
Page 196: Travelling And Holidays
• Vials of insulin (cargo area temperatures may affect insulin) • A signed letter from your healthcare provider explaining that you need to carry insulin supplies and the Omnipod 5 System • Prescriptions for all medications • Medications and supplies with their original prescription label Note: Generic medications may be easier to find than brand names outside your country. -
Page 197: Plan For Changing Time Zones
Living with Diabetes 15 Plan for Changing Time Zones If you’re planning a holiday or business trip to a different time zone, you may need to adjust Basal Programmes that you would typically follow while in Manual Mode. For changes of just a few hours, basal rate adjustments are minor and easy to calculate. -
Page 198: Avoiding Lows, Highs And Diabetic Ketoacidosis
If the use of a Personal Medical Electronic Device using Bluetooth technology is allowed, set your Omnipod 5 App to flight mode while on the aeroplane (see “Flight mode” on page 116). The Bluetooth setting remains enabled in the Controller's Flight Mode so you can communicate with your Pod. -
Page 199: Hypoglycaemia (Low Glucose)
Tip: Hypoglycaemia unawareness is a condition in which you do not realise when your glucose is low. If you are prone to hypoglycaemia unawareness, you may want to use the Omnipod 5 System's blood glucose reminder and check your glucose more frequently (see “Check BG After Bolus” on page 210). -
Page 200: To Avoid Hypoglycaemia (Low Glucose)
15 Living with Diabetes To avoid hypoglycaemia (low glucose) • Work with your healthcare provider to establish individualised Target Glucose settings and guidelines. • Keep a fast-acting carbohydrate with you at all times to respond quickly to low glucose. Examples of fast-acting carbs are glucose tablets, hard sweets or juice. -
Page 201: To Treat Hypoglycaemia (Low Glucose)
Living with Diabetes 15 Possible causes of Suggested action hypoglycaemia Prone to severe Consult your healthcare provider about hypoglycaemia hypoglycaemia unawareness and about raising or hypoglycaemia Target Glucose. unawareness Consult with your healthcare provider about Unplanned physical using a Temp Basal (Manual Mode) or the Activity activity feature (Automated Mode). -
Page 202: Hyperglycaemia (High Glucose)
Pods use rapid-acting insulin, which has a shorter duration than long-acting insulin, so you have no long-acting insulin in your body when using the Omnipod 5 System. If a blockage (interruption of insulin delivery from the Pod) or occlusion occurs, your glucose can rise rapidly. - Page 203 Living with Diabetes 15 Possible causes of Suggested action hyperglycaemia Expired insulin or Deactivate and remove the used Pod. Apply a new Pod insulin exposed to filled from a new vial of insulin. extreme temperatures Infusion site in or Deactivate and remove the used Pod. Apply a new Pod near a scar or mole in a different location.
-
Page 204: To Treat Hyperglycaemia (High Glucose)
4. Check your glucose again after 2 hours. 5. If glucose has not decreased, do both of the following: • Take a second bolus by injection, using a sterile syringe. Ask your healthcare provider whether to inject the same amount of insulin as in step 3. -
Page 205: Diabetic Ketoacidosis (Dka)
Pods use rapid-acting insulin, which has a shorter duration than long-acting insulin, so you have no long-acting insulin in your body when using the Omnipod 5 System. If insulin delivery from the Pod is interrupted (a blockage or occlusion), your glucose can rise rapidly and lead to diabetic ketoacidosis (DKA). -
Page 206: Handling Special Situations
Check your glucose again after 2 hours. If your glucose has not declined or if your ketone levels have risen or remain elevated, immediately contact your healthcare provider for guidance. 15.5. Handling Special Situations Sick Days Any physical or emotional stress can cause your glucose to rise, and illness is physical stress. -
Page 207: X-Rays, Mris And Ct Scans
Living with Diabetes 15 The Pod’ s adhesive keeps it securely in place for up to 3 days. However, if necessary, several products are available to enhance adhesion. Ask your healthcare provider about these products. Avoid getting body lotion, creams or oils near the infusion site; these products may loosen the adhesive. - Page 208 This page intentionally left blank.
-
Page 209: Section 3: Smartbolus Calculator
SMARTBOLUS CALCULATOR SmartBolus Calculator Important Safety Information 16 Delivering a Bolus 17 Delivering a Bolus with the SmartBolus Calculator 18 SmartBolus Calculator Calculations... - Page 210 This page intentionally left blank.
-
Page 211: Smartbolus Calculator Important Safety Information
Warning: insulin. This can lead to hypoglycaemia Do NOT use the or hyperglycaemia. Omnipod 5 System if you are taking hydroxyurea, a medication used in Warning: ALWAYS be aware of the treatment of diseases including your current sensor glucose value, cancer and sickle cell anaemia. - Page 212 Caution: DO NOT navigate away from the Omnipod 5 App while you are in the process of making changes to your insulin delivery settings. If you leave the App before you are able to...
-
Page 213: Chapter 16: Delivering A Bolus
16.5. Reminder Settings ........ -
Page 214: Delivering A Manual Bolus
You can extend some or all of a manual bolus in Manual Mode. When delivering a manual bolus, the Omnipod 5 System does not adjust the bolus amount based on your glucose value, carbohydrates being consumed or IOB as it does when the SmartBolus Calculator is used. -
Page 215: Delivering Immediate And Extended Boluses
“immediate bolus” or, simply, a “bolus”. In Manual Mode, you can also spread out the delivery of all or part of a meal bolus so that it is delivered steadily over a specified period of time. This is referred to as an “extended bolus”. 5 . 0 Bolus 4 . 0... -
Page 216: Tracking The Progress Of A Bolus
Note: You cannot navigate within the Omnipod 5 App during an immediate bolus. Note: Look for the progress bar to confirm the bolus delivery has started before navigating away from the Omnipod 5 App. -
Page 217: Cancelling A Bolus In Progress
4. Optional: take into consideration the amount remaining from the cancelled bolus and add the amount in the Total Bolus field. 5. Check if the amount entered in the Total Bolus field is correct. Then tap CONFIRM. 6. Tap START. -
Page 218: Reminder Settings
If a meal bolus or a manual bolus is not delivered during the Missed Bolus time period, the Omnipod 5 System will generate the Missed Bolus reminder. You can set time intervals from 30 minutes to 4 hours. You can set up to 6 Missed Bolus reminders per day. -
Page 219: Add A New Missed Bolus Reminder
4. Tap the No bolus between field and select the start of the Missed Bolus time interval. 5. Tap the next field and select the end of the time interval. 6. Tap SAVE. Edit a Missed Bolus reminder To edit a Missed Bolus reminder: 1. - Page 220 This page intentionally left blank.
-
Page 221: Chapter 17: Delivering A Bolus With The Smartbolus Calculator
17.4. Insulin On Board (IOB) ......... . 218 17.5. Adjustments to Your Calculation ....... . 219 17.6. -
Page 222: About The Smartbolus Calculator
17 Delivering a Bolus with the SmartBolus Calculator 17.1. About the SmartBolus Calculator A bolus is a dose of insulin taken to cover carbohydrates in a meal, drink or snack (a meal bolus) or to correct elevated glucose (a correction bolus). The SmartBolus Calculator calculates a suggested bolus amount of insulin to bring down high glucose (a correction bolus) and/or to cover carbohydrates in a meal (a meal bolus). - Page 223 After opening the SmartBolus Calculator, bolus delivery must be initiated within 5 minutes or values will need to be refreshed. If more than 5 minutes pass, you will see a message that values have expired. Tap CONTINUE to refresh the SmartBolus Calculator, then enter or use your current values.
-
Page 224: Entering Meal Information
1. On the Home screen, tap the Bolus button Note: The Bolus screen is only valid for 5 minutes. After 5 minutes, if bolus delivery has not started, you must refresh and re-enter new values. 2. Tap the Carbs field. Enter the grams of carbs and tap Done. -
Page 225: Import And Use Sensor Glucose Value
Delivering a Bolus with the SmartBolus Calculator 17 To enter a blood glucose reading: 1. Tap the Glucose field . If you have manually entered a blood glucose reading from a meter within the past 10 minutes, that value automatically appears in the Glucose field. If you want the SmartBolus Calculator to use that value, skip the next step. -
Page 226: Insulin On Board (Iob)
If the sensor glucose value displays “HIGH”, the SmartBolus Calculator is temporarily disabled. Note: If your Omnipod 5 System does not have a valid sensor glucose value or trend at the time you open the SmartBolus Calculator, the USE SENSOR option is disabled. -
Page 227: Adjustments To Your Calculation
• Blood glucose reading, if manually entered • Sensor glucose value and trend (see “19.5. Sensor Glucose Trend Arrows” on page 252) 17.6. Delivering an Immediate Bolus The Total Bolus field shows the proposed bolus. The amount of any IOB adjustment appears below the Total Bolus field. -
Page 228: Delivering An Extended Bolus
17 Delivering a Bolus with the SmartBolus Calculator 6. Review the bolus details on the Confirm Bolus screen. Grams of carbs Blood glucose or sensor glucose value The total bolus includes any IOB Adjusted for adjustments and IOB of x U means the any adjustments SmartBolus you made to the... - Page 229 Note: You can extend only the meal portion of the bolus. A correction portion of the bolus, if any, is always delivered immediately. 5. Tap the Duration field and enter the duration for the extended portion of the bolus. 6. Tap CONFIRM.
-
Page 230: Bolus Settings
Impacts on Suggested Bolus Calculations The following table describes what each SmartBolus Calculator setting does, how you can adjust them and how they are used to calculate a suggested bolus. Omnipod 5 Setting and How to Enter the Impacts on Suggested... - Page 231 Delivering a Bolus with the SmartBolus Calculator 17 Omnipod 5 Setting and How to Enter the Impacts on Suggested Range Setting Bolus Calculations Maximum Bolus Enter in Omnipod 5 Limits amount of single App Settings or during bolus dose. 0.05 – 30 U First-Time Set-up (0.05 U increments)
-
Page 232: Maximum Bolus
17 Delivering a Bolus with the SmartBolus Calculator Omnipod 5 Setting and How to Enter the Impacts on Suggested Range Setting Bolus Calculations Duration of Insulin Enter in Omnipod 5 Increase in setting value Action App Settings or during may decrease amount of... -
Page 233: Minimum Glucose For Calculations
Delivering a Bolus with the SmartBolus Calculator 17 calculates a correction bolus if your glucose is above your Correct Above setting. In Automated Mode, the Omnipod 5 System will adjust your automated insulin delivery with the goal of bringing you to your Target Glucose. -
Page 234: Correction Factor
17 Delivering a Bolus with the SmartBolus Calculator 4. Repeat the previous step as needed for the remaining segments. 5. After confirming that all segments are correct, tap SAVE. Note: You can add and delete segments by editing the existing segments. -
Page 235: Chapter 18: Understanding Smartbolus Calculator Calculations
CHAPTER 18 Understanding SmartBolus Calculator Calculations Contents 18.1. The SmartBolus Calculator ........228 SmartBolus Calculator Boluses . -
Page 236: The Smartbolus Calculator
= 3 units (3 units meal bolus) Maximum Bolus The Omnipod 5 System does not allow you to enter a bolus that is above your Maximum Bolus setting. If the SmartBolus Calculator calculates a bolus amount greater than your Maximum Bolus, you will only be able to deliver up to the Maximum Bolus amount. -
Page 237: When The Smartbolus Calculator Does Not Work
The SmartBolus Calculator does not work when it is disabled or when there is no Pod communication. Being “disabled” means that the SmartBolus Calculator is temporarily unable to calculate a suggested bolus. Your Omnipod 5 System may disable the SmartBolus Calculator in a few situations. -
Page 238: Sensor Glucose Trend
IOB from previous correction boluses is referred to as correction IOB. IOB from previous meal boluses is referred to as meal IOB. Additionally, in Manual or Automated Mode, the Omnipod 5 algorithm constantly calculates IOB from your basal delivery. -
Page 239: Reverse Correction
Accept- How does the SmartBolus Calculator use ed Value this value? Using the Omnipod 5 System with a CE-marked Blood Glucose Meter Blood Glucose To calculate total bolus volume. 1.1–33.3 Reading from a BG mmol/L... - Page 240 To calculate total bolus volume. 1-150 Ratio grams You can adjust this value in your Omnipod 5 System settings. The value indicates the grams of carbohydrate covered by one unit of insulin. Duration of Insu- To calculate total bolus volume.
-
Page 241: Boundaries Of The Smartbolus Calculator Suggestions
Understanding SmartBolus Calculator Calculations 18 Boundaries of the SmartBolus Calculator suggestions The following figure shows the boundaries between the types of calculations performed by the SmartBolus Calculator depending on your glucose. Some examples of how to read the figure are provided below: •... -
Page 242: Considerations About Smartbolus Calculator Recommendations
The SmartBolus Calculator refreshes values every 5 minutes. If you do not start your bolus within 5 minutes of entering the SmartBolus Calculator, the Omnipod 5 System will need to clear the screen so that it has the latest IOB and Sensor information. -
Page 243: Insulin On Board (Iob)
4 hrs after the bolus, Duration of Insulin Action set to 4 hrs IOB has returned to zero In the Omnipod 5 System, the correction IOB can also change depending on the SmartAdjust technology calculations. It can increase or decrease automatically. - Page 244 3 hours – 2 hours x 4.5 U = 1.5 U meal IOB 3 hours In other words, two hours after your previous meal bolus, your body has used up 3 units from the meal bolus. The remaining 1.5 units of insulin are still in your body, working to cover your meal.
-
Page 245: Smartbolus Calculator Equations
Correction Factor: 2.8, Preliminary meal bolus: 2.5 U 4.2 mmol/L – 8.3 mmol/L = -1.5 U Reverse Correction -1.5 U (Reverse Correction) + 2.5 U (prelim. meal bolus) = 1.0 U meal bolus A Reverse Correction is only applied to the meal bolus. In this example, the... -
Page 246: Smartbolus Calculator Rules
18 Understanding SmartBolus Calculator Calculations SmartBolus Calculator Rules The SmartBolus Calculator applies the following rules to the suggested bolus doses: Rule Detail Rounding Boluses will always be rounded down to the nearest 0.05 U and will never be below 0 U. IOB will always be rounded up to the nearest 0.05 U and will never be below 0 U. -
Page 247: Overview Of The Bolus Calculations Screen
Understanding SmartBolus Calculator Calculations 18 Overview of the Bolus Calculations Screen You can tap VIEW BOLUS CALCULATIONS from the Insulin & BG history screen or tap CALCULATIONS from the SmartBolus Calculator screen if you want to view bolus calculation details. When a sensor glucose value and trend are used for a bolus, the SmartBolus Calculator will not only consider the value but may also adjust the bolus amount for the trend. -
Page 248: Smartbolus Calculator Examples
18 Understanding SmartBolus Calculator Calculations 18.2. SmartBolus Calculator Examples Example 1 Eating 50 g carbs, 0.6 U meal IOB and 0.5 U correction IOB from previous meal and correction boluses. Sensor glucose is not available and a blood glucose reading is not entered. - Page 249 Understanding SmartBolus Calculator Calculations 18 Example 2 Eating 30 g carbs, no meal or correction IOB. Used sensor glucose value of 10 mmol/L, with a rising trend. Correction Bolus Your glucose is 1.2 U 10 mmol/L, which is Sensor = 10, Target Glucose = 7 . 2 2 .
- Page 250 18 Understanding SmartBolus Calculator Calculations Example 3 No carbs entered, used sensor glucose value of 10 mmol/L with a decreasing trend. There is 0.8 U of meal IOB and 0.5 U of correction IOB from the previous meal and correction boluses. Correction Bolus...
-
Page 251: Section 4: Using A Sensor With Omnipod
USING A SENSOR WITH OMNIPOD 5 Sensor Important Safety Information 19 About the Dexcom G6 20 Connecting Dexcom G6 to the Pod... - Page 252 This page intentionally left blank.
-
Page 253: Sensor Important Safety Information
ALWAYS Dexcom G6 Transmitter serial number check your blood glucose using a (SN) you save in the Omnipod 5 App BG meter, and consider treatment matches the one you are wearing. In and/or Sensor calibration if necessary. - Page 254 Pod removal guidelines. Warning: DO NOT use the Omnipod 5 System if you are taking hydroxyurea, a medication used in the treatment of diseases including cancer and sickle cell anaemia. Your Dexcom G6 sensor glucose values may...
-
Page 255: Chapter 19: About The Dexcom G6
19.5. Sensor Glucose Trend Arrows ........ -
Page 256: Dexcom G6 Overview
User Guide, contact your healthcare provider. The Omnipod 5 System is designed to connect with the Dexcom G6 CGM System. When connected to the Dexcom G6, the Pod receives glucose values and trends from the Dexcom G6. -
Page 257: Dexcom G6 Sensor Placement
About the Dexcom G6 19 Note: The Omnipod 5 System also alerts you when your sensor glucose values are at or below 3.1 mmol/L. • Always ensure that the Transmitter serial number (SN) entered in the Dexcom G6 and Omnipod 5 Apps match the Transmitter on your body. -
Page 258: Using The Dexcom G6 With Omnipod 5
Note: Consult the Dexcom G6 CGM System Instructions for Use for more information on approved Sensor placement locations. 19.3. Using the Dexcom G6 with Omnipod 5 When using Omnipod 5 System with the Dexcom G6 CGM System, you need to use the Dexcom G6 app to control your Sensor. Caution:... -
Page 259: Sensor Glucose Values
High and Low Sensor Glucose Values The Omnipod 5 App indicates high and low sensor glucose values as follows. Sensor Glucose Values Screen display Above 22.2 mmol/L HIGH Below 2.2 mmol/L... -
Page 260: Sensor Glucose Trend Arrows
Note: Use a BG meter to confirm your glucose. Treat low glucose as needed. Note: The Urgent Low Glucose Advisory Alarm has to do directly with your body’ s current glucose, while other alarms have to do with the Pod or Omnipod 5 App state. -
Page 261: Communication Messages
• SEARCHING FOR SENSOR: When the Sensor is active and connected to the Omnipod 5 Pod but the most recent sensor glucose value was not acquired within the 5-minute window. There may be no valid sensor glucose value available due to a Pod/Sensor communication issue or a temporary Sensor issue (recoverable without any user action). - Page 262 This page intentionally left blank.
-
Page 263: Chapter 20: Connecting Dexcom G6 To The Pod
CHAPTER 20 Connecting Dexcom G6 to the Pod Contents 20.1. About Connecting Dexcom G6 to the Pod ..... . 256 20.2. Connecting the Dexcom G6 during Initial Pod Set-up ... 256 20.3. -
Page 264: About Connecting Dexcom G6 To The Pod
Before you can view and use sensor glucose values in the Omnipod 5 System, you must first set up the Omnipod 5 System to allow the Pod to communicate with the Sensor. Once connected, you will be able to use the system in Automated Mode, view sensor glucose values in the Omnipod 5 App and use sensor glucose values in the bolus calculator in both Manual and Automated Mode. -
Page 265: Connecting The Dexcom G6 Transmitter
Warning: ALWAYS confirm the Dexcom G6 Transmitter serial number (SN) you save in the Omnipod 5 App matches the one you are wearing. In cases where more than one person in the household uses the Dexcom G6, mismatching Transmitter serial numbers (SN) could result in over-delivery or under-delivery of insulin, which can lead to hypoglycaemia and hyperglycaemia. -
Page 266: Disconnecting The Transmitter From The Pod
20 Connecting Dexcom G6 to the Pod If you do not have an active Pod or you are changing your Pod, the Transmitter serial number (SN) will be saved and sent to the next Pod that is activated. 20.4. Disconnecting the Transmitter from the Pod To stop the Pod from communicating with the Transmitter, delete the SN. -
Page 267: Section 5: Automated Mode
AUTOMATED MODE 21 About Automated Mode 22 Switching Between Manual Mode and Automated Mode 23 Activity Feature 24 Automated Mode Alarms 25 Omnipod 5 System Clinical Studies... - Page 268 This page intentionally left blank.
-
Page 269: Automated Mode Important Safety Information
2 years old. SmartAdjust hypoglycaemia, seizure, loss of technology should also NOT be used consciousness or death. in people who require less than 5 units • Erroneously low sensor glucose of insulin per day, as the safety of the... - Page 270 Warning: Do NOT use the Omnipod 5 System if you are taking hydroxyurea, a medication used in the treatment of diseases including cancer and sickle cell anaemia. Your Dexcom G6 sensor glucose values could be...
-
Page 271: Chapter 21: About Automated Mode
Ongoing Use 21.5. About Automated Mode: Limited ......269 21.6. Automated Delivery Restriction ....... . 271... -
Page 272: About Automated Mode
60 minutes into the future. SmartAdjust technology uses this information, along with your current sensor glucose value and trend, to automatically adjust insulin delivery every 5 minutes. The System’ s goal is to help you bring your glucose to your defined Target Glucose. - Page 273 Failure to deliver a bolus for meals could lead to hyperglycaemia. How insulin is calculated and delivered during Automated Mode The Omnipod 5 System uses your total daily insulin history over the last few Pods to determine how much insulin your body needs. The calculated amount per hour is known as the Adaptive Basal Rate, which provides a baseline for automated insulin delivery.
- Page 274 Target Glucose (For example starting the system for the first time). Consult with your healthcare provider before making any changes in your Target Glucose. See “Omnipod 5 Clinical Studies” on page 285 for clinical study information at each Target Glucose.
-
Page 275: About The Dexcom G6 In Automated Mode
User Guide, contact your healthcare provider. While in Automated Mode, the Omnipod 5 System relies on your current and predicted sensor glucose values to calculate automated insulin delivery. Sensor glucose values and trends may also be used by the SmartBolus Calculator in both Automated and Manual Modes. -
Page 276: Bolus Settings And The Importance Of A Bolus
TDI to set a new Adaptive Basal Rate for you. When sensor glucose values and trend are available, SmartAdjust technology will also adjust this rate up or down every 5 minutes in response to your current and predicted glucose. -
Page 277: About Automated Mode: Limited
With each Pod change, for as long as you wear the System, updated insulin delivery information is sent and saved in the Omnipod 5 App so that the next Pod that is started is updated with the new Adaptive Basal Rate. - Page 278 Sensor. After 20 minutes of the Pod not receiving sensor glucose values, you move into a state of Automated Mode called Automated: Limited. The Omnipod 5 App will display “Limited” on the Home screen. Your System will remain in Automated: Limited until Sensor communication is restored or the Sensor warm-up period ends.
-
Page 279: Automated Delivery Restriction
About Automated Mode 21 Check your Dexcom G6 app to see if there are any Sensor actions you need to take to re-establish communication. See your Dexcom G6 CGM System Instructions for Use. Note: Automated: Limited state can occur due to a loss of communication between the Sensor and Pod. - Page 280 When the Automated Delivery Restriction alarm appears, the System will ask you to switch to Manual Mode for 5 minutes or longer. This step allows the System to know that you are aware of the situation and considering action. While in Manual Mode, you can check BG, review the Sensor Graph and troubleshoot your Sensor and Pod.
-
Page 281: Chapter 22: Switching Between Manual Mode And Automated Mode
CHAPTER 22 Switching Between Manual Mode and Automated Mode Contents 22.1. Switching from Manual Mode to Automated Mode ... . . 274 Before you begin . . . . . . . . . . . . . . . . . . . . . . . . . . . . . . . . . . . . . . . . . . . . . . . . . . . . . 2 74 To switch to Automated Mode . -
Page 282: Switching From Manual Mode To Automated Mode
22 Switching Between Manual Mode and Automated Mode 22.1. Switching from Manual Mode to Automated Mode Warning: ALWAYS be aware of your current sensor glucose value, trust how your body feels and do not ignore symptoms of high and low glucose. Even though insulin delivery adjusts automatically in Automated Mode, with the goal of bringing your glucose level to your defined Target Glucose, severe hypoglycaemia or hyperglycaemia may still occur. -
Page 283: To Switch To Automated Mode
Switching Between Manual Mode and Automated Mode 22 To switch to Automated Mode To switch from Manual Mode to Automated Mode: 1. From the Home screen, tap the Menu button ( ) > Switch Mode. Note: If the screen displays a red circle with an exclamation mark and SWITCH TO AUTOMATED is disabled (greyed out), take the corrective action... -
Page 284: Switching From Automated Mode To Manual Mode
22 Switching Between Manual Mode and Automated Mode 22.2. Switching from Automated Mode to Manual Mode When you switch from using Automated Mode to using Manual Mode, basal insulin will be delivered based on the Basal Programme scheduled for the current time. -
Page 285: Chapter 23: Activity Feature
CHAPTER 23 Activity Feature Contents 23.1. About the Activity Feature ........278 23.2. -
Page 286: About The Activity Feature
While in Automated Mode, you cannot start a temp basal or manually pause insulin delivery. The Omnipod 5 System provides an option for modified automated insulin delivery through the Activity feature. The Activity feature can be useful in times when you need less insulin, for example, when you are exercising. -
Page 287: Starting The Activity Feature
1. Navigate to the Home screen ACTIVITY tab. 2. Tap CANCEL. 3. Tap YES to confirm cancellation. The Omnipod 5 App cancels Activity and full automated insulin delivery starts. Note: You may see a decrease in insulin on board (IOB) when cancelling the... - Page 288 This page intentionally left blank.
-
Page 289: Chapter 24: Automated Mode Alarms
CHAPTER 24 Automated Mode Alarms Contents 24.1. Advisory Alarm List ..........282 Automated Delivery Restriction . -
Page 290: Advisory Alarm List
Omnipod 5 App Screens: Lock Screen: Cause Insulin was either paused for too long or at maximum delivery for too long while the Omnipod 5 System was in Automated Mode. Tone (Pod) • 6-beep tone, repeats once every minute for 3 minutes •... - Page 291 While in Manual Mode, you can check your Sensor Graph to find out whether your insulin has been paused or has been at a maximum for a long time. After at least 5 minutes of Manual Mode, you can return to Automated Mode after you have confirmed your sensor glucose values are accurate.
- Page 292 Lock Screen: ¾ Tap OK to acknowledge the alert. For more information about Automated Mode: Limited state, see “21.5. About Automated Mode: Limited” on page 269. Check your Dexcom G6 app to see if there are sensor glucose values present or if the cause of the loss of communication is related to the Sensor.
-
Page 293: Chapter 25: Omnipod 5 Clinical Studies
CHAPTER 25 Omnipod 5 Clinical Studies Contents 25.1. Studies in Children, Adolescents and Adults with Type 1 Diabetes ..........286 Demographics . -
Page 294: Studies In Children, Adolescents And Adults With
Omnipod 5 Pivotal Study in Children, Adolescents and Adults (6-70 years) The goal of the US-based pivotal study of the Omnipod 5 System was to assess the safety and effectiveness of the system. This single-arm, multicentre, prospective study enrolled 112 children (6 to 13.9 years) and 128 adolescents and adults (14 to 70 years). -
Page 295: Demographics
Overview of the Omnipod 5 System Pivotal Clinical Study 25 Demographics Baseline characteristics including demographics of the participants at the start of the 3-month Omnipod 5 treatment phase are provided in the table below. Baseline Characteristics at Omnipod 5 Treatment Phase Start (n=240) Children Adolescents &... - Page 296 A1C% and % time in range (3.9–10 mmol/L, 70–180 mg/dL). Adolescents, adults and children experienced improvements in overall A1C and time in range after 3 months of Omnipod 5 System use. This was achieved with a reduction of time >10 mmol/L (>180 mg/dL) in adolescents, adults and children as well as a reduction in median time <3.9 mmol/L (<70 mg/dL) in adolescents...
- Page 297 (Q1, Q3). The median is the middle number in an ascending list of numbers and the interquartile range represents the middle 50% of values. *Change between the standard-therapy phase and Omnipod 5 System phase was statistically significant...
- Page 298 ≥13.9 mmol/L, (15.0%) (5.1%) (12.7%) (7.0%) ≥250 mg/dL (std dev) Avg % 6.7% -4.8%* 4.2% 1.5% -2.7%* ≥16.7 mmol/L, (9.1%) (2.5%) (8.0%) (3.1%) ≥300 mg/dL (std dev) *Change between the standard-therapy phase and the Omnipod 5 System phase was statistically significant...
-
Page 299: Change In A1C Analysed By Baseline A1C
A1C% in children (6 to 13.9 years) and adolescents and adults (14 to 70 years). Adolescents, adults and children experienced a reduction in A1C after 3 months of Omnipod 5 System use regardless of baseline A1C <8% or ≥8% category. -
Page 300: Glycaemic Results By Baseline Treatment
Time in range (3.9–10 mmol/L, 70–180 mg/dL) and A1C were improved after 3 months of Omnipod 5 System use, regardless of baseline treatment type. After 3 months of Omnipod 5 System use, time <3.9 mmol/L (<70 mg/dL) improved in adolescents and adults regardless of baseline therapy, but remained unchanged in children. -
Page 301: Insulin Requirements
(0.16) (0.12) (std dev) *Change between the standard-therapy phase and the Omnipod 5 System phase was statistically significant Body Mass Index Results The table below provides information on the average body mass index (BMI), which is a measure of weight adjusted for height, and BMI z-score, which is a measure of weight adjusted for height, sex and age, during the standard-therapy phase and the 3-month Omnipod 5 System phase in children. -
Page 302: Omnipod 5 System Use
Adverse Events The table below provides a full list of the adverse events that occurred during the 3-month Omnipod 5 System treatment phase. There were 3 severe hypoglycaemia events not attributable to the Omnipod 5 System automated insulin delivery or system malfunction, and 1 DKA event from a suspected infusion-site failure. -
Page 303: Glycaemic Results At Target Glucose Settings In The Pivotal Study
Study The tables below provide information on the glycaemic results at various self- selected Target Glucose settings during the 3-month Omnipod 5 System phase of the pivotal study. Of the customisable Glucose targets, the most selected was 6.1 mmol/L (110 mg/dL) Overall (24 hours) Glycaemic Results at Target Glucose Settings... - Page 304 25 Overview of the Omnipod 5 System Pivotal Clinical Study Overall (24 hours) Glycaemic Results at Target Glucose Settings in Adolescents and Adults (14 to 70 years) from the Pivotal Study Characteristic 6.1 mmol/L, 6.7 mmol/L, 7.2 mmol/L, 110 mg/dL...
- Page 305 Target Glucose settings of 7.2 mmol/L (130 mg/dL), 7.8 mmol/L (140 mg/dL) and 8.3 mmol/L (150 mg/dL) for a total of 9 days, followed by 5 days of free choice of Target Glucose ranging from 6.1–8.3 mmol/L (110–150 mg/dL).
- Page 306 25 Overview of the Omnipod 5 System Pivotal Clinical Study Overall (24 hours) Glycaemic Results at Target Glucose Settings in Adolescents and Adults (14 to 70 years) from the Pre-Pivotal Study Characteristic 6.1 mmol/L, 6.7 mmol/L, 7.2 mmol/L, 7.8 mmol/L, 8.3 mmol/L,...
- Page 307 A study was conducted on 25 participants with type 1 diabetes aged 6-70 years to assess the Omnipod 5 Sensor-informed SmartBolus Calculator. During Phase 1, participants used the Omnipod 5 system in Manual Mode for the first 7 days without a connected Sensor (standard SmartBolus Calculator). In Phase 2, participants used the Omnipod 5 system in Manual Mode with a connected Sensor (CGM-informed SmartBolus Calculator) for 7 days.
-
Page 308: Studies In Very Young Children With Type 1 Diabetes
Diabetes Omnipod 5 Clinical Study in Very Young Children The goal of this study was to assess the safety and effectiveness of the Omnipod 5 System in children with type 1 diabetes aged 2 to 5.9 years. This single-arm, multicentre, prospective study enrolled 80 children. -
Page 309: Demographics
Overview of the Omnipod 5 System Pivotal Clinical Study 25 Demographics Baseline characteristics, including the demographics of the participants at the start of the 3-month Omnipod 5 treatment phase, are provided in the table below. Baseline Characteristics at Omnipod 5 Treatment Phase Start Characteristic Age (years) ±... -
Page 310: Glycaemic Results
A1C% and % time in range (3.9–10 mmol/L, 70–180 mg/dL). Participants experienced improvements in A1C and overall time in range after 3 months of Omnipod 5 System use. This result was achieved with a reduction of time >10 mmol/L (>180 mg/dL) as well as a reduction in median time <3.9 mmol/L (<70 mg/dL). - Page 311 Avg % ≥13.9 mmol/L, 13.0% 3.9% -9.1%* ≥250 mg/dL (13.2%) (3.9%) (std dev) Avg % ≥16.7 mmol/L, 4.3% 1.2% -3.1%* ≥300 mg/dL (6.7%) (1.6%) (std dev) *Change between the standard-therapy phase and the Omnipod 5 System phase was statistically significant...
-
Page 312: Change In A1C Analysed By Baseline A1C
Change in A1C Analysed by Baseline A1C The table below provides information on the average change in A1C% from baseline to the end of the 3-month Omnipod 5 System treatment phase, analysed by baseline A1C%. Participants experienced a reduction in A1C after 3 months of Omnipod 5 System use regardless of baseline A1C <8% or ≥8% category. -
Page 313: Insulin Requirements
16.7 (1.5) 16.7 (1.4) BMI z-score (std dev) 0.74 (0.95) 0.76 (0.89) 0.05 Omnipod 5 System Use The median (Q1, Q3) % of time for which study participants used the Omnipod 5 System in Automated Mode was 97.8% (95.8, 98.5). -
Page 314: Adverse Events
25 Overview of the Omnipod 5 System Pivotal Clinical Study Adverse Events The table below provides a full list of the adverse events that occurred during the 3-month Omnipod 5 System treatment phase. Other related, but non-glycaemic adverse events included skin irritation (n=2), cellulitis (n=1) and ketosis not meeting the DKA definition (n=2). -
Page 315: Glycaemic Results At Target Glucose Settings
Glycaemic Results at Target Glucose Settings The tables below provide information on the glycaemic results at various self- selected Target Glucose settings during the 3-month Omnipod 5 System phase of the pivotal study. The most commonly selected target glucose values were 6.1 mmol/L (110 mg/dL) and 6.7 mmol/L (120 mg/dL), which were used 33% and... - Page 316 CGM-Informed SmartBolus Calculator Clinical Study in Very Young Children A study was conducted on 5 participants with type 1 diabetes aged 2-5.9 years to assess the Omnipod 5 CGM-informed SmartBolus Calculator in Manual Mode. During Phase 1, participants used the Omnipod 5 system in Manual Mode for the first 7 days without a connected Sensor (standard SmartBolus Calculator).
-
Page 317: Section 6: Additional Information
ADDITIONAL INFORMATION 26 Frequently Asked Questions and Troubleshooting Appendix... - Page 318 This page intentionally left blank.
-
Page 319: Chapter 26: Troubleshooting
26.1. Omnipod 5 Pump FAQs ........ -
Page 320: Omnipod 5 Pump Faqs
26 Frequently Asked Questions and Troubleshooting 26.1. Omnipod 5 Pump FAQs The following topics have been frequently asked during the use of Omnipod 5, and the main causes and recommended actions are listed below. Pod Issues Issue Possible cause What you can do... -
Page 321: Finding Out How Much Insulin Was Delivered
This will show you the time, sensor glucose value and corresponding amount of insulin delivered at each 5-minute interval. Where to find The Omnipod 5 App maintains the history for previous history of insulin insulin deliveries. You can check here: deliveries ) >... -
Page 322: Controller Issues
Caution: DO NOT reset the Omnipod 5 App before checking with your healthcare provider. This will erase all of your settings, Adaptive Basal Rate and history, and require you to change your active Pod. Before resetting, make sure you have a current record of your settings and a new Pod with supplies to use when restarting the app. - Page 323 Pod and re-entering your Transmitter serial number (SN). Opening the You cleared If you clear data for the Omnipod 5 App, Omnipod 5 App data for the your current Pod will still be delivering App restarts Omnipod 5 App.
-
Page 324: Smartbolus Calculator Faqs
26 Frequently Asked Questions and Troubleshooting 26.2. SmartBolus Calculator FAQs Issue Possible cause What you can do With carbs You have already You can remove the sensor glucose entered and received a lot of value so that the calculator only sensor glucose insulin (your IOB suggests a bolus amount for the carbs... -
Page 325: Sensor Faqs
If you have Omnipod 5 App. just connected, it can take up to 20 minutes for values to appear in the Omnipod 5 App. You are using 1. Use the Dexcom G6 app on your the Dexcom G6 smartphone. The Omnipod 5 receiver. - Page 326 Sensor. Omnipod 5 App. The Omnipod 5 App receives sensor glucose values from the Pod. Occasionally, there is a slight delay before the value is updated on the Omnipod 5 App.
-
Page 327: High Glucose Issues
Frequently Asked Questions and Troubleshooting 26 High Glucose Issues Issue Possible cause What you can do After using the One of the benefits It is common to need changes system for a couple of automated to your Insulin to Carb ratio, of weeks, sensor insulin delivery is generally a lowering of the ratio... - Page 328 26 Frequently Asked Questions and Troubleshooting Issue Possible cause What you can do After using the Your Target Check your Target Glucose here: system in Automated Glucose may need Menu button ( ) > Settings Mode for a few to be adjusted. In >...
-
Page 329: Low Glucose Issues
Frequently Asked Questions and Troubleshooting 26 Low Glucose Issues Issue Possible cause What you can do Sensor glucose Your Target Check your Target Glucose here: values are Glucose may Menu button ( ) > Settings > Bolus running low need to be in the late adjusted for the evening;... -
Page 330: Automated Mode Faqs
Transmitter then follow instructions there. Automated Follow the instructions on the Mode may have screen to check your glucose. After 5 reached the minutes in Manual Mode and you are limits of insulin confident that your Pod and Sensor delivery, either the... -
Page 331: Pod Communication Issues - "Try Again
If the Omnipod 5 App has not sent the instruction to the Pod, the Omnipod 5 App tells you to move to a new location and tap TRY AGAIN to reattempt communication. After you tap TRY AGAIN, if the next communication attempt fails, the Omnipod 5 App offers these options: •... -
Page 332: Error When Cancelling A Bolus
DEACTIVATE POD: This should not be your first choice. When you select this option, you can follow the instructions for replacing your Pod. If the “cancel bolus” instruction has already been sent from the Omnipod 5 App when a communication error occurs, the Omnipod 5 App offers these options: •... -
Page 333: About Keeping Your Omnipod 5 Controller Nearby
Pod, to deliver a bolus, or check the status of your System and glucose. After you enter the Transmitter serial number (SN) into the Omnipod 5 App and use the Dexcom G6 app on your smartphone to activate your Sensor, you can switch from Manual Mode to Automated Mode. -
Page 334: Boot Mode
26 Frequently Asked Questions and Troubleshooting If you have a problem with your System, contact Customer Care at 1-800-591-3455. You may be asked to share device data. To share device data: 1. Ensure a working Wi-Fi connection. 2. Go to: Menu button ( ) >... - Page 335 Appendix Summary of Settings and Options The options for the various Omnipod 5 Automated Insulin Delivery System settings are: Time format 12-hour Time zone GMT-11:00 to GMT+13.00. Daylight Savings Time ON or OFF. Default based on date and time zone.
- Page 336 Rolling 90-day period. Language English. Pod Specifications Size: 3.9cm wide x 5.2cm long x 1.45cm high (1.53" x 2.05" x 0.57") Weight (without insulin): 26 grams (0.92 oz) Operating temperature range: Pod operating environment of 5°C to 40°C (41°F to 104°F).
- Page 337 Accuracy test results: The following graph shows the flow accuracy of the Pod against given time periods. The measurements were made using a Pod with a basal rate of 0.5 μl/h (which delivers 0.05 U/h of U-100 insulin) at a high operating temperature. The overall mean percentage flow error was 1.40%.
- Page 338 Appendix Controller Specifications Size: 143.92 mm high x 67.57 mm wide x 12.33 mm deep (5.67" x 2.66" x 0.49") Weight: 165 grams (5.82 oz) Screen active area: 56.16 mm wide x 120.58 mm high (2.21" x 4.75") Operating temperature range: 5°C to 40°C (41°F to 104°F) Storage temperature range: 0°C to 30°C (32°F to 86°F)
- Page 339 Omnipod 5 System detects a blockage, it sounds a hazard alarm and prompts you to deactivate and change your Pod. A blockage hazard alarm sounds when an average of 3 units to 5 units of missed insulin occurs. The following table depicts blockage detection for three different situations when using U-100 insulin.
- Page 340 The Summary of Safety and Clinical Performance (SSCP) is available at www.omnipod.com/sscp. The SSCP is also available in the European Database on Medical Devices (EUDAMED) website (https://ec.europa.eu/tools/eudamed) where it is linked to the Basic UDI-DI. The Basic UDI-DI for Omnipod 5 is 0385083000145W. Delivery performance characterization Basal Delivery: In order to assess basal delivery accuracy, 12 Pods were tested by delivering at low, medium, and high basal rates (0.05, 1.00, and 30.0 U/hr).
- Page 341 [177.49, 181.15] Note: A measurement at the 12-hour period with a 30.0 U/hr basal rate is not applicable to the Omnipod 5 System as the reservoir will empty at approximately 6 ⅔ hours at this rate. Bolus Delivery: In order to assess bolus delivery accuracy, 12 Pods were tested by delivering a minimum, intermediate, and maximum bolus amount (0.05, 5.00,...
- Page 342 Appendix The tables below show for each requested bolus size, the range of amount of insulin that was observed delivered compared to the requested amount. Each table provides the number and percent of delivered bolus sizes observed within the specified range. Amount of Insulin Delivery for a Minimum (0.05 U) Bolus Request Amount <0.0125...
- Page 343 Appendix Amount of Insulin Delivery for an Intermediate (5.00 U) Bolus Request Amount <1.25 1.25-3.75 3.75-4.50 4.50-4.75 4.75-5.25 (Units) (% of settings) (<25%) (25-75%) (75-90%) (90-95%) (95-105%) Number and percent 0/300 0/300 1/300 4/300 287/300 of boluses (0%) (0%) (0.3%) (1.3%)
- Page 344 Appendix Omnipod 5 System Label Symbols The following symbols appear on the Omnipod 5 System or its packaging: Symbol Meaning Symbol Meaning Single-use only MR unsafe Consult Do not use if package accompanying is damaged documents Sterilized using Type BF applied part...
- Page 345 Caution: DO NOT make changes or modifications to any component of the Omnipod 5 System that has not been authorized by Insulet Corporation. Unauthorized tampering with the System can revoke your right to operate it. The Omnipod 5 Automated Insulin Delivery System is designed to comply with Part 15 of the Federal Communications Commission (FCC) Rules.
- Page 346 Consult the dealer or an experienced radio/TV technician for help. Quality of Service The Omnipod 5 System includes two wireless transmission pathways. Insulet defines the quality of service of the Omnipod 5 System for each of the two pathways: Omnipod 5 App to Pod wireless communication definition Successful transfer of commands, data, and alarms between the Controller and Pod when in communication range (within 1.5 meters (5 feet) during normal...
- Page 347 If you must use a different cable, use only cables less than or equal to 1.2 meters (4 feet) in length. Care should be taken if the Omnipod 5 System is used adjacent to other electrical equipment; if adjacent use is inevitable, such as in work environments, the Omnipod 5 System should be observed to verify normal operation in this setting.
- Page 348 DO NOT use portable radio frequency (RF) communications equipment (including peripherals such as antenna cables and external antennas) closer than 30 cm (12 inches) to any part of the Omnipod 5 System, as it may impact the communication between your Controller and your Pod.
- Page 349 Disturbances 80 MHz KHz-80 portable RF communications equipment induced by at least 30 cm (12 inches) away from the 6V in ISM RF fields (IEC Omnipod 5 System. and amateur 6V in 61000-4-6) radio bands ISM and between 150 amateur...
- Page 350 1 cycle at 0 in UT) for degrees 1 cycle at 0 degrees 0% UT (100% dip in 0% UT UT) for 0.5 (100% dip cycles at 0, in UT) for 45, 90, 135, 0.5 cycles 180, 225, at 0, 45, 90,...
- Page 351 Appendix 430– GMRS FM c) ±5 460, FRS 460 deviation 1 kHz sine 704– Pulse Band 13, modulatio n b) 217 Hz 800- Pulse 800/900, modulation TETRA b) 18 Hz 800. ODEM 820, CDMA 850, LTE Band 5 1720 1700–...
- Page 352 Scope of Services Insulet Corporation’ s scope of services is limited to providing the Omnipod 5 Automated Insulin Delivery System. The Omnipod 5 System consists of the Pod and the handheld, wireless Controller, which programs the Pod with insulin delivery instructions. Compliance The Omnipod 5 Automated Insulin Delivery System is manufactured and distributed by Insulet Corporation.
- Page 353 Please review our HIPAA Privacy Notice later in this section. 4. Receive a timely response to your request for service. 5. Receive continued service. 6. Select the medical equipment supplier of your choice. 7. Make informed decisions regarding your care planning.
- Page 354 Controller under this Limited Express Warranty, the warranty coverage for the replacement Controller shall expire four (4) years (for all countries except for Canada) or five (5) years (for Canada) from the date of purchase of the original Controller.
- Page 355 Controller or of the Pod to any other person or entity. This Limited Express Warranty will apply only if the Controller or the Pod at issue has been used in accordance with the Omnipod 5 Automated Insulin Delivery System User Guide and/...
- Page 356 Your statutory rights are not affected by this Limited Express Warranty. Insulet does not warrant the suitability of the Controller or the Pods or the Omnipod System for any specific person as health care and treatment are complex subjects requiring the services of qualified health care providers.
- Page 357 Appendix a Pod, or an Omnipod 5 Automated Insulin Delivery System. No employee, agent or other representative of Insulet or any other party is authorized to make any product warranty or agreement applicable to a Controller, a Pod, or an Omnipod 5 Automated Insulin Delivery System in addition to those made in the foregoing..
- Page 358 This page intentionally left blank.
- Page 359 About screen 48 basal history records 130–138 Action Item Notifications Basal Programme Connect to a Wireless Network about 93 create new 91 Omnipod 5 Error 168 delete 92 active insulin. See insulin on board edit 91 Activity feature rename 91 cancel 279...
- Page 360 167 default settings 327 Dexcom Issue Detected 253 Hazard Alarms 152–159 diabetic ketoacidosis 72, 197 Blockage Detected 152 diagnostic functions Omnipod 5 App Error 153 check alarms 151 Omnipod 5 Memory Corruption dropped Controller 181 Duration of Insulin Action...
- Page 361 Index Pod Error 155 change background 117 Pod Expired 156 change message 117 Pod Out of Insulin 157 lock 36 Pod Shutdown 158 message 117 System Error 159 unlock 36 HIPAA privacy notice 349 low battery history records recharging 183 carbs 130–138 low Pod Insulin setting 121 glucose 130–138...
- Page 362 Index change setting 224 Searching for Sensor 253 temp basal 102 security physical exertion 198 Controller 58 Sensor forgotten 37 Dexcom Issue Detected 253 reset 118 missed values advisory alarm 284 playing sports 198 Transmitter Error 253 Transmitter Not Found 253 activation 72 set temp basal cleaning 179...
- Page 363 Index location 178 specifications 328 unconfirmed bolus 136 supplies unlock Controller set-up 55 controller 36 obtaining 54 Urgent Low Glucose travel 188 Advisory Alarm 164 surgery 199 USB cable 181 suspend (pause) insulin delivery 113 swimming 179 Switching modes from automated to manual 275 vibration or sound symbols on labels 336 notifications 147...
- Page 364 My Settings Notes My Settings Use these pages to keep track of your important settings. Remember to update your information if you change or add settings. Basal Programme 1 Basal Programme 2 Basal rate Basal rate Name_______________ Name_______________ U/hr U/hr midnight midnight U/hr...
- Page 365 My Settings Insulin to Carbohydrate Correction Factor Ratio (IC Ratio) 1 unit of 1 unit of insulin IC Ratio for each time Correction Factor for decreases insulin covers segment each time segment glucose by midnight to g carb midnight to mmol/L g carb mmol/L...
- Page 366 My Notes...
Need help?
Do you have a question about the 5 and is the answer not in the manual?
Questions and answers
Why is there a purple bar on my Omnipod 5 graph?
The purple bar on the Omnipod 5 graph indicates periods of time when the Omnipod 5 was in Automated Mode.
This answer is automatically generated