
Related Manuals for OmniPod Pod


Summary of Contents for OmniPod Pod
- Page 1 CAREGIVER GUIDE SIMPLE, NONSTOP INSULIN DELIVERY DESIGNED SO KIDS CAN BE KIDS KATIE R. SINCE 2015...
-
Page 2: Table Of Contents
. . . . . . . . . . . . . . . . . . . . . . . . . . . . . . . . . . . . . . . . . . . . . . . This guide is intended to be used in conjunction with the individual’s Diabetes Management Plan, input from the parents and/or healthcare provider and the Omnipod Insulin ®... - Page 3 We’re here to help with our 24/7 comprehensive customer support . *Up to 72 hours of insulin delivery The Pod has a waterproof IPX8 rating for up to 7 .6 meters for 60 minutes . † The PDM is not waterproof .
-
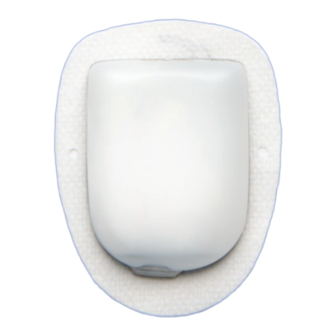
Page 4: The Pod
THE POD A small, lightweight Pod that’s easy to apply and wear daily. Pod shown at actual size Dimensions 3 .9 cm wide 5 .2 cm long 1 .45 cm high Weight 25 g without insulin Viewing window Fill port... -
Page 5: The Pdm (Personal Diabetes Manager)
(BG) levels . history, and personal user information . More actions: Settings: Change the Pod Enter, edit, and name basal programs Add BG readings Program temp basal, carbohydrate, Assign/Edit BG tags and bolus presets... -
Page 6: How To Check Blood Glucose And Deliver A Bolus
HOW TO CHECK BLOOD GLUCOSE AND DELIVER A BOLUS . A bolus is an extra dose of insulin that helps manage the rapid natural rise in blood glucose (also known as blood sugar) that results when you eat carbohydrates (sugar or starch) . Follow the steps below to check the individual’s blood glucose level, determine the appropriate bolus and deliver the bolus . - Page 7 If not eating, press No . Cancel Measurements obtained from alternate site testing should not be used to WARNING: calculate insulin doses with Omnipod Insulin Management System . ® For more information about blood glucose testing, control solution testing, manual blood...
- Page 8 HOW TO CHECK BLOOD GLUCOSE AND DELIVER A BOLUS 3:00p 2/11 If eating, press the Up/down controller Enter carbs. button to enter the correct number of carbs, then press Enter . Back Enter 3:00p 2/11 3:00p 2/11 Review the BG and carb values to make sure Suggested bolus: 5.00 Suggested bolus: 5.00 they are correct .
- Page 9 HOW TO CHECK BLOOD GLUCOSE AND DELIVER A BOLUS 3:00p 2/11 3:00p 2/11 Press Enter to accept the suggested bolus . Suggested bolus: 5.00 Suggested bolus: 5.00 Carbs: 60 Carbs: 60 BG: 150 mg/dL Press Extend and follow on-screen BG: 8.3 mmol/L instructions to deliver a portion/percentage 5.00...
-
Page 10: How To Change The Pod
HOW TO CHANGE THE POD. You may need to change the Pod: When the reservoir is low or empty, or the Pod is nearing expiration In response to an alarm If the Pod has become dislodged If the individual has a blood glucose reading of 13 .9 mmol/L or more... - Page 11 2:51 p today Follow the steps on pages 11 and 12 to fill Last bolus 1.00 a new Pod with insulin . As you proceed, if 2:01 p today the PDM screen times out, press and hold the Home/power button to turn it back on .
-
Page 12: Pod Placement Options
HOW TO CHANGE THE POD POD PLACEMENT OPTIONS The Pod may be placed over any subcutaneous tissue in most places one would deliver an insulin injection . Please note the recommended positioning for each body area . The individual’s Diabetes Management Plan or healthcare provider should indicate any preferred sites . -
Page 13: Activate A New Pod
Alcohol prep swab Wash your hands . STEP 1: FILL THE POD Remove the Pod from its sterile packaging . Use the alcohol prep swab to clean the top of the insulin vial . Assemble the fill syringe by twisting the needle onto the syringe . - Page 14 NEVER inject air into the fill port . WARNING: Doing so may result in unintended or interrupted insulin delivery . NEVER use a Pod if you hear a crackling noise or WARNING: feel resistance when you depress the plunger . These conditions...
-
Page 15: Step 2: Apply The Pod
The PDM establishes a one-to-one relationship with the Pod, which will not allow it to communicate NOTE: Do not remove with any other Pod while this Pod is active . Once needle cap at this time. the Pod successfully completes its priming and safety checks, the PDM will beep . - Page 16 Run your finger around the adhesive to secure it . Press Next on the PDM . To facilitate insertion, place one hand over the Pod and make a wide pinch around the skin surrounding the viewing window; this step is critical if the insertion site does not have much...
-
Page 17: Step 3: Press Start
WARNINGS: NEVER inject insulin (or anything else) into the fill port while the Pod is on the individual’s body . Doing so may result in unintended or interrupted insulin delivery . If you observe blood in the cannula, check the individual’s blood glucose more frequently to ensure insulin delivery has not been affected . -
Page 18: How To Enter Atemporary Basal Rate
HOW TO ENTER A TEMPORARY BASAL RATE. The basal rate refers to the steady dose of insulin the individual receives at all times. You may need to: Temporarily increase the basal rate in response to high blood sugar if, for instance, the individual is ill or insulin delivery has been interrupted . - Page 19 Start temp basal rate shown on the screen (In this example, increase? 25% more basal insulin will be delivered for 0 .5 hours) . The Pod beeps to indicate that +25% the temporary basal rate is running . Back Confirm...
-
Page 20: How To Suspend Insulin Delivery
HOW TO SUSPEND INSULIN DELIVERY. If the individual has severe low blood sugar you may need to suspend insulin delivery. Never ignore the signs of low blood sugar (no matter how mild) . Any time the individual’s blood glucose is low, treat immediately . If blood glucose is below 3 .9 mmol/L, provide the individual with 15 grams of fast-acting carbohydrates, such as glucose tablets, juice, or hard candy . - Page 21 INSULIN SUSPENDED Pod exp 1:48p 2/14 Home The Pod will beep every 15 minutes until the 3:00p 2/11 End of insulin suspend. end of the suspension period . At the end of the suspension period, a Pod advisory alarm will Press “OK”...
-
Page 22: Supplies
A vial of rapid-acting U-100 insulin Syringes or pens/needles for injecting insulin Instructions from the individual’s healthcare provider about how much insulin to inject if delivery from the Pod is interrupted Blood glucose test strips Ketone test strips Lancing device and lancets... -
Page 23: Pdm Personal Settings
PDM PERSONAL SETTINGS Use this section to record the individual’s most recent PDM settings, as provided by your healthcare provider. 1. MAX BASAL 2. BASAL RATE Select > Settings Select > Settings > System setup > Basal programs > Bolus/basal/calcs Choose a program >... - Page 24 PDM PERSONAL SETTINGS 5. BG GOAL 6. BOLUS CALCS Select > Settings Select > Settings > System setup > System setup > BG meter > Bolus/basal/calcs > BG goal > Bolus calcs Write down the BG goal settings . Check the box below that matches the Bolus calcs setting .
- Page 25 PDM PERSONAL SETTINGS 9. INSULIN TO CARB RATIO 10. CORRECTION FACTOR Select > Settings Select > Settings > System setup > System setup > Bolus/basal/calcs > Bolus/basal/calcs > Ratios/factors/targets > Ratios/factors/targets > IC ratio > Correction factor Write down the settings for Write down the settings for Insulin to carb (IC) ratio .
- Page 26 PDM PERSONAL SETTINGS 13. BOLUS INCREMENT 14. MAX BOLUS Select > Settings Select > Settings > System setup > System setup > Bolus/basal/calcs > Bolus/basal/calcs > Bolus increment > Max bolus Check the box that matches the Write down the value for Bolus increment value .
- Page 27 “Omnipod allows ® us to focus more on his childhood than his diabetes.” — RACHEL C., FRANK’S MOTHER Frank C. PODDER SINCE BEFORE ™ HE COULD EVEN WALK N OT E S...
- Page 28 Customer Care Program: 1 .855 .POD .INFO (1 .855 . 7 63 .4636) ® © 2017 Insulet Corporation . Omnipod, the Omnipod logo, and Podder are trademarks or registered trademarks of Insulet Corporation in the United States of America and other various jurisdictions . All rights reserved .
Need help?
Do you have a question about the Pod and is the answer not in the manual?
Questions and answers